2011 MERCEDES-BENZ E-Class COUPE ECU
[x] Cancel search: ECUPage 258 of 344
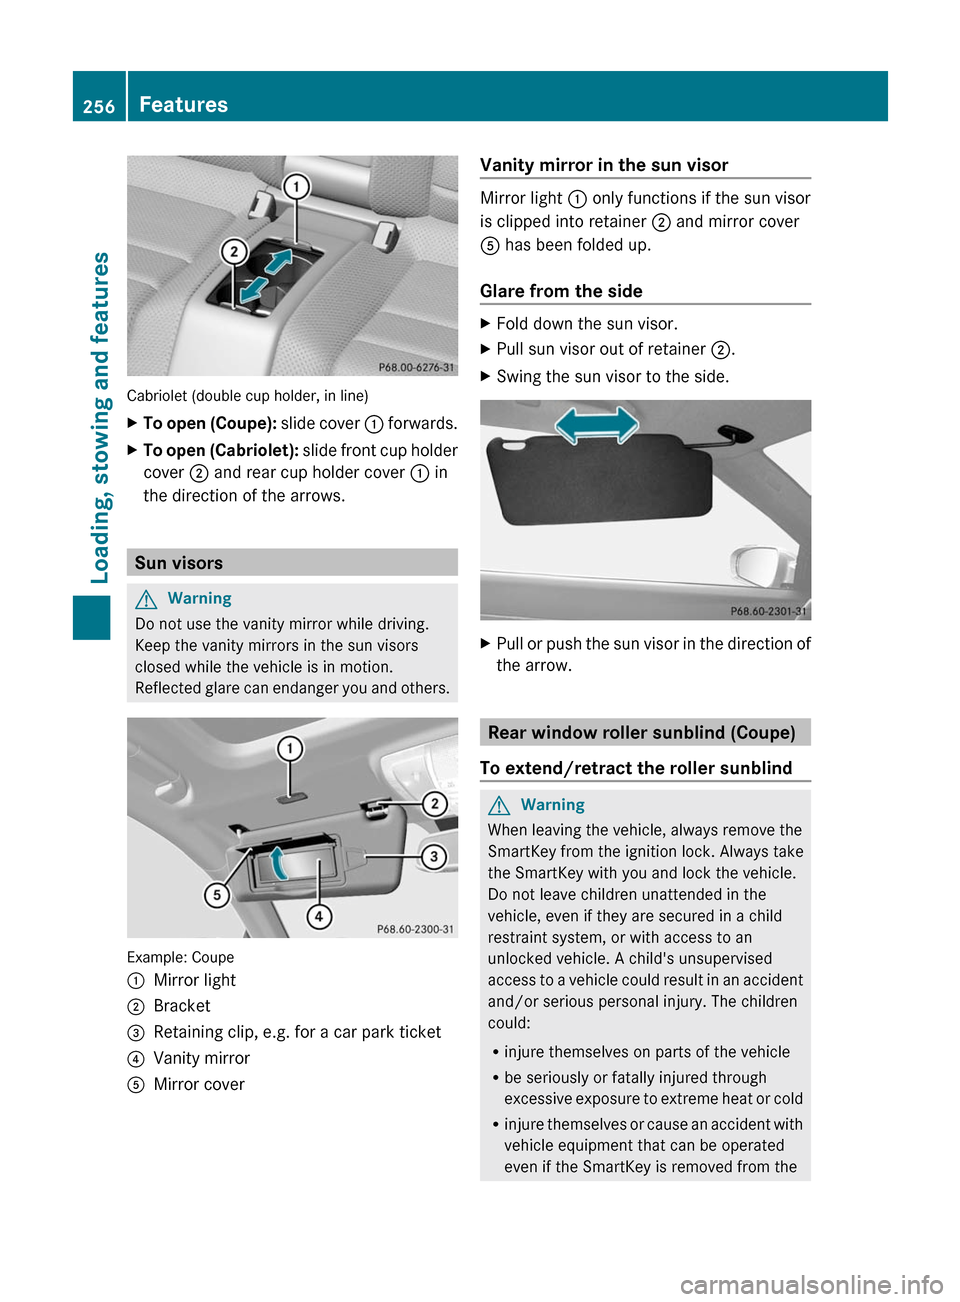
Cabriolet (double cup holder, in line)
XTo open (Coupe): slide cover : forwards.XTo open (Cabriolet): slide front cup holder
cover ; and rear cup holder cover : in
the direction of the arrows.
Sun visors
GWarning
Do not use the vanity mirror while driving.
Keep the vanity mirrors in the sun visors
closed while the vehicle is in motion.
Reflected glare can endanger you and others.
Example: Coupe
:Mirror light;Bracket=Retaining clip, e.g. for a car park ticket?Vanity mirrorAMirror coverVanity mirror in the sun visor
Mirror light : only functions if the sun visor
is clipped into retainer ; and mirror cover
A has been folded up.
Glare from the side
XFold down the sun visor.XPull sun visor out of retainer ;.XSwing the sun visor to the side.XPull or push the sun visor in the direction of
the arrow.
Rear window roller sunblind (Coupe)
To extend/retract the roller sunblind
GWarning
When leaving the vehicle, always remove the
SmartKey from the ignition lock. Always take
the SmartKey with you and lock the vehicle.
Do not leave children unattended in the
vehicle, even if they are secured in a child
restraint system, or with access to an
unlocked vehicle. A child's unsupervised
access to a vehicle could result in an accident
and/or serious personal injury. The children
could:
Rinjure themselves on parts of the vehicle
Rbe seriously or fatally injured through
excessive exposure to extreme heat or cold
Rinjure themselves or cause an accident with
vehicle equipment that can be operated
even if the SmartKey is removed from the
256FeaturesLoading, stowing and features
BA 207 USA, CA Edition B 2011; 1; 3, en-USd2sboikeVersion: 3.0.3.62010-05-20T10:38:09+02:00 - Seite 256
Page 260 of 344
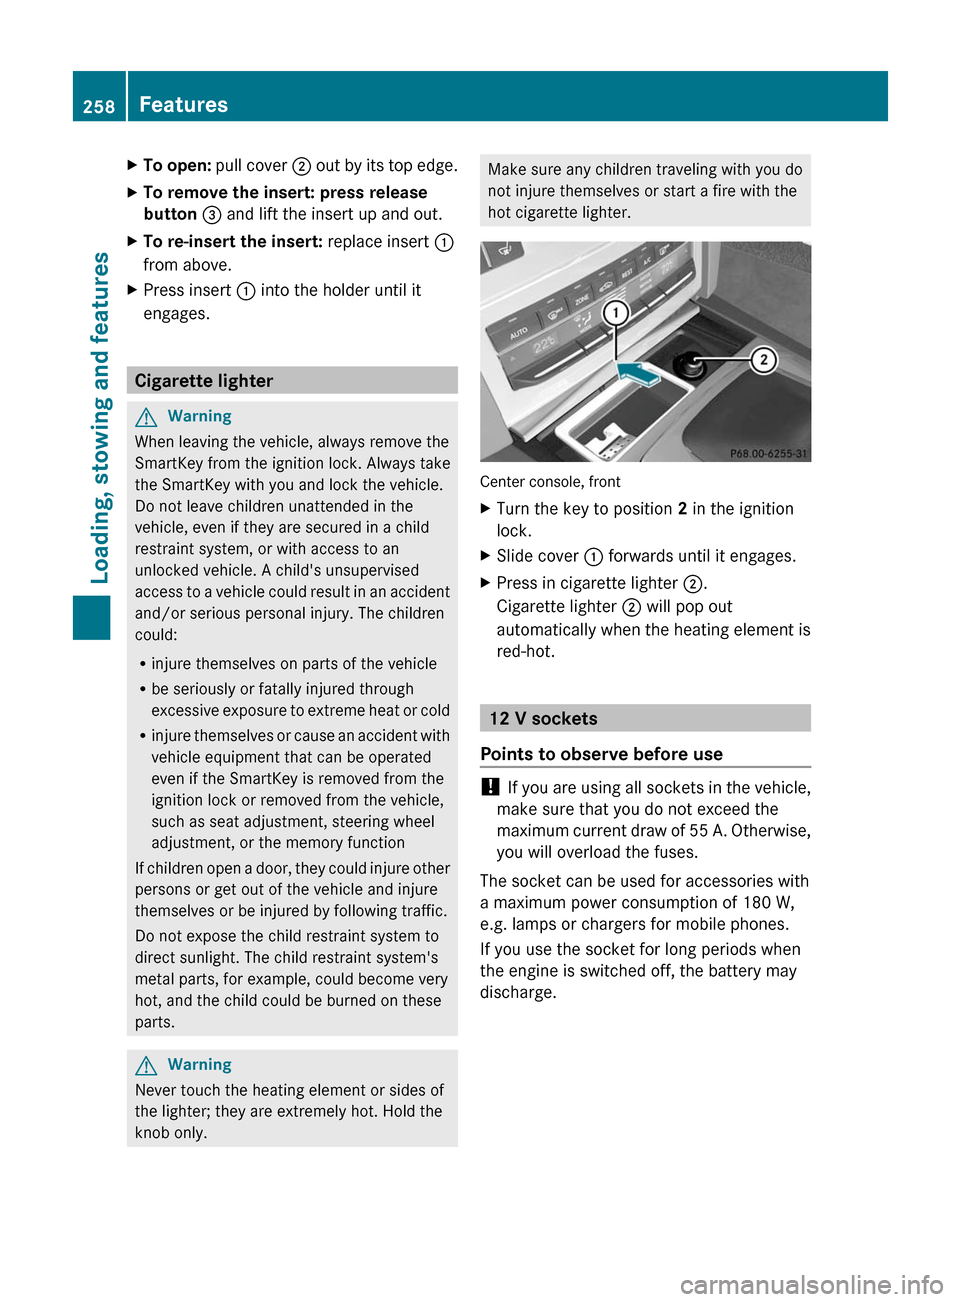
XTo open: pull cover ; out by its top edge.XTo remove the insert: press release
button = and lift the insert up and out.
XTo re-insert the insert: replace insert :
from above.
XPress insert : into the holder until it
engages.
Cigarette lighter
GWarning
When leaving the vehicle, always remove the
SmartKey from the ignition lock. Always take
the SmartKey with you and lock the vehicle.
Do not leave children unattended in the
vehicle, even if they are secured in a child
restraint system, or with access to an
unlocked vehicle. A child's unsupervised
access to a vehicle could result in an accident
and/or serious personal injury. The children
could:
Rinjure themselves on parts of the vehicle
Rbe seriously or fatally injured through
excessive exposure to extreme heat or cold
Rinjure themselves or cause an accident with
vehicle equipment that can be operated
even if the SmartKey is removed from the
ignition lock or removed from the vehicle,
such as seat adjustment, steering wheel
adjustment, or the memory function
If children open a door, they could injure other
persons or get out of the vehicle and injure
themselves or be injured by following traffic.
Do not expose the child restraint system to
direct sunlight. The child restraint system's
metal parts, for example, could become very
hot, and the child could be burned on these
parts.
GWarning
Never touch the heating element or sides of
the lighter; they are extremely hot. Hold the
knob only.
Make sure any children traveling with you do
not injure themselves or start a fire with the
hot cigarette lighter.
Center console, front
XTurn the key to position 2 in the ignition
lock.
XSlide cover : forwards until it engages.XPress in cigarette lighter ;.
Cigarette lighter ; will pop out
automatically when the heating element is
red-hot.
12 V sockets
Points to observe before use
! If you are using all sockets in the vehicle,
make sure that you do not exceed the
maximum current draw of 55 A. Otherwise,
you will overload the fuses.
The socket can be used for accessories with
a maximum power consumption of 180 W,
e.g. lamps or chargers for mobile phones.
If you use the socket for long periods when
the engine is switched off, the battery may
discharge.
258FeaturesLoading, stowing and features
BA 207 USA, CA Edition B 2011; 1; 3, en-USd2sboikeVersion: 3.0.3.62010-05-20T10:38:09+02:00 - Seite 258
Page 271 of 344
a circle without impeding the remaining
traffic.
In order to calibrate the compass correctly,
observe the following points:
Rcalibrate the compass in the open and not
in the vicinity of steel structures or high-
voltage power lines
Rswitch off electrical consumers such as
climate control, the windscreen wipers or
the rear window heating
Rclose all doors and the trunk lid
XSwitch on the ignition.XPress and hold button = for approximately
six seconds until the C symbol appears in
compass display ;.
XDrive a full circle at approximately 3 mph
(5 km/h) to 6 mph (10 km/h).
Once the calibration has been successfully
completed, the current heading appears in
compass display ;.
Floormat on the driver's side
GWarning!
Whenever you are using a floormat, make sure
there is enough clearance and that the
floormat is securely fastened.
The floormat should always be securely
fastened using the fastening equipment.
Before driving off, check that the floormat is
securely in place and adjust it if necessary. A
loose floormat could slip and hinder proper
functioning of the pedals.
Do not place several floormats on top of each
other as this may impair pedal movement.
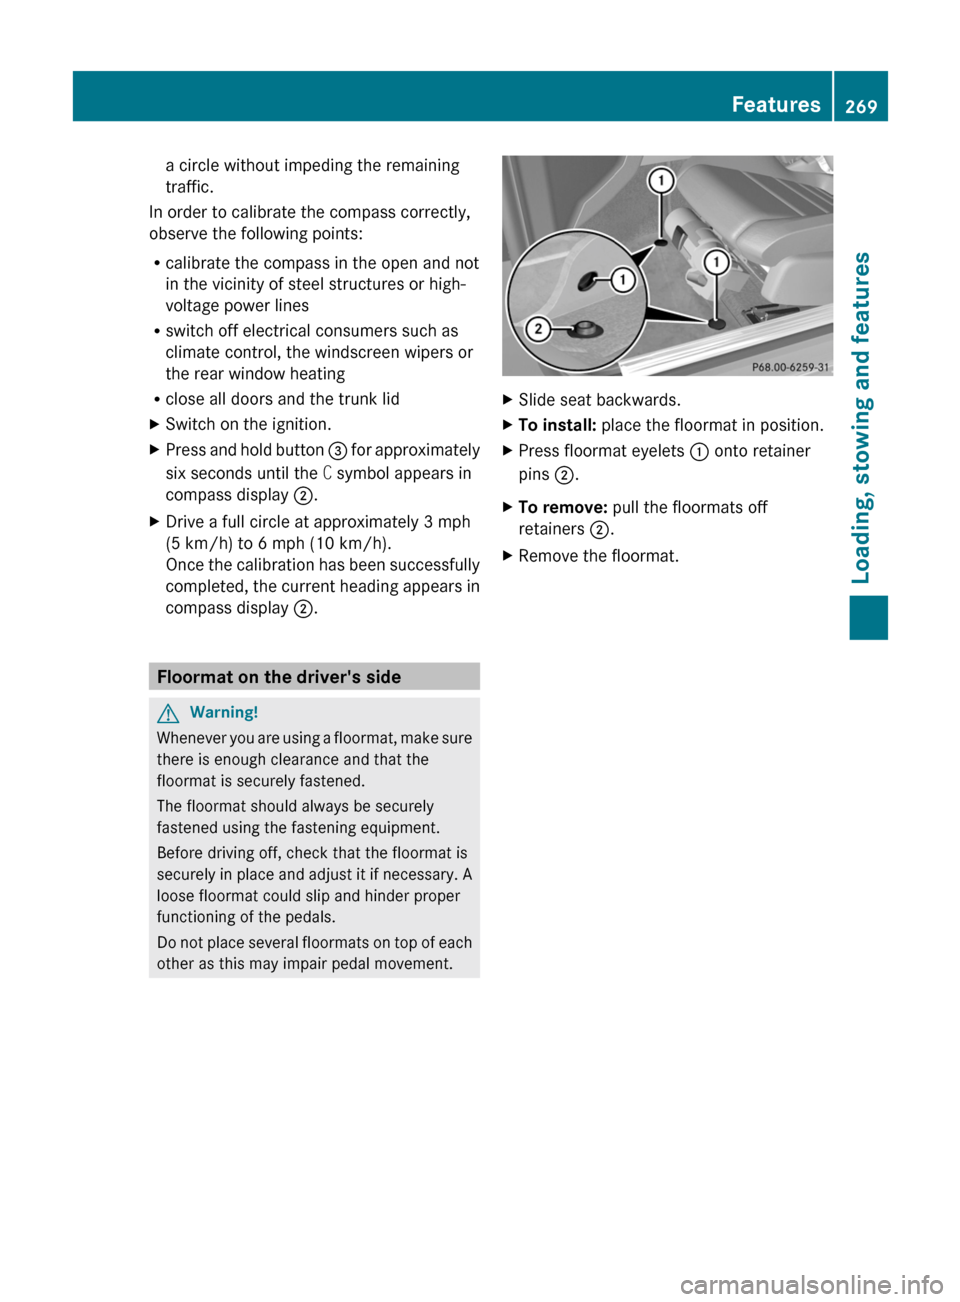
XSlide seat backwards.XTo install: place the floormat in position.XPress floormat eyelets : onto retainer
pins ;.
XTo remove: pull the floormats off
retainers ;.
XRemove the floormat.Features269Loading, stowing and featuresBA 207 USA, CA Edition B 2011; 1; 3, en-USd2sboikeVersion: 3.0.3.62010-05-20T10:38:09+02:00 - Seite 269Z
Page 275 of 344

XPull release lever : on the hood.
The hood is released.
! Make sure that the windshield wipers are
not folded away from the windshield. You
could otherwise damage the windshield
wipers or the hood.
XReach into the gap, pull hood catch
handle ; up and lift the hood.
Closing the hood
GWarning
When closing the hood, use extreme caution
not to catch hands or fingers. Be careful that
you do not close the hood on anyone.
Make sure the hood is securely engaged
before driving off. Do not continue driving if
the hood can no longer engage after an
accident, for example. The hood could
otherwise come loose while the vehicle is in
motion and injure you and/or others.
XLower the hood and let it fall from a height
of approximately 8 inches (20 cm).
XCheck that the hood has engaged properly.
If the hood can be raised slightly, it is not
properly engaged. Open it again and close
it with a little more force.
Engine oil
Notes on the oil level
Depending on the driving style, the vehicle
consumes up to 0.9 US qt (0.8 l) of oil over a
distance of 600 miles (1000 km). The oil
consumption may be higher than this when
the vehicle is new or if you frequently drive at
high engine speeds.
When checking the oil level:
Rpark the vehicle on a level surface.
Rthe engine should be switched off for at
least five minutes if the engine is at normal
operating temperature.
Rthe engine should be switched off for at
least 30 minutes if it is not at normal
operating temperature (i.e. if you only start
the engine briefly).
Checking the oil level using the oil
dipstick
Depending on the engine, the oil dipstick may
be installed in a different location.
XPull oil dipstick : out of the dipstick guide
tube.
XWipe off oil dipstick :.XSlowly insert oil dipstick : into the
dipstick guide tube to the stop, and take it
out again.
The oil level is correct if the level is between
MIN mark = and MAX mark ;.
XAdd oil if necessary.Engine compartment273Maintenance and careBA 207 USA, CA Edition B 2011; 1; 3, en-USd2sboikeVersion: 3.0.3.62010-05-20T10:38:09+02:00 - Seite 273Z
Page 276 of 344

Adding engine oilHEnvironmental note
When adding oil, take care not to spill any. If
oil enters the soil or waterways, it is harmful
to the environment.
! Only use engine oils and oil filters which
have been approved for vehicles with a
service system. A list of the engine oils and
oil filters that have been tested and
approved according to the Mercedes-Benz
specifications for service products can be
found on the Internet at http://
www.mbusa.com (USA only). Further
information on tested and approved engine
oils and oil filters can be obtained from any
authorized Mercedes-Benz Center.
The following causes engine failure or
damage to the exhaust system:
Rusing engine oils and oil filters that are
not specifically approved for the service
system
Rreplacing the engine oil and oil filter later
than the specified replacement interval
required by the service system
Rusing engine oil additives
Example: engine oil cap
XTurn cap : counter-clockwise and remove
it.
XAdd the amount of oil required.
Fill carefully to the maximum mark on the oil
dipstick.
iThe difference in quantity between the
MIN mark and the MAX mark on the
dipstick is (depending on the engine)
approximately 1.6 to 2.1 US qt. (1.5 to 2 l).
! Do not add too much oil. If the oil level is
above the MAX mark on the dipstick, too
much oil has been added. This can lead to
damage to the engine or the catalytic
converter. Have excess oil siphoned off.
Further information on engine oil
(Y page 337).
XReplace cap : on the filler neck and
tighten clockwise.
Ensure that the cap locks into place
securely.
Checking and adding other service
products
Checking the coolant level
Only check the coolant level when the vehicle
is on a level surface and the engine has cooled
down.
XTurn the SmartKey to position
2(Y page 151) in the ignition lock.
On vehicles with KEYLESS-GO, press the
Start/Stop button twice (Y page 151).
XCheck the coolant temperature display in
the instrument cluster.
The coolant temperature must be below
158 ‡ (70 †).
GWarning
In order to avoid any potentially serious burns:
Ruse extreme caution when opening the
hood if there are any signs of steam or
coolant leaking from the cooling system, or
if the coolant temperature display indicates
that the coolant is overheated.
Rdo not remove the pressure cap on the
coolant reservoir if the coolant temperature
is above 158 ‡ (70 †). Allow the engine to
cool down before removing the cap. The
274Engine compartmentMaintenance and care
BA 207 USA, CA Edition B 2011; 1; 3, en-USd2sboikeVersion: 3.0.3.62010-05-20T10:38:09+02:00 - Seite 274
Page 283 of 344
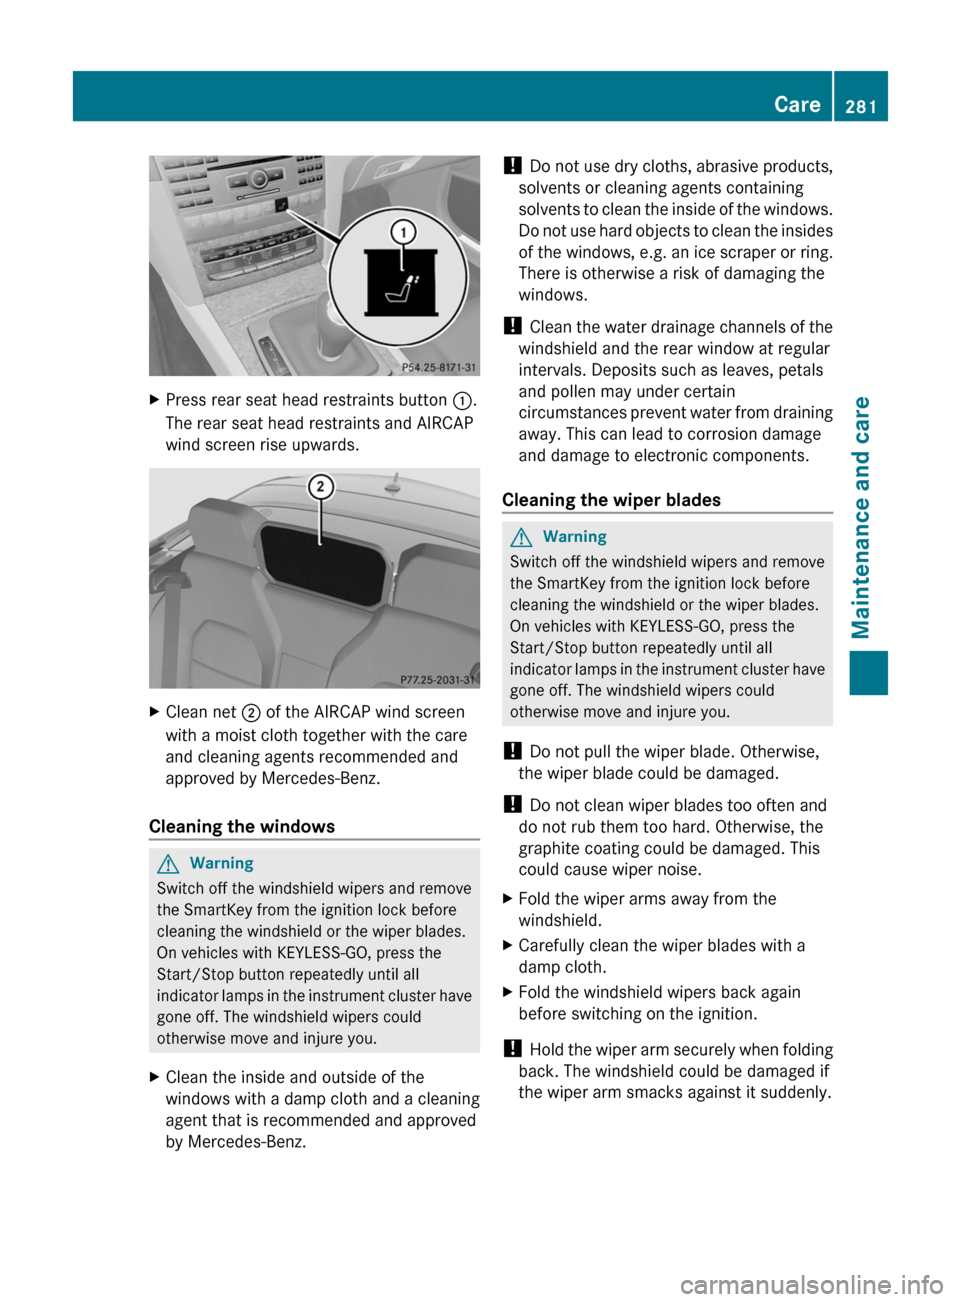
XPress rear seat head restraints button :.
The rear seat head restraints and AIRCAP
wind screen rise upwards.
XClean net ; of the AIRCAP wind screen
with a moist cloth together with the care
and cleaning agents recommended and
approved by Mercedes-Benz.
Cleaning the windows
GWarning
Switch off the windshield wipers and remove
the SmartKey from the ignition lock before
cleaning the windshield or the wiper blades.
On vehicles with KEYLESS-GO, press the
Start/Stop button repeatedly until all
indicator lamps in the instrument cluster have
gone off. The windshield wipers could
otherwise move and injure you.
XClean the inside and outside of the
windows with a damp cloth and a cleaning
agent that is recommended and approved
by Mercedes-Benz.
! Do not use dry cloths, abrasive products,
solvents or cleaning agents containing
solvents to clean the inside of the windows.
Do not use hard objects to clean the insides
of the windows, e.g. an ice scraper or ring.
There is otherwise a risk of damaging the
windows.
! Clean the water drainage channels of the
windshield and the rear window at regular
intervals. Deposits such as leaves, petals
and pollen may under certain
circumstances prevent water from draining
away. This can lead to corrosion damage
and damage to electronic components.
Cleaning the wiper blades
GWarning
Switch off the windshield wipers and remove
the SmartKey from the ignition lock before
cleaning the windshield or the wiper blades.
On vehicles with KEYLESS-GO, press the
Start/Stop button repeatedly until all
indicator lamps in the instrument cluster have
gone off. The windshield wipers could
otherwise move and injure you.
! Do not pull the wiper blade. Otherwise,
the wiper blade could be damaged.
! Do not clean wiper blades too often and
do not rub them too hard. Otherwise, the
graphite coating could be damaged. This
could cause wiper noise.
XFold the wiper arms away from the
windshield.
XCarefully clean the wiper blades with a
damp cloth.
XFold the windshield wipers back again
before switching on the ignition.
! Hold the wiper arm securely when folding
back. The windshield could be damaged if
the wiper arm smacks against it suddenly.
Care281Maintenance and careBA 207 USA, CA Edition B 2011; 1; 3, en-USd2sboikeVersion: 3.0.3.62010-05-20T10:38:09+02:00 - Seite 281Z
Page 291 of 344
Changing a wheel and mounting the
spare wheel
Preparing the vehicle
GWarning!
The wheel and tire size of the emergency
spare wheel/spare wheel may differ to that of
the damaged wheel. When using an
emergency spare wheel/spare wheel the
handling characteristics of the vehicle may
change.
Adapt your style of driving accordingly.
Never operate the vehicle with more than one
emergency spare wheel/spare wheel that
differs in size.
Only use an emergency spare wheel/spare
wheel of a differing size briefly and do not
switch off ESP®.
When using an emergency spare wheel, you
must not exceed a maximum speed of 50 mph
(80 km/h).
GWarning!
Have the emergency spare wheel/spare
wheel replaced with a new wheel as soon as
possible at a qualified specialist workshop
which has the necessary specialist knowledge
and tools to carry out the work required.
Mercedes-Benz recommends that you use an
authorized Mercedes-Benz Center for this
purpose. In particular, work relevant to safety
or on safety-related systems must be carried
out at a qualified specialist workshop.
iVehicles without an emergency spare
wheel/spare wheel are not equipped with
wheel-changing tools at the factory. For
more information on which tools are
required to perform a wheel change on your
vehicle, e.g. wheel chock, alignment bolt or
lug wrench, consult an authorized
Mercedes-Benz Center.
XPrepare the vehicle as described
(Y page 288).
XRemove the following items from the
stowage well under the trunk floor:
Rthe emergency spare wheel
Rthe vehicle tool kit
Rthe folding wheel chock
Rthe jack
XSecure the vehicle to prevent it from rolling
away.
Securing the vehicle to prevent it from
rolling away
GWarning
Only jack up the vehicle on level ground or on
slight inclines/declines. The vehicle could
otherwise fall off the jack and injure you or
others.
If your vehicle is equipped with a wheel chock,
it can be found in the vehicle tool kit
(Y page 287).
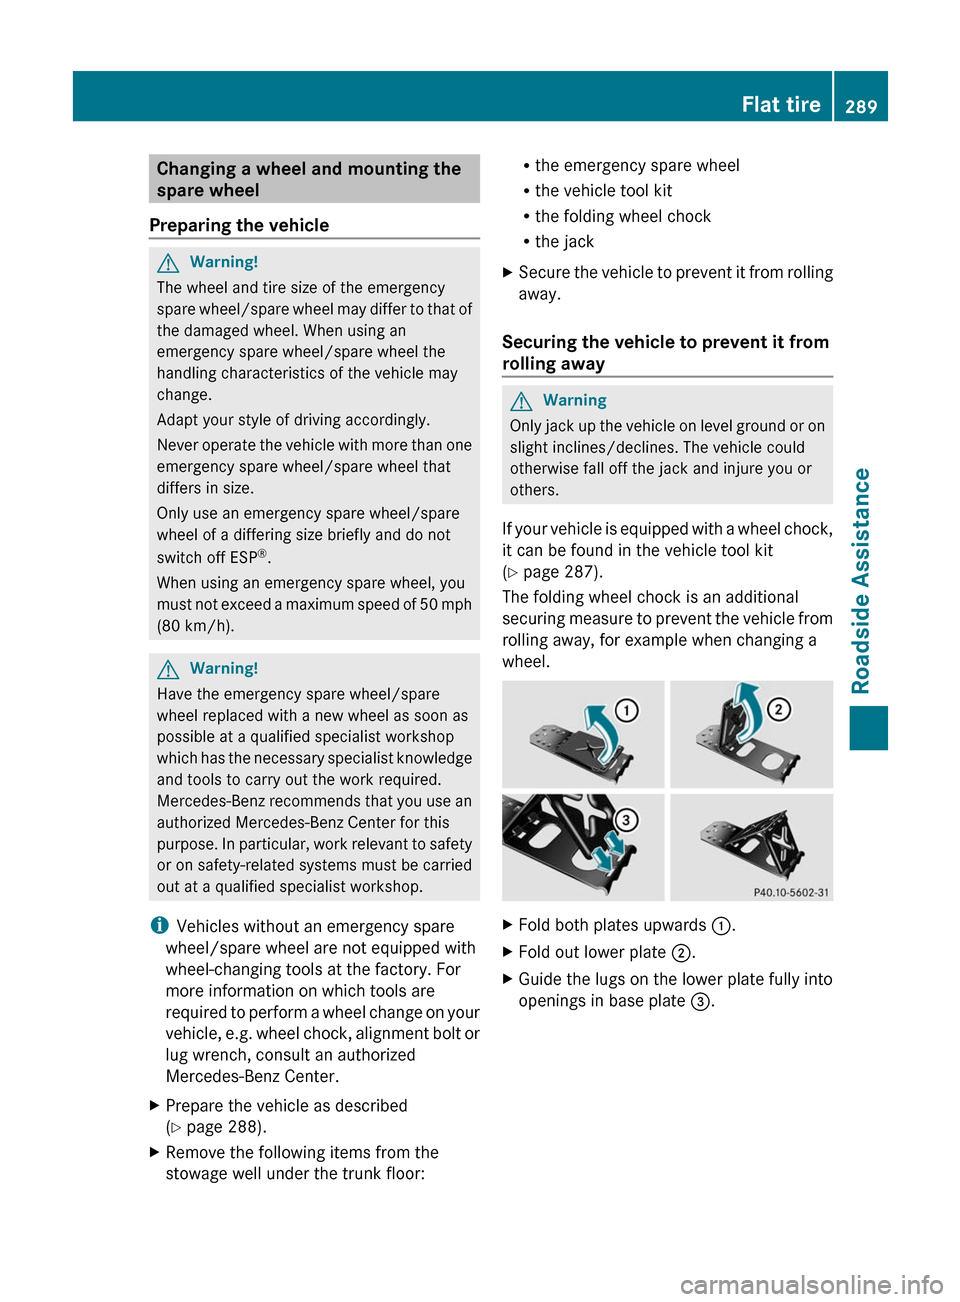
The folding wheel chock is an additional
securing measure to prevent the vehicle from
rolling away, for example when changing a
wheel.
XFold both plates upwards :.XFold out lower plate ;.XGuide the lugs on the lower plate fully into
openings in base plate =.
Flat tire289Roadside AssistanceBA 207 USA, CA Edition B 2011; 1; 3, en-USd2sboikeVersion: 3.0.3.62010-05-20T10:38:09+02:00 - Seite 289Z
Page 292 of 344

Securing the vehicle on level ground (example:Coupe)
XOn level ground: place chocks or other
suitable items under the front and rear of
the wheel that is diagonally opposite the
wheel you wish to change.
Securing the vehicle on slight downhill gradients(example: Coupe)
XOn downhill gradients: place chocks or
other suitable items in front of the wheels
of the front and rear axle.
Raising the vehicle
GWarning
When jacking up the vehicle, only use the jack
which has been specifically approved by
Mercedes-Benz for your vehicle.
The jack is designed exclusively for jacking up
the vehicle at the jacking points built into both
sides of the vehicle. The jack saddle must be
placed centrally under the jacking point. The
jack must always be vertical when in use,
especially on inclines or declines.
The jack is intended only for lifting the vehicle
briefly for wheel changes. It is not suited for
performing maintenance work under the
vehicle. To help avoid personal injury, use the
jack only to lift the vehicle during a wheel
change.
Never get beneath the vehicle while it is
supported by the jack. Keep hands and feet
away from the area under the lifted vehicle.
Always lower the vehicle onto sufficient
capacity jackstands before working under the
vehicle.
Always firmly engage the parking brake and
block the wheels with wheel chocks or other
sizable objects before raising the vehicle with
the jack. Do not disengage the parking brake
while the vehicle is raised.
Make sure that the ground on which the
vehicle is standing and where you place the
jack is solid, level and not slippery. If
necessary, use a large underlay. On slippery
surfaces, such as tiled floors, you should use
a non-slip underlay, for example a rubber mat.
Do not use wooden blocks or similar objects
as a jack underlay. Otherwise, the jack may
not be able to achieve its load-bearing
capacity if it is not at its full height.
Never start the engine when the vehicle is
raised.
Also observe the notes on the jack.
XUsing lug wrench :, loosen the bolts on
the wheel you wish to change by about one
full turn. Do not unscrew the bolts
completely.
290Flat tireRoadside Assistance
BA 207 USA, CA Edition B 2011; 1; 3, en-USd2sboikeVersion: 3.0.3.62010-05-20T10:38:09+02:00 - Seite 290