2011 MERCEDES-BENZ E-Class COUPE center console
[x] Cancel search: center consolePage 99 of 344
AIRCAP
General notes
With AIRCAP, four people can travel
comfortably with the soft top down. AIRCAP
reduces the draft for the driver and
passengers in both the front and the rear
compartment in a vehicle with the soft top
down. You can open or close AIRCAP either
when the vehicle is stationary or when driving
up to a speed of 160 km/h.
AIRCAP has the following components:
Ra wind deflector between the windshield
and the soft top
Ran AIRCAP wind screen between the two
head restraints on the rear bench seat
GRisk of injury
When extending and retracting AIRCAP, make
sure that no one can become trapped. If there
is a risk of entrapment, press the button again
to retract AIRCAP again.
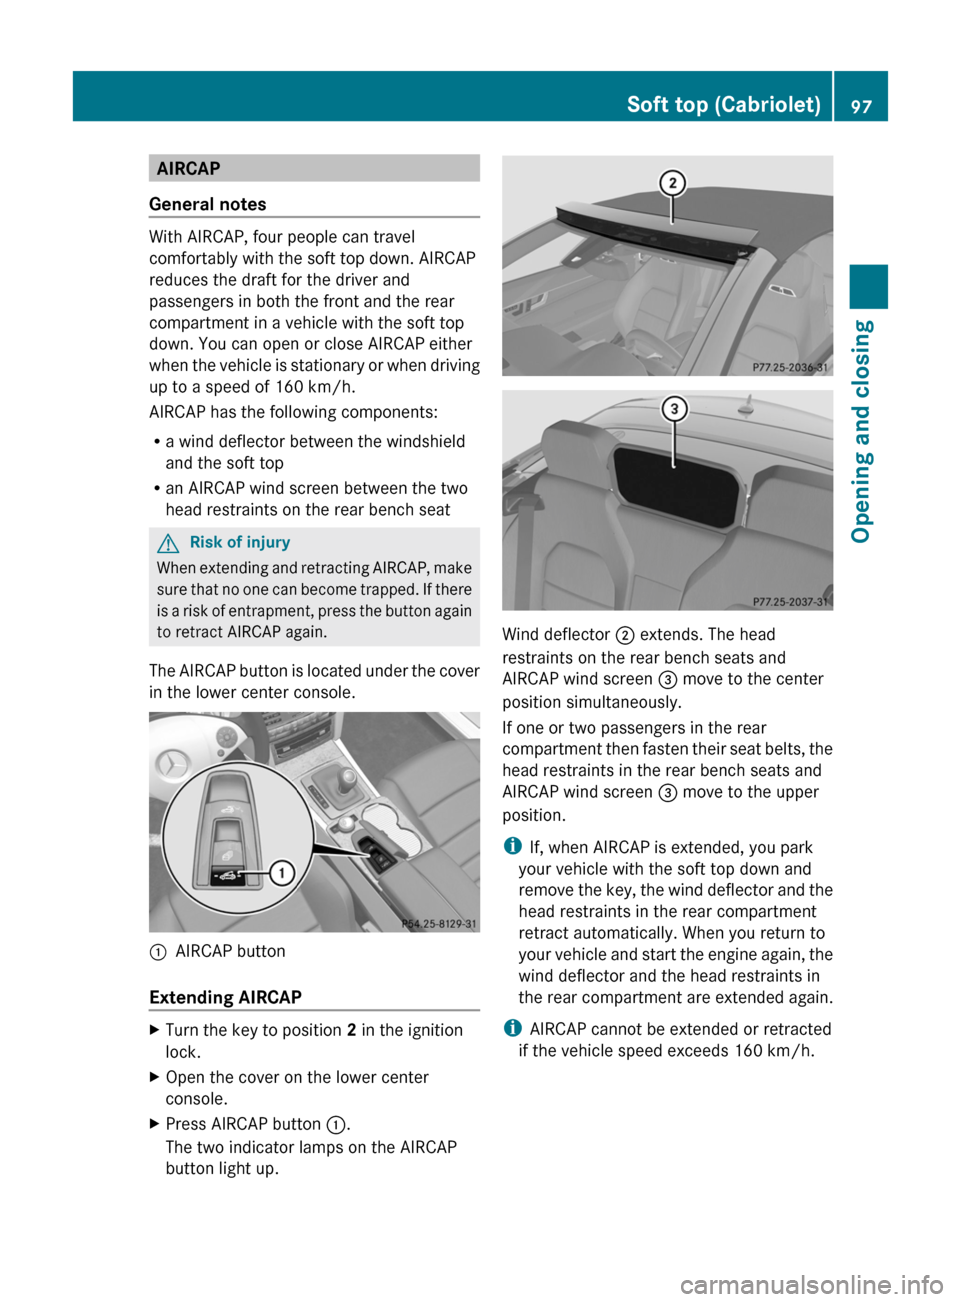
The AIRCAP button is located under the cover
in the lower center console.
:AIRCAP button
Extending AIRCAP
XTurn the key to position 2 in the ignition
lock.
XOpen the cover on the lower center
console.
XPress AIRCAP button :.
The two indicator lamps on the AIRCAP
button light up.
Wind deflector ; extends. The head
restraints on the rear bench seats and
AIRCAP wind screen = move to the center
position simultaneously.
If one or two passengers in the rear
compartment then fasten their seat belts, the
head restraints in the rear bench seats and
AIRCAP wind screen = move to the upper
position.
iIf, when AIRCAP is extended, you park
your vehicle with the soft top down and
remove the key, the wind deflector and the
head restraints in the rear compartment
retract automatically. When you return to
your vehicle and start the engine again, the
wind deflector and the head restraints in
the rear compartment are extended again.
iAIRCAP cannot be extended or retracted
if the vehicle speed exceeds 160 km/h.
Soft top (Cabriolet)97Opening and closingBA 207 USA, CA Edition B 2011; 1; 3, en-USd2sboikeVersion: 3.0.3.62010-05-20T10:38:09+02:00 - Seite 97Z
Page 100 of 344
Retracting AIRCAPXTurn the key to position 2 in the ignition
lock.XOpen the cover on the lower center
console.XPress AIRCAP button :.
The two indicator lamps on the AIRCAP
button go out. Wind deflector ; retracts.
The head restraints on the rear bench seats
and AIRCAP wind screen = move to the
lowest position simultaneously.
i If there are passengers wearing seat belts
in the rear compartment, the head
restraints on the rear bench seats and the
AIRCAP wind screen remain in the upper
position.
Retracting the head restraints on the
rear bench seats from the driver's seat
To improve the rear view, you can retract the
head restraints on the rear bench seats
individually ( Y page 109). The wind deflector
remains in its current position.
Installing and removing the AIRCAP
wind screen
Preparation
You will need a 4 mm Allen key to install/
remove the AIRCAP wind screen.
Before installing or removing the AIRCAP
wind screen:
XTurn the key to position 2 in the ignition
lock.XOpen the folding roof fully ( Y page 90).XExtend the head restraints in the rear
compartment fully ( Y page 109).Removing
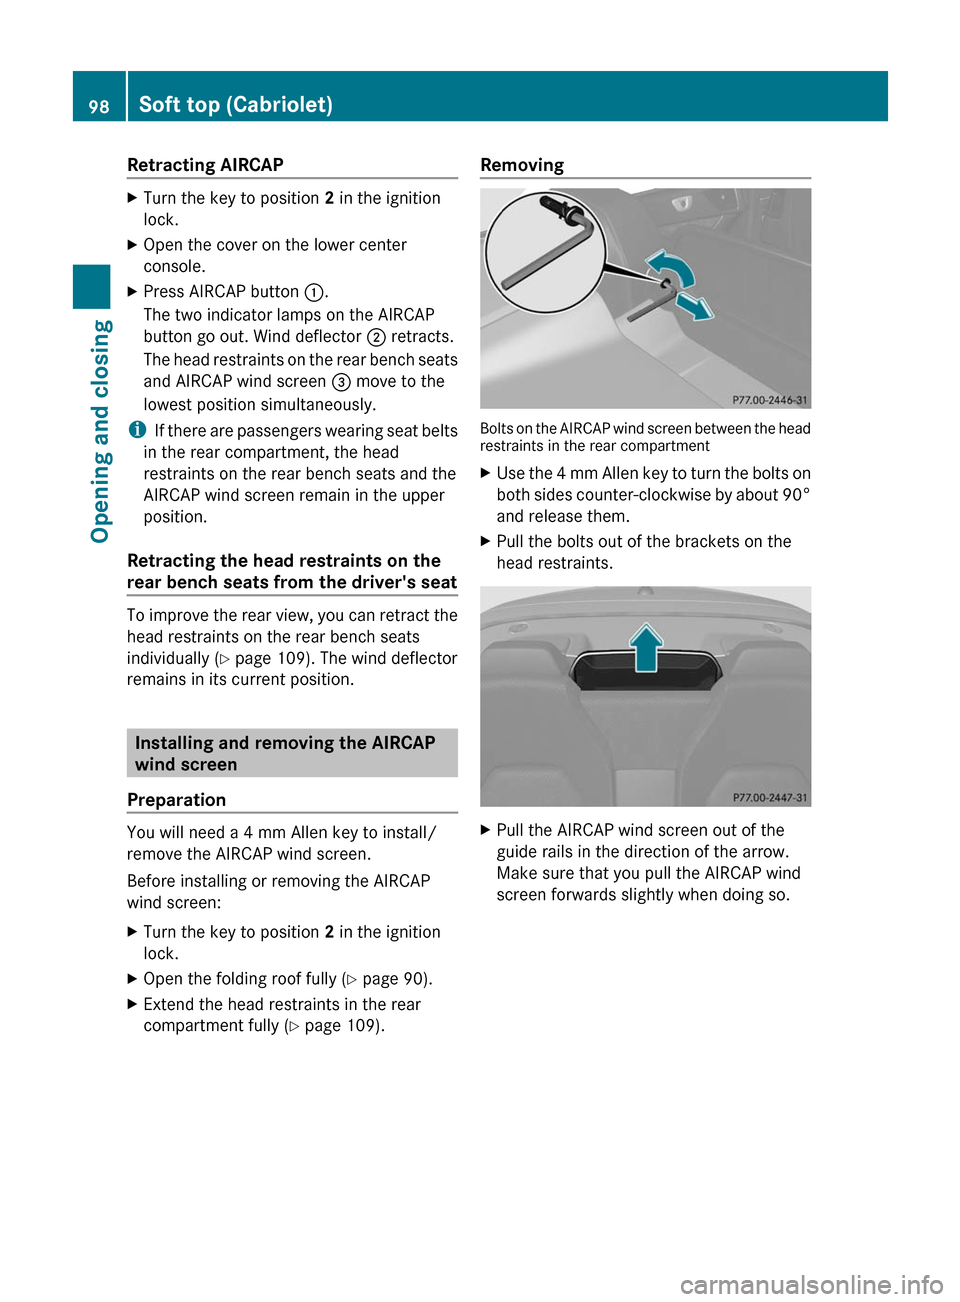
Bolts on the AIRCAP wind screen between the head
restraints in the rear compartment
XUse the 4 mm Allen key to turn the bolts on
both sides counter-clockwise by about 90°
and release them.XPull the bolts out of the brackets on the
head restraints.XPull the AIRCAP wind screen out of the
guide rails in the direction of the arrow.
Make sure that you pull the AIRCAP wind
screen forwards slightly when doing so.98Soft top (Cabriolet)Opening and closing
BA 207 USA, CA Edition B 2011; 1; 3, en-USd2sboikeVersion: 3.0.3.62010-05-20T10:38:09+02:00 - Seite 98
Page 164 of 344

Problems with the transmissionProblemPossible causes/consequences and M SolutionsThe acceleration ability
is deteriorating.
The transmission no
longer changes gear.The transmission is in emergency mode.
It is only possible to shift into 2nd gear and reverse gear.XStop the vehicle.XShift the transmission to position P.XSwitch off the engine.XWait at least 10 seconds before restarting the engine.XShift the transmission to position D or R.
If D is selected, the transmission shifts into 2nd gear; if R is
selected, the transmission shifts into reverse gear.XHave the transmission checked at a qualified specialist
workshop immediately.Releasing the parking lock manually
In the event of an electrical malfunction, it is
possible to release the selector lever lock
manually to move it out of position P, e.g. if
you wish to tow the vehicle away.
! Do not use any sharp-edged objects to
remove the selector lever cover in the
center console. This can damage the
selector lever cover.
XDepress the parking brake firmly.XPry out selector lever gaiter : with a flat,
blunt object (e.g. a screwdriver wrapped incloth) from the right-hand edge, pulling it
up and out.XPress release button ; down and
simultaneously move the selector lever out
of position P.
The selector lever can now be moved freely
until it is returned to position P.
Refueling
Important safety notes
GWarning
Gasoline is highly flammable and poisonous.
It burns violently and can cause serious
personal injury.
Never allow sparks, flames or smoking
materials near gasoline.
Turn off the engine before refueling.
Whenever you are around gasoline, avoid
inhaling fumes and any skin or clothing
contact.
Direct skin contact with fuels and the
inhalation of fuel vapors are damaging to your
health.
162RefuelingDriving and parking
BA 207 USA, CA Edition B 2011; 1; 3, en-USd2sboikeVersion: 3.0.3.62010-05-20T10:38:09+02:00 - Seite 162
Page 194 of 344
XTo reverse into the parking space:
maintain the steering wheel angle and
reverse carefully.
XStop as soon as you hear an acoustic
signal, at the latest when PARKTRONIC
sounds the continuous warning tone.
The Parking Guidance Finished
message appears in the multifunction
display and a tone sounds. You may be
asked to steer in a different direction and
then change gear. In this case, further
displays in the multifunction display will
direct you to the final position.
XManeuver if necessary.XAlways observe the warning messages
displayed by PARKTRONIC (Y page 187).
Canceling Parking Guidance
XPress the PARKTRONIC button on the
center console (Y page 187).
Parking Guidance is canceled immediately
and PARKTRONIC is deactivated.
Parking Guidance is canceled automatically if
it is no longer possible to guide you into the
parking space or if a malfunction occurs.
The parking space symbol disappears and the
Parking Guidance canceled message
appears in the multifunction display.
Rear view camera
Important safety notes
The rear view camera is an optical parking aid.
It shows the area behind your vehicle in the
COMAND display.
GWarning!
Make sure no persons or animals are in or
near the area in which you are parking/
maneuvering. Otherwise, they could be
injured.
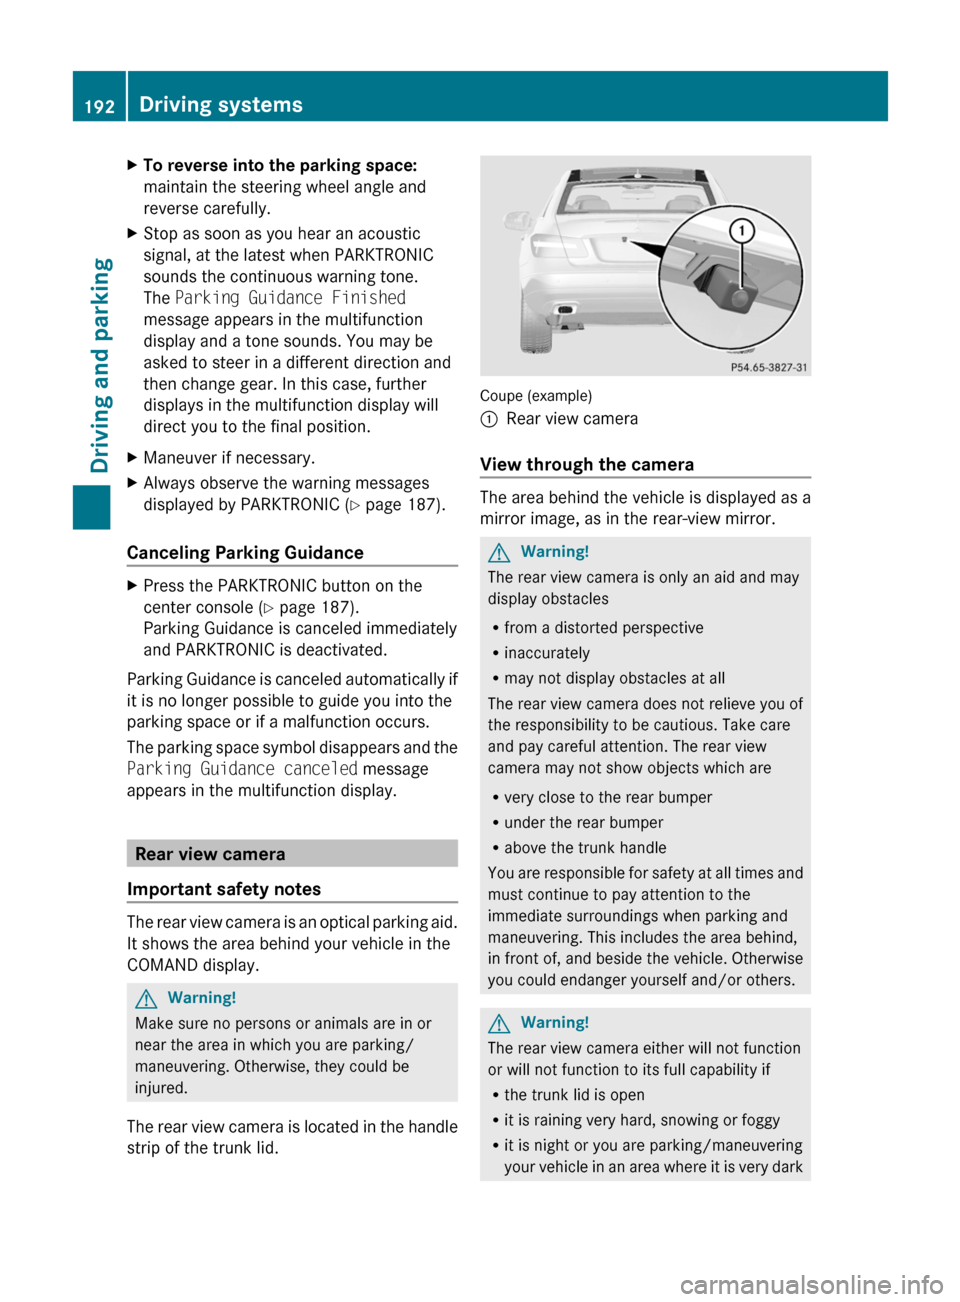
The rear view camera is located in the handle
strip of the trunk lid.
Coupe (example)
:Rear view camera
View through the camera
The area behind the vehicle is displayed as a
mirror image, as in the rear-view mirror.
GWarning!
The rear view camera is only an aid and may
display obstacles
Rfrom a distorted perspective
Rinaccurately
Rmay not display obstacles at all
The rear view camera does not relieve you of
the responsibility to be cautious. Take care
and pay careful attention. The rear view
camera may not show objects which are
Rvery close to the rear bumper
Runder the rear bumper
Rabove the trunk handle
You are responsible for safety at all times and
must continue to pay attention to the
immediate surroundings when parking and
maneuvering. This includes the area behind,
in front of, and beside the vehicle. Otherwise
you could endanger yourself and/or others.
GWarning!
The rear view camera either will not function
or will not function to its full capability if
Rthe trunk lid is open
Rit is raining very hard, snowing or foggy
Rit is night or you are parking/maneuvering
your vehicle in an area where it is very dark
192Driving systemsDriving and parking
BA 207 USA, CA Edition B 2011; 1; 3, en-USd2sboikeVersion: 3.0.3.62010-05-20T10:38:09+02:00 - Seite 192
Page 257 of 344
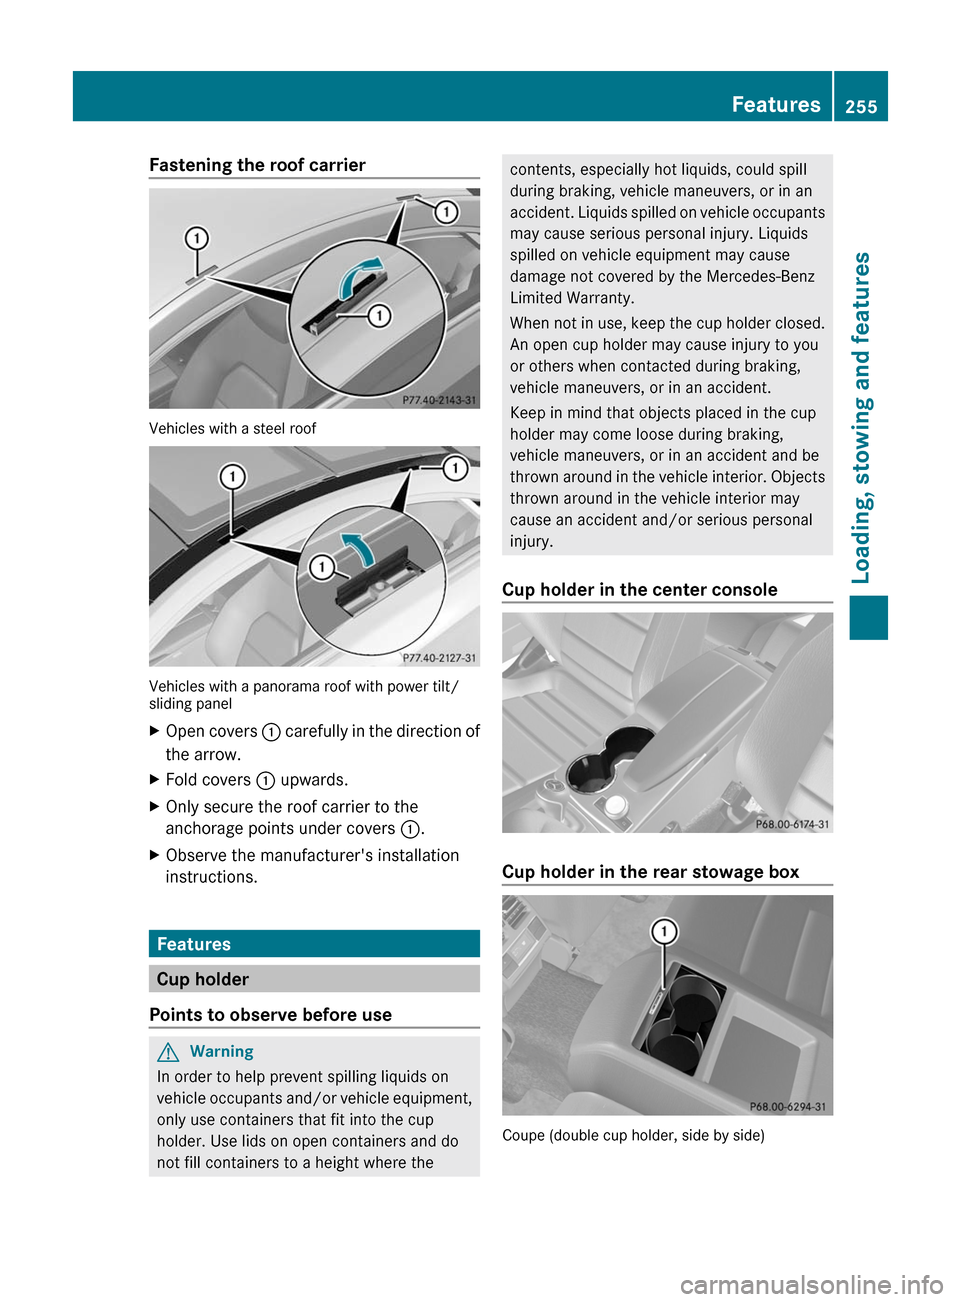
Fastening the roof carrier
Vehicles with a steel roof
Vehicles with a panorama roof with power tilt/sliding panel
XOpen covers : carefully in the direction of
the arrow.
XFold covers : upwards.XOnly secure the roof carrier to the
anchorage points under covers :.
XObserve the manufacturer's installation
instructions.
Features
Cup holder
Points to observe before use
GWarning
In order to help prevent spilling liquids on
vehicle occupants and/or vehicle equipment,
only use containers that fit into the cup
holder. Use lids on open containers and do
not fill containers to a height where the
contents, especially hot liquids, could spill
during braking, vehicle maneuvers, or in an
accident. Liquids spilled on vehicle occupants
may cause serious personal injury. Liquids
spilled on vehicle equipment may cause
damage not covered by the Mercedes-Benz
Limited Warranty.
When not in use, keep the cup holder closed.
An open cup holder may cause injury to you
or others when contacted during braking,
vehicle maneuvers, or in an accident.
Keep in mind that objects placed in the cup
holder may come loose during braking,
vehicle maneuvers, or in an accident and be
thrown around in the vehicle interior. Objects
thrown around in the vehicle interior may
cause an accident and/or serious personal
injury.
Cup holder in the center console
Cup holder in the rear stowage box
Coupe (double cup holder, side by side)
Features255Loading, stowing and featuresBA 207 USA, CA Edition B 2011; 1; 3, en-USd2sboikeVersion: 3.0.3.62010-05-20T10:38:09+02:00 - Seite 255Z
Page 260 of 344
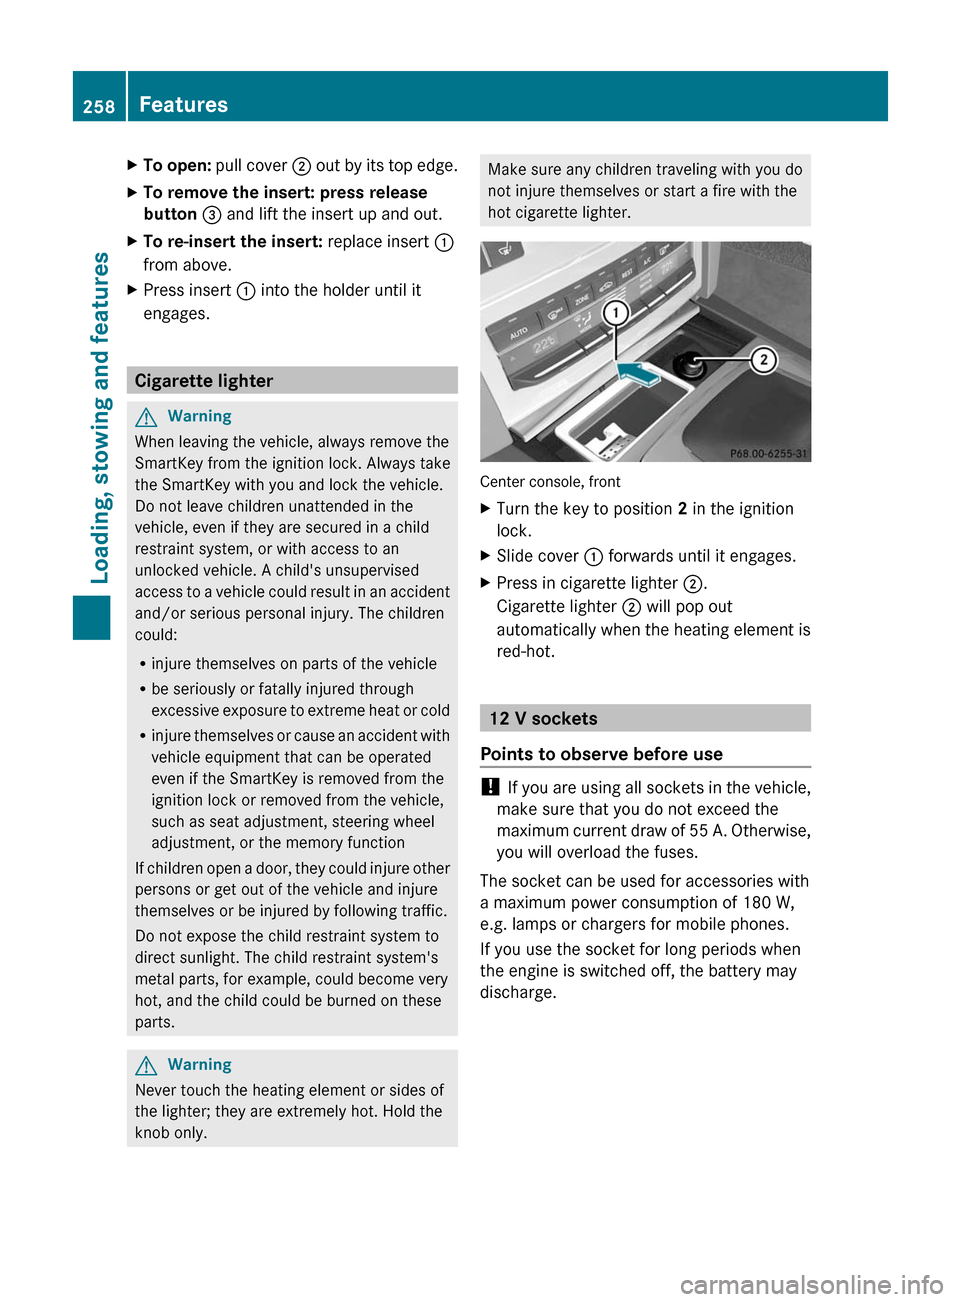
XTo open: pull cover ; out by its top edge.XTo remove the insert: press release
button = and lift the insert up and out.
XTo re-insert the insert: replace insert :
from above.
XPress insert : into the holder until it
engages.
Cigarette lighter
GWarning
When leaving the vehicle, always remove the
SmartKey from the ignition lock. Always take
the SmartKey with you and lock the vehicle.
Do not leave children unattended in the
vehicle, even if they are secured in a child
restraint system, or with access to an
unlocked vehicle. A child's unsupervised
access to a vehicle could result in an accident
and/or serious personal injury. The children
could:
Rinjure themselves on parts of the vehicle
Rbe seriously or fatally injured through
excessive exposure to extreme heat or cold
Rinjure themselves or cause an accident with
vehicle equipment that can be operated
even if the SmartKey is removed from the
ignition lock or removed from the vehicle,
such as seat adjustment, steering wheel
adjustment, or the memory function
If children open a door, they could injure other
persons or get out of the vehicle and injure
themselves or be injured by following traffic.
Do not expose the child restraint system to
direct sunlight. The child restraint system's
metal parts, for example, could become very
hot, and the child could be burned on these
parts.
GWarning
Never touch the heating element or sides of
the lighter; they are extremely hot. Hold the
knob only.
Make sure any children traveling with you do
not injure themselves or start a fire with the
hot cigarette lighter.
Center console, front
XTurn the key to position 2 in the ignition
lock.
XSlide cover : forwards until it engages.XPress in cigarette lighter ;.
Cigarette lighter ; will pop out
automatically when the heating element is
red-hot.
12 V sockets
Points to observe before use
! If you are using all sockets in the vehicle,
make sure that you do not exceed the
maximum current draw of 55 A. Otherwise,
you will overload the fuses.
The socket can be used for accessories with
a maximum power consumption of 180 W,
e.g. lamps or chargers for mobile phones.
If you use the socket for long periods when
the engine is switched off, the battery may
discharge.
258FeaturesLoading, stowing and features
BA 207 USA, CA Edition B 2011; 1; 3, en-USd2sboikeVersion: 3.0.3.62010-05-20T10:38:09+02:00 - Seite 258
Page 261 of 344
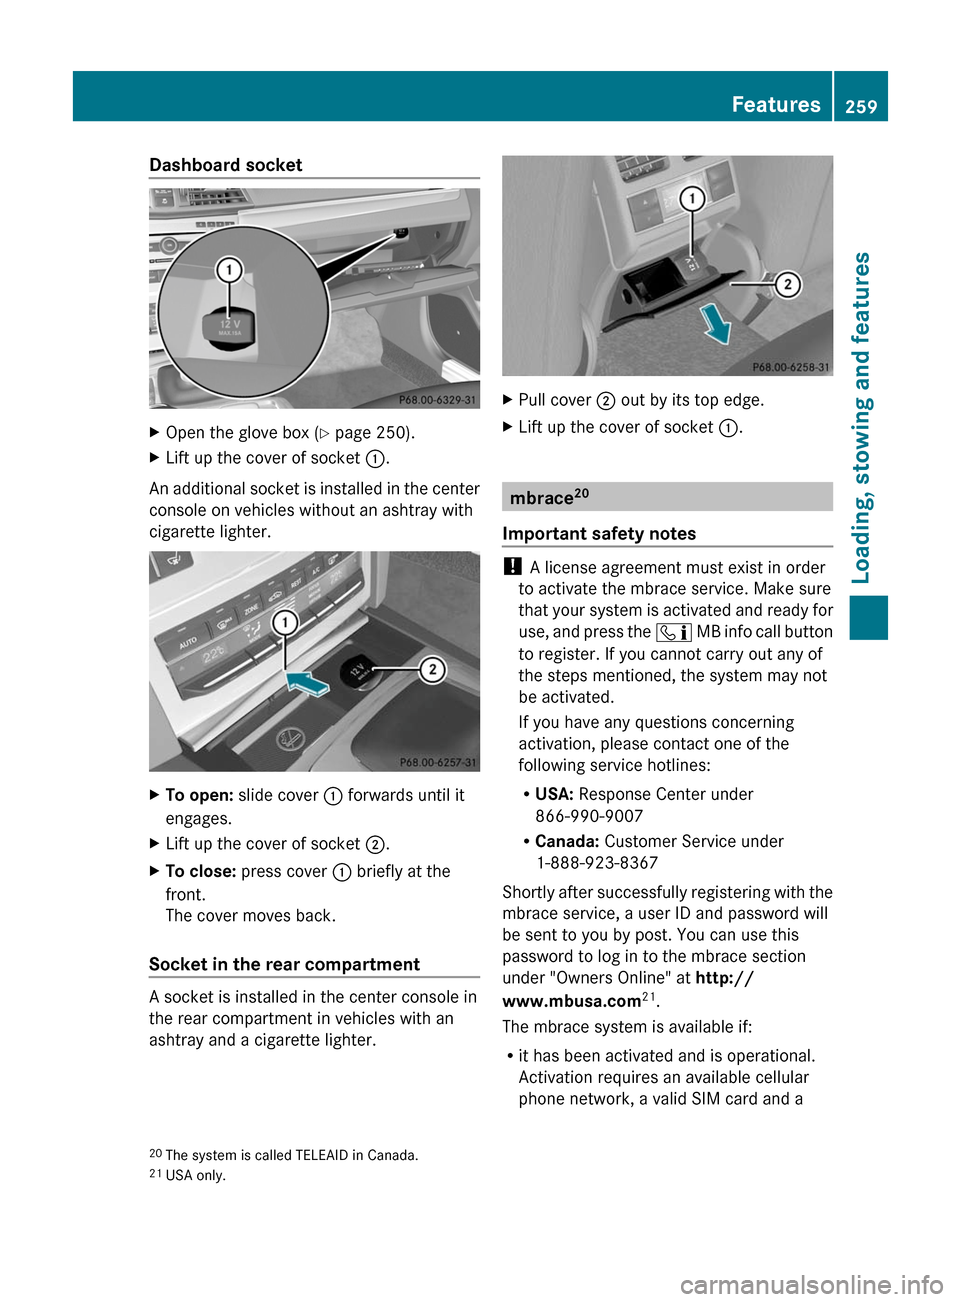
Dashboard socketXOpen the glove box (Y page 250).XLift up the cover of socket :.
An additional socket is installed in the center
console on vehicles without an ashtray with
cigarette lighter.
XTo open: slide cover : forwards until it
engages.
XLift up the cover of socket ;.XTo close: press cover : briefly at the
front.
The cover moves back.
Socket in the rear compartment
A socket is installed in the center console in
the rear compartment in vehicles with an
ashtray and a cigarette lighter.
XPull cover ; out by its top edge.XLift up the cover of socket :.
mbrace20
Important safety notes
! A license agreement must exist in order
to activate the mbrace service. Make sure
that your system is activated and ready for
use, and press the ï MB info call button
to register. If you cannot carry out any of
the steps mentioned, the system may not
be activated.
If you have any questions concerning
activation, please contact one of the
following service hotlines:
RUSA: Response Center under
866-990-9007
RCanada: Customer Service under
1-888-923-8367
Shortly after successfully registering with the
mbrace service, a user ID and password will
be sent to you by post. You can use this
password to log in to the mbrace section
under "Owners Online" at http://
www.mbusa.com21.
The mbrace system is available if:
Rit has been activated and is operational.
Activation requires an available cellular
phone network, a valid SIM card and a
20The system is called TELEAID in Canada.21USA only.
Features259Loading, stowing and featuresBA 207 USA, CA Edition B 2011; 1; 3, en-USd2sboikeVersion: 3.0.3.62010-05-20T10:38:09+02:00 - Seite 259Z
Page 282 of 344
Rtar or stain remover
R other organic solvents
! Remove bird droppings immediately as
they are corrosive and, therefore, can make
the soft-top fabric leak. Do not use high-
pressure cleaning equipment to clean the
vehicle. Do not use sharp-edged equipment
to remove ice and snow.
Frequent cleaning reduces the resistance to
dirt of the soft top.
To restore this resistance to dirt, clean the
soft top using soft top cleaning agents that
have been recommended and approved by
Mercedes-Benz.
Improper cleaning and care, as well as aging,
can cause the soft top seams to leak. Have
the soft top seams sealed at a qualified
specialist workshop, e.g. at an authorized
Mercedes-Benz Center.
i Cover the soft top with a suitable cover if
you plan to leave the vehicle outside for a
long period of time.
Cleaning AIRCAP
Cleaning the wind deflector
Clean the wind deflector on the windshield
with the soft top closed.
XApply the parking brake firmly.XVehicles with SmartKey: turn the
SmartKey to position 2(Y page 151) in the
ignition lock.XVehicles with KEYLESS-GO: press the
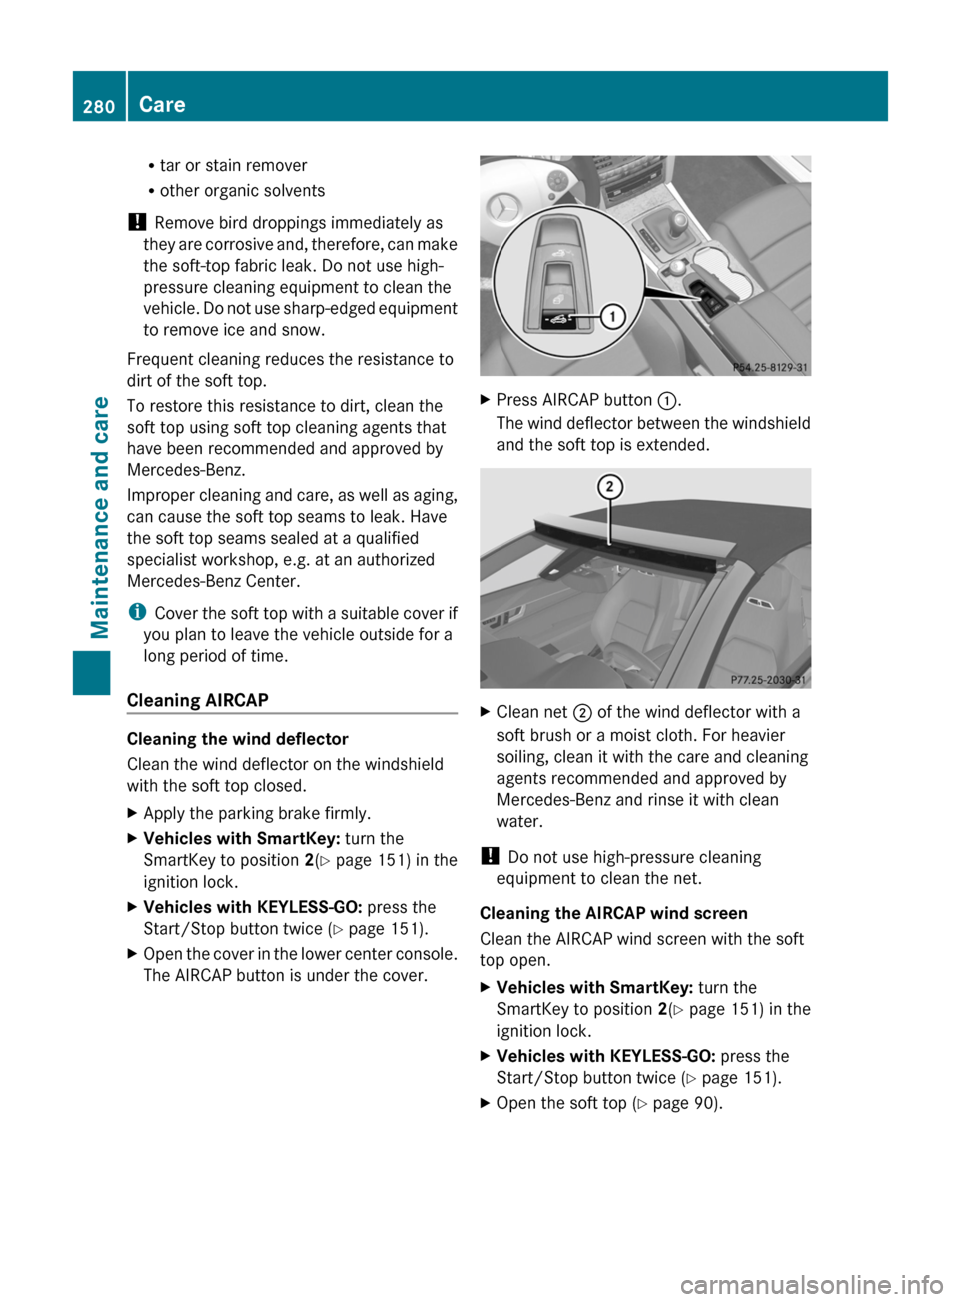
Start/Stop button twice ( Y page 151).XOpen the cover in the lower center console.
The AIRCAP button is under the cover.XPress AIRCAP button :.
The wind deflector between the windshield
and the soft top is extended.XClean net ; of the wind deflector with a
soft brush or a moist cloth. For heavier
soiling, clean it with the care and cleaning
agents recommended and approved by
Mercedes-Benz and rinse it with clean
water.
! Do not use high-pressure cleaning
equipment to clean the net.
Cleaning the AIRCAP wind screen
Clean the AIRCAP wind screen with the soft
top open.
XVehicles with SmartKey: turn the
SmartKey to position 2(Y page 151) in the
ignition lock.XVehicles with KEYLESS-GO: press the
Start/Stop button twice ( Y page 151).XOpen the soft top ( Y page 90).280CareMaintenance and care
BA 207 USA, CA Edition B 2011; 1; 3, en-USd2sboikeVersion: 3.0.3.62010-05-20T10:38:09+02:00 - Seite 280