2011 MERCEDES-BENZ E-Class COUPE Correct driver seat position
[x] Cancel search: Correct driver seat positionPage 63 of 344

Special seat belt retractorGWarning
Observe "Important safety notes"
( Y page 58).
All seat belts in the vehicle, except the
driver's seat belt, are equipped with a special
seat belt retractor. When activated, the
special seat belt retractor ensures that the
seat belt cannot slacken after being fastened.
Installing a child restraint system:
XAlways comply with the manufacturer's
installation instructions.XPull the seat belt smoothly from the inertia
reel.XEngage the seat belt tongue in the belt
buckle.
Activating the special seat belt retractor:
XPull the seat belt out fully and let the inertia
reel retract it again.
While the seat belt is retracting, you should
hear a ratcheting sound. The special seat
belt retractor function is enabled.XPush down on the child restraint system to
take up any slack.
Removing a child restraint system/
deactivating the special seat belt retractor:
XAlways comply with the manufacturer's
installation instructions.XPress the seat belt release button and
guide the belt tongue to the belt outlet.
The special seat belt retractor function is
deactivated.GWarning
Never release the seat belt buckle while the
vehicle is in motion, since the special seat belt
retractor will be deactivated.
LATCH-type (ISOFIX) child seat anchors
in the rearGWarning
Observe "Important safety notes"
( Y page 58).
GWarning
Children that are too large for a child restraint
must travel in seats using normal seat belts.
Position shoulder belt across the chest and
shoulder, not face or neck.
In order to attain the correct seating position
for children weighing over 41 lb (18 kg), it may
be necessary to use a booster seat until they
reach a height where a normal lap/shoulder
seat belt lies properly across their bodies
without the need for a booster seat.
Install the child restraint system according to
the manufacturer's instructions.
The child restraint system must be installed
firmly on both brackets.
An incorrectly installed child restraint system
can come loose in the event of an accident,
causing the child to be severely or fatally
injured.
Child restraint systems/child restraint
retaining brackets that are damaged or have
suffered damage due to an impact must be
replaced.
ISOFIX is a standardized securing system for
specially designed child restraint systems on
the rear seats. Securing rings for two LATCH-
type (ISOFIX) child restraint systems are
installed on the left and right of the rear seats.
Use the vehicle's seat belts to install child
restraint systems without the ISOFIX
securing system. Follow the manufacturer's
instructions for of child restraint systems.
Children in the vehicle61SafetyBA 207 USA, CA Edition B 2011; 1; 3, en-USd2sboikeVersion: 3.0.3.62010-05-20T10:38:09+02:00 - Seite 61Z
Page 107 of 344

Vehicle equipment ............................106
Correct driver's seat position ..........106
Seats .................................................. 107
Steering wheel .................................. 113
Mirrors ............................................... 114
Memory functions .............................116105Seats, steering wheel and mirrorsBA 207 USA, CA Edition B 2011; 1; 3, en-USd2sboikeVersion: 3.0.3.62010-05-20T10:38:09+02:00 - Seite 105
Page 108 of 344

Vehicle equipment
i This manual describes all the standard
and optional equipment of your vehicle
which was available at the time of
purchase. Country-specific differences are
possible. Bear in mind that your vehicle
may not feature all functions described
here. This also refers to safety-related
systems and functions.
Correct driver's seat position
Observe the important safety notes on
( Y page 107).
XCheck whether you have adjusted seat =
properly.
Electrical seat adjustment ( Y page 108)
When adjusting the seat, make sure:
R you are as far away from the driver's air
bag as possible.
R you are sitting in a normal upright
position.
R you can fasten the seat belt properly.
R you have moved the backrest to an
almost vertical position.R you have set the seat cushion angle so
that your thighs are gently supported.
R you can depress the pedals properly.XCheck whether the head restraint is
adjusted properly ( Y page 108).
When doing so, make sure that you have
adjusted the head restraint so that the back
of your head is supported at eye level by
the center of the head restraint.
Observe the important safety notes on
( Y page 113).
XCheck whether steering wheel : is
adjusted properly.
Adjusting the steering wheel electrically
( Y page 113)
When adjusting the steering wheel, make
sure:
R you can hold the steering wheel with your
arms slightly bent.
R you can move your legs freely.
R you can see all the displays in the
instrument cluster clearly.
Observe the important safety notes on
( Y page 53).
XCheck whether you have fastened seat
belt ; properly ( Y page 54).
The seat belt should:
R fit snugly across your body
R be routed across the middle of your
shoulder
R be routed in your pelvic area across the
hip jointsXBefore starting off, adjust the rear-view
mirror and the exterior mirrors
( Y page 114) in such a way that you have
a good view of road and traffic conditions.XVehicles with memory function: save the
seat, steering wheel and exterior mirror
settings ( Y page 116).106Correct driver's seat positionSeats, steering wheel and mirrors
BA 207 USA, CA Edition B 2011; 1; 3, en-USd2sboikeVersion: 3.0.3.62010-05-20T10:38:09+02:00 - Seite 106
Page 109 of 344

Seats
Important safety notes
GWarning
In order to avoid possible loss of vehicle
control, all seat, head restraint, steering
wheel and rear view mirror adjustments, as
well as fastening of seat belts, must be done
before setting the vehicle in motion.
GWarning
Do not adjust the driver's seat while driving.
Adjusting the seat while driving could cause
the driver to lose control of the vehicle.
Never travel in a moving vehicle with the seat
backrest in an excessively reclined position as
this can be dangerous. You could slide under
the seat belt in a collision. If you slide under
it, the seat belt would apply force at the
abdomen or neck. This could cause serious or
fatal injuries. The seat backrest and seat belts
provide the best restraint when the wearer is
in a position that is as upright as possible and
seat belts are properly positioned on the
body.
GWarning
Your seat belt must be adjusted so that you
can correctly fasten your seat belt.
Observe the following points:
R adjust the seat backrest until your arms are
slightly angled when holding the steering
wheel.
R adjust the seat to a comfortable seating
position that still allows you to reach the
accelerator/brake pedal safely. The
position should be as far back as possible
with the driver still able to operate the
controls properly.
R adjust the head restraint so that it is as
close to the head as possible and the center
of the head restraint supports the back of
the head at eye level.
R never place hands under the seat or near
any moving parts while a seat is being
adjusted.
Failure to do so could result in an accident
and/or serious personal injury.GWarning
The electrically adjustable seats can be
operated at any time. Therefore, do not leave
children unattended in the vehicle, or with
access to an unlocked vehicle. A child's
unsupervised access to a vehicle could result
in an accident and/or serious personal injury.
GWarning!
According to accident statistics, children are
safer when properly restrained in the rear
seating positions than in the front seating
position. Thus, we strongly recommend that
children be placed in the rear seats whenever
possible. Regardless of seating position,
children 12 years old and under must be
seated and properly secured in an
appropriately sized infant restraint, toddler
restraint, or booster seat recommended for
the size and weight of the child. For additional
information, see "Children in the vehicle".
A child's risk of serious or fatal injuries is
significantly increased if the child restraints
are not properly secured in the vehicle and/
or the child is not properly secured in the child
restraint.
GWarning
For your protection, drive only with properly
positioned head restraints.
Adjust the head restraint so that it is as close
to the head as possible and the center of the
head restraint supports the back of the head
at eye level. This will reduce the potential for
injury to the head and neck in the event of an
accident or similar situation.
Seats107Seats, steering wheel and mirrorsBA 207 USA, CA Edition B 2011; 1; 3, en-USd2sboikeVersion: 3.0.3.62010-05-20T10:38:09+02:00 - Seite 107Z
Page 117 of 344

mirror using adjustment button = as long
as the indicator lamp is lit.
XPress adjustment button = up, down, to
the right or to the left until the exterior
mirror is set to a position which provides
you with a good overview of traffic
conditions.
Exterior mirror out of position
If an exterior mirror has been pushed out of
position, proceed as follows:
XMove the exterior mirror into the correct
position manually.
Automatic anti-glare mirrors
GWarning!
The auto dimming function does not react if
incoming light is not aimed directly at sensors
in the interior rear view mirror.
The interior rear view mirror and the exterior
rear view mirror on the driver's side do not
react, for example, if the rear window
sunshade is in raised position.
Light hitting the mirror(s) at certain angles
(incident light) could blind you. As a result,
you may not be able to observe traffic
conditions and could cause an accident.
The rear-view mirror and the exterior mirror
on the driver's side automatically go into anti-
glare mode if the ignition is switched on and
incident light from headlamps strikes the
sensor in the rear-view mirror.
The mirrors do not go into anti-glare mode if
reverse gear is engaged or the interior lighting
is switched on.
Parking position for the exterior
mirror on the front-passenger side
Setting and storing the parking position
You can position the front-passenger side
exterior mirror in such a way that you can see
the rear wheel on that side as soon as you
engage reverse gear. You can store this
position.
XMake sure that the vehicle is stationary and
that the key is in position 2 in the ignition
lock.
XPress button ; for the exterior mirror on
the front-passenger side.
XEngage reverse gear.
The exterior mirror on the front-passenger
side moves to the preset parking position.
XUse adjustment button = to adjust the
exterior mirror to a position which allows
you to see the rear wheel and the curb.
The parking position is stored.
iIf you shift the transmission to another
position, the exterior mirror on the front-
passenger side returns to the driving
position.
iYou can also store the parking position
using memory button M ?.
XWith the key in position 2 in the
ignition lock and with the exterior
mirror on the front-passenger side
activated, use adjustment button = to
Mirrors115Seats, steering wheel and mirrorsBA 207 USA, CA Edition B 2011; 1; 3, en-USd2sboikeVersion: 3.0.3.62010-05-20T10:38:09+02:00 - Seite 115Z
Page 238 of 344

Display messagesPossible causes/consequences and M Solutionsh
Check Tire PressureGRisk of accident
The tire pressure in one or more tires has dropped significantly.
XStop the vehicle without making any sudden steering or braking
maneuvers. Pay attention to the traffic conditions as you do so.XIf necessary, change a wheel ( Y page 320).XCheck the tire pressure. If necessary, correct the tire pressure
( Y page 311).h
Correct Tire
PressureThe tire pressure is insufficient in at least one of the tires or the
tire pressure difference between the wheels is too great.XCheck the tire pressures at the next opportunity. If necessary,
correct the tire pressure ( Y page 311).
Vehicle
Display messagesPossible causes/consequences and M SolutionsShift to 'P' or 'N'
to Start EngineYou have attempted to start the engine with the transmission in
position R or D. XShift the transmission to position P or N.P
Shift to 'P'You turned off the engine with the Start/Stop button and opened
the driver's door while the transmission was in position N.
or
You have attempted to turn off the engine with the Start/Stop
button while the transmission was in position R or D.XShift the transmission to position P.While the HOLD function or DISTRONIC PLUS is active, you have:
R opened the driver's door and released the seat belt or
R switched off the engine or
R opened the hood
A tone may also sound at regular intervals. The tone becomes
louder if you attempt to lock the vehicle.
You cannot start the engine.XShift the transmission to position P.
You can restart the engine.NThe trunk lid is open. XClose the trunk lid.236Display messagesOn-board computer and displays
BA 207 USA, CA Edition B 2011; 1; 3, en-USd2sboikeVersion: 3.0.3.62010-05-20T10:38:09+02:00 - Seite 236
Page 271 of 344

a circle without impeding the remaining
traffic.
In order to calibrate the compass correctly,
observe the following points:
Rcalibrate the compass in the open and not
in the vicinity of steel structures or high-
voltage power lines
Rswitch off electrical consumers such as
climate control, the windscreen wipers or
the rear window heating
Rclose all doors and the trunk lid
XSwitch on the ignition.XPress and hold button = for approximately
six seconds until the C symbol appears in
compass display ;.
XDrive a full circle at approximately 3 mph
(5 km/h) to 6 mph (10 km/h).
Once the calibration has been successfully
completed, the current heading appears in
compass display ;.
Floormat on the driver's side
GWarning!
Whenever you are using a floormat, make sure
there is enough clearance and that the
floormat is securely fastened.
The floormat should always be securely
fastened using the fastening equipment.
Before driving off, check that the floormat is
securely in place and adjust it if necessary. A
loose floormat could slip and hinder proper
functioning of the pedals.
Do not place several floormats on top of each
other as this may impair pedal movement.
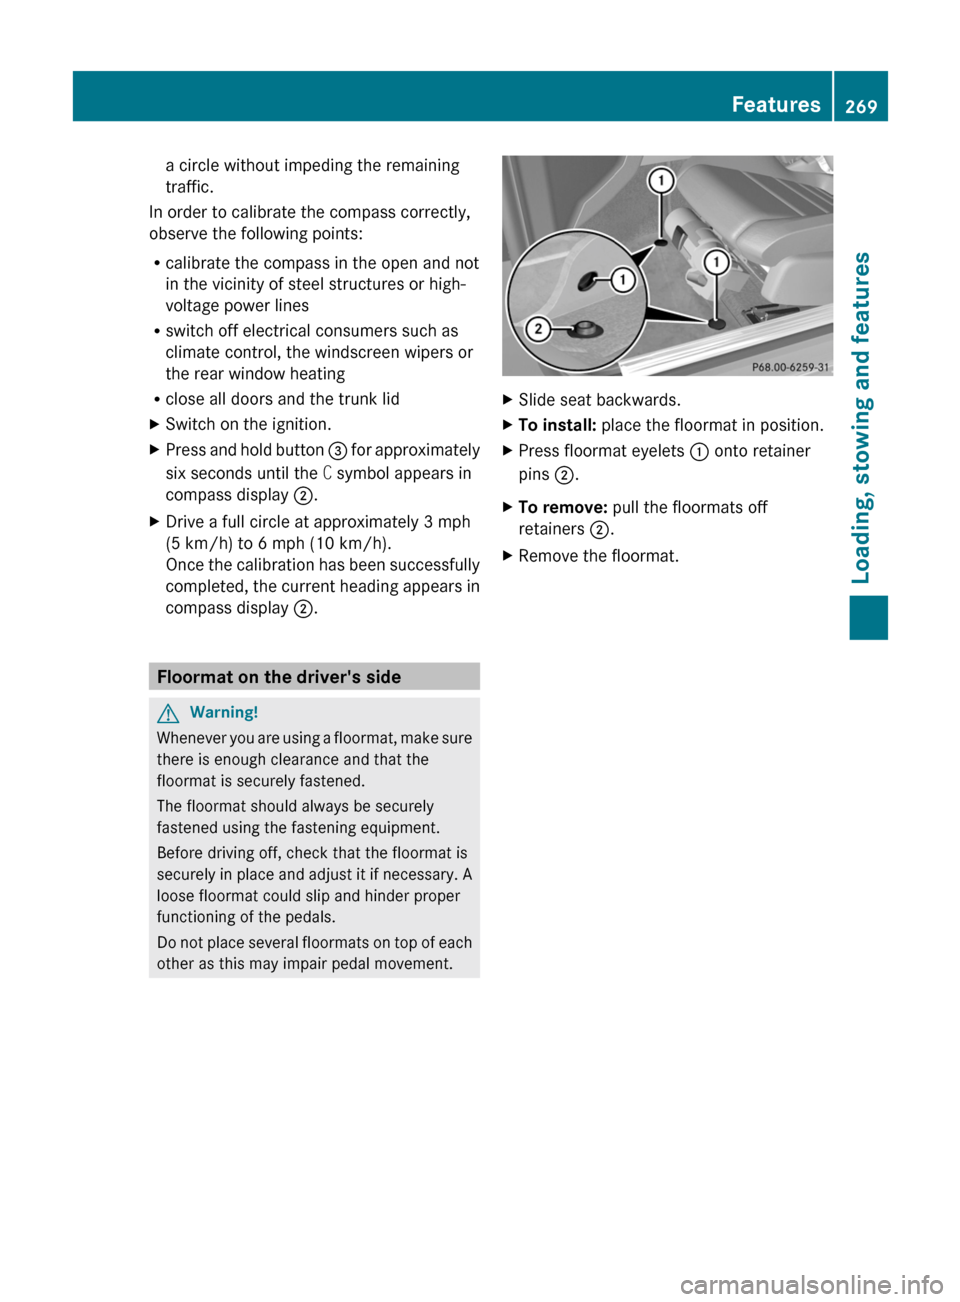
XSlide seat backwards.XTo install: place the floormat in position.XPress floormat eyelets : onto retainer
pins ;.
XTo remove: pull the floormats off
retainers ;.
XRemove the floormat.Features269Loading, stowing and featuresBA 207 USA, CA Edition B 2011; 1; 3, en-USd2sboikeVersion: 3.0.3.62010-05-20T10:38:09+02:00 - Seite 269Z