2011 MERCEDES-BENZ E-CLASS CABRIOLET clock
[x] Cancel search: clockPage 10 of 353

Cell phone
see Mobile phone
Centra llocking
Automatic lockin g(on-board com-
puter) ............................................ .228
Locking/unlocking (key ).................. 72
Centre console ..................................... 32
Changing bulbs Dipped-bea mheadlamps ............... 122
Important safety notes ..................121
Main-beam headlamps ................... 123
Overview of bul btypes .................. 122
Parking lamps (front) .....................123
Standing lamps .............................. 123
Turn signals (front) ......................... 123
Child-proof locks
Child sea tlock ................................. 52
Important safety notes ....................61
Children
In the vehicle ................................... 51
Restraint systems ............................ 51
Child seat
Automatic recognition .....................53
Child sea tlock ................................. 52
Display message ............................ 237
ISOFIX .............................................. 54
On the front-passenger sea t............ 52
Problem (malfunction) .....................57
Recommendations ...........................59
Suitable positions ............................ 57
Cigarette lighter ................................ 272
Cleaning Trailer tow hitch ............................. 291
Climate control
Activating/deactivating rear win-
dow heating ................................... 135
Auxiliary heating/ventilatio n.......... 137
Controlling automatically ...............132
Convenience opening/closing (air
recirculation) ................................. 136
Cooling with aird ehumidification..131
Demisting the windows .................. 135
Demisting the windscree n............. 134
Important safety notes ..................128
Indicator lamp ................................ 132
Notes on using THERMATI Cauto-
matic climate control .....................129Notes on using THERMOTRONIC
automatic climate control
..............131
Overview of systems ......................128
Problems with cooling with air
dehumidification ............................ 132
Problem with the rear window
heating .......................................... 135
Rea rcontrol panel ......................... 130
Setting the aird istribution.............133
Setting the airflow .........................134
Setting the airv ents...................... 141
Setting the climate mode .............. .132
Setting the temperature ................133
Switching air-recirculation mode
on/off ............................................ 135
Switching on/off ........................... 131
Switching residua lheato n/off ......136
Switching the ZONE function on/
off .................................................. 134
THERMATI Cautomatic climate
control (2-zone) ............................. 129
THERMOTRONIC (3-zone) auto-
matic climate control .....................130
Clock( on-board computer) ...............226
Cockpit Overview .......................................... 26
see Instrument cluster
COMAND
see Separate operating instructions
Combination switch ..........................116
Constant headlamp mode see Daytime driving lamps
Consumptio nstatistic s(on -board
computer) .......................................... 217
Convenience closing feature ..............84
Convenience opening/closing (air-
recirculation mode) ........................... 136
Convenience opening feature ............83
Coolan t(engine)
Checkin gthe level ......................... 283
Display message ............................ 242
Notes ............................................. 337
Temperature gauge ........................ 212
Warning lamp ................................. 260
Cooling
see Climate control Index
7
Page 31 of 353

Instrumen
tcluster Display
sand controls i
Instrument cluster: kilometres Function Page
:
Fuel gauge
;
Time 226
=
Speedometer with seg-
ments
213
?
Multifunction display 214
A
Rev counter 212
B
Coolant temperature 212
C
Brightness control knob for
the instrumen
tcluster light-
ing: tur nclockwise or anti-
clockwise 28
Instrument clusterAt
ag lance
Page 32 of 353

i
Instrument cluster: miles Function Page
:
Fuel gauge
;
Time 226
=
Speedometer with seg-
ments
213
?
Multifunction display
214 Function Page
A
Rev counter 212
B
Coolant temperature 212
C
Brightness control knob for
the instrument cluster light-
ing: turn clockwise or anti-
clockwise Instrument cluster
29Atag lance
Page 82 of 353

Unlocking the driver's door (emer-
gency key element)
If the vehicle can no longer be unlocked with
the key, use the emergency key element.
If you use the emergency key element to
unlock and open the driver' sdoor, the anti-
thef talarm system will be triggered
(Y page 68).
X Take the emergency key elemen tout of the
ke y( Ypage 74).
X Inser tthe emergency key element into the
lock of the driver's door as far as it will go. X
Turn the emergency key element anti-
clockwise to position 1.
The door is unlocked.
i On right-hand-drive vehicles, turn the
emergency key element clockwise.
X Turn the emergency key element back and
remove it.
X Insert the emergency key element into the
key. Locking the vehicle (emergency key
element)
If the vehicle can no longer be locked with the
key, use the emergency key element.
X Open the driver's door.
X Close the front-passenger door and the
boot lid.
X Press the locking button (Y page 78).
X Check whether the locking knob on the
front-passenger door is still visible. Press down the locking knob by hand, if neces-
sary.
X Close the driver's door.
X Take the emergency key element out of the
key (Y page 74).
X Insert the emergency key element into the
lock of the driver's door as far as it will go. X
Turn the emergency key element clockwise
as far as it will go to position 1.
i On right-hand-drive vehicles, turn the
emergency key element anti-clockwise.
X Turn the emergency key element back and
remove it.
X Make sure that the doors and the boot lid
are locked.
X Insert the emergency key element into the
key. Boot
Important safety notes
Do not leave the key in the boot. You could
otherwise lock yourself out. G
WARNING
Exhaust fumes could enter the vehicle interior
if the engine is running and the boot lid is
open. This could poison you. Therefore, you
should make sure that the boot lid is always
closed when the engine is running.
! The boot lid swings upwards when
opened. Therefore, make sure that there is
sufficient clearance above the boot lid. Boot
79Opening and closing Z
Page 84 of 353

Opening
You can unlock and open the boot lid simul-
taneously with the key.
X Press and hold the Fbutton on the key
until the boot lid opens. Opening automatically from inside
You can open the boot lid from the driver's
seat when the vehicle is stationary and
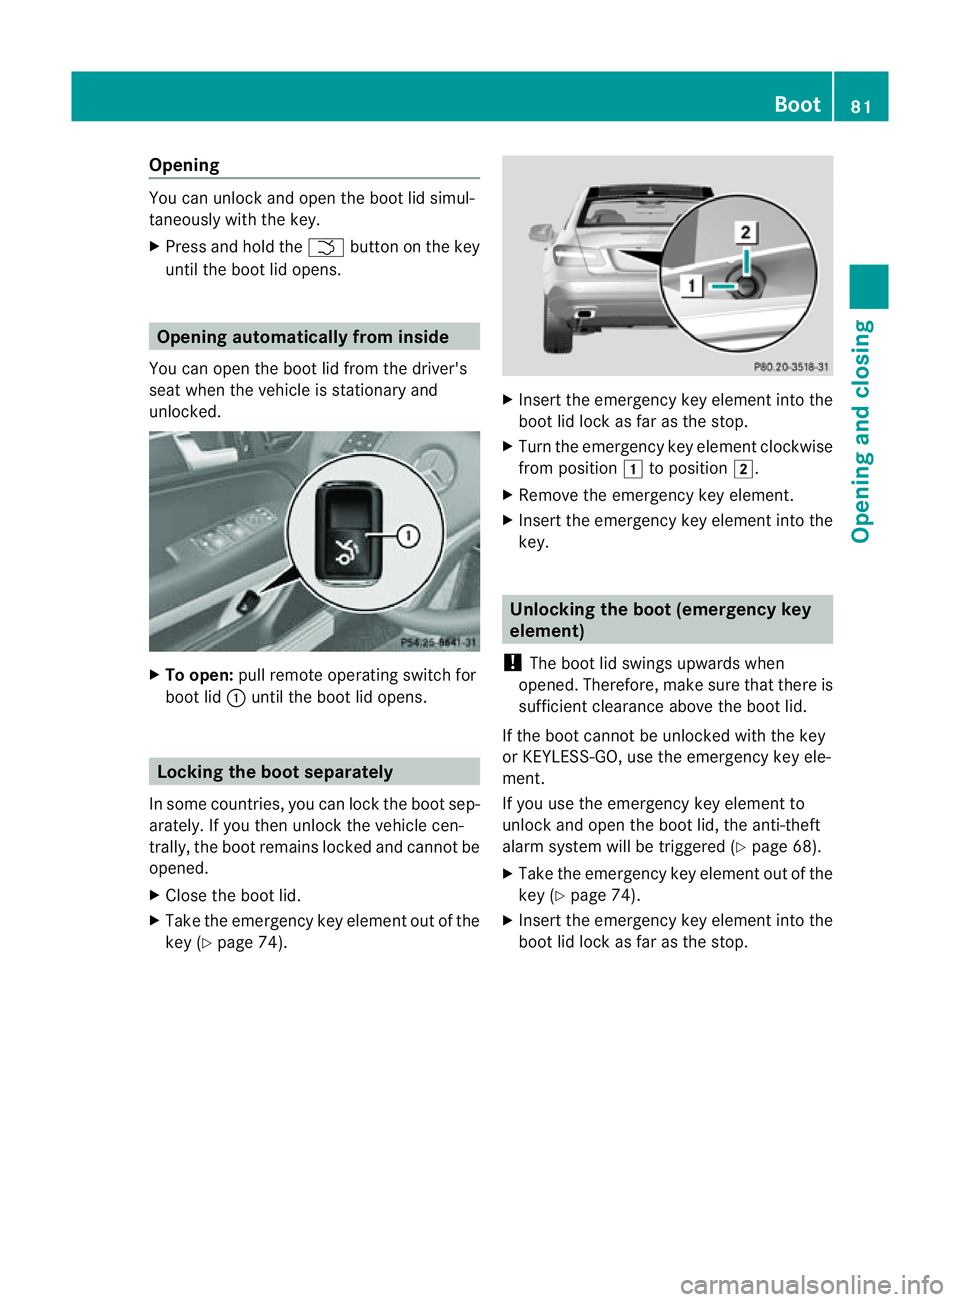
unlocked. X
To open: pull remot eoperatin gswitch for
boot lid :until the boot lid opens. Locking the boot separately
In some countries, you can lock the boot sep-
arately. If you then unlock the vehicle cen-
trally, the boot remains locked and cannot be
opened.
X Close the boot lid.
X Take the emergency key element out of the
key (Y page 74). X
Inser tthe emergency key element into the
boot lid lock as far as the stop.
X Turn the emergency key element clockwise
from position 1to position 2.
X Remove the emergency key element.
X Insert the emergency key element into the
key. Unlocking the boot (emergency key
element)
! The boot lid swings upwards when
opened. Therefore, make sure that there is
sufficient clearance above the boot lid.
If the boot cannot be unlocked with the key
or KEYLESS-GO, use the emergency key ele-
ment.
If you use the emergency key element to
unlock and open the boot lid, the anti-theft
alarm system will be triggered (Y page 68).
X Take the emergency key element out of the
key (Y page 74).
X Insert the emergency key element into the
boot lid lock as far as the stop. Boot
81Opening and closing Z
Page 85 of 353

X
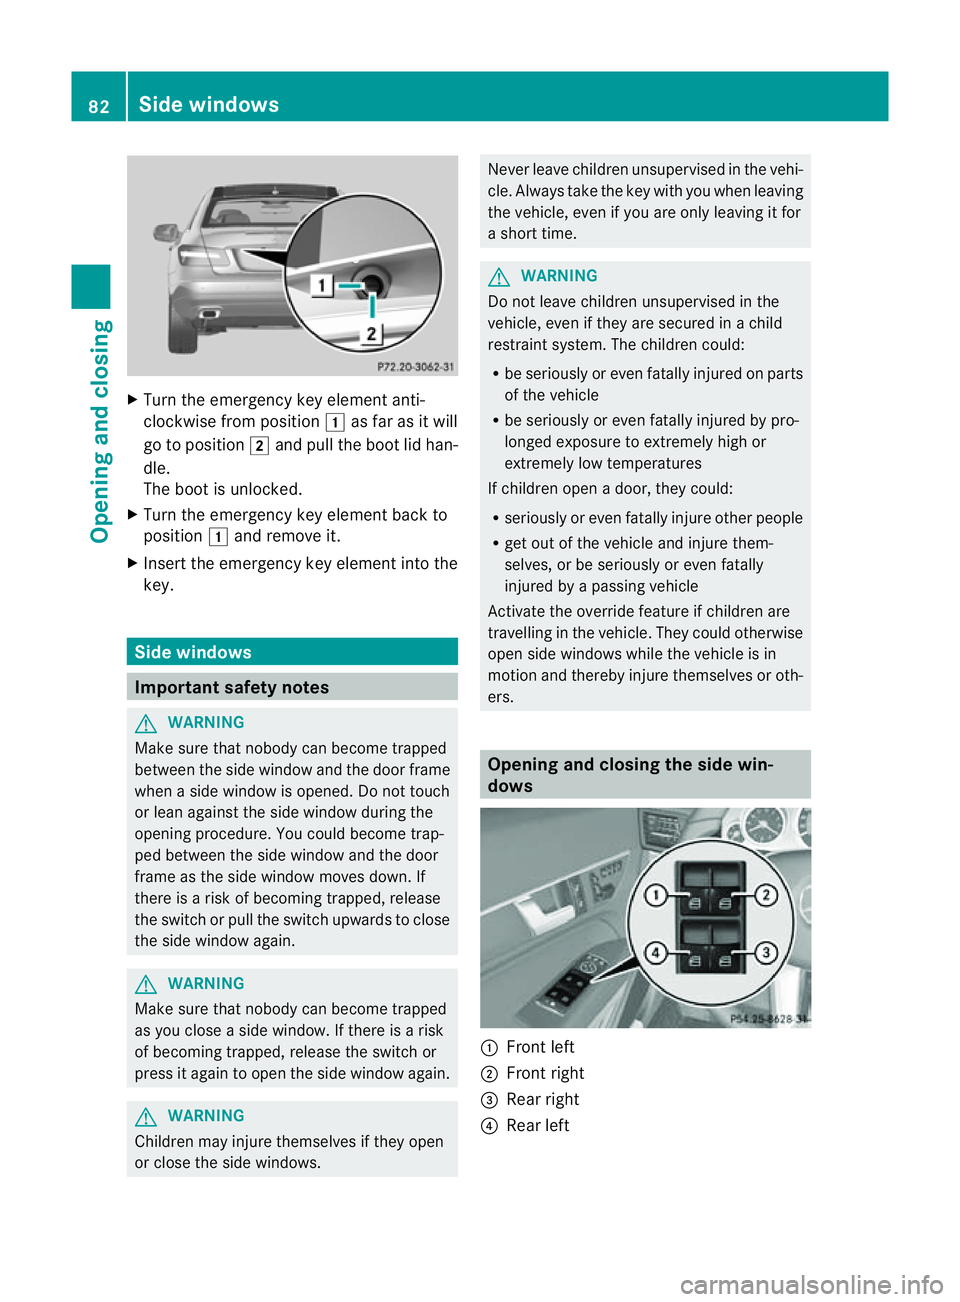
Turn the emergenc ykey element anti-
clockwise from position 1as far as it will
go to position 2and pull the boot lid han-
dle.
The boot is unlocked.
X Turn the emergenc ykey element back to
position 1and remove it.
X Insert the emergenc ykey element into the
key. Side windows
Important safety notes
G
WARNING
Make sure that nobody can become trapped
between the side window and the door frame
when aside window is opened. Do not touch
or lean against the side window during the
opening procedure. You could become trap-
ped between the side window and the door
frame as the side window moves down. If
there is arisk of becoming trapped, release
the switch or pull the switch upwards to close
the side window again. G
WARNING
Make sure that nobody can become trapped
as you close aside window. If there is arisk
of becoming trapped, release the switch or
press it again to open the side window again. G
WARNING
Children may injure themselves if they open
or close the side windows. Never leave children unsupervised in the vehi-
cle. Always take the key with you when leaving
the vehicle, even if you are only leaving it for
as
hort time. G
WARNING
Do not leave children unsupervised in the
vehicle, even if they are secured in achild
restraint system. The children could:
R be seriously or even fatally injured on parts
of the vehicle
R be seriously or even fatally injured by pro-
longed exposure to extremely high or
extremely low temperatures
If children open adoor, they could:
R seriously or even fatally injure other people
R get out of the vehicle and injure them-
selves, or be seriously or even fatally
injured by apassing vehicle
Activate the override feature if children are
travelling in the vehicle. They could otherwise
open side windows while the vehicle is in
motion and thereby injure themselves or oth-
ers. Opening and closing the side win-
dows
:
Frontl eft
; Frontr ight
= Rear right
? Rear left 82
Side windowsOpening and closing
Page 90 of 353

Opening and closing with the key
Important safet ynotes G
WARNING
Make sure nobody can be trapped or injured
by movin gparts such as the soft-top linkage
or soft-top compartment cover when opening
or closing the soft top.
If there is arisk of entrapment ,immediately
release the %or& button on the key.
The soft-top mechanism stops immediately.
Opening and closing i
The key must be close to the driver's door
handle.
X Point the tip of the key at the driver's door
handle.
X To open: press and hold the %button
on the key until the soft top is fully opened.
The Top in operation message appears
in the multifunction display. The seat ven-
tilation is switched on. The rear side win-
dows open.
X To close: press and hold the &button
on the key until the soft top is fully closed.
The Top in operation message appears
in the multifunction display. The soft top
and the side windows close. Closing the soft top manually
If the soft top cannot be closed automatically,
chec kthe following points:
R Is the boot separator engaged
(Y page 92)?
R Are the head restraintsont he rear bench
seats extended?
R Is the boot lid closed?
R Is the on-board voltage sufficient?
Start the engine if necessary.
If automatic operation still does not work, the
soft top can be closed manually.
This work must be performed by two persons. i
Closing the soft top manually is acom-
plex, technically demanding process which
requires agreat deal of force. Only close
the soft top manually in extreme emergen-
cies. In these situations, it is better to get
in touch with aqualified specialist work-
shop, e.g. aMercedes-Ben zService
Centre. G
WARNING
Remove wristwatches and any jewellery such
as rings or bracelets .You could otherwise get
caught, injured and damage the vehicle.
Always grip the soft top at the indicated grip-
ping points when closing the soft top man-
ually.Y ou could otherwise be injured.
X Depress the parking brake.
X Open the side windows.
X Lower the head restraint s(automatically
(Y page 103) or manually (Y page 103)).
X Remove the key from the ignition lock.
X Open the boot.
X Take the two straps out of the vehicle tool
kit (Y page 295).
X Take the hex-socket wrench out of the
Owner's Manual walleta nd keepitwith
you. X
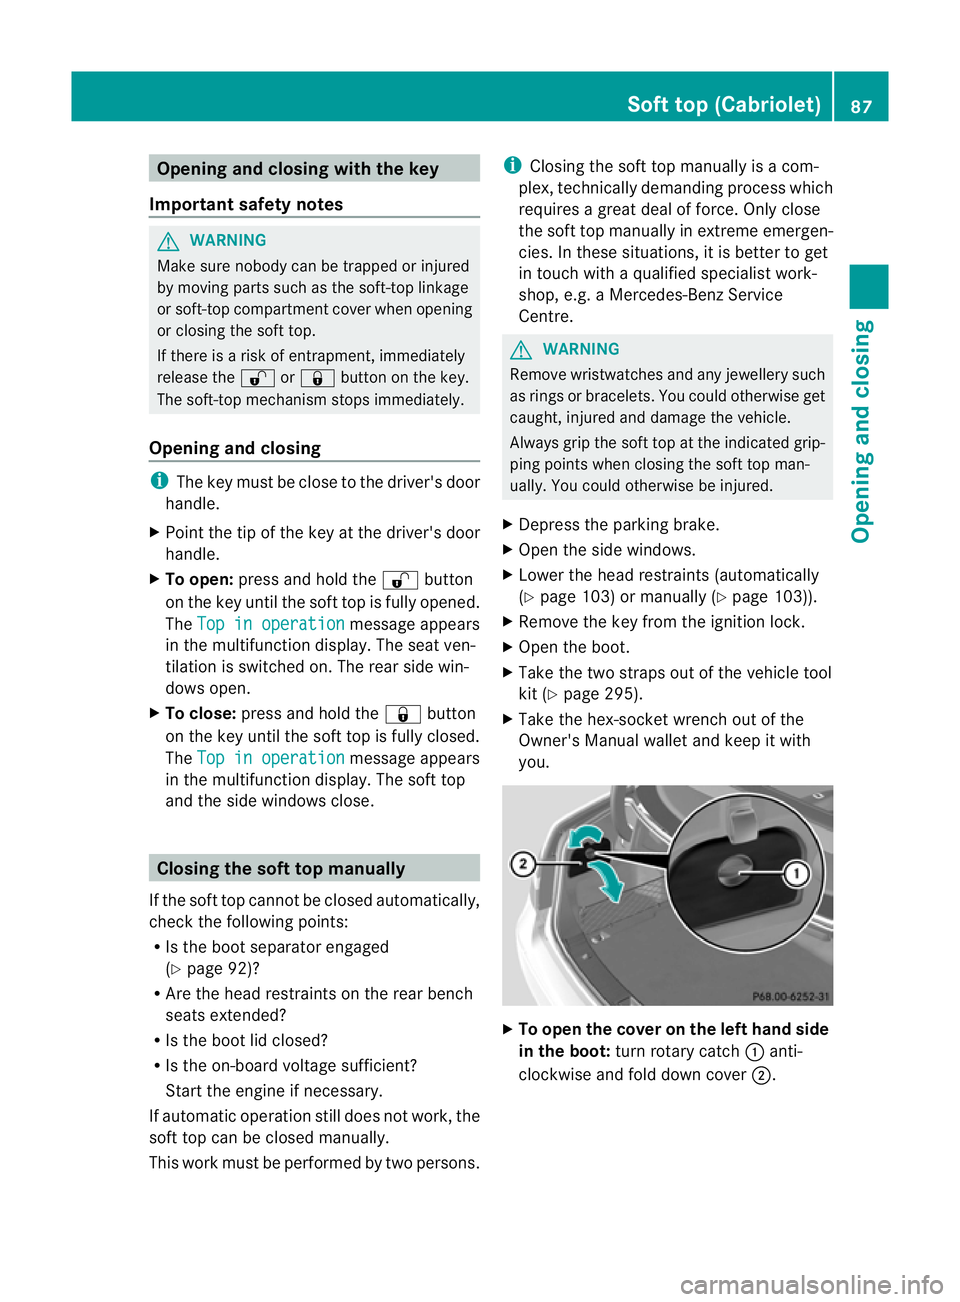
To ope nthe cove ronthe left hand side
in the boot: turn rotary catch :anti-
clockwise and fold down cover ;. Soft top (Cabriolet)
87Opening and closing Z
Page 91 of 353

X
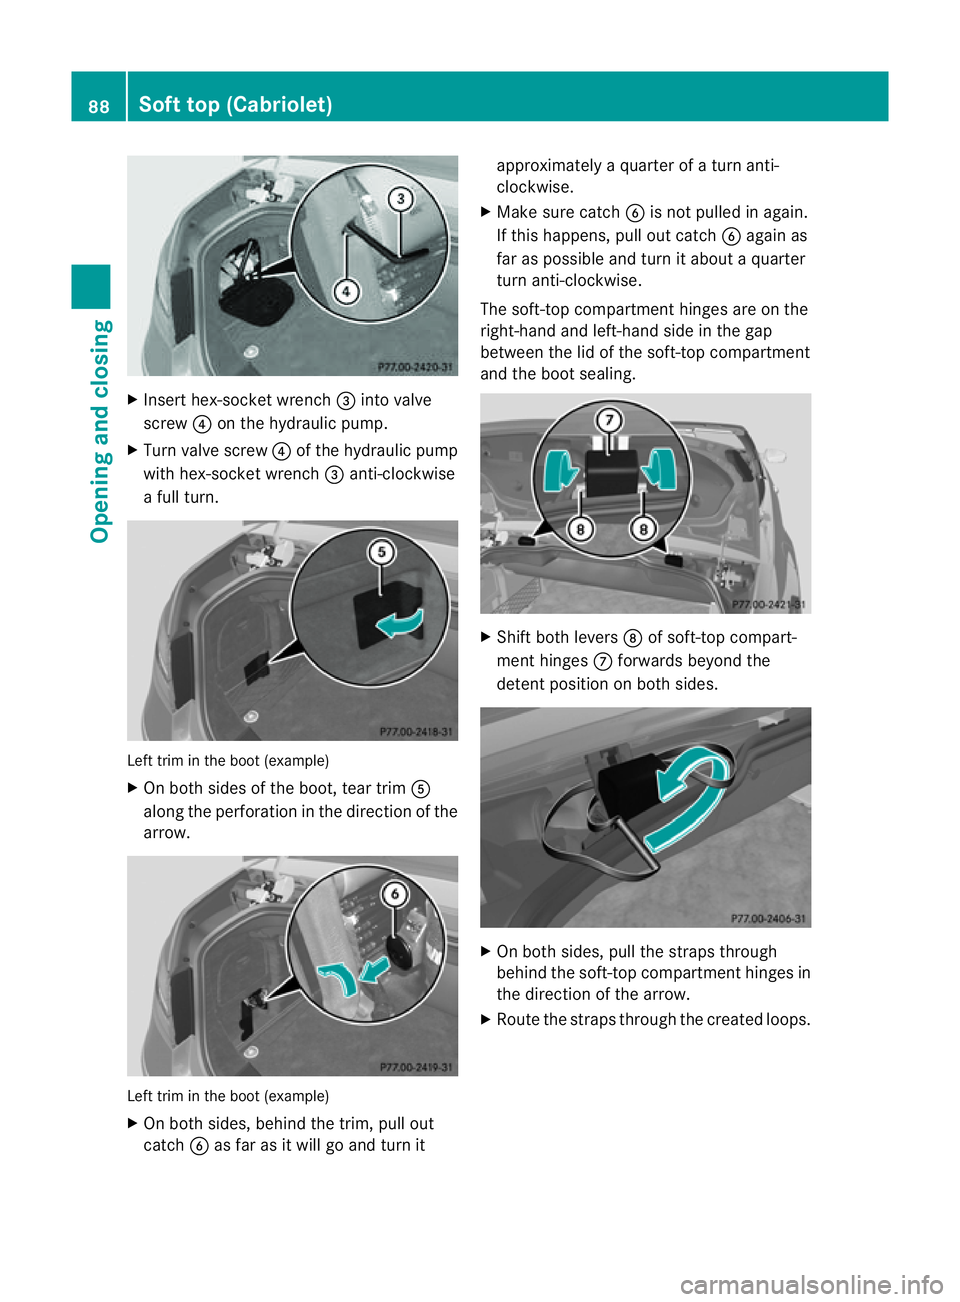
Insert hex-socket wrench =into valve
screw ?on the hydraulicp ump.
X Turn valv escrew ?of th ehydraulic pump
wit hh ex-socke twrench =anti-clockwise
af ull turn. Left trim in the boot (example)
X
On both side softhe boot, tear trim A
along the perforation in the direction of the
arrow. Left trim in the boot (example)
X
On both sides, behind the trim, pullo ut
catch Bas far as it willgoa nd turn itapproximatel
yaquarter of aturn anti-
clockwise.
X Make sure catch Bis not pulled in again.
If this happens, pullo ut catchBagain as
far as possible and turn it about aquarter
turn anti-clockwise.
The soft-top compartment hinges are on the
right-hand and left-hand side in the gap
between the lid of the soft-top compartment
and the boot sealing. X
Shift both levers Dof soft-top compart-
ment hinges Cforwards beyond the
detent position on both sides. X
On both sides, pullt he straps through
behind the soft-top compartment hinges in
the direction of the arrow.
X Route the straps through the created loops. 88
Soft top (Cabriolet)Opening and closing