2011 MERCEDES-BENZ E-CLASS CABRIOLET clock
[x] Cancel search: clockPage 93 of 353

G
WARNING
Do not reach between the cover halves and
the hinges .You could otherwise become trap-
ped.
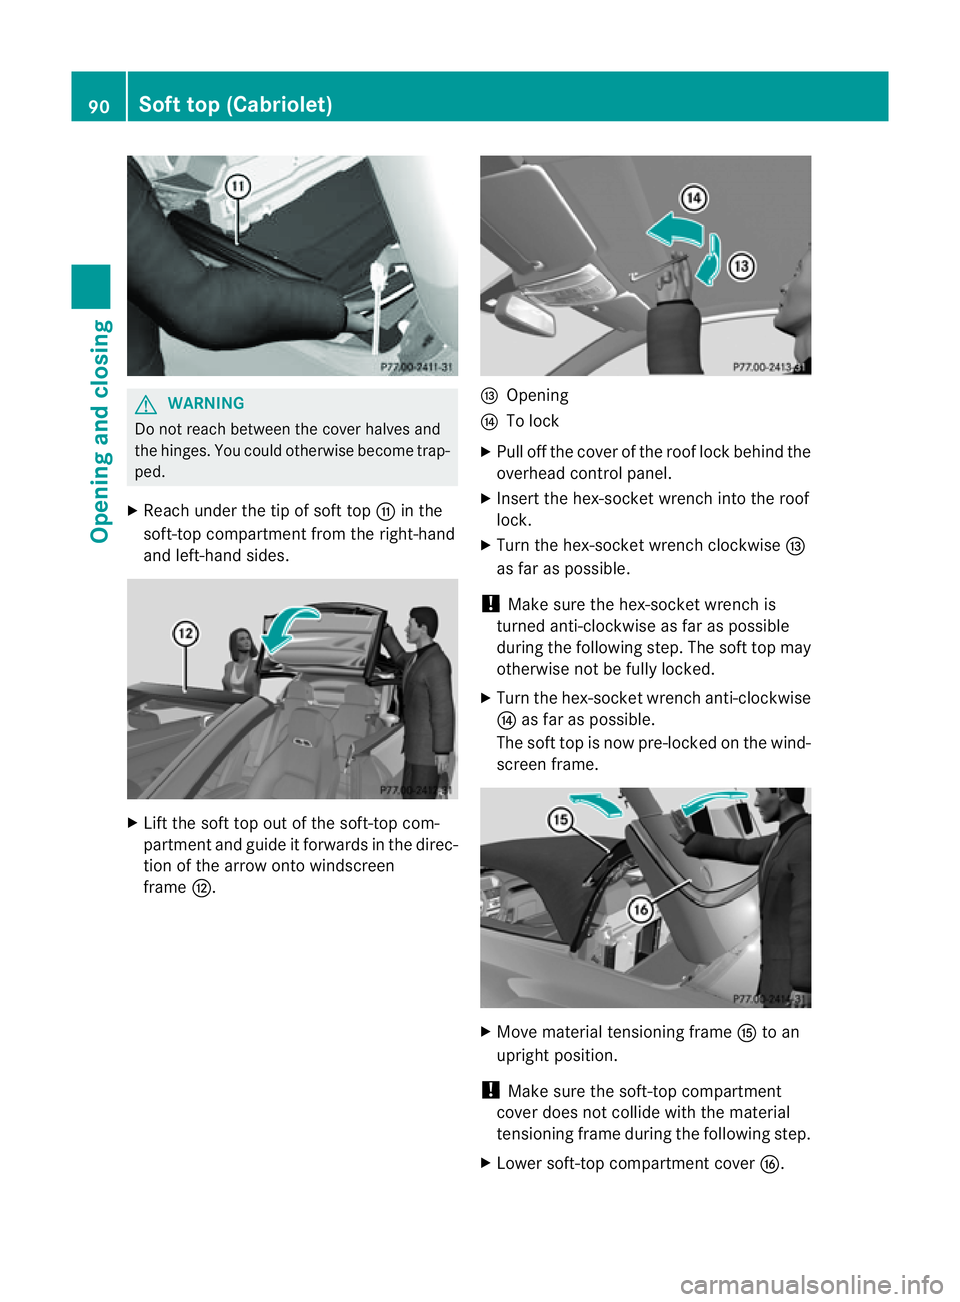
X Reach under the tip of soft top Gin the
soft-top compartment from the right-hand
and left-hand sides. X
Lift the soft top out of the soft-top com-
partment and guide it forwards in the direc-
tion of the arrow ontow indscreen
frame H. I
Opening
J To lock
X Pull off the cover of the roof lock behind the
overhead control panel.
X Insert the hex-socket wrench into the roof
lock.
X Turn the hex-socket wrench clockwise I
as far as possible.
! Make sure the hex-socket wrench is
turned anti-clockwise as far as possible
during the following step. The soft top may
otherwise not be fully locked.
X Turn the hex-socket wrench anti-clockwise
J as far as possible.
The soft top is now pre-locked on the wind-
screen frame. X
Move material tensioning frame Kto an
upright position.
! Make sure the soft-top compartment
cover does not collide with the material
tensioning frame during the following step.
X Lower soft-top compartment cover L.90
Soft top (Cabriolet)Opening and closing
Page 94 of 353

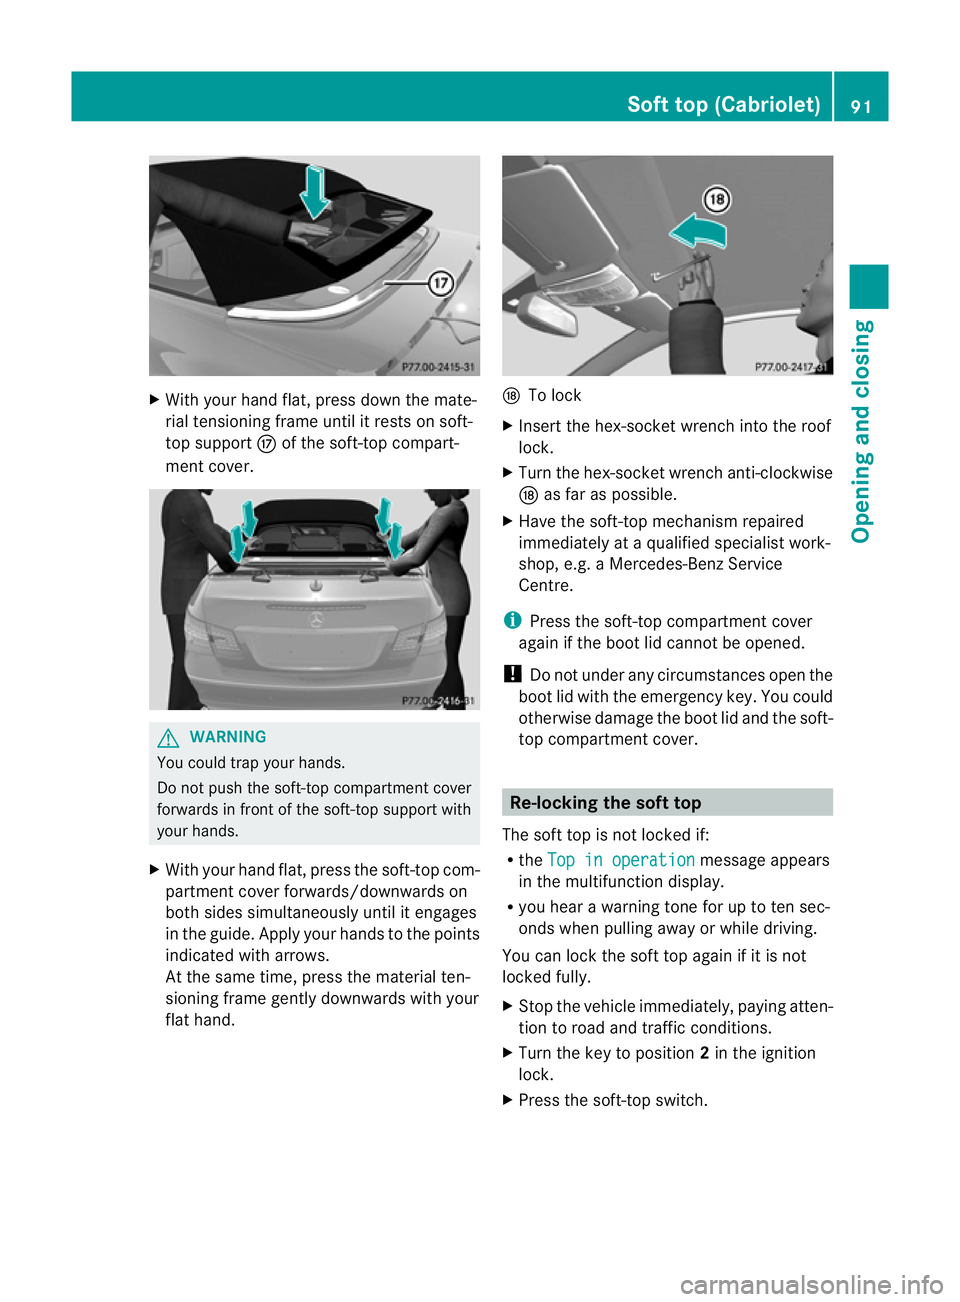
X
With your hand flat, press down the mate-
rial tensioning frame until it rests on soft-
top support Mof the soft-top compart-
ment cover. G
WARNING
You could trap your hands.
Do not push the soft-top compartment cover
forwards in fron tofthe soft-top support with
your hands.
X With your hand flat, press the soft-top com-
partmen tcover forwards/downwards on
both sides simultaneously until it engages
in the guide. Apply your hands to the points
indicated with arrows.
At the same time, press the material ten-
sioning frame gently downwards with your
flat hand. N
To lock
X Insert the hex-socket wrench into the roof
lock.
X Turn the hex-socket wrench anti-clockwise
N as far as possible.
X Have the soft-top mechanism repaired
immediately at aqualified specialist work-
shop, e.g. aMercedes-Benz Service
Centre.
i Press the soft-top compartment cover
again if the boot lid cannot be opened.
! Do not under any circumstances open the
boot lid with the emergenc ykey. You could
otherwise damage the boot lid and the soft-
top compartment cover. Re-locking the soft top
The soft top is not locked if:
R the Top in operation message appears
in the multifunction display.
R you hear awarning tonef or up to ten sec-
onds when pulling away or while driving.
You can lock the soft top again if it is not
locked fully.
X Stop the vehicle immediately, paying atten-
tion to road and traffic conditions.
X Turn the key to position 2in the ignition
lock.
X Press the soft-top switch. Soft top (Cabriolet)
91Opening and closing Z
Page 97 of 353

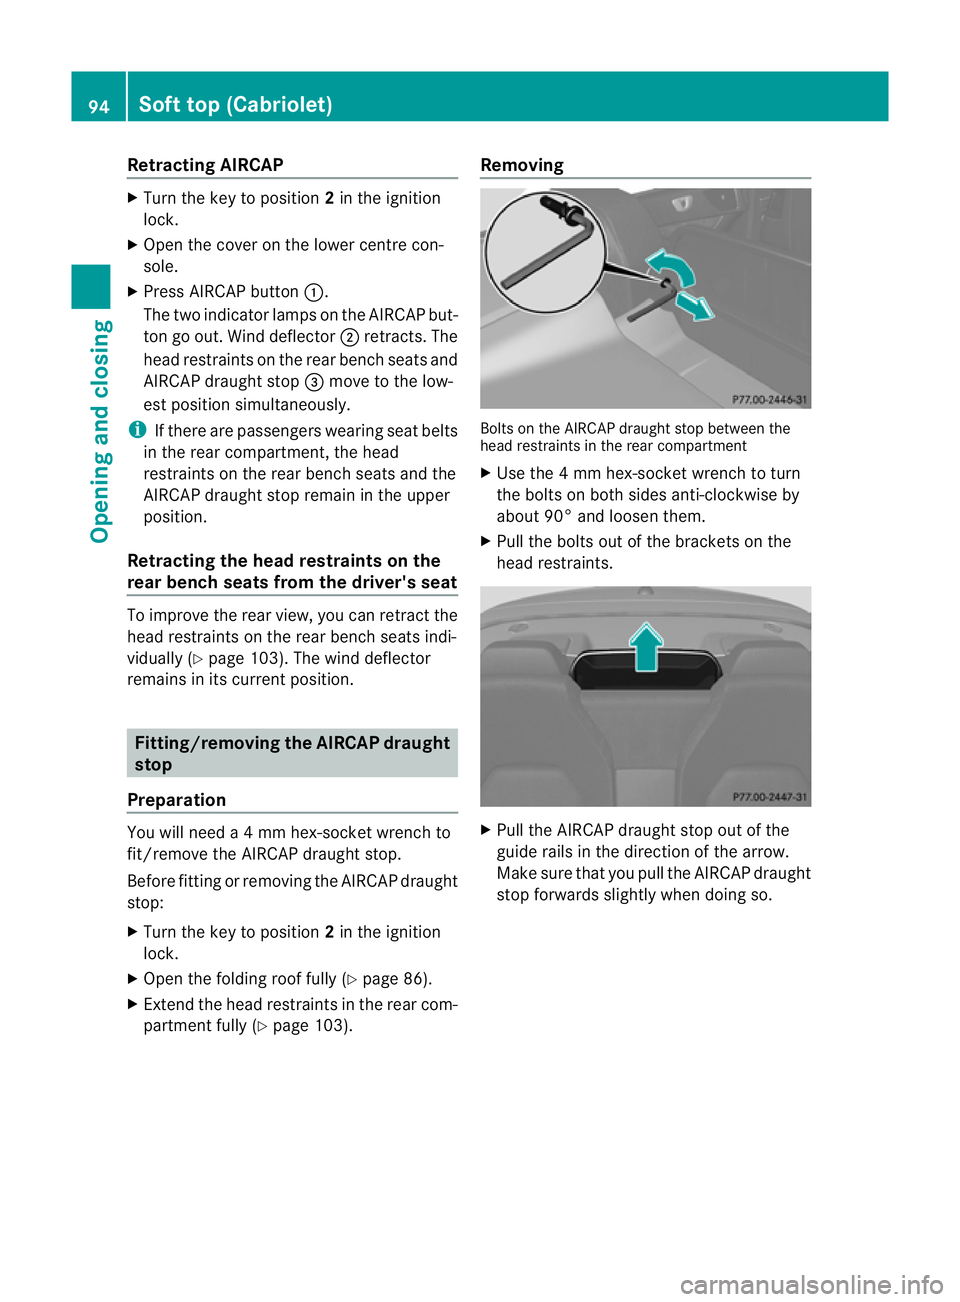
Retracting AIRCAP
X
Turn the key to position 2in the ignition
lock.
X Ope nthe cove ronthe lowe rcentre con-
sole.
X Press AIRCAP button :.
The two indicator lamps on the AIRCAP but-
ton go out. Wind deflector ;retracts. The
hea drestraints on the rea rbenchs eats and
AIRCAP draught stop =move to the low-
est position simultaneously.
i If ther eare passengers wearing seat belts
in the rear compartment ,the head
restraint sonthe rear bench seats and the
AIRCAP draught stop remain in the upper
position.
Retracting the head restraint sonthe
rear bench seats from the driver's seat To improve the rear view, you can retract the
head restraint
sonthe rear bench seats indi-
vidually (Y page 103). The wind deflector
remains in its curren tposition. Fitting/removing the AIRCAP draught
stop
Preparation You will need
a4mmhex-socket wrench to
fit/remove the AIRCAP draught stop.
Before fitting or removing the AIRCAP draught
stop:
X Turn the key to position 2in the ignition
lock.
X Open the folding roof full y(Ypage 86).
X Exten dthe head restraint sinthe rear com-
partment fully (Y page 103). Removing Bolt
sont he AIRCAP draught stop between the
head restraint sinthe rear compartment
X Use the 4mmhex-socket wrenc htoturn
the bolts on both sides anti-clockwise by
about 90° and loosen them.
X Pull the bolts out of the brackets on the
head restraints. X
Pull the AIRCAP draught stop out of the
guide rails in the direction of the arrow.
Make sure that you pull the AIRCAP draught
stop forwards slightly when doing so. 94
Soft top (Cabriolet)Opening and closing
Page 125 of 353

G
WARNING
Bulb sand lights can become very hot. For this
reason, allow them to cool downb efore
changin gthem. Otherwise, you could burn
yourself when you touch them.
Keep bulbs out of the reach of children .Oth-
erwise, the ycould damage them, for example,
and injure themselves.
Never us eabulbw hich ha sbeend ropped.
Suc hab ulbm ayexplode and injure you.
Halogen bulb sarepressurised and could
explode when yo uchange them, especiall yif
the yarever yhot. Yo ushould therefore wear
eye protection and gloves when you are
changing them. Overview of bulb replacement
–bulbs
You can replace the following bulbs. The
details for the bul btype can be found in the
legend. Halogen headlamps
:
Dipped-bea mheadlamps 9
:H755W
; Main-beam headlamp: H7 55 W
= Side lamp/parkin glamp: W5W
? Turn signal lamp 9
:PY21W Bi-xenon headlamps
:
Cornering lamp: H7 55 W Changing the front bulbs
Dipped-beam headlamps (halogen
headlamps) Due to their location, have the bulbs in the
left-hand headlamp changed at
aqualified
specialist workshop, e.g. aMercedes-Benz
Service Centre.
X Switc hoff the lights.
X Open the bonnet.
X Turn housing cover :anti-clockwise and
pull it out.
X Turn bulb holder ;anti-clockwise and pull
it out.
X Take the bulb out of bulb holder ;.
X Inser tthe new bulb into bulb holder ;.
9 Due to their location, have the bulbs in the left-hand headlamp replaced at aqualified specialist workshop,
e.g. aMercedes-Ben zService Centre. 122
Changing bulbsLights and windscreen wipers
Page 126 of 353

X
Insert bulbh older;into the lamp and turn
it clockwise.
X Align housing cover :and turn it clock-
wise until it engages.
Main-beam headlamps (halogen head-
lamps)/cornering lamps (Intelligent
Light System) X
Switch off the lights.
X Open the bonnet.
X Turn housing cover :anti-clockwise and
pullito ut.
X Turn bulbh older;anti-clockwise and pull
it out.
X Take the bulbo ut of bulbholder;.
X Insert the new bulbi nto bulbholder;.
X Insert bulbh older;into the lamp and turn
it clockwise.
X Align housing cover :and turn it clock-
wise until it engages. Side lamps/parking lamps (halogen
headlamps) X
Switch off the lights.
X Open the bonnet.
X Turn housing cover :anti-clockwise and
pullito ut.
X Pullo ut bulbh older;.
X Take the bulbo ut of bulbholder;.
X Insert the new bulbi nto bulbholder;.
X Insert bulbh older;.
X Align housing cover :and turn it clock-
wise until it engages.
Turn signal lamp (halogen headlamps) Due to their location, have the bulbs in the
left-hand headlamp changed at aqualified
specialist workshop, e.g. aMercedes-Benz
Service Centre.
X Switc hoff the lights.
X Open the bonnet.
X Turn bulb holder :anti-clockwise and pull
it out. Changing bulbs
123Lights and windscreen wipers Z
Page 127 of 353

X
Turn the bulb anti-clockwise, applying
slight pressure, and remove it from bulb
holder :.
X Insert the new bulb into bulb holder :and
turn it clockwise.
X Insert bulb holder :into the lamp and turn
it clockwise. Windscreen wipers
Switching the windscreen wipers on/
off
G
WARNING
The windscreen will not longer be wiped prop-
erly if the wiper blades are worn. This could
prevent you from observing the traffic condi-
tions, thereby causing an accident .Replace
the wiper blades twice ayear, ideally in spring
and autumn.
! Do not operate the windscreen wipers
when the windscreen is dry, as this could
damage the wiper blades. Moreover ,dust
that has collected on the windscreen can
scratch the glass if wiping takes place when
the windscreen is dry.
! If the windscreen wipers leave smears on
the windscreen after the vehicle has been
washed in an automatic car wash, this may
be due to wax or other residue. Clean the
windscreen with washer fluid after an auto-
matic car wash. Combination switch
1
$ Windscreen wipers off
2 Ä Intermittentw ipe, low10
3 Å Intermittentw ipe, high11
4 ° Continuous wipe, slow
5 ¯ Continuous wipe, fast
B í Single wipe/ îTo wipe the
windscreen using washer fluid
X Turn the key to position 1or 2in the ignition
lock.
X Turn the combination switch to the corre-
spondin gposition.
! Intermittentw iping with rain sensor :due
to optical influences and the windscreen
becomin gdirty in dry weather conditions,
the windscreen wipers may be activated
inadvertently. This could damage the wind-
screen wiper blades or scratch the wind-
screen.
For this reason, you should alway sswitch
off the windscreen wipers in dry weather.
In the ÄorÅ position ,the appropriate
wiping frequenc yisset automatically accord-
ing to the intensity of the rain. In the Å
position ,the rain sensor is more sensitive
than in the Äposition ,causing the wind-
screen wiper to wipe more frequently.
10 Rain sensor set to low sensitivity.
11 Rain sensor set to high sensitivity. 124
Windscreen wipersLights and windscreen wipers
Page 145 of 353

Setting the centre air vents
:
Centre air vent,l eft
; Centre air vent,r ight
= Centre vent thumbwheel, right
? Centre vent thumbwheel, left
X To open/close: turn thumbwheels =
and ?up or down. Setting the side air vents
X
To open/close: turn thumbwheel =up or
down.
i Side window demister vent :is never
completely shut, even if side air vent ;is
shut. Setting the glove compartment air
vent
When automatic climate control is activated,
the glove compartmen tcan be ventilated, for
instance to cool its contents .The level of air- flow depends on the airflow and air distribu-
tion settings.
!
Close the air vent when heating the vehi-
cle.
At high outside temperatures, open the air
vent and activate the "cooling with air dehu-
midification" function. Otherwise, temper-
ature-sensitive items stored in the glove
compartmentc ould be damaged. :
Air vent thumbwheel
; Air vent
X To open/close: turn thumbwheel :
clockwise or anti-clockwise. Setting the rear-compartment air
vents
Setting the centre vents in the rear com-
partment :
Rear-compartment air vent thumbwheel
; Rear-compartment air vent,r ight142
Adjusting the air ventsClimate control
Page 166 of 353

Refuelling
Fue lfille rflap The fuel filler flap is unlocked or locked auto-
matically when you open or close the vehicle
with the key or using KEYLESS-GO.
The position of the fuel filler cap is displayed
in the instrumen tcluster 8.T he arrow
next to the filling pump indicates the side of
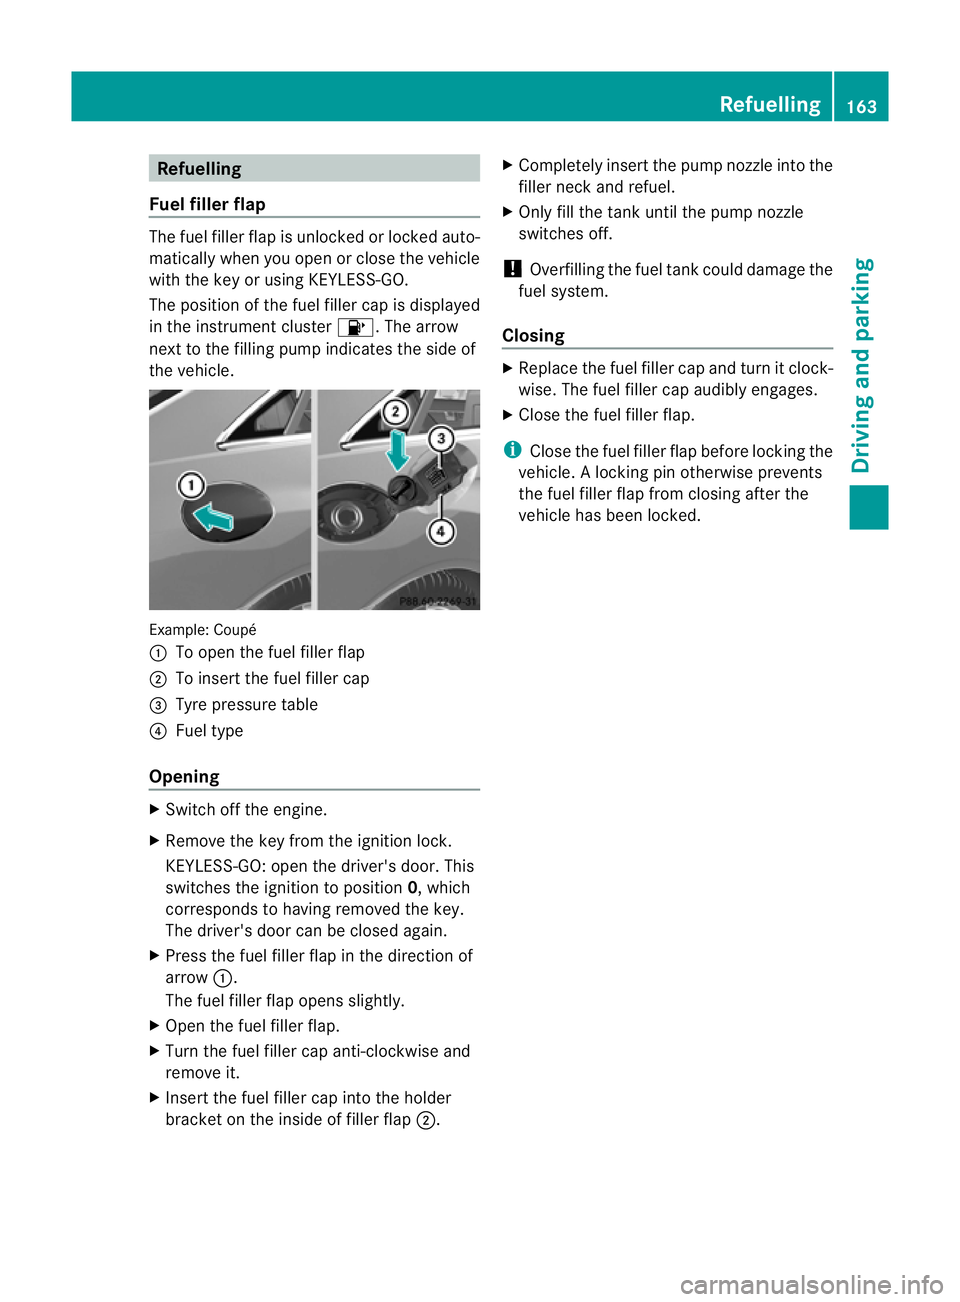
the vehicle. Example: Coupé
:
To open the fuel filler flap
; To insert the fuel filler cap
= Tyre pressure table
? Fuel type
Opening X
Switch off the engine.
X Remove the key from the ignition lock.
KEYLESS-GO: open the driver's door. This
switches the ignition to position 0,which
corresponds to having removed the key.
The driver's door can be closed again.
X Press the fuel filler flap in the direction of
arrow :.
The fuel filler flap opens slightly.
X Open the fuel filler flap.
X Turn the fuel filler cap anti-clockwise and
remove it.
X Insert the fuel filler cap into the holder
bracket on the inside of filler flap ;.X
Completely insert the pump nozzle into the
filler neck and refuel.
X Only fill the tank until the pump nozzle
switches off.
! Overfilling the fuel tank could damage the
fuel system.
Closing X
Replace the fuel filler cap and turn it clock-
wise. The fuel filler cap audibly engages.
X Close the fuel filler flap.
i Close the fuel filler flap before locking the
vehicle. Alockingp in otherwise prevents
the fuel filler flap from closing after the
vehicle has been locked. Refuelling
163Driving and parking Z