2011 MERCEDES-BENZ E-CLASS CABRIOLET Page 183
[x] Cancel search: Page 183Page 35 of 353

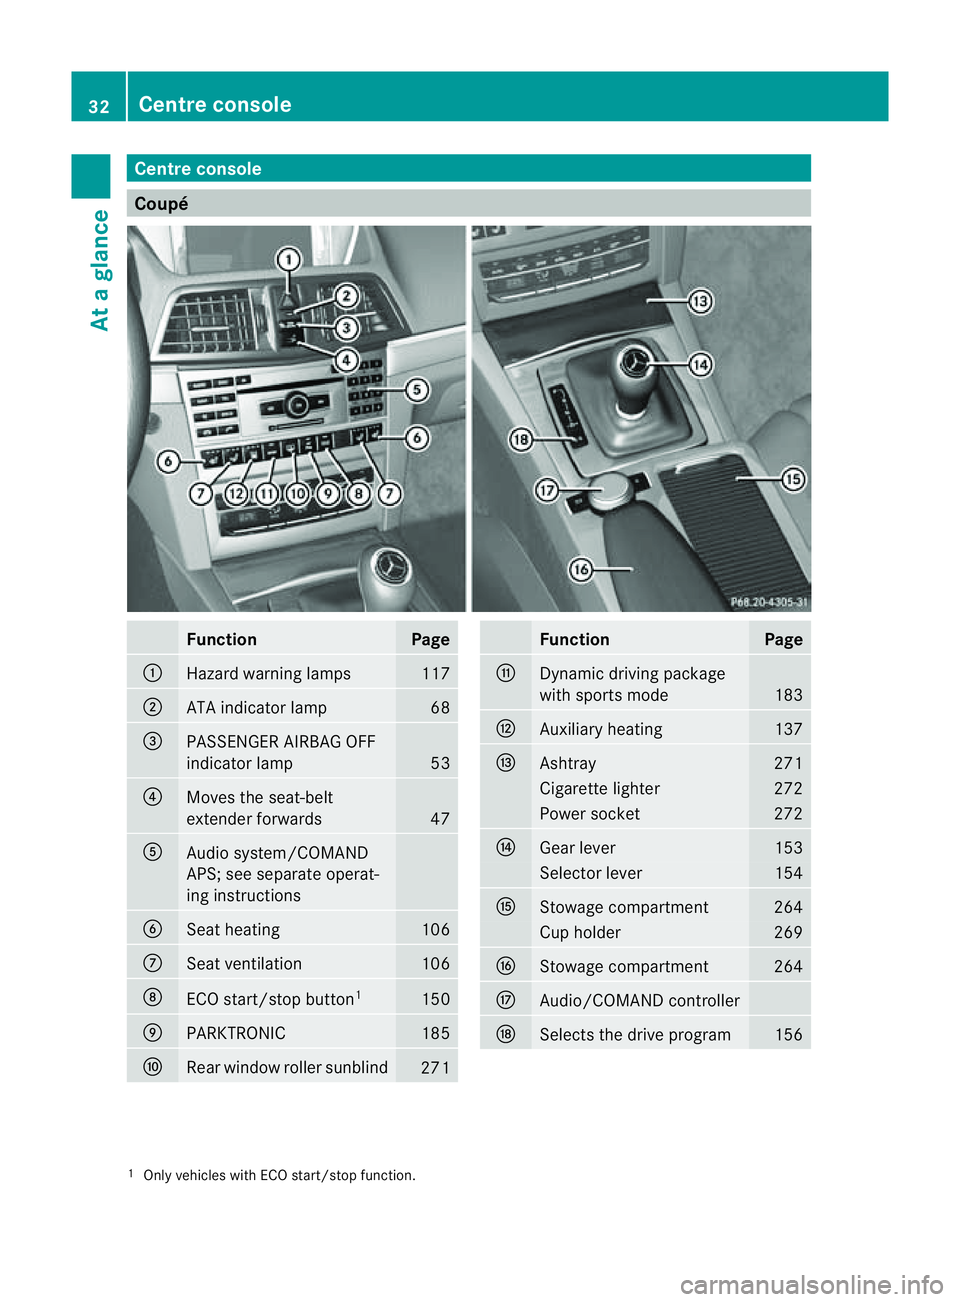
Centre console
Coupé
Function Page
:
Hazard warning lamps 117
;
AT
Ai ndicator lamp 68
=
PASSENGER AIRBA
GOFF
indicator lamp 53
?
Moves th
eseat-belt
extender forwards 47
A
Audi
osystem/COMAND
APS; see separate operat-
ing instructions B
Seat heating 106
C
Seat ventilation 106
D
ECO start/sto
pbutton 1 150
E
PARKTRONIC 185
F
Rear window roller sunblind
271 Function Page
G
Dynamic driving package
wit
hsports mode 183
H
Auxiliary heating 137
I
Ashtray 271
Cigarett
elighter 272
Power socket 272
J
Gear lever 153
Selector lever 154
K
Stowage compartment 264
Cup holder 269
L
Stowage compartment 264
M
Audio/COMAND controller
N
Select
sthe driv eprogram 156
1
Only vehicle swithE CO start/sto pfunction. 32
Centre consoleAt
ag lance
Page 36 of 353

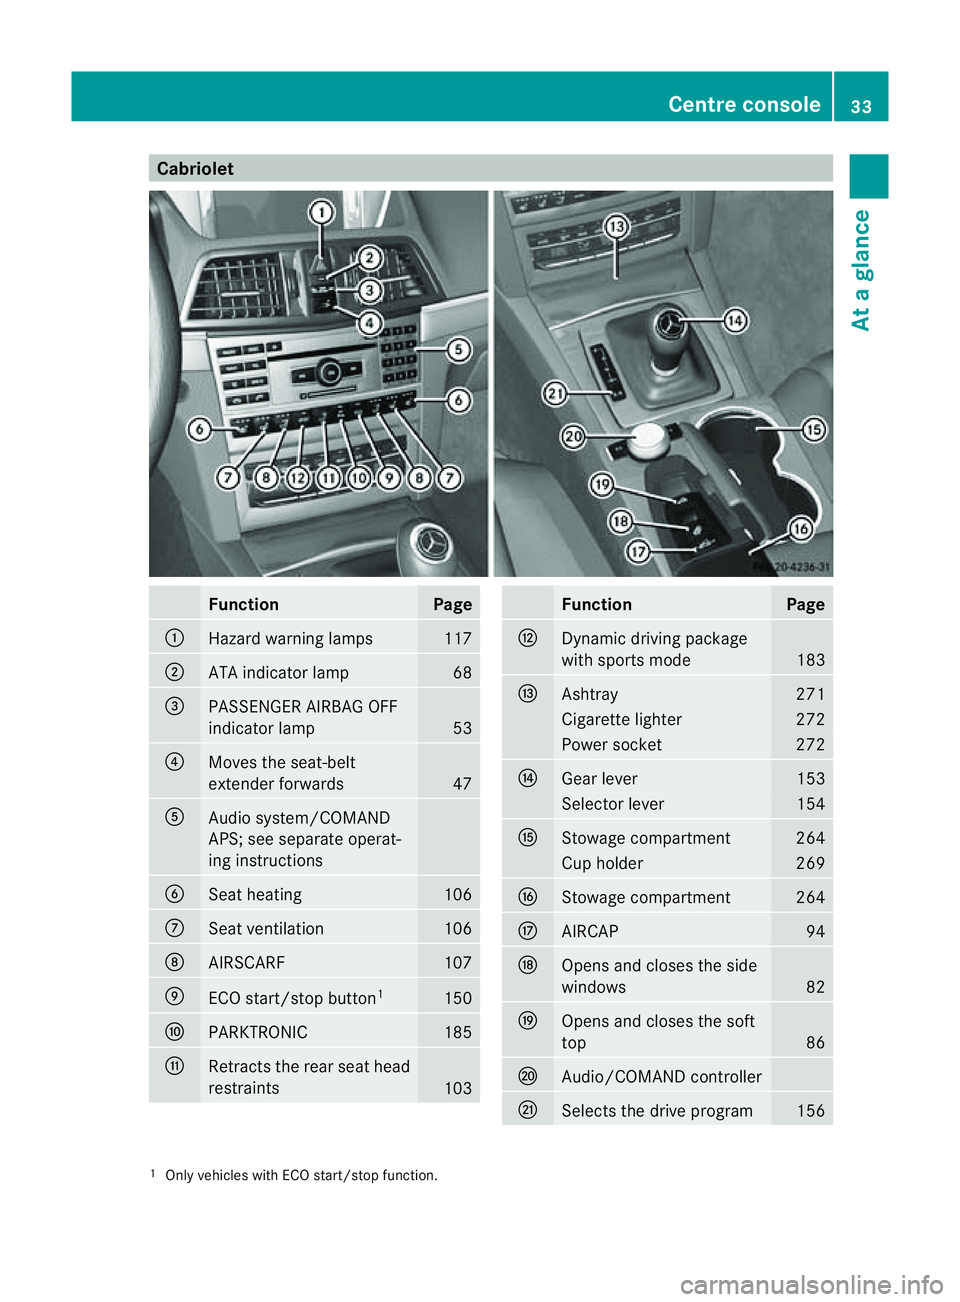
Cabriolet
Function Page
:
Hazard warning lamps 117
;
AT
Ai ndicator lamp 68
=
PASSENGER AIRBA
GOFF
indicator lamp 53
?
Moves th
eseat-belt
extender forwards 47
A
Audi
osystem/COMAND
APS; see separate operat-
ing instructions B
Seat heating 106
C
Seat ventilation 106
D
AIRSCARF 107
E
ECO start/sto
pbutton 1 150
F
PARKTRONIC 185
G
Retracts th
erear seat head
restraints 103 Function Page
H
Dynamic driving package
wit
hsports mode 183
I
Ashtray 271
Cigarett
elighter 272
Power socket 272
J
Gear lever 153
Selector lever 154
K
Stowage compartment 264
Cup holder 269
L
Stowage compartment 264
M
AIRCAP 94
N
Open
sand closes th eside
windows 82
O
Open
sand closes th esoft
top 86
P
Audio/COMAND controller
Q
Select
sthe driv eprogram 156
1
Only vehicle swithE CO start/sto pfunction. Centre console
33Atag lance
Page 184 of 353

G
WARNING
Do not change downf or additional engine
braking on aslippery road surface. This could
cause the drive wheels to lose their grip and
the vehicle could skid.
You can set avariable or permanent limit
speed:
R variable for speed limits, e.g. in built-up
areas
R permanent for long-term speed restric-
tions, e.g. when driving with winter tyres
fitted (Y page 183) G
WARNING
Speedtronic is only an aid designed to assist
driving. You are responsible for the vehicle's
speed and for braking in good time.
i The speed indicated in the speedometer
may differ slightly from the limit speed
stored.
Variable SPEEDTRONIC General notes
With the cruise control lever, you can operate
cruise control or DISTRONIC PLUS and vari-
able SPEEDTRONIC.
The LIM indicator lamp on the cruise control
lever indicates which system you have selec-
ted:
R LIM indicator lamp off: cruise control or
DISTRONIC PLUS is selected.
R LIM indicator lamp on: variable SPEED-
TRONIC is selected.
You can use the cruise control lever to limit
the speed to any speed above 30 km/hw hile
the engine is running. :
To store the current speed or ahigher
speed
; LIM indicator lamp
= To store the current speed or to call up
the last stored speed
? To store the current speed or alower
speed
A To switch between cruise control or DIS-
TRONIC PLUS and variable SPEEDTRONIC
B To deactivate variable SPEEDTRONIC
Selecting variable SPEEDTRONIC
X Check whether LIM indicator lamp ;is on.
If it is on, variable SPEEDTRONIC is already
selected.
If it is not, press the cruise control lever in
the direction of arrow A.
LIM indicator lamp ;in the cruise control
lever lights up. VariableS PEEDTRONIC is
selected. G
WARNING
If there is achange of drivers, advise the new
driver of the limit speed stored.
Only use variable SPEEDTRONIC if you will not
have to accelerate suddenly to aspeed above
that stored as the limit speed. You could oth-
erwise cause an accident.
You can only exceed the limit speed stored if
you deactivate variable SPEEDTRONIC:
R using the cruise control lever
R by depressing the accelerator pedal
beyond the pressure point (kickdown) Driving systems
181Driving and parking
Z
Page 186 of 353

Permanent SPEEDTRONIC
You can use the on-board computer to limit
the speed permanently to avalue between
16 0k m/ h(e.g. for driving on winter tyres)
and th emaximum spee d(Ypage 228).
Shortly before th estoreds peed is reached, it
appears in the multifunction display.
Permanent SPEEDTRONIC remains active,
even if variable SPEEDTRONIC is deactivated.
You cannot exceed the stored limit speed,
even if you depress the accelerator pedal
beyond the pressure point (kickdown). Dynamic handling package with
sports mode
General notes The most important part of the dynamic han-
dling package with sport smode is the adjust-
able suspension system. This automatically
controls and adapts the suspension to the
respective drivin gsituation.
The calibration of the suspension depends
on:
R your drivin gstyle
R the road surface conditions
R your individual selection; see the following
description
If your vehicle is equipped with automatic
transmission ,the dynamic handling package
with sport smode also includes steering
wheel gearshift paddles (Y page 157)with a
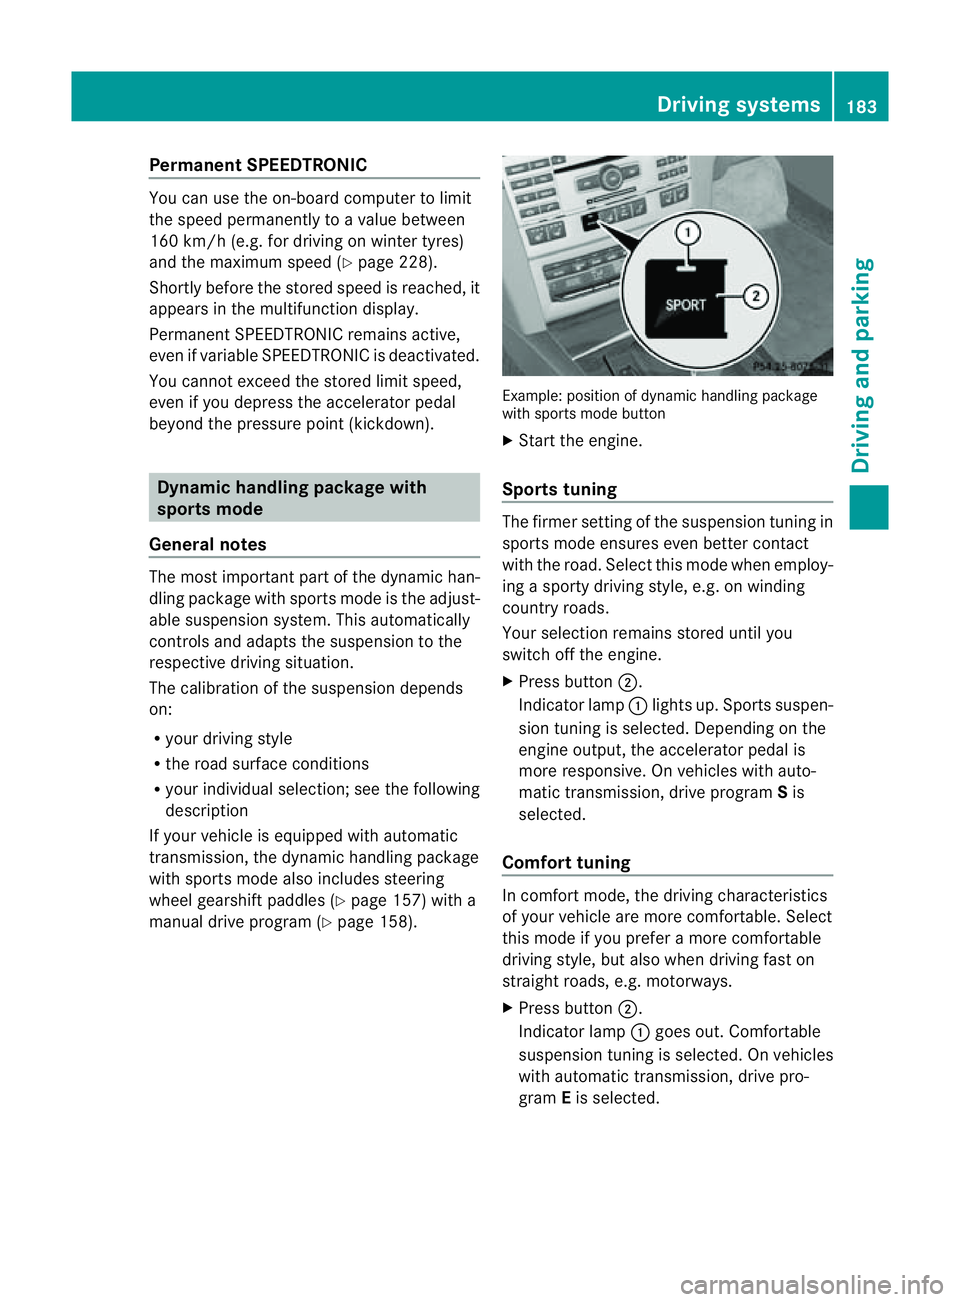
manual drive program (Y page 158). Example: position of dynamic handling package
with sport smode button
X Start the engine.
Sports tuning The firmer setting of the suspension tunin
gin
sport smode ensures even better contact
with the road. Select this mode when employ-
ing asport ydrivin gstyle, e.g. on winding
country roads.
Your selection remains stored until you
switc hoff the engine.
X Press button ;.
Indicator lamp :lights up. Sport ssuspen-
sion tunin gisselected. Depending on the
engin eoutput, the accelerator pedal is
more responsive. On vehicles with auto-
matic transmission ,drive program Sis
selected.
Comfor ttuning In comfort mode, the drivin
gcharacteristics
of your vehicle are more comfortable. Select
this mode if you prefer amore comfortable
drivin gstyle, but also when drivin gfast on
straight roads, e.g. motorways.
X Press button ;.
Indicator lamp :goes out. Comfortable
suspension tunin gisselected. On vehicles
with automatic transmission ,drive pro-
gram Eis selected. Driving systems
183Driving and parking Z
Page 231 of 353

aroun
dthe vehicle are displayed in red in
th em ultifunction display.
X Press the abuttontos ave th esetting.
Deactivating delayed switch-off of th eexte-
rior lighting temporarily:
X Before leaving th evehicle ,turn th ekeyto
position 0in th eignition lock.
X Turn th ekeyto position 2in th eignition
loc ka nd back to position 0.
The exterio rlighting delayed switch-off is
deactivated.
Delayed switch-off of the exterior lighting is
reactivated the nex ttim ey ou start the
engine.
Activating/deactivating th einterior light-
ing delayed switch-off
If you activat ethe Light. delay function,
the interior lighting remain sonfor 20 sec-
onds after you remove the key fro mthe igni-
tion lock.
X Press the =or; button on the steer-
ing wheel to selec tthe Settings menu.
X Press the :or9 button to select the
Light submenu.
X Press the abutton to confirm.
X Press the :or9 button to select the
Light. delay function.
When the Light. delay function is acti-
vated, the vehicle interior is displayed in
red in the multifunction display.
X Press the abutton to save the setting.
Vehicle Setting permanent SPEEDTRONIC
You can set permanent SPEEDTRONIC
(Y page 183) using the Limit speed (win‐ter tyres) function.
X Press the =or; button on the steer-
ing wheel to select the Settings menu.
X Press the :or9 button to select the
Vehicle submenu. X
Press the abutton to confirm.
X Press :or9 to select the Limit speed (winter tyres): function.
You will see the current setting.
X Press the abutton to confirm.
X Press :or9 to adjust permanent
SPEEDTRONIC in increments of 10
(240 km/h to
160 km/h ). The
Off setting
switches permanent SPEEDTRONIC off.
X Press the abutton to store the entry.
Switching the automatic locking feature
on/off
If you select the Automatic door lock func-
tion, the vehicle is centrally locked above a
speed of around 15 km/h.
i For further information on the automatic
locking feature, see (Y page 78).
X Press the =or; button on the steer-
ing wheel to select the Settings menu.
X Press the :or9 button to select the
Vehicle submenu.
X Press the abutton to confirm.
X Press the :or9 button to select the
Automatic door lock function.
When the Automatic door locks func-
tion is activated, the vehicle doors are dis-
played in red in the multifunction display.
X Press the abutton to save the setting.
Activating/deactivating the acoustic
locking confirmation
If you activate the Acoustic Lock function,
an audible signal sounds when the vehicle is
locked or unlocked. When unlocking, the sig-
nal sounds once. When locking, it sounds
three times.
X Press the =or; button on the steer-
ing wheel to select the Settings menu.
X Press the :or9 button to select the
Vehicle submenu.
X Press the abutton to confirm. 228
Menus and submenusOn-board computer and displays
Page 323 of 353

Only winter tyres bearing the
isnowflake
symbol in addition to the M+S marking pro-
vide the best possibleg rip in wintry road con-
ditions. Only these tyres will allowd riving
safety systems such as ABS and ESP ®
to
function optimally in winter, as these tyres
have been designed specificallyf or driving on
snow.
Use M+S tyres of the same make and tread
on all wheels to maintain safe handling char-
acteristics. G
WARNING
M+S tyres with atread depth of less than
4mmm ust be replaced. They are no longer
suitable for winter use and can no longer pro-
vide sufficient grip .This could cause you to
lose control of your vehicle and cause an acci-
dent.
Always observe the maximum permissible
speed specified for the M+S tyres you have
fitted.
If you fit M+S tyres which have alower max-
imum permissible speed than that of the vehi-
cle, affix an appropriate warning sign in the
driver's field of vision. This can be obtained
at aq ualified specialist workshop, e.g. at a
Mercedes-Ben zService Centre.
Under these circumstances, you should also
restrict the maximum speed of the vehicle
using permanent SPEEDTRONIC so that it
does not exceed the maximum permissible
speed for the M+S tyres (Y page 183).
When you have fitted the M+S tyres:
X Check the tyre pressures (Y page 321).
X Restart the tyre pressure loss warning sys-
tem (Y page 322). G
WARNING
If you fit the spare wheel when driving with M
+S tyres, bear in mind that driving stability will
be impaired due to unstable corneringc har-
acteristics caused by the different tyres. You
should therefore adapt your driving style and
drive carefully. Have the spare wheel replaced at the nearest
qualified specialist workshop which has the
necessary specialist knowledge and tools to
carry out the work required. Mercedes-Benz
recommends that you use
aMercedes-Benz
Service Centr efor this purpose. In particular,
work relevant to safety or on safety-related
systems must be carried out at aqualified
specialist workshop. Snow chains
For safety reasons, Mercedes-Benz recom-
mends that you only use snow chains that
have been specially approved for your vehicle
by Mercedes-Benz ,orthat are of acorre-
spondin gstandard of quality.
If you inten dtofit snow chains, please bear
the following point sinmind:
R it is not permissible to attac hsnow chains
to all wheel-tyre combinations; see the
information under "Wheel/tyre combina-
tions" in the "Wheels and tyres" section.
R snow chains must not be fitted to emer-
genc yspare wheels, e.g. a"Minispare"
emergency spare wheel.
R fit snow chains only in pairs and only to the
rear wheels. Observe the manufacturer's
installation instructions.
! Vehicles with steel wheels: if you wish
to fit snow chains to steel wheels, make
sure that you remove the respective
wheels' hubcaps first .The hubcaps may
otherwise be damaged.
Do not exceed the maximum permissible
speed of 50 km/h.
i You may wish to deactivate ESP ®
(Y page 64) when pulling away with snow
chains fitted. This way you can allow the
wheels to spin in acontrolled manner, ach-
ieving an increased driving force (cutting
action). 320
Winter operationWheels and tyres