2011 MERCEDES-BENZ E-CLASS CABRIOLET ECO mode
[x] Cancel search: ECO modePage 49 of 353

G
WARNING
Only use headr estraint covers which have
been tested and approved by Mercedes-Benz
for yourv ehicle model.
The use of non-approved head restraint cov-
ers may preven tNECK-PRO head restraints
from triggering properly. Consequently, the
NECK-PRO head restraints cannot provide the
intended level of protection.
Consult aMercedes-Benz Service Centre
regarding availability.
If the NECK-PRO head restraint shave been
triggered in an accident, reset the NECK-PRO
head restraint sonthe driver’s and front-
passenger seat (Y page 46). Otherwise, the
additional protection will not be available in
the event of another rear-en dcollision. You
can recognise when NECK-PRO head
restraint shave been triggered by the fact that
they have moved forwards and can no longer
be adjusted. Resetting triggered NECK-PRO head
restraints
Following arear-en dcollision, Mercedes-
Benz recommends that you have NECK-PRO
head restraint schecked at aqualified spe-
cialist workshop, e.g. aMercedes-Benz
Service Centre.
i Resetting the NECK-PRO head restraints
requires alot of strength. If you have diffi-
culty resetting the NECK-PRO head
restraints, have this work carried out at a
qualified specialist workshop, e.g. a
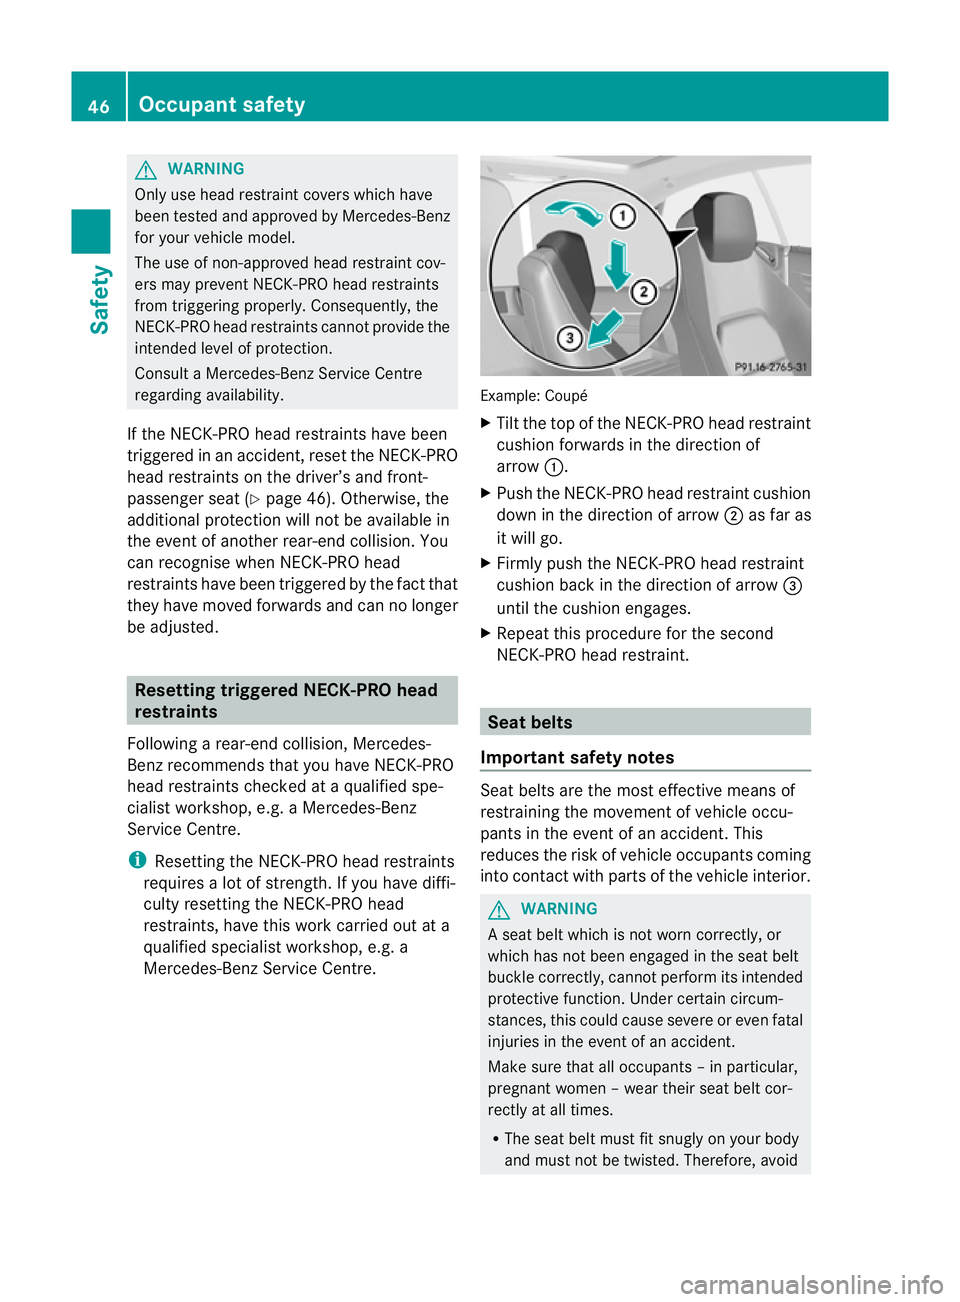
Mercedes-Benz Service Centre. Example: Coupé
X
Tilt the top of the NECK-PRO head restraint
cushion forwards in the direction of
arrow :.
X Push the NECK-PRO head restraint cushion
down in the direction of arrow ;as far as
it will go.
X Firmly push the NECK-PRO head restraint
cushion back in the direction of arrow =
until the cushion engages.
X Repeat this procedure for the second
NECK-PRO head restraint. Seat belts
Important safety notes Seat belts are the most effective means of
restraining the movemen
tofvehicle occu-
pants in the event of an accident. This
reduces the risk of vehicle occupant scoming
into contact with parts of the vehicle interior. G
WARNING
As eat belt which is not worn correctly, or
which has not been engaged in the seat belt
buckle correctly, cannot perform its intended
protective function .Under certain circum-
stances, this could cause severe or even fatal
injuries in the event of an accident.
Make sure that all occupant s–inparticular,
pregnan twome n–w ear their seat belt cor-
rectly at all times.
R The seat belt must fit snugly on your body
and must no tbetwisted. Therefore, avoid 46
Occupant safetySafety
Page 112 of 353

thereb
yunintentionall yactivate the EASY-
ENTRY/EXIT featur eand become trapped.
Positio nofthe steering whee lwhent he
EASY-ENTRY/EXI Tfeatur eisactive The steerin
gwheel tilts upwards if you:
R remove the key from the ignition lock
R open the driver's door and the key is in
position 0or 1in the ignition lock
i The steerin gwheel only moves upwards if
it has not already reached the upper end
stop.
If you insert the key into the ignition lock with
the driver's door closed, the steerin gwheel is
automatically moved to the previously set
position.
Position of the steering wheel for driv-
ing The steerin
gwheel is moved to the previously
set position if:
R the driver's door is closed
R you insert the key into the ignition lock
or
R you press the Start/Stop button onceon
vehicles with KEYLESS-GO.
If you close the driver's door with the key
inserted into the ignition lock, the steering
wheel is automatically moved to the previ-
ously set position.
The last position of the steerin gwheel is
stored after each manual setting or when you
stor ethe setting with the memory function
(Y page 112).
Crash-responsive EASY-EXIT feature If the crash-responsive EASY-EXIT feature is
triggered in an accident ,the steerin gcolumn
will move upwards when the driver's door is
opened. This occurs irrespective of the posi-
tion of the key in the ignition lock. This makes
it easier to exit the vehicle and rescue the
occupants. The crash-responsive EASY-EXIT feature is
only operational if the EASY-EXIT/ENTRY fea-
ture is activated in the on-board computer. Mirrors
Rear-view mirror
Rear-view mirror (manual anti-dazzle) X
Anti-dazzle mode: flick anti-dazzle
switch :forwards or back. Exterior mirrors
Adjusting the exterior mirrors G
WARNING
The exterior mirrors reduce the size of the
image. Objects are actually closer than they
appear. You could misjudge the distanc efrom
vehicles driving behind and cause an acci-
dent ,e.g. when changin glane. For this rea-
son ,makes ure of th eactual distanc efromt he
vehicle driving behin dbyglancingovery our
shoulder.
The convex exterior mirrors provide alarger
field of vision.
The exterior mirrors are automatically heated
if the rear window heating is switched on and
the outside temperature is low. Mirrors
109Seats, steering wheel and mirrors Z
Page 114 of 353

Automati
canti-dazzle mirrors G
WARNING
If inciden tlight fro mheadlamps is prevented
from striking the sensor in the rear-view mir-
ror, for instance, by luggage piled too high in
the vehicle, the mirror's automatic anti-dazzle
function will not operate.
Incident light could then blind you. This may
distrac tyou from the traffic conditions and,
as aresult, you may cause an accident.
The rear-view mirror and the exterior mirror
on the driver's side automatically go into anti-
dazzle mode if the ignition is switched on and
inciden tlight fro mheadlamps strikes the sen-
sor in the rear-view mirror.
The mirror sdonot go intoa nti-dazzle mode if
revers egear is engaged. Parking position for the exterior mir-
ror on the front-passenger side
Setting and storing the parking position You can position the front-passenger side
exterior mirror in such away that you can see
the rear wheel on that side as soon as you
engage revers egear. You can stor ethis posi-
tion. X
Make sure that the vehicle is stationary and
that the key is in position 2in the ignition
lock.
X Press button ;for the exterior mirror on
the front-passenger side. X
Engage revers egear.
The exterior mirror on the front-passenger
side moves to the preset parkin gposition.
X Use adjustment button =to adjust the
exterior mirror to aposition that allows you
to see the rear wheel and the kerb.
The parkin gposition is stored.
i If you shift the transmission to another
position ,the exterior mirror on the front-
passenger side return stothe driving posi-
tion.
i You can also stor ethe parkin gposition
using memory button M?.
X Make sure that the key is in position
2in the ignition lock.
X With the exterior mirror on the front-
passenger side activated, use adjust-
ment button =to adjust the exterior
mirror to aposition which allows you
to see the rear wheel and the kerb.
X Press memory button M? and one of
the arrows on adjustment button =
within three seconds.
The parkin gposition is stored if the
exterior mirror does not move.
If the mirror moves out of position ,repeat
the steps.
Calling up astore dparking position set-
ting X
Tur nthe key to position 2in the ignition
lock.
X Adjust the exterior mirror on the front-
passenger side with the corresponding but-
ton (Y page 109).
X Engage reverse gear.
The exterior mirror on the front-passenger
side moves to the stored parking position. Mirrors
111Seats, steering wheela nd mirrors Z
Page 117 of 353

Useful information
i This Owner's Manual describes all models
and all standard and optional equipment
available to your vehicle at the time of pub-
lication of the Owner's Manual. Country-
specific deviation sare possible. Please
not ethat your vehicle may not be equipped
with all feature sdescribed. This also
applies to safety-relevan tsystems and
functions.
i Pleas ereadt he information on qualified
specialist workshop s(Ypage 22). Exterior lighting
Important safet
ynotes
Fo rreasons of safety, Mercedes-Benzr ecom-
mends that you drive with the lights switched
on even during the daytime. In some coun-
tries, operation of the headlamps varies due
to legal requirement sand self-imposed obli-
gations. Notes on driving abroad
Convert to symmetrical dipped beam
when driving abroad: switch the headlamps
to symmetrical dipped beam in countries in
which traffic drives on the opposite side of the
road to the country where the vehicle is reg-
istered. This prevents glare to oncoming traf-
fic. Symmetrical lights do not illuminate as
large an area of the edge of the carriageway.
Convert the headlamps as close to the border
as possible before driving in these countries
(Y page 227).
Convert to asymmetrical dipped beam
after returning: convert the headlamps back
to asymmetrical dipped beam as soon as pos-
sible after crossing the border when returning
(Y page 227). If the headlamps are converted to symmetri-
cal dipped beam, the "motorway mode" and
"extended range foglamps" function
s(Intelli-
gent Light System )are not available. Light switch
Operation 1W
Left-hand parkin glamps
2X Right-hand parkin glamps
3T Side lamps, licenc eplate and instru-
ment cluster lighting
4Ã Automatic headlamp mode/daytime
driving lights
5L Dipped-beam/main-beam head-
lamps
BR Rear foglamp
CN Foglamps 7
The turn signals, main-beam headlamps and
the headlamp flasher are operated using the
combination switch (Y page 116).
! Switc hoff the side lamps and parking
lamp when you leave the vehicle. This pre-
vent sthe batter yfrom discharging.
The exterior lighting (except the side lamps/
parkin glamps) switches off automatically if
you:
R remove the key from the ignition lock
R open the driver's door with the key in posi-
tion 0
7 Only vehicles with fron tfoglamps have the "Foglamps" function. 114
Exterior lightingLights and windscree
nwipers
Page 121 of 353

Intelligen
tLight System
Active light function The active light function is
asyste mthat
moves the headlamps according to the steer-
ing movementsoft he front wheels. In this
way,r elevant areas remain illuminated while
driving. This allowsy ou to recognise pedes-
trians, cyclists and animals.
Active: when the lights are switched on.
Cornering light function The cornering light function improves the illu-
mination of the road over
awide angle in the
direction you are turning, enabling better vis-
ibility in tight bends, for example. It can only
be activated when the dipped-beamh ead-
lamps are switched on.
Active: if you are driving at speeds below
40 km/ha nd switch on the indicator lamp or
tur nthe steering wheel.
Not active: if you are driving at speeds above
40 km/h or switch off the turn signal or turn the steering wheel to the straight-ahead posi-
tion.
The cornering light function may remain lit for
as
hort time, but is automatically switched off
after no more than three minutes.
Motorway mode Motorway mode increases the range of the
beam.
Active:
R
if you are driving at speeds above
110 km/h and do not make any large steer-
ing movementsf or 1,000 m
R if you are driving at speeds above
130 km/h
Not active: if you are driving at speeds below
80 km/h following activation
Extended range foglamps The extended range foglamps reduce the
glare experienced by the driver and improve
the illumination of the edge of the carriage-
way.118
Exterior lightingLights and windscreen wipers
Page 131 of 353

Useful information
i This Owner's Manual describes all models
and all standard and optional equipment
available to your vehicle at the time of pub-
lication of the Owner's Manual. Country-
specific deviation sare possible. Please
not ethat your vehicle may not be equipped
with all feature sdescribed. This also
applies to safety-relevan tsystems and
functions.
i Pleas ereadt he information on qualified
specialist workshop s(Ypage 22). Overview of climat
econtro lsystems Important safet
ynotes G
WARNING
Observ ethe setting srecommended on the
following pages. Otherwise ,the windows
could mist up. This may obstruct your view of
the traffic situation and, as aresult ,you may
cause an accident.
THERMATIC/THERMOTRONIC automatic cli-
mate control controls the temperature and
the humidit yofthe vehicle interior and filters
out undesirable substances fro mthe air.
THERMATIC/THERMOTRONIC automatic cli-
mate control is only operational when the
engine is running. 12
i Ventilate the vehicle for abrief period
during warm weather, e.g. using the con-
venience opening feature (Y page 83). This
will speed up the cooling process and the
desired vehicle interior temperature will be
reached more quickly.
i The integrated filter can filter out most
particles of dust and completely filters out
pollen. Aclogged filter reduces the amount
of air supplied to the vehicle interior .For
this reason, you should always observe the interval for replacing the filter, which is
specified in the Servic
eBooklet .Asit
depends on environmental conditions, e.g.
heavy air pollution, the interval may be
shorter than stated in the Service Booklet.
i It is possible that the residualh eat func-
tion may be activated automaticallyanh our
after the key is removed. The vehicle is then
ventilated for 30 minutes to dry the air-
conditioning system.
12 THERMOTRONIC automatic climate control: the residualh eat function can only be activated/deactivated
when the ignition is switched off. 128
Overview of climatec
ontrol systemsClimatecontrol
Page 132 of 353

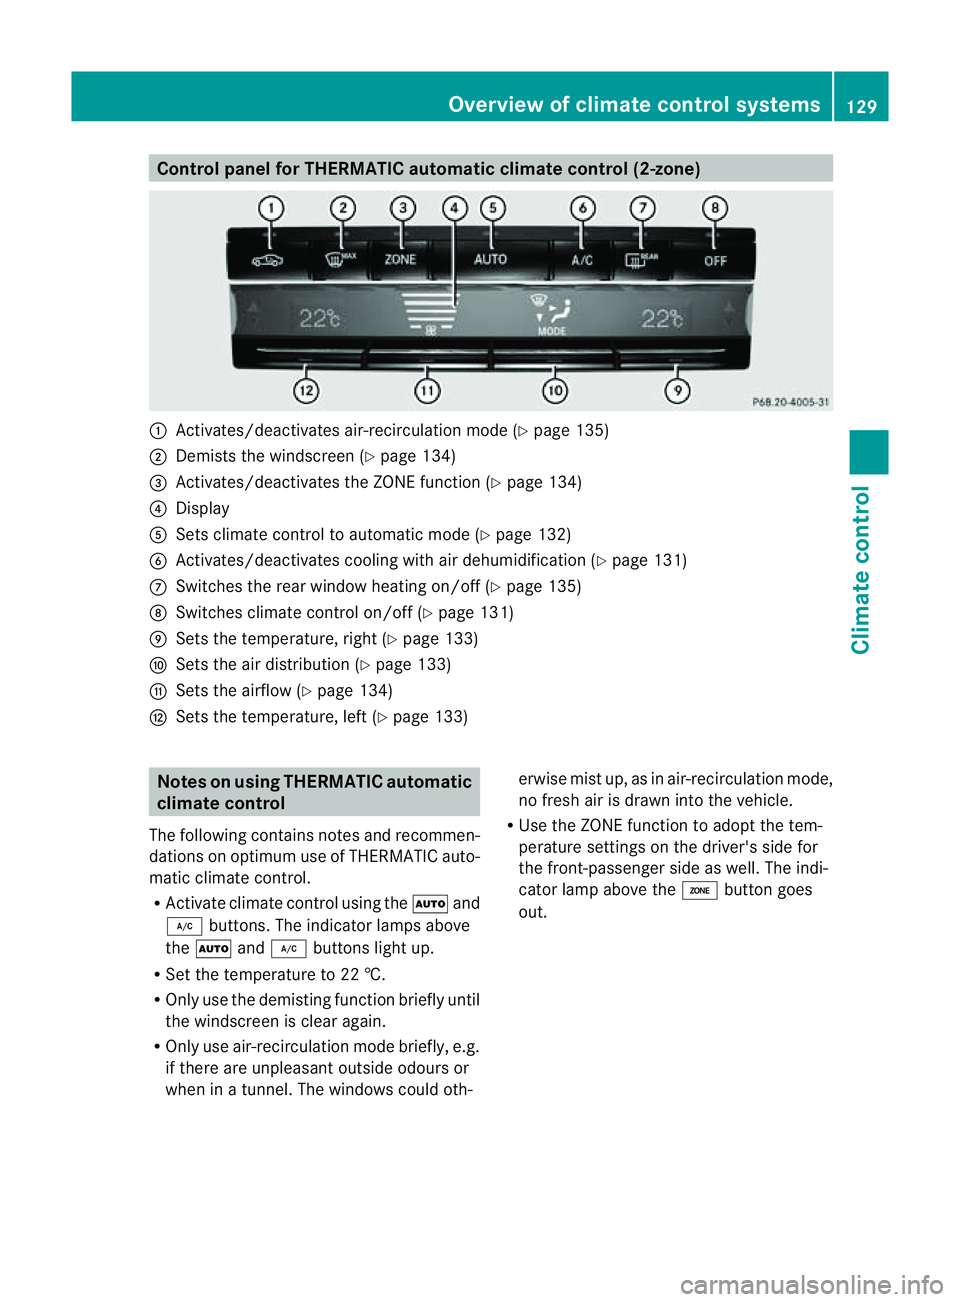
Control panel for THERMATIC automatic climat
econtrol (2-zone) :
Activates/deactivate sair-recirculation mod e(Ypage 135)
; Demists th ewindscree n(Ypage 134)
= Activates/deactivate sthe ZONE function (Y page 134)
? Display
A Setsclimate control to automatic mod e(Ypage 132)
B Activates/deactivates coolin gwith air dehumidification ( Ypage 131)
C Switches the rear window heatin gon/off (Y page 135)
D Switches climate control on/off (Y page 131)
E Setsthe temperature, right (Y page 133)
F Setsthe air distribution (Y page 133)
G Setsthe airflow (Y page 134)
H Setsthe temperature, left (Y page 133)Notes on using THERMATIC automatic
climate control
The followin gcontain snotes and recommen-
dation sonoptimum use of THERMATI Cauto-
matic climate control.
R Activate climate control using the Ãand
¿ buttons .The indicator lamps above
the à and¿ buttons light up.
R Set the temperature to 22 †.
R Only use the demisting function briefly until
the windscreen is clear again.
R Only use air-recirculation mode briefly, e.g.
if there are unpleasant outside odours or
when in atunnel. The windows could oth- erwise mist up, as in air-recirculation mode,
no fresh air is drawn into the vehicle.
R Use the ZONE function to adopt the tem-
perature settings on the driver's side for
the front-passenger side as well. The indi-
cator lamp above the ábutton goes
out. Overview of climate control systems
129Climatecontrol Z
Page 133 of 353

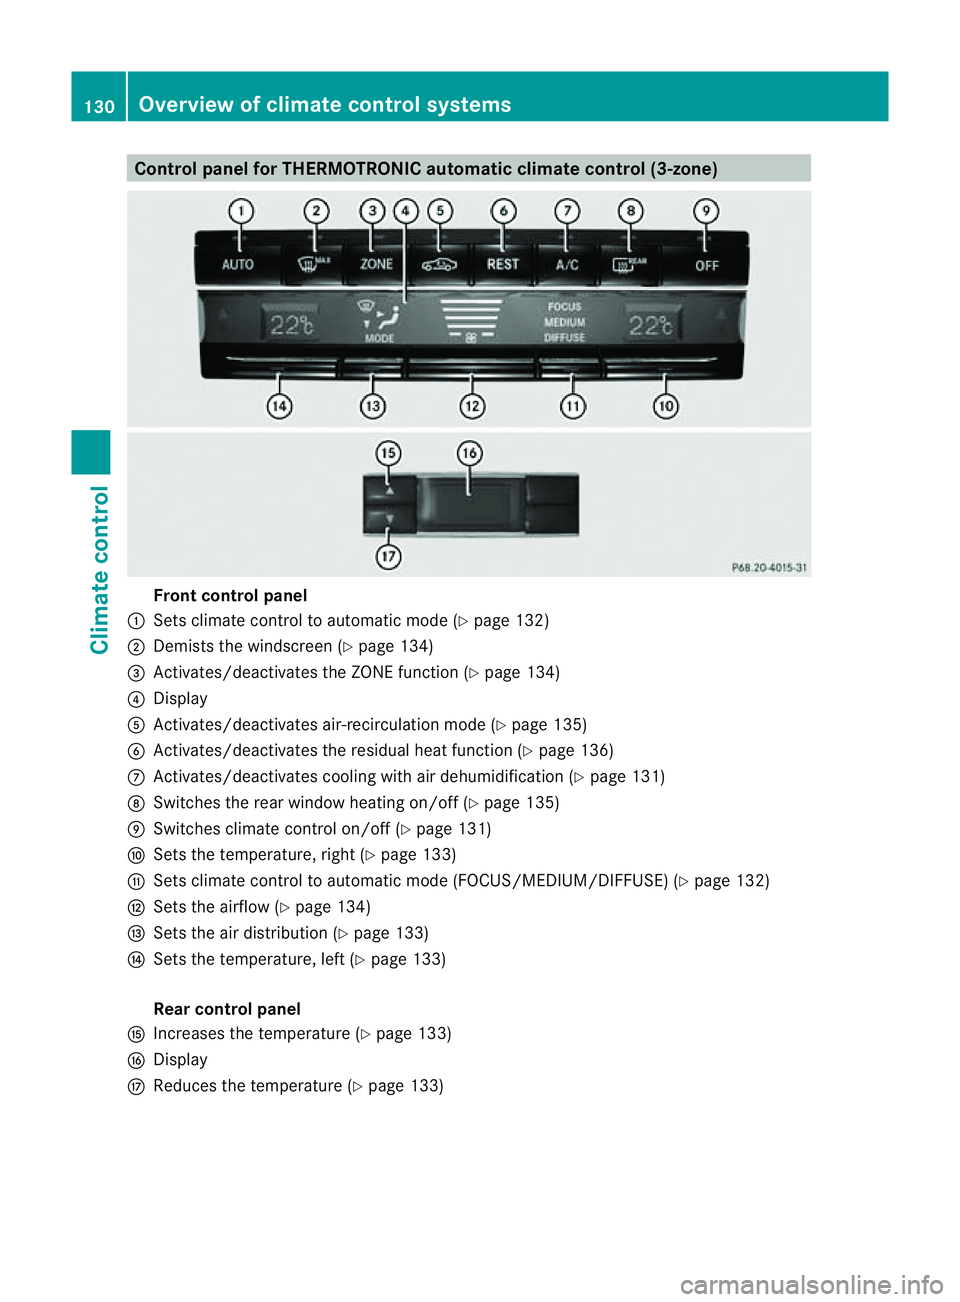
Control panel for THERMOTRONIC automatic climat
econtrol (3-zone) Fron
tcontrol panel
: Setsclimate control to automatic mode (Y page 132)
; Demist sthe windscreen (Y page 134)
= Activates/deactivates th eZONE function (Y page 134)
? Display
A Activates/deactivates air-recirculatio nmode (Y page 135)
B Activates/deactivates the residual heat function (Y page 136)
C Activates/deactivates cooling with air dehumidification ( Ypage 131)
D Switches the rear window heating on/off( Ypage 135)
E Switches climat econtro lon/off (Y page 131)
F Setsthe temperature, right (Y page 133)
G Setsclimat econtro ltoautomatic mode (FOCUS/MEDIUM/DIFFUSE )(Y page 132)
H Setsthe airflow (Y page 134)
I Setsthe air distribution (Y page 133)
J Setsthe temperature, left (Y page 133)
Rear control panel
K Increases the temperature (Y page 133)
L Display
M Reduces the temperature ( Ypage 133) 130
Overview of climat
econtrol systemsClimat econtrol