2011 MERCEDES-BENZ E-CLASS CABRIOLET light
[x] Cancel search: lightPage 291 of 353
!
The following may cause the paint to
become shiny and thus reduce the matt
effect:
R Vigorous rubbing with unsuitablem ate-
rials.
R Frequent use of car washes.
R Washing the vehicle in direct sunlight.
! Never use paint cleaner, buffing or pol-
ishing products, or gloss preserver, e.g.
wax. These products are only suitablef or
high-gloss surfaces. Their use on vehicles
with matt finish leadstoc onsiderable sur-
face damage (shiny, spotted areas).
Alwaysh ave paintwork repairs performed
at aq ualified specialist workshop, e.g. a
Mercedes-Benz Service Centre.
! Do not use wash programs with ahot wax
treatment under any circumstances.
i The vehicle should preferably be washed
by hand using asoft sponge, car shampoo
and plenty of water.
i Use only insect remover and car shampoo
from the range of recommended and
approved Mercedes-Benz care products.
Cleaning the Cabriolets oft topX
Light soiling: you can clean th esoftt op
while it is dry or rinse it with clear water.
X Norma ltoheavy soiling: clean theroof
with abrush and clear water .Clean stains
and other dirt with abrush and aMercedes-
Ben zrecommended and approved cleaning
agent. Always brush from fron ttoback in
the direction of the fabric.
! Never use any of the following to clean the
soft top:
R petrol
R thinner
R tar or stain remover
R other organic solvents
! Remove bird droppings immediately as
they are corrosive and, therefore, can make the soft-top fabric leak. Do not use high-
pressure cleanin
gequipment to clean the
vehicle. Do not use sharp-edged equipment
to remove ice and snow.
Frequent cleanin greduces the resistance to
dirt of the soft top.
To restore this resistance to dirt, clean the
soft top using soft top cleanin gagents that
have been recommended and approved by
Mercedes-Benz.
Incorrec tcleanin gand care ,aswell as ageing,
can cause the soft top seams to leak. Have
the soft-top seams sealed at aqualified spe-
cialist workshop, e.g. at aMercedes-Benz
Servic eCentre.
i Cover the soft top with asuitable cover if
you plan to leave the vehicle outside for a
long period of time.
Cleaning AIRCAP Cleaning th
ewind deflector
Clean the wind deflector on the windscreen
with the soft top closed.
X Apply the parking brak efirmly.
X Vehicles with key: turnthe key to position
2 (Y page 147) in the ignition lock.
X Vehicles with KEYLESS-GO: press the
Start/Stop button twice (Y page 147).
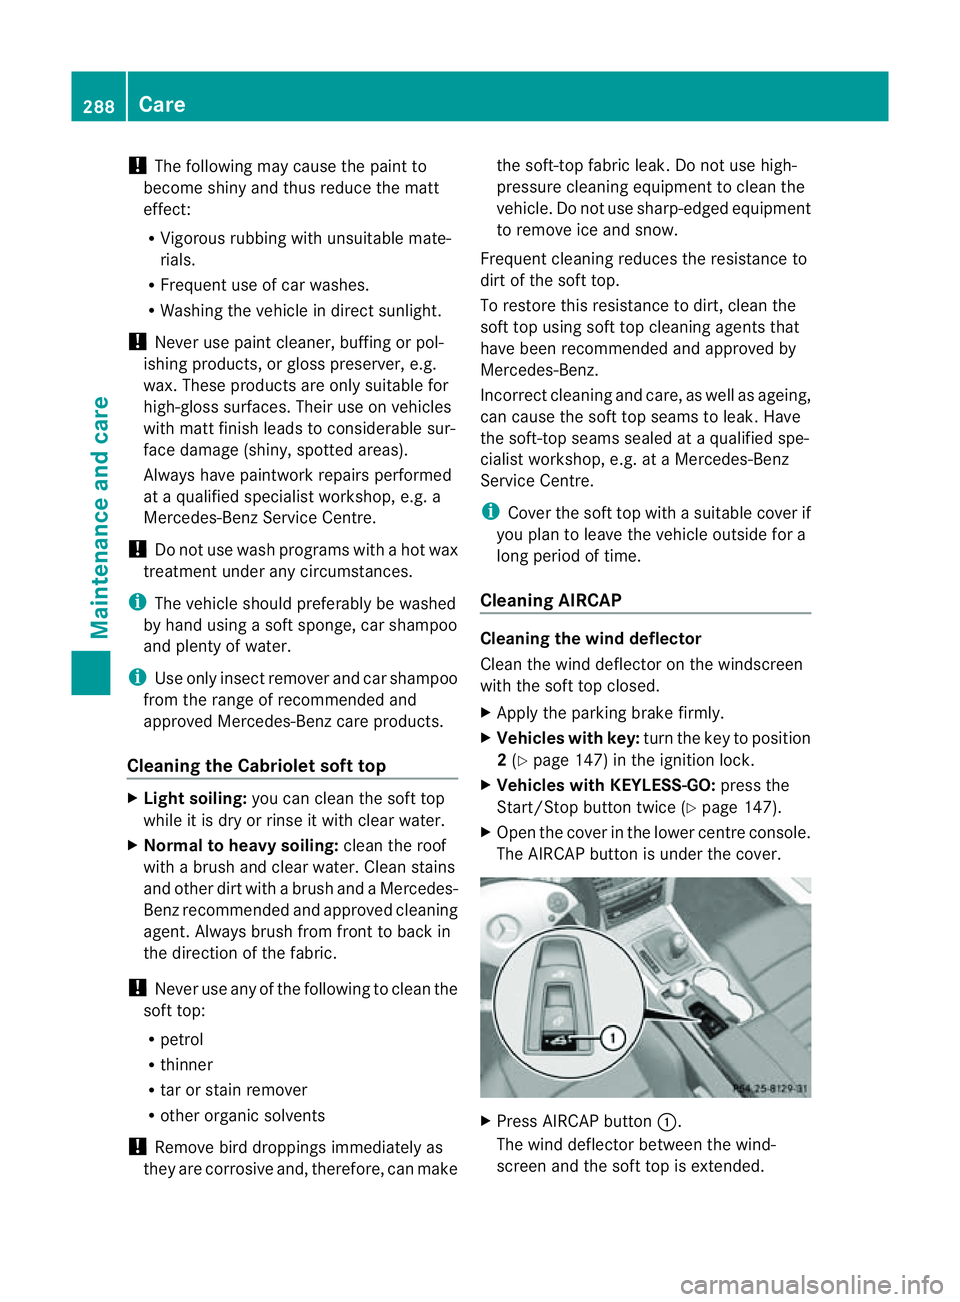
X Open the cover in the lower centre console.
The AIRCAP button is under the cover. X
Press AIRCAP button :.
The wind deflector between the wind-
screen and the soft top is extended. 288
CareMaintenance and care
Page 293 of 353
Cleaning th
ewiper blades G
WARNING
Switch off th ewindscree nwipers and remove
the key fro mthe ignition lock before cleaning
the windscreen or the wiper blades. On vehi-
cles with KEYLESS-GO, press the Start/Stop
button repeatedly until all indicator lamps in
the instrument cluster have gone off. The
windscreen wipers could otherwise move and
injure you.
! Do not pull on the wiper blade. Otherwise,
the wiper blade could be damaged.
! Do not clean wiper blades too often and
do not rub them too hard. Otherwise, the
graphite coating could be damaged. This
could cause wiper noise.
X Fold the wiper arms away from the wind-
screen.
X Cleant he wiper blades carefully using a
damp cloth.
X Fold the windscreen wipers back again
before switching on the ignition.
! Hold the wiper arm securely when folding
back. The windscreen could be damaged if
the wiper arm hits against it suddenly.
Cleaningt he exterior lighting X
Cleant he plastic lenses of the exterior
lighting using awet sponge and amild
cleaning agent, e.g. Mercedes-Ben zcar
shampoo or cleanin gcloths.
! Only use cleanin gagents or cleaning
cloth sthata re suitable for plastic lenses.
Unsuitable cleanin gagents or cleaning
cloth scould scratch or damag ethe plastic
lenses of th eexteri or lighting. Cleaning th
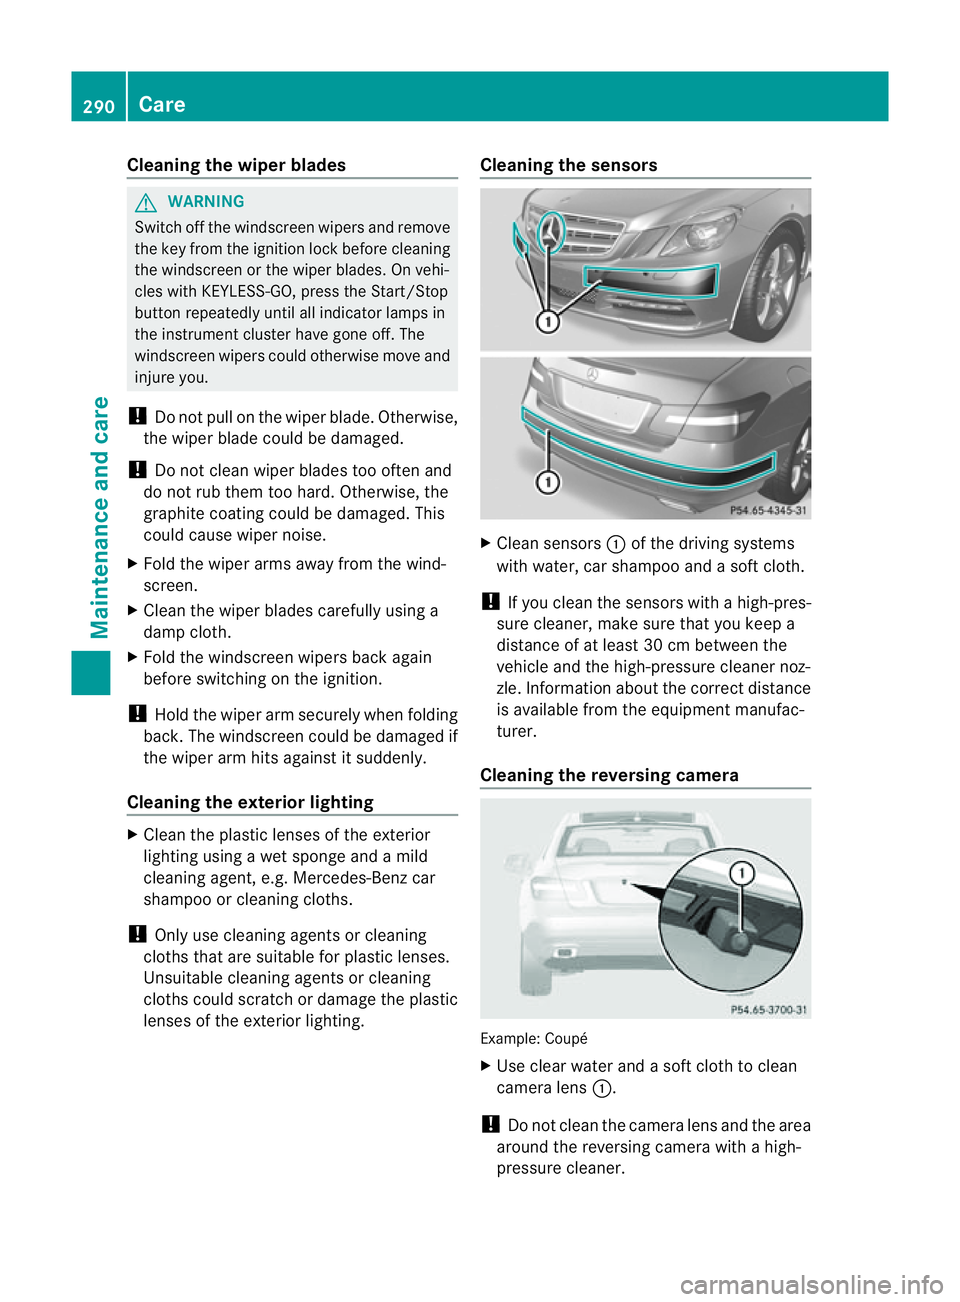
esensors X
Clean sensors :of th edriving systems
wit hw ater, car shampoo and asoftc loth.
! If you clean the sensors with ahigh-pres-
sure cleaner, mak esure that you keep a
distanc eofatl east 30 cm between the
vehicle and the high-pressure cleaner noz-
zle. Information about the correc tdistance
is available fro mthe equipment manufac-
turer.
Cleaningt he reversing camera Example: Coupé
X
Use clear water and asoft cloth to clean
camera lens :.
! Do not clean the camera lens and the area
around the reversing camera with ahigh-
pressure cleaner. 290
CareMaintenance and care
Page 294 of 353

Cleaning th
eexhaust tail pipes Impurities combined wit
hthe effect sofroad
grit and corrosive environmental factors may
cause flash rust to form on the surface. You
can restore the original shine of the exhaust
tail pip ebycleaning it regularly ,especially in
winter and after washing.
! Do not clea nthe exhaust tail pipes with
alkaline-based cleaning agents, such as
wheel cleaner.
X Cleant he exhaust tail pipes with achrome
care product tested and approved by
Mercedes-Benz.
Cleaningt he trailer tow hitch The ball coupling must be cleaned if it
becomes dirty or corroded.
X Remove any rust using awire brush.
X Remove dirt with aclean, lint-free cloth or
ab rush.
! Do not clean the ball coupling with ahigh-
pressure cleaner. Do not use solvents. X
After cleaning, lightly oil or grease ball cou-
pling :.
X Check that the vehicle's trailer tow hitch is
working properly.
! Observe the note on care provided by the
trailer manufacturer.
i Maintenanceoft he ball coupling and
trailer tow hitch can also be performed at
aq ualified specialist workshop, e.g. a
Mercedes-Ben zService Centre. H
Environmental note
Dispose of oily and greasy cloths in an envi-
ronmentally-responsible manner. Interior care
Cleaningt he display X
Before cleaning the display, make sure that
it is switched off and has cooled down.
X Cleant he displays urface using acommer-
cially-available microfibre cloth and TFT/
LCD displayc leaner.
X Dry the displays urface usingadry micro-
fibre cloth.
! For cleaning, do not use any of the fol-
lowing:
R alcohol-based thinner or petrol
R abrasive cleaning agents
R commercially-available household clean-
ing agents
These may damage the displays urface. Do
not put pressure on the displays urface
when cleaning. This could lead to irrepara-
ble damage to the display.
Cleaningt he plastic trim G
WARNING
When cleaning the steering wheel boss and
dashboard, do not use cockpit sprays or
cleaning agents containing solvents. Cleaning
agents containing solvents cause the surface
to become porous, and as aresult plastic
parts may break away and be thrown around
the interior when an airbag is deployed, which
may result in severe injuries.
! Do not affix the following to plastic surfa-
ces:
R stickers
R films
R scented oil bottles or similar items
You could otherwise damage the plastic. Care
291Maintenance and care Z
Page 295 of 353
!
Do not allowc osmetics, insect repellent
or sunscreen to come in contact with the
plastic trim. This maintains the high-quality
look of the surfaces.
X Wipe the plastic trim with adamp, lint-free
cloth, e.g. amicrofibre cloth.
X Heavy soiling: use car care and cleaning
products recommended and approved by
Mercedes-Benz.
The surface may change colour tempora-
rily. Wait until the surface is dry again.
Cleaning wooden trim and trim pieces X
Wipe the wooden trim and trim pieces with
ad amp, lint-free cloth, e.g. amicrofibre
cloth.
X Heavy soiling: use car care and cleaning
products recommended and approved by
Mercedes-Benz.
! Do not use solvent-based cleaning agents
such as tar remover, wheel cleaners, pol-
ishes or waxes. There is otherwise arisk of
damaging the surface.
Cleaning the seat covers !
Do not use microfibre cloths to clean gen-
uine leather, artificial leather or
Alcantara® covers. If used often, these can
damage the cover.
! Observe the following when cleaning:
R clean genuine leather covers carefully
with adamp cloth and then wipe the cov-
ers down with adry cloth. Make sure that
the leather does not become soaked. It
may otherwise become rough and
cracked. Only use leather care agents
that have been tested and approved by
Mercedes-Benz.Y ou can obtain these
from aqualified specialist workshop, e.g.
aM ercedes-Benz Servic ecentre.
R clean artificial leather covers with acloth
moistened with asolution containing 1%
detergent (e.g. washing-up liquid). R
clean cloth covers with amicrofibre cloth
moistened with asolution containing 1%
detergent (e.g. washing-up liquid). Rub
carefully and always wipe entire seat sec-
tions to avoid leaving visible lines. Leave
the seat to dry afterwards. Cleaning
results depend on the type of dirt and
how long it has been there.
R clean Alcantara® covers with adamp
cloth. Make sure you wipe entires eat
section stoavoid leaving visible lines.
i Note that regular care is essential to
ensure that the appearance and comfor tof
the covers is retaine dovertime.
Cleaning th eseat belts X
Use clean ,lukewarm water and soap solu-
tion.
! Do not clean the seat belts using chemical
cleaning agents. Do not dry the seatbelts
at temperatures above 80 †orbyexposing
them to direc tsunlight. 292
CareMaintenance and care
Page 301 of 353
TIREFI
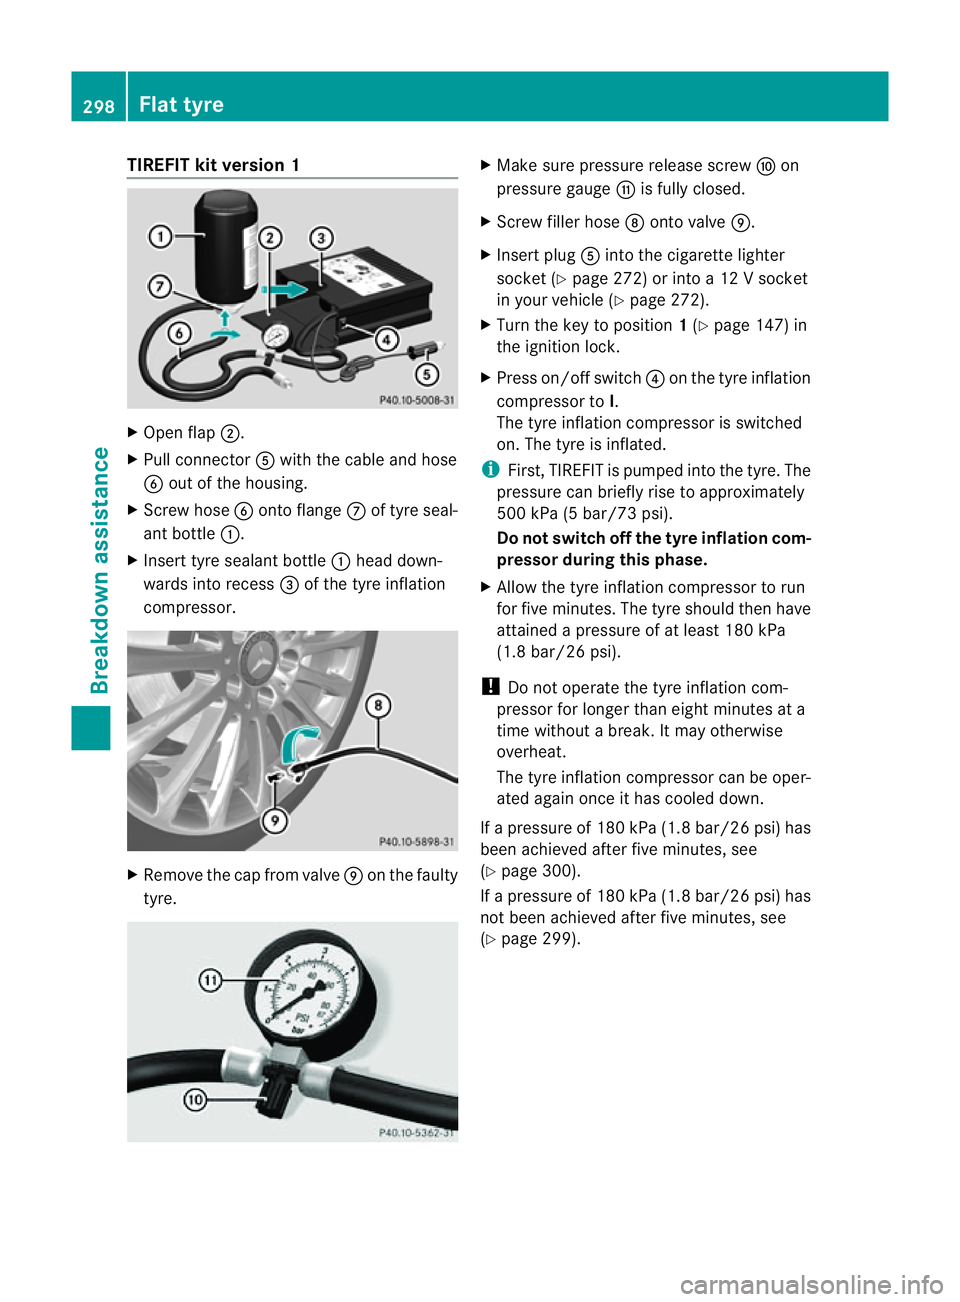
Tkit version 1 X
Open flap ;.
X Pull connector Awith the cable and hose
B out of the housing.
X Screw hose Bontoflange Cof tyre seal-
ant bottle :.
X Insert tyre sealant bottle :head down-
wards int orecess =of the tyre inflation
compressor. X
Remove the cap from valve Eon the faulty
tyre. X
Make sure pressure release screw Fon
pressure gauge Gis fully closed.
X Screw filler hose Dontovalve E.
X Insert plug Aintot he cigarett elighter
socket (Y page 272)orintoa12Vs ocket
in your vehicle (Y page 272).
X Turn the key to position 1(Y page 147 )in
the ignition lock.
X Press on/off switch ?on the tyre inflation
compressor to I.
The tyre inflation compressor is switched
on. The tyre is inflated.
i First, TIREFIT is pumped int othe tyre .The
pressure can briefly rise to approximately
500 kPa (5 bar/73 psi).
Do not switch off the tyrei nflation com-
pressor during this phase.
X Allow the tyre inflation compressor to run
for five minutes. The tyre should then have
attained apressure of at least 180 kPa
(1.8 bar/26 psi).
! Do not operate the tyre inflation com-
pressor for longer than eight minutes at a
time without abreak. It may otherwise
overheat.
The tyre inflation compressor can be oper-
ated again once it has cooled down.
If ap ressure of 180 kPa (1.8 bar/26 psi) has
been achieved after five minutes, see
(Y page 300).
If ap ressure of 180 kPa (1.8 bar/26 psi) has
not been achieved after five minutes, see
(Y page 299). 298
Flat tyreBreakdown assistance
Page 302 of 353
TIREFI
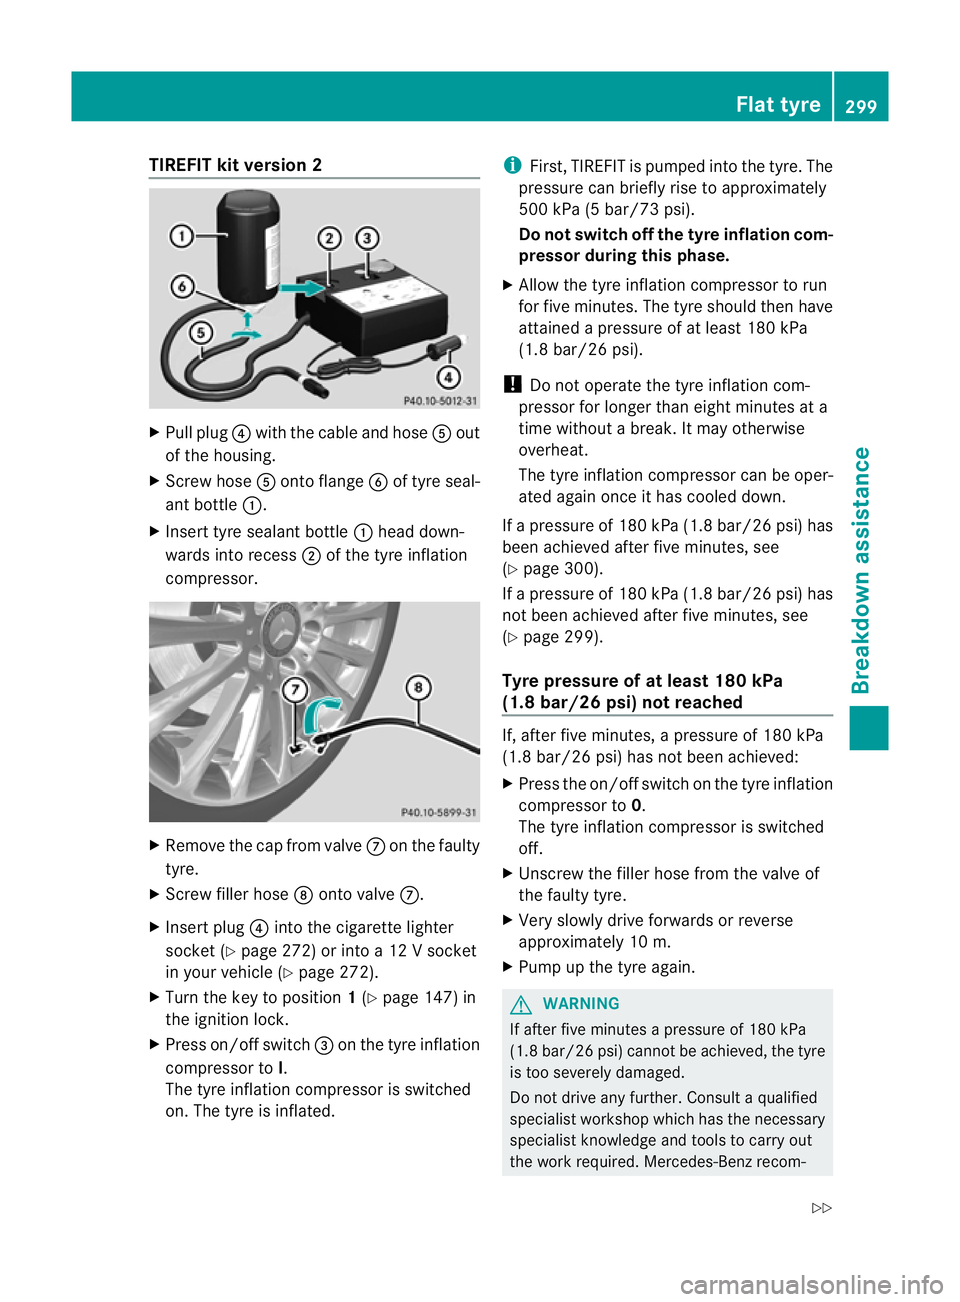
Tkit version 2 X
Pull plug ?with the cable and hose Aout
of the housing.
X Screw hose Aontoflange Bof tyre seal-
ant bottle :.
X Insert tyre sealant bottle :head down-
wards int orecess ;of the tyre inflation
compressor. X
Remove the cap from valve Con the faulty
tyre.
X Screw filler hose Dontovalve C.
X Insert plug ?intot he cigarett elighter
socket (Y page 272)orintoa12Vs ocket
in your vehicle (Y page 272).
X Turn the key to position 1(Y page 147 )in
the ignition lock.
X Press on/off switch =on the tyre inflation
compressor to I.
The tyre inflation compressor is switched
on. The tyre is inflated. i
First, TIREFIT is pumped int othe tyre. The
pressure can briefly rise to approximately
500 kPa (5 bar/7 3psi).
Do not switch off the tyrei nflation com-
pressor during this phase.
X Allow the tyre inflation compressor to run
for five minutes. The tyre should then have
attained apressure of at least 180 kPa
(1.8 bar/26 psi).
! Do not operate the tyre inflation com-
pressor for longer than eight minutes at a
time without abreak. It may otherwise
overheat.
The tyre inflation compressor can be oper-
ated again once it has cooled down.
If ap ressure of 180 kPa (1.8 bar/26 psi) has
been achieved after five minutes, see
(Y page 300).
If ap ressure of 180 kPa (1.8 bar/26 psi) has
not been achieved after five minutes, see
(Y page 299).
Tyrep ressur eofatleast 180 kPa
(1.8 bar/26 psi) not reached If, after five minutes,
apressure of 180 kPa
(1.8 bar/26 psi) has not been achieved:
X Press the on/off switch on the tyre inflation
compressor to 0.
The tyre inflation compressor is switched
off.
X Unscrew the filler hose from the valve of
the faulty tyre.
X Very slowly drive forwards or reverse
approximately 10 m.
X Pump up the tyre again. G
WARNING
If after five minutes apressure of 180 kPa
(1.8 bar/26 psi) cannot be achieved, the tyre
is too severel ydamaged.
Do not drive any further. Consult aqualified
specialist workshop which has the necessary
specialist knowledge and tools to carry out
the work required. Mercedes-Benz recom- Flat tyre
299Breakdown assistance
Z
Page 305 of 353

X
Fold both plates upwards :.
X Fold ou tlower plate ;.
X Guide the lugs on the lower plate fully into
the openings in base plate =.Securing the vehicle on level ground (example:
Coupé)
X
On level ground: place chocksorother
suitable items under the front and rear of
the wheel that is diagonally opposite the
wheel you wish to change. Securing the vehicle on slight downhill gradients
(example: Coupé)
X On downhill gradients: place chocksor
other suitable items in front of the wheels
of the front and rear axle.
Raising the vehicle G
WARNING
The jack is intended only for lifting the vehicle
briefly for wheel changes.
The vehicle must be placed on stands if you
intendtow ork under it. Make sure that the jack is placed on
afirm,
non-slip, level surface. Do not use wooden
blocks or similar object sasajack underlay.
The vehicle could otherwise slip off the jack
and seriously injure you.
Do not start the engine at any time while the
wheel is being changed.
Do not lie under the vehicle when it is being
supported by the jack.Ify ou do not raise the
vehicle as described, it could slip off the jack
(e.g. if the engine is started or adoor or the
boot lid is opened or closed) and seriously
injure you. G
WARNING
If you fail to position the jack correctly, the
vehicle may:
R slip off the jack
R injure you or others
R be damaged.
Therefore, make sure that the jack is posi-
tioned correctly in the respectiv ejacking
points. Before positioning the jack,r emove
any dirt that may have collected in the jacking
points. Please note that you must position the
jack in the opening of the jacking point. X
Using wheel wrench :,loosen the bolts on
the wheel you wish to change by about one
full turn. Do not unscrew the bolts com-
pletely.
The jacking points for the jack are located
behind the wheel housings of the front wheels
and in front of the wheel housings of the rear
wheels (arrows). 302
Flat tyreBreakdown assistance
Page 317 of 353

Blow
nfuses must be replace dwith fuses of
the same rating, which you can recognise by
the colour and value. The fuse ratings are lis-
ted in the fuse allocation chart. AMercedes-
BenzS ervice Centr ewill be happy to advise
you.
If the newly inserted fuse also blows, have the
cause traced and rectified at aqualified spe-
cialist workshop, e.g. aMercedes-Benz
Service Centre.
! Only use fuses that have been approved
for Mercedes-Benz vehicles and which
have the correct fuse ratin gfor the system
concerned. Otherwise, componentsors ys-
tems could be damaged. Befor
echanging afuse
X Park the vehicle and apply the parking
brake.
X Switc hoff all electrical consumers.
X Remove the key from the ignition lock.
The fuses are located in various fuse boxes:
R fuse box on the driver's side of the dash-
board
R fuse box in the engin ecompartment on the
left-hand side of the vehicle, when viewed
in the direction of travel
R fuse box in the boot on the right-hand side
of the vehicle, when viewed in the direction
of travel
The fuse allocation chart is located in the
vehicle tool kit (Y page 295)inthe stowage
compartment under the boot floor. Dashboar
dfuse box
! Do not use apointed objec tsuch as a
screwdriver to open th ecover in th edash-
board. You could damag ethe dashboard or
the cover. X
To open: pull out cover :slightly at the
botto mint hedirection of arrow =.
X Pull cover :outwards in th edirection of
arrow ;and remove it.
X To close: clip in cover :on th efront of
th ed ashboard.
X Fol dc over : inwards until it engages. Fuse box in th
eengine compartment
X Mak esure that th ewindscree nwipers are
turned off. G
WARNING
Make sure that the windscreen wipers are
turned off and the key is pulled out of the igni-
tion lock befor eyou open the cover of the fuse
box. Otherwise, the windscreen wipers and
the wiper rods above the cover could be set
in motion. This could lead to you or others
being injured by the wiper rods.
X Open the bonnet (Y page 281).314
Electrical fusesBreakdown assistance