2011 MERCEDES-BENZ E-CLASS CABRIOLET light
[x] Cancel search: lightPage 273 of 353
X
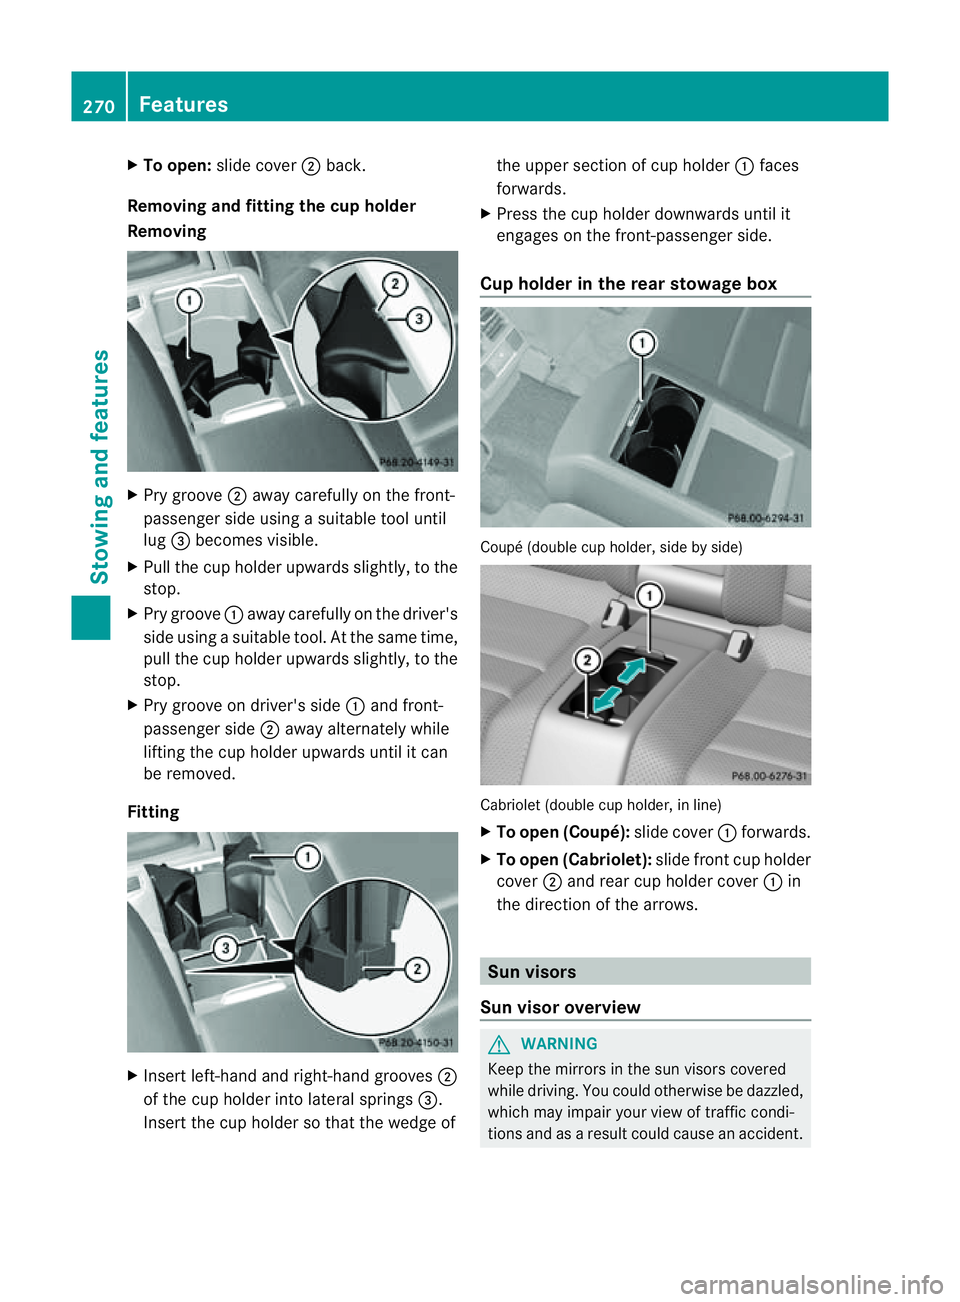
To open: slidecover ;back.
Removing and fitting the cu pholder
Removing X
Pry groove ;away carefull yonthe front-
passenge rside using asuitable too luntil
lug =becomes visible.
X Pull the cup holder upwards slightly, to the
stop.
X Pry groove :away carefully on the driver's
side using asuitable tool. At the same time,
pull the cup holder upwards slightly, to the
stop.
X Pry groove on driver's side :and front-
passenger side ;away alternately while
lifting the cup holder upwards until it can
be removed.
Fitting X
Insert left-han dand right-han dgrooves ;
of the cup holder int olateral springs =.
Insert the cup holder so that the wedge of the upper section of cup holder
:faces
forwards.
X Press the cup holder downwards until it
engages on the front-passenger side.
Cup holder in th erears towage box Coupé (double cup holder
,side by side) Cabriolet (double cup holder
,inline)
X To open (Coupé): slide cover:forwards.
X To open (Cabriolet): slide front cup holder
cover ;and rear cup holder cover :in
the direction of the arrows. Sun visors
Sun visor overview G
WARNING
Keep the mirrors in the sun visor scovered
while driving. You could otherwise be dazzled,
which may impair your view of traffic condi-
tion sand as aresult could cause an accident. 270
FeaturesStowing and features
Page 274 of 353
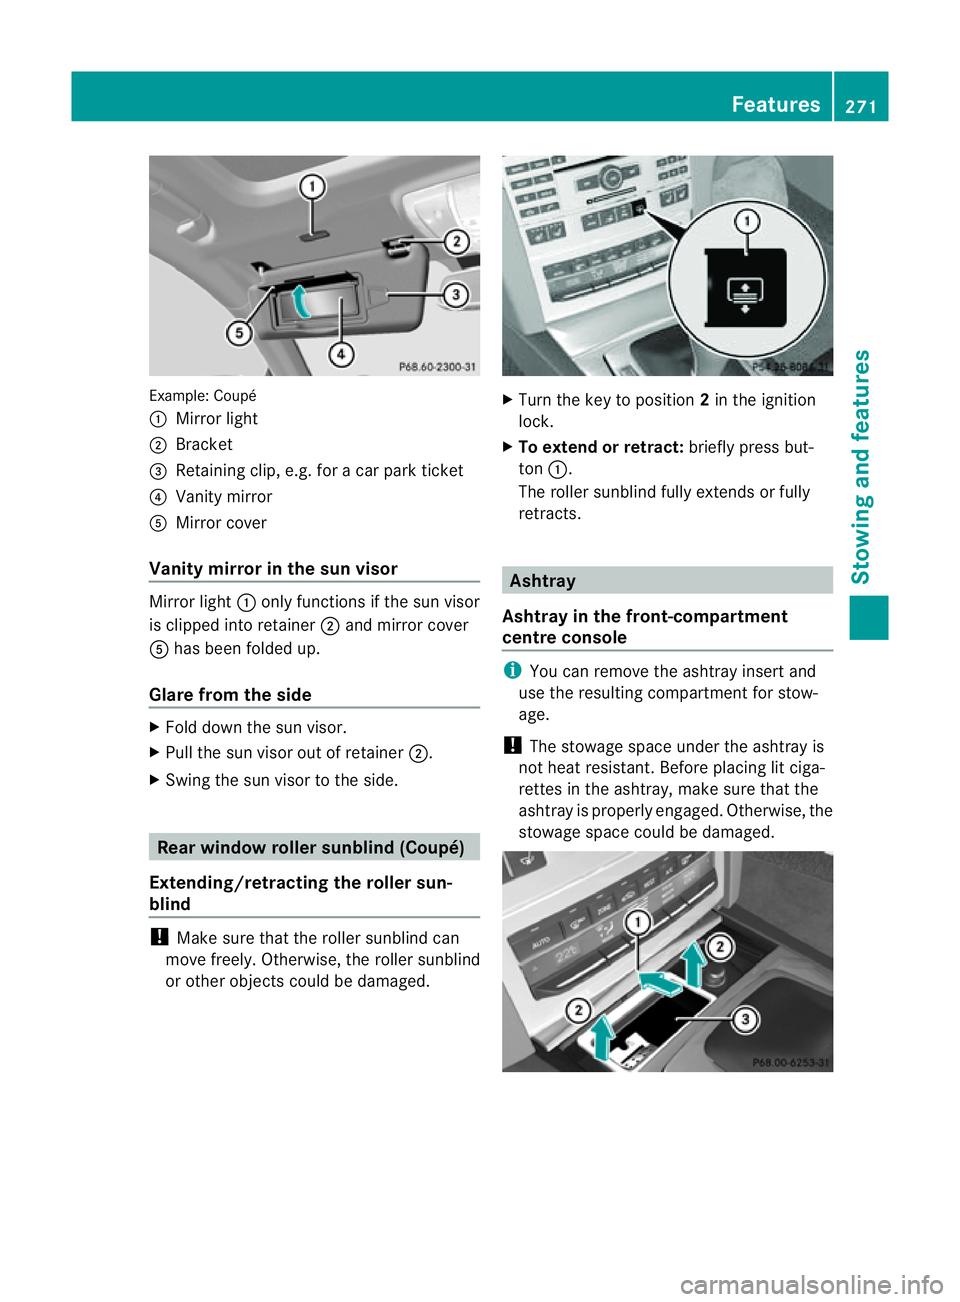
Example: Coupé
:
Mirror light
; Bracket
= Retaining clip, e.g .for ac ar park ticket
? Vanity mirror
A Mirror cover
Vanity mirro rint he sun visor Mirror light
:onlyfun ctions if the su nvisor
is clipped into retainer ;and mirror cover
A hasb eenf olde dup.
Glare from the side X
Fol dd ownthe su nvisor.
X Pull the sun visor out of retainer ;.
X Swin gthe sun visor to the side. Rea
rwindow roller sunblind (Coupé)
Extending/retracting th eroller sun-
blind !
Make sure that the roller sunblin dcan
move freely. Otherwise, the roller sunblind
or other object scould be damaged. X
Turn the key to position 2in the ignition
lock.
X To extend or retract: briefly press but-
ton :.
The roller sunblin dfully extends or fully
retracts. Ashtray
Ashtra yinthefront-compartment
centr econsole i
You can remove the ashtray inser tand
us et he resulting compartment for stow-
age.
! The stowag espace under the ashtra yis
not hea tresistant. Befor eplacing lit ciga-
rettes in the ashtray, make sure that the
ashtray is properly engaged. Otherwise, the
stowage space could be damaged. Features
271Stowing and features Z
Page 275 of 353
X
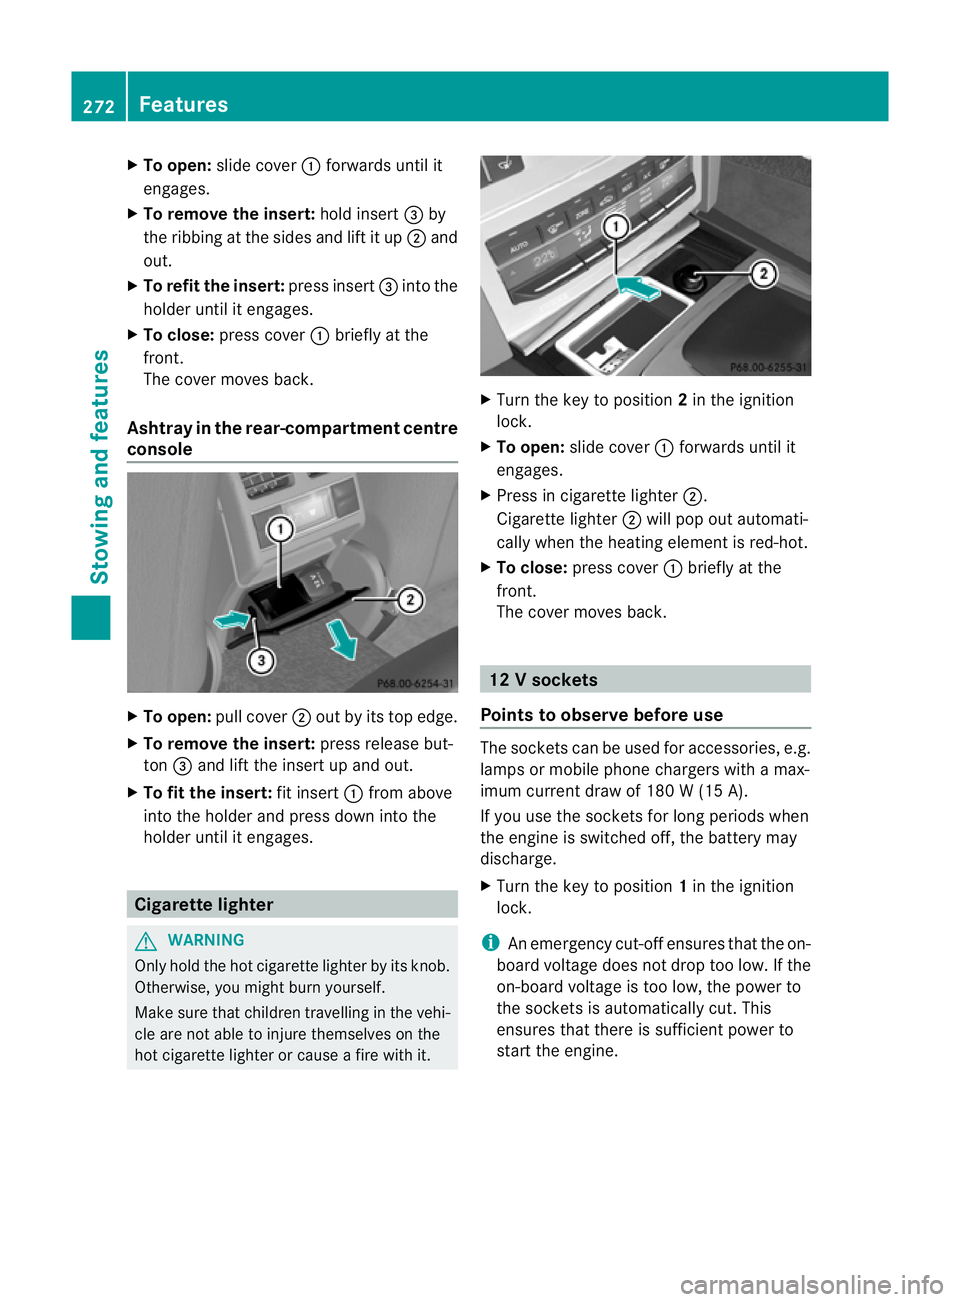
To open: slidecover :forwards unti lit
engages.
X To remove the insert: holdinsert =by
the ribbing at the side sand lift it up ;and
out.
X To refi tthe insert: press insert =into the
holder until it engages.
X To close: press cover :briefly at the
front.
The cover moves back.
Ashtray in the rear-compartment centre
console X
To open: pullcover ;out by its top edge.
X To remove the insert: press release but-
ton =and lift the insert up and out.
X To fit the insert: fit insert:from above
into the holder and press dow ninto the
holde runtil it engages. Cigarette lighter
G
WARNING
Onl yholdt he hot cigarette lighte rbyitsknob.
Otherwise ,you might burn yourself.
Mak esuret hatc hildren travellin ginthevehi-
cle are no table to injure themselves on the
hot cigarette lighter or cause afire with it. X
Turn the key to position 2in the ignition
lock.
X To open: slide cover :forwards until it
engages.
X Press in cigarette lighter ;.
Cigarett elighter ;will pop out automati-
cally when the heating element is red-hot.
X To close: press cover :briefly at the
front.
The cover moves back. 12
Vsockets
Point stoo bserve befor euse The socket
scan be used for accessories ,e.g.
lamps or mobile phon echargers with amax-
imum curren tdraw of 18 0W(15 A).
If you use th esocket sfor lon gperiods when
th ee ngine is switche doff,t he battery may
discharge.
X Turn the key to position 1in the ignition
lock.
i An emergency cut-offe nsures thatthe on-
board voltage does not drop too low. If the
on-board voltage is too low, the power to
the socketsisa utomatically cut. This
ensures that there is sufficient power to
start the engine. 272
FeaturesStowing and features
Page 276 of 353
Socket in the glove compartment
X
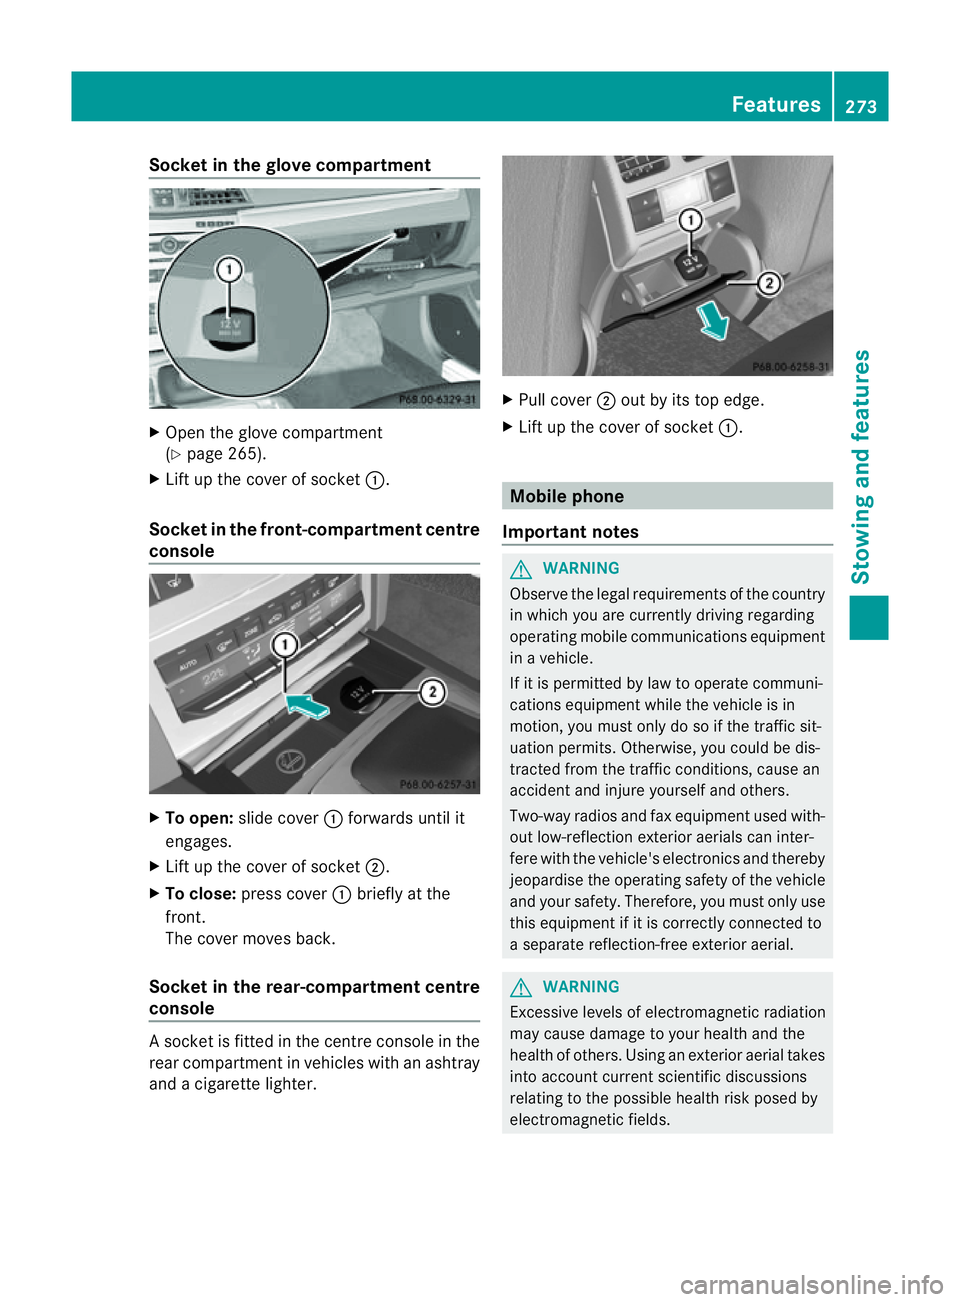
Open the glove compartment
(Y page 265).
X Lift up the cover of socket :.
Socket in the front-compartment centre
console X
To open: slide cover :forwards until it
engages.
X Lift up the cover of socket ;.
X To close: press cover :briefly at the
front.
The cover moves back.
Socket in the rear-compartment centre
console As
ocket is fitted in the centre console in the
rear compartment in vehicles with an ashtray
and acigarett elighter. X
Pull cover ;out by its top edge.
X Lift up the cover of socket :. Mobile phone
Important notes G
WARNING
Observe the legal requirements of the country
in which you are currently driving regarding
operating mobile communications equipment
in av ehicle.
If it is permitted by law to operate communi-
cations equipment while the vehicle is in
motion ,you must only do so if the traffic sit-
uation permits. Otherwise, you could be dis-
tracted from the traffic conditions, cause an
accident and injure yourself and others.
Two-way radios and fax equipment used with-
out low-reflection exterior aerials can inter-
fere with the vehicle's electronics and thereby
jeopardise the operating safety of the vehicle
and your safety. Therefore, you must only use
this equipment if it is correctly connected to
as eparate reflection-free exterior aerial. G
WARNING
Excessive levels of electromagnetic radiation
may cause damage to your health and the
health of others. Using an exterior aerial takes
into account current scientific discussions
relating to the possible health risk posed by
electromagnetic fields. Features
273Stowing and features Z
Page 279 of 353

door opener depends on the garage door
drive system. You might require several
attempts
.You should test every position for
at least 25 seconds before trying another
position.
X Press and hold transmitter button Bon
garage door remote control Auntil indi-
cator lamp :lights up green.
The programming has been successful if
indicator lamp :lights up or flashes
green.
X Release transmitter button ;,=or? on
the integrated garage door opener and the
transmitter button on garage door remote
control B.
If indicator lamp :lights up red:
X Repeat the programming procedure for the
transmitter buttons. When doing so, vary
the distance between the garage door drive
remote control and the rear-view mirror.
i If the indicator lamp flashes green after
successful programming, the garage door
system is using arolling code. After pro-
gramming, you must synchronise the
garage door opener integrated in the rear-
view mirror with the receiver of the garage
door system.
Synchronising the rolling code
Your vehicle must be within reach of the
garage or gate opener drive. Make sure that
neither your vehicle nor any persons/objects
are present within the sweep of the door or
gate.
Observe the safety notes when performing
the rolling code synchronisation.
X Turn the key to position 2in the ignition
lock.
X Press the programming button of the door
or gate drive (see the door or gate drive
operating instructions, e.g. under "Pro-
gramming of additional remote controls"). i
Usually ,you now have 30 seconds to ini-
tiate the next step.
X Press the previously programmed button of
the integrated HomeLink ®
garage door
opener repeatedly until the door startsto
move.
The rolling code synchronisation is then
complete.
Problems when programming
If you have problems when programming the
integrated garage door opener, please note
the following:
R check the transmitter frequency of garage
door remote control A(this can usually be
found on the rear of the remote control).
R change the batteries in garage door remote
control A.This increases the likelihood
that garage door remote control Awill
send astronga nd precise signal to the
integrated remote control in the rear-view
mirror.
R when programming, hold garage door
remote control Aat different distances
and angles from the transmitter button that
you are programming. Try various angles at
ad istance of between 5and 30 cm or the
same angle but varying distances.
R if there is another remote control for the
same garage door drive, perform the pro-
gramming steps again using this remote
control. Before performing these steps,
make sure that new batteries have been
fitted in the garage door drive remote con-
trol.
R note that some remote controls transmit
only for alimited period (the indicator lamp
on the remote control goes out). Press the
button on the remote control again before
transmission ends.
R align the aerial cable of the garage door
opener unit. This can improve signal recep-
tion/transmission. 276
FeaturesStowing and features
Page 280 of 353
Opening or closing the garage door
Oncep
rogrammed, the integrated garage
door opener will assume the function of the
garage door system's remot econtrol. Please
also read the operatin ginstructions for the
garage door system.
X Turn the key to position 2in the ignition
lock.
X Press overhead control panel transmitter
button ;,=or? that you have pro-
grammed to operate the garage door.
Garage door system with afixed code: indi-
cator lamp :lights up green.
Garage door system with arolling code:
indicator lamp :flashes green.
i The transmitter will transmit asignal for
as long as the transmitter button is
pressed. The transmission is halted after a
maximum of 10 seconds, and indicator
lamp :flashes yellow. Press the transmit-
ter button again, if necessary.
Clearing the memory of the integrated
garage door opener in the rear-view mir-
ror X
Turn the key to position 2in the ignition
lock.
X Press transmitter buttons ;and ?.
The indicator lamp lights up yellow.
X Press and hold transmitter buttons ;
and ?until the indicator lamp turn sgreen.
i Make sure that you clear the memory of
the integrated garage door opener before
selling the vehicle. Features
277Stowing and features Z
Page 285 of 353

X
Pull release lever :on the bonnet.
The bonnet is released.
! Make sure that the windscreen wipers are
not folded away from the windscreen .Oth-
erwise, yo ucould damage the windscreen
wipers or the bonnet. X
Reach into the gap, pull bonnet catc hhan-
dle ;up and lift the bonnet.
If yo uliftt he bonnet by approximately
40 cm, the bonnet is opene dand held open
automaticall ybythe gas-filled strut.
Closin gthe bonnet G
WARNING
Make sure tha tnobody can become trapped
as you close the bonnet. X
Lower the bonnet and let it fall from a
height of approximately 20 cm.
X Check that the bonnet has engaged prop-
erly.
If the bonnet can be raised slightly, it is not
properly engaged. Open it again and close
it with alittle more force. Engine oil
Notes on the oil level Depending on driving style, the vehicle con-
sumes
amaximum of 0.8 loil per 1000 km.
The oil consumption may be higher than this
when the vehicle is new or if you frequently
drive at high engine speeds.
Checking the oil level using the oil dip-
stick Depending on the engine, the oil dipstick may
be installed at
adifferent location.
When checking the oil level:
R park the vehicle on alevel surface.
R the engine should be switched off for
approximately five minutes if the engine is
at normal operating temperature. Example:
E350
X Pull oil dipstick :out of the oil dipstick
tube.
X Wipe off oil dipstick :.282
Engine compartmentMaintenance and care
Page 290 of 353
High-pressure cleaning equipment
G
WARNING
Do not use high-pressure cleaners with circu-
lar-jet nozzles (dirt grinders) to clea nyour
vehicle, in particular the tyres. You could oth-
erwise damage the tyres and cause an acci-
dent.
! Always maintain adistance of at least
30 cm between the vehicle and the high-
pressure cleaner nozzle. Information about
the correc tdistanc eisavailable fro mthe
equipment manufacturer.
Move the high-pressure cleaner nozzle
around when cleaning your vehicle.
Do not aim directly at any of the following:
R tyres
R door gaps, jointse tc.
R soft top (Cabriolet)
R wind deflector net (Cabriolet)
R electrical components
R battery
R connectors
R lights
R seals
R trim elements
R ventilation slots
Damaged seals or electrical components
can lead to leaks or failures.
Cleaningt he wheels !
Do not use acidic wheel cleaning products
to remove brake dust. This could damage
wheel bolts and brake components.
! Do not park up the vehicle for an extended
period straight after cleaning it, particularly
after having cleaned the wheels with wheel
cleaner. Wheel cleaners could cause
increased corrosion of the brake discs and
brake pads/linings. For this reason, you
should drive for afew minutes after clean-
ing. Braking heats the brake discs and the brake pads/linings, thus drying them. The
vehicle can then be parked up.
Cleaningt he paintwork Scratches, corrosive deposits, areas affected
by corrosion and damage caused by inade-
quate care cannot always be completely
repaired. In such cases, visit aqualified spe-
cialist workshop, e.g. aMercedes-Benz
Service Centre.
X Remove impurities immediately, where
possible, whilst avoiding rubbing too hard.
X Soak insect remains with insect remover
and rinse off the treated areas afterwards.
X Soak bird droppings with water and rinse
off the treated areas afterwards.
X Remove coolant, brake fluid, tree resin,
oils, fuels and greases by rubbing gently
with acloth soaked in petroleum ether or
lighter fluid.
X Use tar remover to remove tar stains.
X Use silicone remover to remove wax.
! Do not affix:
R stickers
R films
R magnetic plates or similar items
to painted surfaces. You could otherwise
damage the paintwork.
Care and treatment of mattp aintwork If your vehicle has
aclear matt finish, observe
the following instructions in order to avoid
damage to the paintwork due to incorrect
care.
These notes also apply to light alloy wheels
with aclear matt finish.
! Never polish the vehicle or the light alloy
wheels. Polishing makes the paintwork
shiny. Care
287Maintenance and care Z