2011 MERCEDES-BENZ E-CLASS CABRIOLET tow
[x] Cancel search: towPage 299 of 353

R
Jack
R Centrin gpin
R On ep air of gloves
R Whee lwrench
R Towin geye "Minispare" emergency spare wheel
The "Minispare" emergency spar ewheel can
be foun dinthestowage well unde rthe boot
floor.
X Lift the boot floor upwards (Y page 268).X
Remove vehicle tool kit tray ;.
X Turn stowage well =anti-clockwise and
remove it.
X Remove "Minispare" emergency spare
wheel :.
For further information on changing awheel
and fittingt he spare wheel, see
(Y page 296). Flat tyre
Preparing the vehicle
Your vehicle may be equipped with:
R aT IREFIT kit
R an emergency spare wheel
R MOExtended tyres (tyres with run-flat char-
acteristics) (Y page 305)
i Vehicle preparation is not necessary on
vehicles with MOExtended tyres. i
Vehicles with MOExtended tyres are not
equipped with aTIREFIT kit at the factory.
It is therefore recommended that you addi-
tionally equip your vehicle with aTIREFIT kit
if you fit tyres that do not feature run-flat
properties, e.g. winter tyres. ATIREFIT kit
can be obtained from aMercedes-Benz
Service Centre.
X Stop the vehicle as far away as possible
from traffic on solid, non-slippery and level
ground.
X Switch on the hazard warning lamps.
X Firmly depress the parking brake.
X Bring the front wheels into the straight-
ahead position.
X Vehicles with manualt ransmission:
engage first or reverse gear.
X Vehicles with automatic transmission:
move the selector lever to P.
X Switch off the engine.
X Vehicles without KEYLESS-GO: remove
the key from the ignition lock.
X Vehicles with KEYLESS-GO: open the
driver's door.
The on-board electronicsh ave status0,
which is the same as the key having been
removed.
X Vehicles with KEYLESS-GO: remove the
Start/Stop button from the ignition lock
(Y page 147).
X All occupants must get out of the vehicle.
Make sure that they are not endangered as
they do so.
X Make sure that no one is near the danger
area whilst awheel is being changed. Any-
one who is not directly assisting in the
wheel change should, for example, stand
behind the barrier.
X Get out of the vehicle. Pay attention to traf-
fic conditionsw hen doing so.296
Flat tyreBreakdown assistance
Page 300 of 353

X
Close th edriver' sdoor.
X Plac ethe warning triangle ( Ypage 294) a
suitable distanc eaway. Observ elegal
requirements. TIREFIT kit
Using th eTIREFIT kit You can use th
eTIREFI Tkit to seal small
punctures, particularly those in the tyre tread.
You can use TIREFIT at outside temperatures
down to -2 0†. G
WARNING
In the followin gsituations ,your safety is at
particular risk as tyre sealant is unable to pro-
vide sufficient breakdown assistance:
R there are cuts or punctures in the tyre
greater than 4mm.
R the wheel rim is damaged.
R you have driven at very low tyre pressures
or on aflat tyre.
Do not drive any further. Consult aqualified
specialist workshop which has the necessary
specialist knowledge and tools to carry out
the work required.
Mercedes-Benz recommends that you use a
Mercedes-Benz Service Centre for this pur-
pose. In particular, work relevant to safety or
on safety-related systems must be carried out
at aq ualified specialist workshop.
X Do not remove any foreign object swhich
have penetrated the tyre, e.g. screws or
nails.
X Remove the tyre sealant bottle, the accom-
panying "max. 80 km/h" sticker and the
tyre inflation compressor from the stowage
well underneath the boot floor
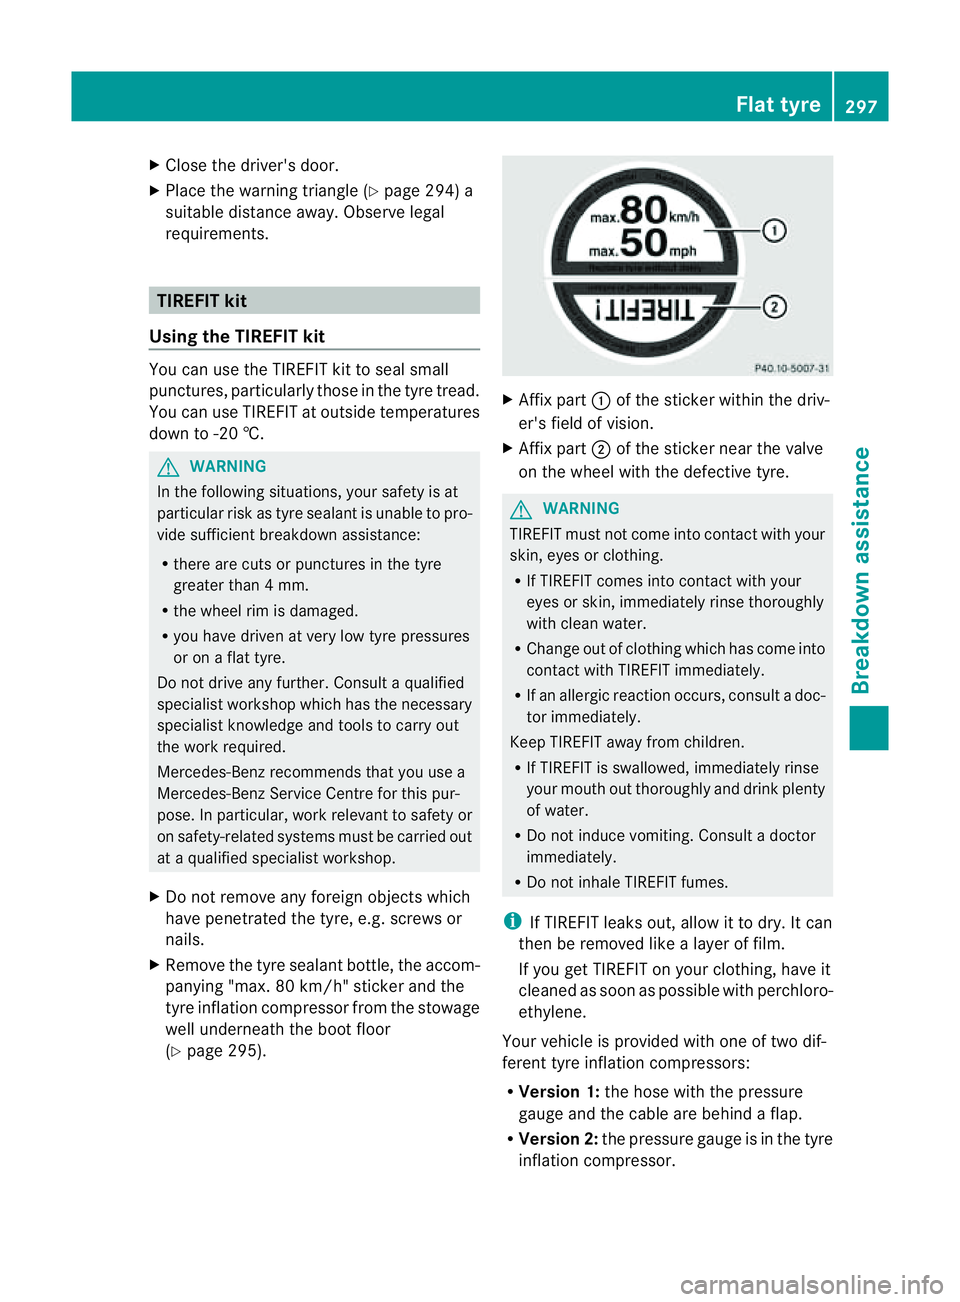
(Y page 295). X
Affix part :of the sticker within the driv-
er's field of vision.
X Affix part ;of the sticker near the valve
on the wheel with the defectiv etyre. G
WARNING
TIREFIT must not come into contact with your
skin, eyes or clothing.
R If TIREFIT comes into contact with your
eyes or skin, immediately rinse thoroughly
with clean water.
R Change out of clothin gwhich has come into
contact with TIREFIT immediately.
R If an allergic reaction occurs, consult adoc-
tor immediately.
Keep TIREFIT away from children.
R If TIREFIT is swallowed, immediately rinse
your mouth out thoroughly and drink plenty
of water.
R Do not induce vomiting. Consult adoctor
immediately.
R Do not inhale TIREFIT fumes.
i If TIREFIT leaks out, allow it to dry. It can
then be removed like alayer of film.
If you get TIREFIT on your clothing, have it
cleaned as soon as possible with perchloro-
ethylene.
Your vehicle is provided with one of two dif-
ferent tyre inflation compressors:
R Version 1: the hose with the pressure
gauge and the cable are behind aflap.
R Version 2: the pressure gauge is in the tyre
inflation compressor. Flat tyre
297Breakdown assistance Z
Page 303 of 353

mends that you use
aMercedes-Benz Service
Centre for this purpose. In particular, work
relevant to safety or on safety-related sys-
tems must be carried out at aqualified spe-
cialist workshop.
Tyre pressure of 180 kPa (1.8 bar/
26 psi) is reached X
Press the on/off switch on the tyre inflation
compresso rto0.
The tyre inflation compressor is switched
off.
X Unscrew the filler hose from the valve of
the faulty tyre.
! After use, excess TIREFIT may run out of
the filler hose. This may cause stains.
Therefore, place the filler hose in the plastic
bag which contained the TIREFIT kit.
X Stow the tyre sealant bottle, the tyre infla-
tion compressor and the warning triangle.
X Pull away immediately. G
WARNING
Do not exceed the maximum speed of
80 km/h.
The "max. 80 km/h" label must be affixed in
the driver's field of vision.
The vehicle's handling characteristics may be
affected.
X Stop after driving for approximately ten
minutes and check the tyre pressure with
the tyre inflation compressor. G
WARNING
If the tyre pressure is less than 130 kPa
(1.3 bar/20 psi), the tyre is too severely dam-
aged. Do not drive any further. Consult a
qualified specialist workshop which has the
necessary specialist knowledge and tools to
carry out the work required. Mercedes-Benz
recommends that you use aMercedes-Benz
Service Centr efor this purpose. In particular,
work relevant to safety or on safety-related systems must be carried out at
aqualified
specialist workshop.
X Correct the tyre pressure if it is still at least
130 kPa (1.3 bar/20 psi) (for the values,
see the fuel filler flap).
X To increase the tyrep ressure: switch on
the tyre inflation compressor. TIREFI
Tkit version 1
X To reduce the tyrep ressure (version
1): open pressure release screw Fon
pressure gauge G. TIREFI
Tkit version 2
X To reduce the tyrep ressure (version
2): press pressure release button Enext
to pressure gauge F.
X Stow the tyre sealant bottle, the tyre infla-
tion compressor and the warning triangle.
X Driv etot he nearest workshop and have the
tyre changed there.
X Have the tyre sealant bottle replaced as
soon as possible at aqualified specialist 300
Flat tyreBreakdown assistance
Page 304 of 353

workshop
,e.g.ataM ercedes-Benz Service
Centre. H
Environmental note
Have the used tyre sealant bottle disposed of
professionally, e.g. at aMercedes-Benz
Service Centre.
X Have the tyre sealant bottle replaced every
four years at aqualified specialist work-
shop, e.g. aMercedes-Benz Service
Centre. Changing
awhee land fitting the spare
wheel
Preparing the vehicle G
WARNING
The wheel and tyre size of the emergency
spare wheel/spare wheel may diffe rtothat of
the damaged wheel. When using an emer-
gency spare wheel/spare wheel the handling
characteristics of the vehicle may change.
Adapt your style of driving accordingly.
Never operate the vehicle with more than one
emergenc yspare wheel/spare wheel that dif-
fers in size.
Only use an emergenc yspare wheel/spare
wheel of adiffering size briefly and do not
switch off ESP ®
.
When using an emergenc yspare wheel you
must not exceed the maximum speed of
80 km/h. G
WARNING
Have the emergenc yspare wheel/spare
wheel replaced with anew wheel as soon as
possible at aqualified specialist workshop
which has the necessary specialist knowledge
and tools to carry out the work required.
Mercedes-Benz recommends that you use a
Mercedes-Benz Service Centre for this pur-
pose. In particular, work relevant to safety or
on safety-related systems must be carried out
at aq ualified specialist workshop. i
Vehicles without an emergenc yspare
wheel/spare wheel are not equipped with
wheel-changing tools at the factory. For
more information on which tools are
required to perform awheel change on your
vehicle, e.g. wheel chock,w heel wrench or
centring pin, consult aMercedes-Benz
Servic eCentre.
X Prepare the vehicle as described
(Y page 296).
X Ifat railer is coupled to the vehicle, uncou-
ple it.
X Remove the following items (depending on
the vehicle's equipment) from the stowage
well under the boot floor:
R
the emergenc yspare wheel
R the vehicle tool kit
R the folding wheel chock
R the jack
X Secure the vehicle to prevent it from rolling
away.
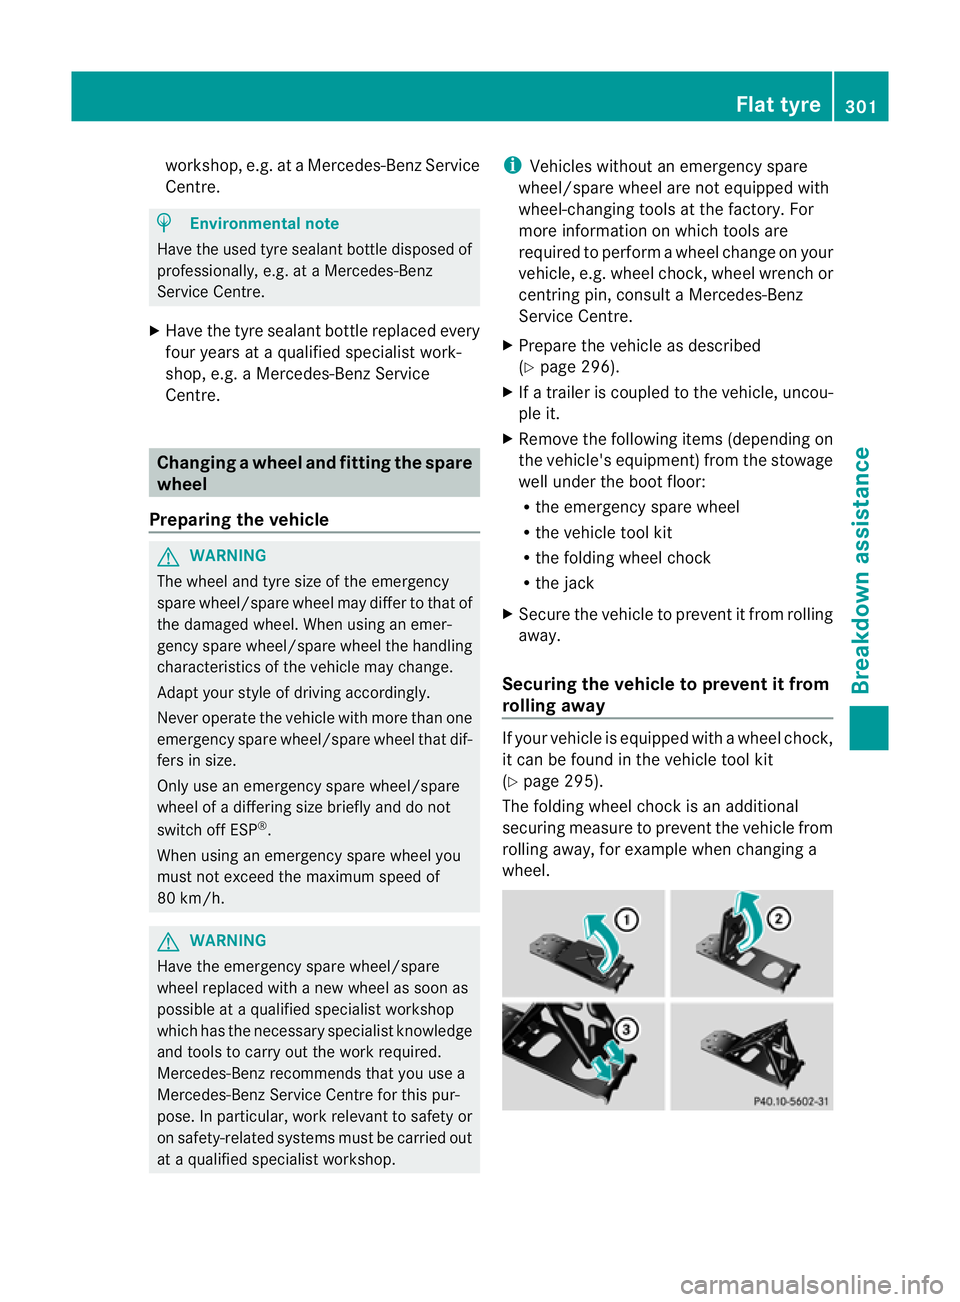
Securing the vehicle to prevent it from
rolling away If your vehicle is equipped with
awheel chock,
it can be found in the vehicle tool kit
(Y page 295).
The folding wheel chock is an additional
securing measure to prevent the vehicle from
rolling away,f or example when changing a
wheel. Flat tyre
301Breakdown assistance Z
Page 305 of 353

X
Fold both plates upwards :.
X Fold ou tlower plate ;.
X Guide the lugs on the lower plate fully into
the openings in base plate =.Securing the vehicle on level ground (example:
Coupé)
X
On level ground: place chocksorother
suitable items under the front and rear of
the wheel that is diagonally opposite the
wheel you wish to change. Securing the vehicle on slight downhill gradients
(example: Coupé)
X On downhill gradients: place chocksor
other suitable items in front of the wheels
of the front and rear axle.
Raising the vehicle G
WARNING
The jack is intended only for lifting the vehicle
briefly for wheel changes.
The vehicle must be placed on stands if you
intendtow ork under it. Make sure that the jack is placed on
afirm,
non-slip, level surface. Do not use wooden
blocks or similar object sasajack underlay.
The vehicle could otherwise slip off the jack
and seriously injure you.
Do not start the engine at any time while the
wheel is being changed.
Do not lie under the vehicle when it is being
supported by the jack.Ify ou do not raise the
vehicle as described, it could slip off the jack
(e.g. if the engine is started or adoor or the
boot lid is opened or closed) and seriously
injure you. G
WARNING
If you fail to position the jack correctly, the
vehicle may:
R slip off the jack
R injure you or others
R be damaged.
Therefore, make sure that the jack is posi-
tioned correctly in the respectiv ejacking
points. Before positioning the jack,r emove
any dirt that may have collected in the jacking
points. Please note that you must position the
jack in the opening of the jacking point. X
Using wheel wrench :,loosen the bolts on
the wheel you wish to change by about one
full turn. Do not unscrew the bolts com-
pletely.
The jacking points for the jack are located
behind the wheel housings of the front wheels
and in front of the wheel housings of the rear
wheels (arrows). 302
Flat tyreBreakdown assistance
Page 307 of 353

Fitting
anew wheel G
WARNING
Replac edamage dorcorrode dwheel bolts.
Never oil or greas ewheel bolts. This could
cause th eboltstol oosenint he wheel hub. G
WARNING
If aw heel hub thread is damaged, you must
not drive the vehicle any further. Consult a
qualified specialist workshop which has the
necessary specialist knowledge and tools to
carry out the work required. Mercedes-Benz
recommends that you use aMercedes-Benz
Service Centr eorService 24h for this pur-
pose. In particular, work relevant to safety or
on safety-related systems must be carried out
at aq ualified specialist workshop. G
WARNING
Only use wheel bolts that have been designed
for the wheel and the vehicle. For safety rea-
sons, Mercedes-Benz recommends that you
only use wheel bolts which have been
approved for Mercedes-Benz vehicles and the
respective wheel. Other wheel bolts could
work loose or damage the brake system.
Do not tighten the wheel bolts completely
while the vehicle is still jacked up. The vehicle
could topple off the jack.
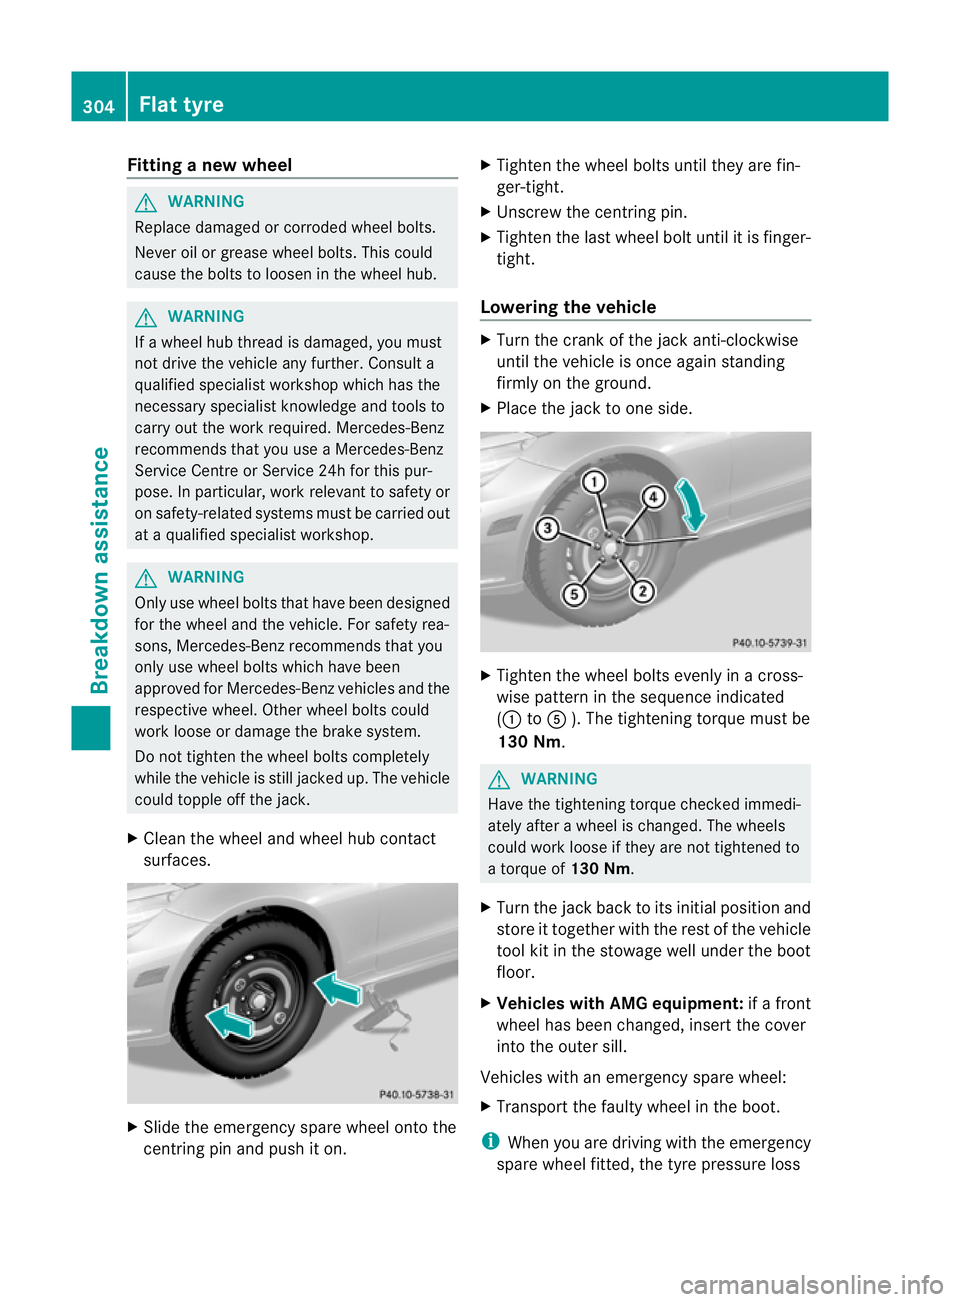
X Clean the wheel and wheel hub contact
surfaces. X
Slide the emergency spare wheel ontot he
centring pin and push it on. X
Tighten the wheel bolts until they are fin-
ger-tight.
X Unscrew the centring pin.
X Tighten the last wheel bolt until it is finger-
tight.
Lowering the vehicle X
Turn the cran kofthe jack anti-clockwise
until the vehicle is oncea gain standing
firmly on the ground.
X Place the jack to one side. X
Tighten the wheel bolts evenly in across-
wise patter ninthe sequence indicated
(: toA ). The tightening torque must be
130 Nm. G
WARNING
Have the tightening torque checked immedi-
ately after awheel is changed. The wheels
could work loose if they are not tightened to
at orque of 130 Nm.
X Turn the jack back to its initial position and
store it together with the rest of the vehicle
tool kit in the stowage well under the boot
floor.
X Vehicles with AMG equipment: ifaf ront
wheel has been changed, insert the cover
into the outer sill.
Vehicles with an emergency spare wheel:
X Transport the faulty wheel in the boot.
i When you are driving with the emergency
spare wheel fitted, the tyre pressure loss 304
Flat tyreBreakdown assistance
Page 313 of 353

Position number
Bidentifies the charged batter yofthe other vehicle or an equivalent jump-
starting device.
X Slide cover :of positive terminal ;in the direction of the arrow.
X Connec tpositive terminal ;on your vehicle to positive terminal =of donor battery B
using the jump lead, beginning with your own battery.
X Start the engine of the donor vehicle and run it at idling speed.
X Connect negative terminal ?of donor battery Bto earth point Aof your vehicle using
the jump lead, connectingt he jump lead to donor battery Bfirst.
X Start the engine.
X Allow the engine to run for afew minutes before disconnecting the jump lead.
X First, remove the jump lead from earth point Aand negative terminal ?,then from positive
terminal ;and positive terminal =,each time disconnecting from the contacts on your
own vehicle first.
X After removing the jump lead, close cover :on positive terminal ;.
X Have the battery checked at aqualified specialist workshop, e.g. aMercedes-BenzS ervice
Centre. The jump-starting procedure is not astandard operatin gstate; therefore, have the
batter ychecked. Towing and tow-starting
Important safet
ynotes
Observe the legal requirements for the rele-
vant countries when towing and tow-starting. G
WARNING
If you tow the vehicle, you must use arigid
towing bar if: 310
Towing and tow-startingBreakdown assistance
Page 314 of 353

R
the engine is not running.
R there is abrake syste mmalfunction.
R there is amalfunctio ninthe power supply
or the vehicle's electrical system.
The power assistance for the steering and the
brake force booster do not work when the
engine is not running. You will need more
force to steer and brake, you may have to
depress the brake pedal with maximum force.
Before towing away,m ake sure that the steer-
ing can be moved and is not locked.
If you tow or tow-start another vehicle, its
weight must not exceed the maximum per-
missible gross vehicle weight of your vehicle. G
WARNING
The vehicle is braked when the HOLD function
or DISTRONIC PLUS is activated. Therefore,
deactivate HOLD and DISTRONIC PLUS if the
vehicle is to be towed.
It is better to have the vehicle transported
than to have it towed.
! You may tow the vehicle for amaximum
of 50 km. Atowing speed of 50 km/h must
not be exceeded.
For towing distances over 50 km, the entire
vehicle must be lifted up and transported.
! Only secure the tow rope or towing bar to
the towing eyes. The vehicle may otherwise
be damaged.
! Do not use the towing eye for recovery,
as this could damage the vehicle. If in
doubt, recover the vehicle with acrane.
! Pull away smoothly when towing away or
tow-starting avehicle. If the tractive power
is too high, the vehicles could be damaged.
! On vehicles with KEYLESS-GO, use the
key instead of the Start/Stop button. Turn
the key to position 2in the ignition lock and
shift the automatic transmission to N.
Then, turn the key back to 0and leave it in
the ignition lock. When towing
avehicle with an automatic
transmission, the transmission must be in
position N.
The battery must be connected and charged.
Otherwise, you:
R cannot turn the key in the ignition lock to
position 2
R cannot shift the transmission to position
N on vehicles with automatic transmission
Vehicles with automatic transmission:
release the selector lever lock manually to
move it out of position P(Y page 160).
i Before the vehicle is towed, switch off the
automatic locking feature (Y page 78). You
could otherwise be locked out when push-
ing or towing the vehicle.
Deactivate tow-away protection
(Y page 68) before the vehicle is towed. Fitting/removing the towing eye
Fitting the towing eye Vehicles with
atrailer tow hitch: if you intend
to use the vehicle for towing, fold out the ball
coupling and connect the towbar to it
(Y page 206).
X Remove the towing eye from the vehicle
tool kit (Y page 295). G
WARNING
The exhaust tail pipe may be hot. You could
burn yourself if you touch the tail pipe. Be
particularly careful when removing the rear
cover.
The mountings for the removable towing eyes
are located in the bumpers. They are at the
front and at the rear, under the covers. Towing and tow-starting
311Breakdown assistance Z