2011 MERCEDES-BENZ E-CLASS CABRIOLET run flat
[x] Cancel search: run flatPage 13 of 353

Electronic Brak
eforce Distribution
see EB D(Electronic Brake force
Distribution)
Electronic Stability Program
see ESP ®
(Electronic Stabilit yProgram)
Electronic Traction System
see ET S(Electronic Tractio nSystem)
Emergency closing (soft top) .............87
Emergency key Unlocking the driver's door ..............79
Emergency key element
Function/notes ................................ 74
Locking vehicle ................................ 79
Emergency release
Driver's door .................................... 79
Emergency spare wheel
Notes/data .................................... 326
Storage location ............................ 296
Emergency unlocking
Boot ................................................. 81
Vehicle ............................................. 79
Engine
Display message ............................ 242
ECO start/stop function ................150
Emergency starting ........................313
Engine numbe r............................... 333
Running irregularl y......................... 152
Starting problems ..........................152
Starting the engine with the key ....148
Starting with KEYLESS GO .............149
Stopping ........................................ 165
Warning lamp (engine diagnos-
tics) ............................................... 260
Engine electronics
Notes ............................................. 331
Problem (fault) ............................... 152
Engine oil
Additives ........................................ 336
Checking the oil leve l..................... 282
Display message ............................ 243
Filling capacity ............................... 335
Notes about oil grades ................... 335
Notes on oil level/consumption ....282
Topping up ..................................... 283
Viscosity ........................................ 336Environmental protection
Note ................................................ .21
Returnin ganend-of-life vehicl e....... 21
ESP ®
(Electronic Stability Pro-
gram) Deactivating/activating .................223
Deactivating/activating (notes) .......64
Display message ............................ 233
ETS .................................................. 64
Function/notes ................................ 64
Important safety guidelines .............64
Trailer stabilisatio n.......................... 65
Warning lamp ................................. 258
ETS (Electronic Traction System) ....... 64
Exhaus ttail pipe (cleaning instruc-
tions) .................................................. 291
Exterior lighting see Lights
Exterior mirrors
Adjusting ....................................... 109
Anti-dazzle mode (automatic) ........111
Folding in/ou t(automatically) .......110
Folding in/ou t(electrically) ...........110
Folding in whe nlocking( on-board
computer) ...................................... 230
Out of position (troubleshooting) ...110
Parking position ............................. 111
Resetting ....................................... 110
Storing settings (memory func-
tion) ............................................... 112 F
Fatigue Assist see ATTENTION ASSIST
Faul tmessage
see Display messages
Filler cap
see Fuel filler flap
Fire extinguisher ............................... 294
First-aid kit ......................................... 294
Flat tyre Changing awheel/fitting the
spare wheel ................................... 301
MOExtended run-fla tsystem ......... 305
Preparing the vehicle .....................296
Raising the vehicle .........................302
TIREFIT kit ...................................... 297 10
Index
Page 16 of 353

Foglamp
s....................................... 115
Foglamps (extende drange )........... 118
Hazard warning lamps ...................117
Headlamp flasher ........................... 117
Headlamp range ............................ 116
Ligh tswitc h................................... 114
Main-beam headlamps ................... 117
Motorway mode ............................. 118
Parking lamps ................................ 114
Rea rfoglamp ................................. 116
Switching Adaptive Highbeam
Assist on/off ................................. 227
Switching the daytime driving
lights on/off (on-board computer) .226
Switching the daytime driving
lights on/off (switch) .....................115
Switching the exterio rlighting
delayed switch-off on/off (on-
board computer )............................ 227
Switching the surround lighting
on/off (on-board computer) ..........227
Turn signals ................................... 116
see Changing bulbs
see Interior lighting
Light sensor (display message) .......241
LIMi ndicator lamp
Cruise control ................................ 170
DISTRONI CPLUS ........................... 173
Variabl eSPEEDTRONIC .................181
Limiting the speed
see SPEEDTRONIC
Loading guidelines ............................264
Locking see Centra llocking
Locking (doors)
Automatic ........................................ 78
Emergency locking ........................... 79
From insid e(central locking but-
ton) .................................................. 78
Locking centrally
see Centra llocking
Locking verification signal (on-
board computer) ............................... 228
Luggage cover see Boot separator
Luggage net ....................................... 266Lumbar support
Adjusting the 4-way lumba rsup-
por t................................................ 105 M
M+ Styres ........................................... 319
Main-beam headlamps Changing bulbs .............................. 123
Display message ............................ 240
Switching Adaptive Highbeam
Assist on/off ................................. 119
Switching on/off ........................... 117
Maintenance
see ASSYST PLUS service interval
display
Manual transmission
Engaging revers egear ................... 154
Gea rlever ...................................... 153
Pulling away ................................... 149
Shifting to neutra l.......................... 154
Shift recommendatio n................... 154
Starting the engine ........................148
Matt finish (cleaning instructions) ..287
Memory card (audio) .........................220
Memory function ............................... 112
Mercedes-Benz Service Centre see Qualified specialist workshop
Message memory (on-board com-
puter) ................................................. .232
Messages see Display messages
Mirrors
see Exterior mirrors
see Rear-view mirror
see Vanity mirror
Mobile phone
Frequencies ................................... 331
Installatio n..................................... 331
Menu (on-board computer) ............221
Notes/placing in the bracket ......... 273
Transmissio noutput (maximum ).... 331
Modifying the programming (key) .....73
MOExtende drun-flat system ...........305
Motorway mode ................................ 118
MP3 Operating ...................................... .220
see Separate operating instructions Index
13
Page 252 of 353

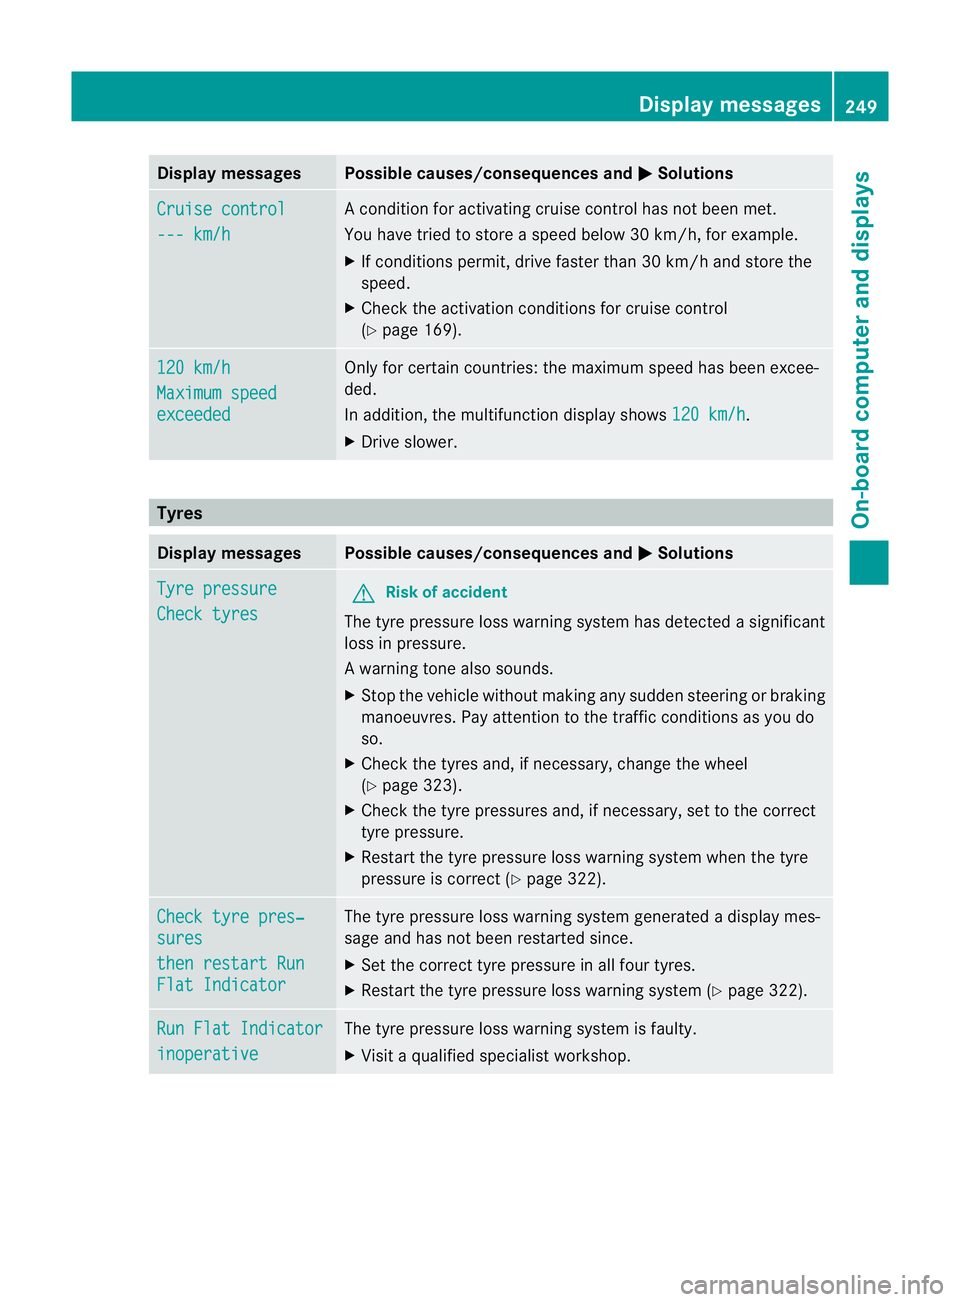
Display messages Possible causes/consequences and
M Solutions
Cruise control
--- km/h Ac
onditi on foractivatin gcruise control has no tbeen met.
You hav etried to store aspeed below 30 km/h, for example.
X If condition spermit ,drive faster than 30 km/ hand stor ethe
speed.
X Check the activation condition sfor cruise control
(Y page 169). 120 km/h
Maximu
mspeed exceeded Only for certain countries: the maximum speed has been excee-
ded.
In addition, the multifunction display shows
120 km/h .
X Driv eslower. Tyres
Display messages Possible causes/consequences and
M Solutions
Tyre pressure
Check tyres G
Risk of accident
The tyre pressure loss warning system has detected asignificant
loss in pressure.
Aw arning tone also sounds.
X Stop th evehicle without making any sudde nsteering or braking
manoeuvres .Pay attentio ntothe traffic conditions as you do
so.
X Check the tyres and, if necessary, change the wheel
(Y page 323).
X Check the tyre pressures and, if necessary, set to the correct
tyre pressure.
X Restart the tyre pressure loss warning system when the tyre
pressure is correc t(Ypage 322). Check tyre pres‐
sures
then restar
tRun Flat Indicator The tyre pressure loss warning system generated
adisplay mes-
sage and has not been restarted since.
X Set the correct tyre pressure in all four tyres.
X Restart the tyre pressure loss warning system (Y page 322).Run Flat Indicator
inoperative The tyre pressure loss warning system is faulty.
X
Visit aqualified specialist workshop. Display messages
249On-boardcomputer and displays Z
Page 299 of 353

R
Jack
R Centrin gpin
R On ep air of gloves
R Whee lwrench
R Towin geye "Minispare" emergency spare wheel
The "Minispare" emergency spar ewheel can
be foun dinthestowage well unde rthe boot
floor.
X Lift the boot floor upwards (Y page 268).X
Remove vehicle tool kit tray ;.
X Turn stowage well =anti-clockwise and
remove it.
X Remove "Minispare" emergency spare
wheel :.
For further information on changing awheel
and fittingt he spare wheel, see
(Y page 296). Flat tyre
Preparing the vehicle
Your vehicle may be equipped with:
R aT IREFIT kit
R an emergency spare wheel
R MOExtended tyres (tyres with run-flat char-
acteristics) (Y page 305)
i Vehicle preparation is not necessary on
vehicles with MOExtended tyres. i
Vehicles with MOExtended tyres are not
equipped with aTIREFIT kit at the factory.
It is therefore recommended that you addi-
tionally equip your vehicle with aTIREFIT kit
if you fit tyres that do not feature run-flat
properties, e.g. winter tyres. ATIREFIT kit
can be obtained from aMercedes-Benz
Service Centre.
X Stop the vehicle as far away as possible
from traffic on solid, non-slippery and level
ground.
X Switch on the hazard warning lamps.
X Firmly depress the parking brake.
X Bring the front wheels into the straight-
ahead position.
X Vehicles with manualt ransmission:
engage first or reverse gear.
X Vehicles with automatic transmission:
move the selector lever to P.
X Switch off the engine.
X Vehicles without KEYLESS-GO: remove
the key from the ignition lock.
X Vehicles with KEYLESS-GO: open the
driver's door.
The on-board electronicsh ave status0,
which is the same as the key having been
removed.
X Vehicles with KEYLESS-GO: remove the
Start/Stop button from the ignition lock
(Y page 147).
X All occupants must get out of the vehicle.
Make sure that they are not endangered as
they do so.
X Make sure that no one is near the danger
area whilst awheel is being changed. Any-
one who is not directly assisting in the
wheel change should, for example, stand
behind the barrier.
X Get out of the vehicle. Pay attention to traf-
fic conditionsw hen doing so.296
Flat tyreBreakdown assistance
Page 301 of 353

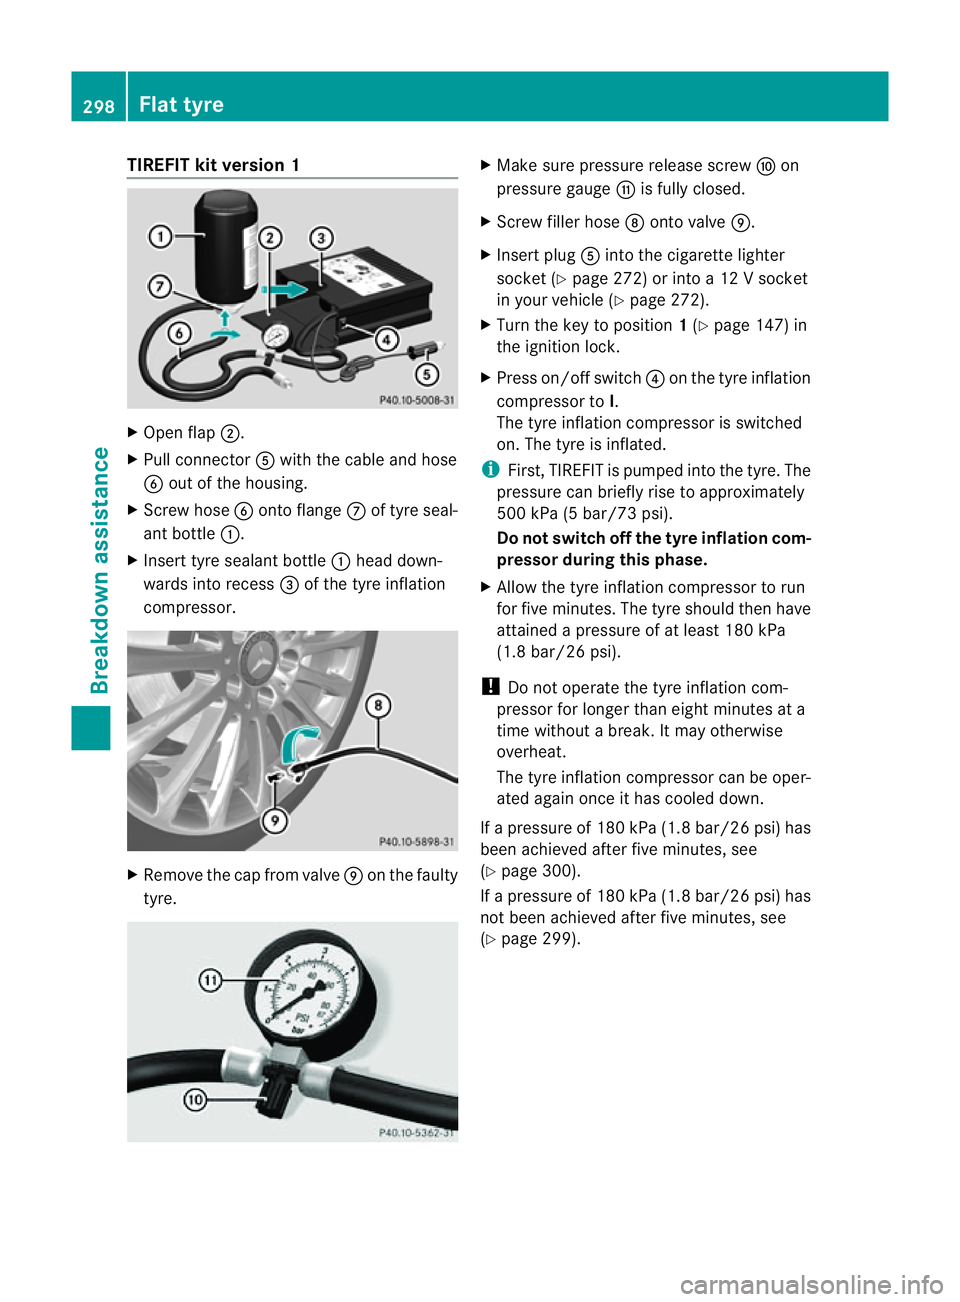
TIREFI
Tkit version 1 X
Open flap ;.
X Pull connector Awith the cable and hose
B out of the housing.
X Screw hose Bontoflange Cof tyre seal-
ant bottle :.
X Insert tyre sealant bottle :head down-
wards int orecess =of the tyre inflation
compressor. X
Remove the cap from valve Eon the faulty
tyre. X
Make sure pressure release screw Fon
pressure gauge Gis fully closed.
X Screw filler hose Dontovalve E.
X Insert plug Aintot he cigarett elighter
socket (Y page 272)orintoa12Vs ocket
in your vehicle (Y page 272).
X Turn the key to position 1(Y page 147 )in
the ignition lock.
X Press on/off switch ?on the tyre inflation
compressor to I.
The tyre inflation compressor is switched
on. The tyre is inflated.
i First, TIREFIT is pumped int othe tyre .The
pressure can briefly rise to approximately
500 kPa (5 bar/73 psi).
Do not switch off the tyrei nflation com-
pressor during this phase.
X Allow the tyre inflation compressor to run
for five minutes. The tyre should then have
attained apressure of at least 180 kPa
(1.8 bar/26 psi).
! Do not operate the tyre inflation com-
pressor for longer than eight minutes at a
time without abreak. It may otherwise
overheat.
The tyre inflation compressor can be oper-
ated again once it has cooled down.
If ap ressure of 180 kPa (1.8 bar/26 psi) has
been achieved after five minutes, see
(Y page 300).
If ap ressure of 180 kPa (1.8 bar/26 psi) has
not been achieved after five minutes, see
(Y page 299). 298
Flat tyreBreakdown assistance
Page 302 of 353

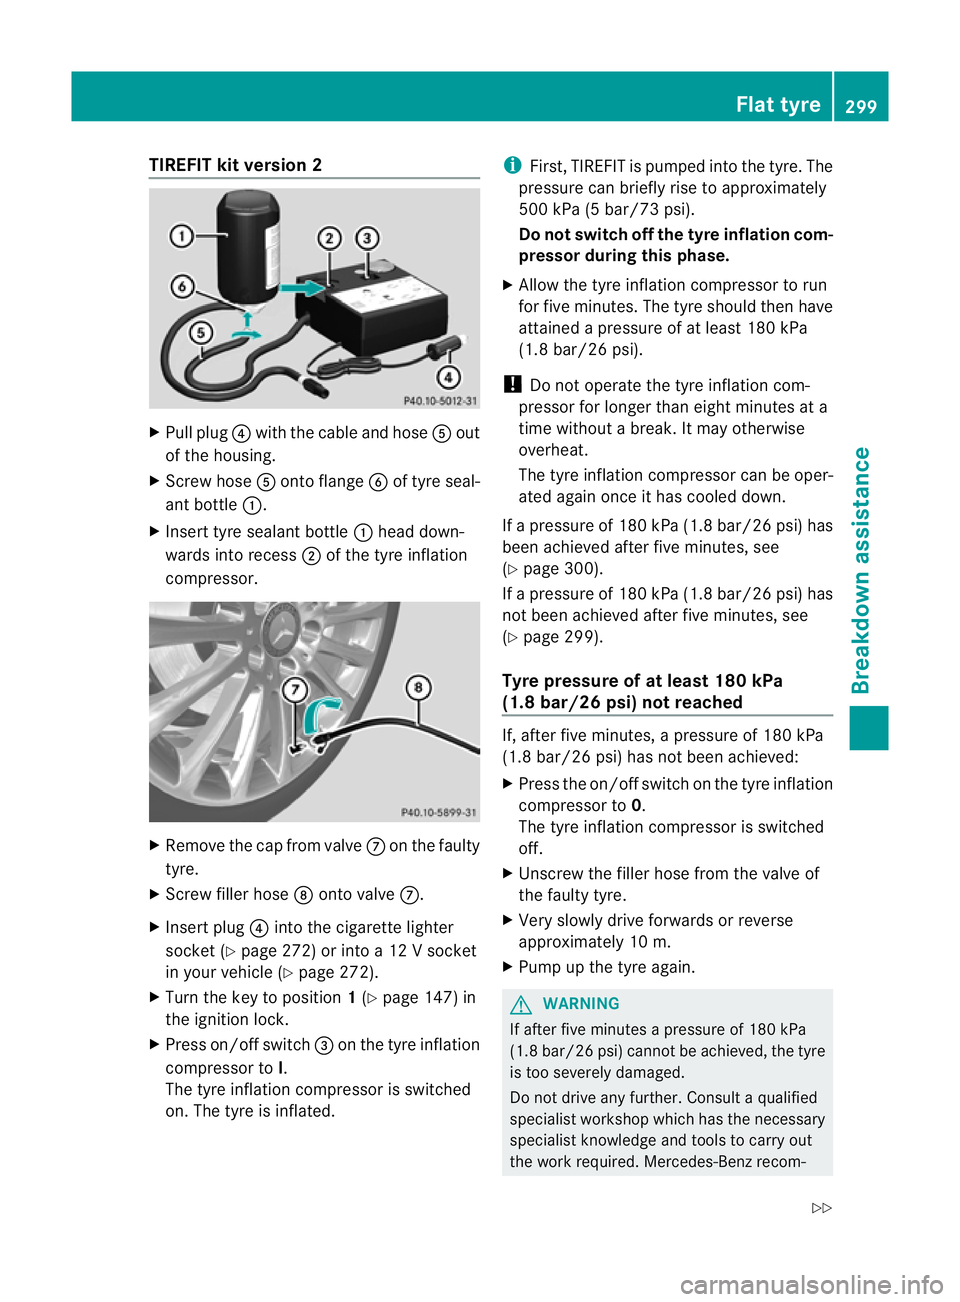
TIREFI
Tkit version 2 X
Pull plug ?with the cable and hose Aout
of the housing.
X Screw hose Aontoflange Bof tyre seal-
ant bottle :.
X Insert tyre sealant bottle :head down-
wards int orecess ;of the tyre inflation
compressor. X
Remove the cap from valve Con the faulty
tyre.
X Screw filler hose Dontovalve C.
X Insert plug ?intot he cigarett elighter
socket (Y page 272)orintoa12Vs ocket
in your vehicle (Y page 272).
X Turn the key to position 1(Y page 147 )in
the ignition lock.
X Press on/off switch =on the tyre inflation
compressor to I.
The tyre inflation compressor is switched
on. The tyre is inflated. i
First, TIREFIT is pumped int othe tyre. The
pressure can briefly rise to approximately
500 kPa (5 bar/7 3psi).
Do not switch off the tyrei nflation com-
pressor during this phase.
X Allow the tyre inflation compressor to run
for five minutes. The tyre should then have
attained apressure of at least 180 kPa
(1.8 bar/26 psi).
! Do not operate the tyre inflation com-
pressor for longer than eight minutes at a
time without abreak. It may otherwise
overheat.
The tyre inflation compressor can be oper-
ated again once it has cooled down.
If ap ressure of 180 kPa (1.8 bar/26 psi) has
been achieved after five minutes, see
(Y page 300).
If ap ressure of 180 kPa (1.8 bar/26 psi) has
not been achieved after five minutes, see
(Y page 299).
Tyrep ressur eofatleast 180 kPa
(1.8 bar/26 psi) not reached If, after five minutes,
apressure of 180 kPa
(1.8 bar/26 psi) has not been achieved:
X Press the on/off switch on the tyre inflation
compressor to 0.
The tyre inflation compressor is switched
off.
X Unscrew the filler hose from the valve of
the faulty tyre.
X Very slowly drive forwards or reverse
approximately 10 m.
X Pump up the tyre again. G
WARNING
If after five minutes apressure of 180 kPa
(1.8 bar/26 psi) cannot be achieved, the tyre
is too severel ydamaged.
Do not drive any further. Consult aqualified
specialist workshop which has the necessary
specialist knowledge and tools to carry out
the work required. Mercedes-Benz recom- Flat tyre
299Breakdown assistance
Z
Page 303 of 353

mends that you use
aMercedes-Benz Service
Centre for this purpose. In particular, work
relevant to safety or on safety-related sys-
tems must be carried out at aqualified spe-
cialist workshop.
Tyre pressure of 180 kPa (1.8 bar/
26 psi) is reached X
Press the on/off switch on the tyre inflation
compresso rto0.
The tyre inflation compressor is switched
off.
X Unscrew the filler hose from the valve of
the faulty tyre.
! After use, excess TIREFIT may run out of
the filler hose. This may cause stains.
Therefore, place the filler hose in the plastic
bag which contained the TIREFIT kit.
X Stow the tyre sealant bottle, the tyre infla-
tion compressor and the warning triangle.
X Pull away immediately. G
WARNING
Do not exceed the maximum speed of
80 km/h.
The "max. 80 km/h" label must be affixed in
the driver's field of vision.
The vehicle's handling characteristics may be
affected.
X Stop after driving for approximately ten
minutes and check the tyre pressure with
the tyre inflation compressor. G
WARNING
If the tyre pressure is less than 130 kPa
(1.3 bar/20 psi), the tyre is too severely dam-
aged. Do not drive any further. Consult a
qualified specialist workshop which has the
necessary specialist knowledge and tools to
carry out the work required. Mercedes-Benz
recommends that you use aMercedes-Benz
Service Centr efor this purpose. In particular,
work relevant to safety or on safety-related systems must be carried out at
aqualified
specialist workshop.
X Correct the tyre pressure if it is still at least
130 kPa (1.3 bar/20 psi) (for the values,
see the fuel filler flap).
X To increase the tyrep ressure: switch on
the tyre inflation compressor. TIREFI
Tkit version 1
X To reduce the tyrep ressure (version
1): open pressure release screw Fon
pressure gauge G. TIREFI
Tkit version 2
X To reduce the tyrep ressure (version
2): press pressure release button Enext
to pressure gauge F.
X Stow the tyre sealant bottle, the tyre infla-
tion compressor and the warning triangle.
X Driv etot he nearest workshop and have the
tyre changed there.
X Have the tyre sealant bottle replaced as
soon as possible at aqualified specialist 300
Flat tyreBreakdown assistance
Page 308 of 353

warning system cannot function reliably.
Only restart th
etyrep ressure loss warning
system when the defective whee lhas been
replaced with anew wheel. MOExtended tyres (tyres with run-flat
characteristics)
MOExtended tyres (tyres with run-flat char-
acteristics) allow you to continue driving the
vehicl eeven when one or more tyres lose all
air pressure.
MOExtended tyres may only be usedinc on-
junction with the activated tyre pressure loss
warning system or with the tyre pressure
monitor.
The maximu mpermissible distanc ewhich
can be driven in run-flat mode depends on the
load in the vehicle. It is 80 km if the vehicle
is partially laden and 30 km if fully laden.
The maximum permissible distanc ewhich
can be driven in run-flat mode is counted from
the momen tthe tyre pressure loss warning
appears in the multifunction display.
You must not exceed amaximum speed of
80 km/h. G
WARNING
The handling characteristics of your vehicle
deteriorate in run-flat mode, for example:
R when cornering
R when braking
R when accelerating rapidly
Adapt your driving style accordingly and avoid
sudden changes in direction and sudden
acceleration, as well as driving over obstacles
(i.e. kerbs, potholes), and driving off-road.
This is particularly the case when the vehicle
is heavily laden.
The maximum permissible distance that can
be driven in run-flat mode depends to alarge
extentont he loads placed on the vehicle. It
can be shorter due to high speeds, aheavy
load, sudden changes in direction, the road
surface condition, outside temperature, etc., or further if you drive carefully and conserva-
tively.
Do not continue to drive in run-flat mode if:
R you hear banging noises.
R the vehicle starts to shake.
R you see smoke and smell rubber.
R ESP ®
is intervening constantly.
R there are tears in the sidewalls of the tyre.
After driving in run-flat mode, you must have
the wheel(s) checked for damage at aquali-
fied specialist workshop which has the nec-
essary specialist knowledge and tools to carry
out the work required. The faulty tyre must be
replaced in every case.
Mercedes-Ben zrecommends that you use a
Mercedes-Benz Service Centr efor this pur-
pose. In particular, work relevant to safety or
on safety-related systems must be carried out
at aq ualified specialist workshop.
i When replacing one or all tyres, make
sure that you only use tyres marked
MOExtended and of the specified size for
the vehicle.
i Vehicles with MOExtended tyres are not
equipped with aTIREFI Tkit at the factory.
It is therefore recommended that you addi-
tionally equip your vehicle with aTIREFI Tkit
if you fit tyres that do not feature run-flat
properties, e.g. winter tyres. ATIREFI Tkit
can be obtained from aMercedes-Benz
Service Centre. Battery
Important safety notes
In order for the batter ytoachieve the maxi-
mum possible service life, it must alway sbe
sufficiently charged.
Have the batter ycharge checked more fre-
quently if you use the vehicle mainly for short
trips or if you leave it standing idle for a
lengthy period. Battery
305Breakdown assistance Z