2011 MERCEDES-BENZ CLS steering
[x] Cancel search: steeringPage 252 of 308
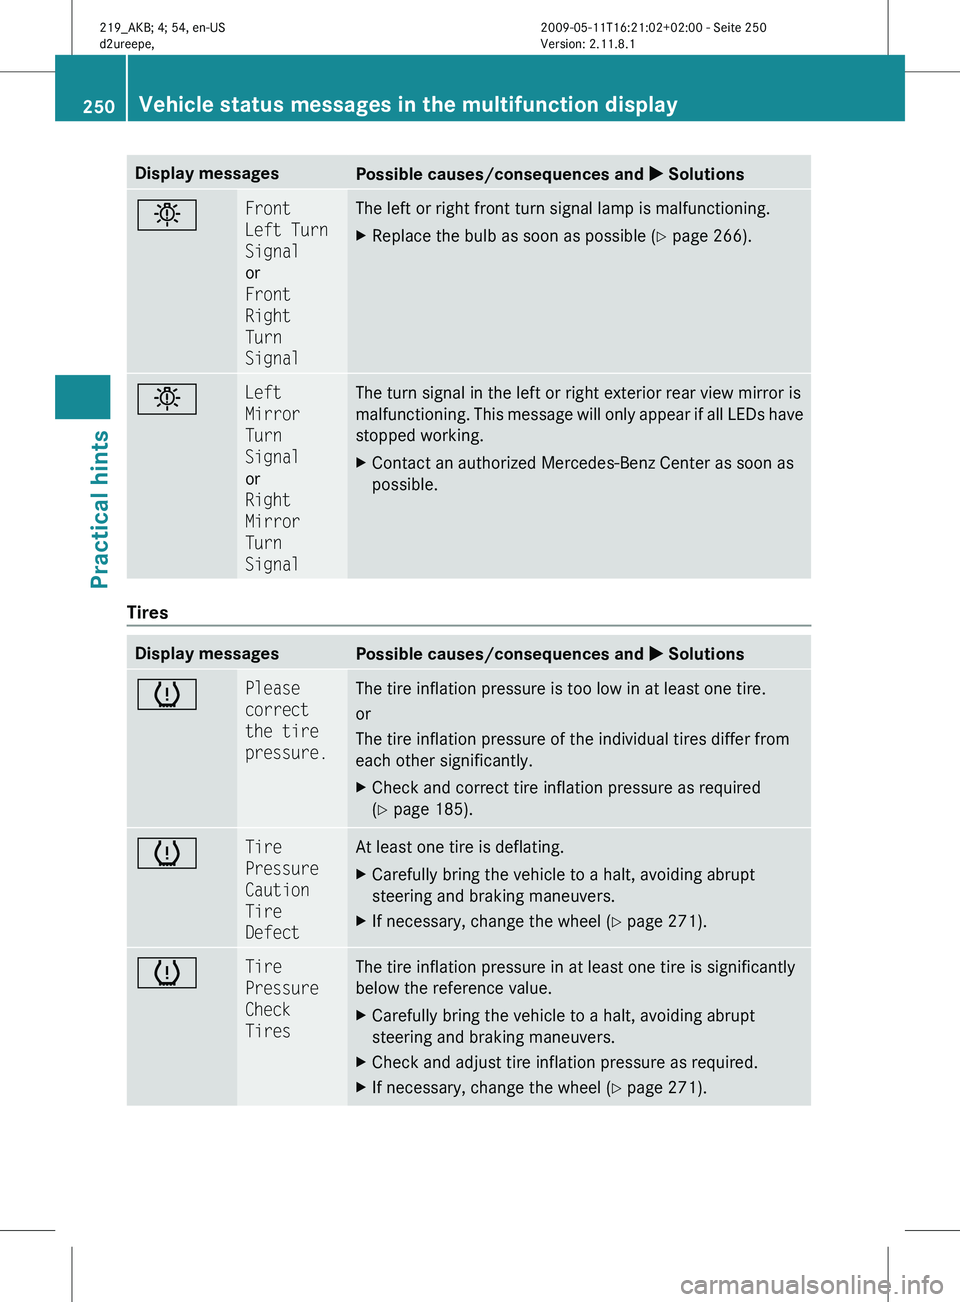
Display messages
Possible causes/consequences and
X Solutionsb Front
Left Turn
Signal
or
Front
Right
Turn
Signal The left or right front turn signal lamp is malfunctioning.
X
Replace the bulb as soon as possible (Y page 266). b Left
Mirror
Turn
Signal
or
Right
Mirror
Turn
Signal The turn signal in the left or right exterior rear view mirror is
malfunctioning.
This message will only appear if all LEDs have
stopped working.
X Contact an authorized Mercedes-Benz Center as soon as
possible. Tires
Display messages
Possible causes/consequences and
X Solutionsh Please
correct
the tire
pressure. The tire inflation pressure is too low in at least one tire.
or
The tire inflation pressure of the individual tires differ from
each other significantly.
X
Check and correct tire inflation pressure as required
(Y page 185). h Tire
Pressure
Caution
Tire
Defect At least one tire is deflating.
X
Carefully bring the vehicle to a halt, avoiding abrupt
steering and braking maneuvers.
X If necessary, change the wheel (Y page 271). h Tire
Pressure
Check
Tires The tire inflation pressure in at least one tire is significantly
below the reference value.
X
Carefully bring the vehicle to a halt, avoiding abrupt
steering and braking maneuvers.
X Check and adjust tire inflation pressure as required.
X If necessary, change the wheel (Y page 271). 250
Vehicle status messages in the multifunction display
Practical hints
219_AKB; 4; 54, en-US
d2ureepe,
Version: 2.11.8.1 2009-05-11T16:21:02+02:00 - Seite 250
Page 254 of 308
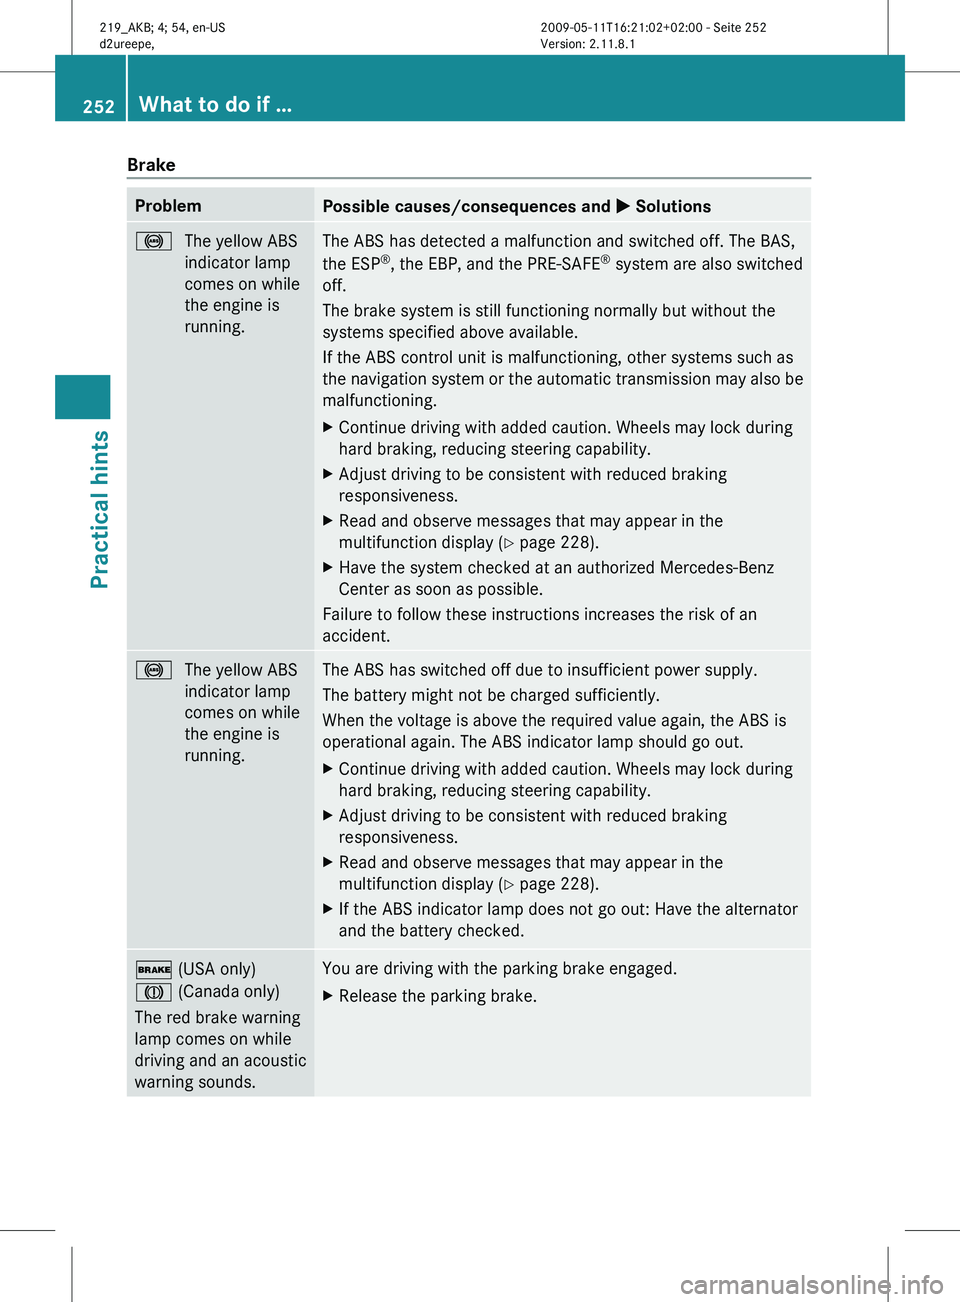
Brake
Problem
Possible causes/consequences and
X Solutions!
The yellow ABS
indicator lamp
comes on while
the engine is
running. The ABS has detected a malfunction and switched off. The BAS,
the ESP
®
, the EBP, and the PRE-SAFE ®
system are also switched
off.
The brake system is still functioning normally but without the
systems specified above available.
If the ABS control unit is malfunctioning, other systems such as
the
navigation system or the automatic transmission may also be
malfunctioning.
X Continue driving with added caution. Wheels may lock during
hard braking, reducing steering capability.
X Adjust driving to be consistent with reduced braking
responsiveness.
X Read and observe messages that may appear in the
multifunction display
(Y page 228).
X Have the system checked at an authorized Mercedes-Benz
Center as soon as possible.
Failure to follow these instructions increases the risk of an
accident. !
The yellow ABS
indicator lamp
comes on while
the engine is
running. The ABS has switched off due to insufficient power supply.
The battery might not be charged sufficiently.
When the voltage is above the required value again, the ABS is
operational again. The ABS indicator lamp should go out.
X
Continue driving with added caution. Wheels may lock during
hard braking, reducing steering capability.
X Adjust driving to be consistent with reduced braking
responsiveness.
X Read and observe messages that may appear in the
multifunction display
(Y page 228).
X If the ABS indicator lamp does not go out: Have the alternator
and the battery checked. $ (USA only)
J (Canada only)
The red brake warning
lamp comes on while
driving and an acoustic
warning sounds. You are driving with the parking brake engaged.
X
Release the parking brake. 252
What to do if …
Practical hints
219_AKB; 4; 54, en-US
d2ureepe,
Version: 2.11.8.1 2009-05-11T16:21:02+02:00 - Seite 252
Page 257 of 308
might deploy unexpectedly and unnecessarily
which could also result in injury.
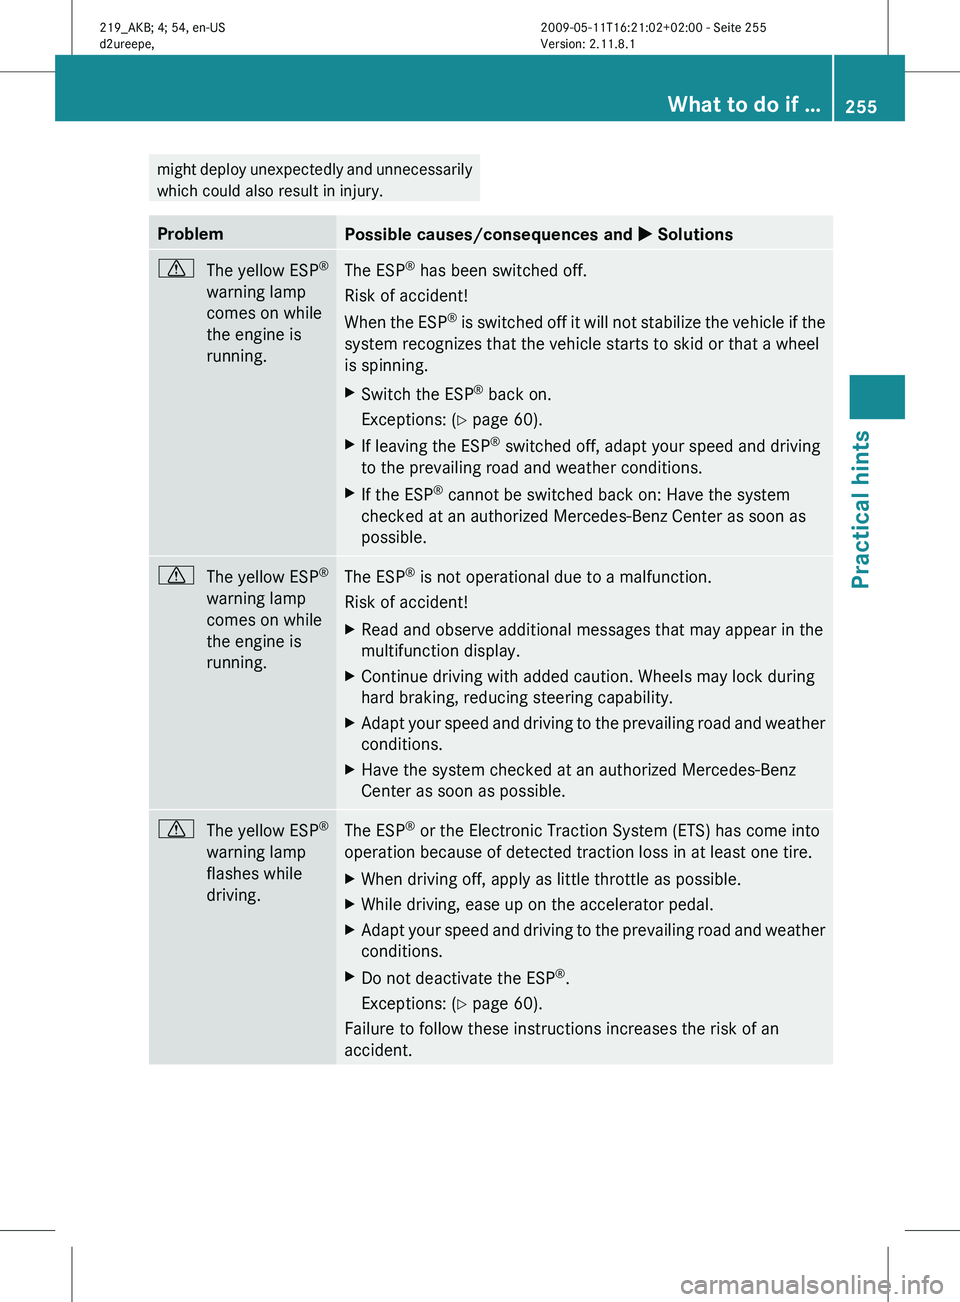
Problem
Possible causes/consequences and
X Solutionsd
The yellow ESP ®
warning lamp
comes on while
the engine is
running. The ESP
®
has been switched off.
Risk of accident!
When
the ESP ®
is switched off it will not stabilize the vehicle if the
system recognizes that the vehicle starts to skid or that a wheel
is spinning.
X Switch the ESP ®
back on.
Exceptions:
(Y page 60).
X If leaving the ESP ®
switched off, adapt your speed and driving
to the prevailing road and weather conditions.
X If the ESP ®
cannot be switched back on: Have the system
checked at an authorized Mercedes-Benz Center as soon as
possible. d
The yellow ESP ®
warning lamp
comes on while
the engine is
running. The ESP
®
is not operational due to a malfunction.
Risk of accident!
X Read and observe additional messages that may appear in the
multifunction display.
X Continue driving with added caution. Wheels may lock during
hard braking, reducing steering capability.
X Adapt your speed and driving to the prevailing road and weather
conditions.
X Have the system checked at an authorized Mercedes-Benz
Center as soon as possible. d
The yellow ESP ®
warning lamp
flashes while
driving. The ESP
®
or the Electronic Traction System (ETS) has come into
operation because of detected traction loss in at least one tire.
X When driving off, apply as little throttle as possible.
X While driving, ease up on the accelerator pedal.
X Adapt your speed and driving to the prevailing road and weather
conditions.
X Do not deactivate the ESP ®
.
Exceptions:
(Y page 60).
Failure to follow these instructions increases the risk of an
accident. What to do if …
255
Practical hints
219_AKB; 4; 54, en-US
d2ureepe, Version: 2.11.8.1 2009-05-11T16:21:02+02:00 - Seite 255 Z
Page 261 of 308
Tires
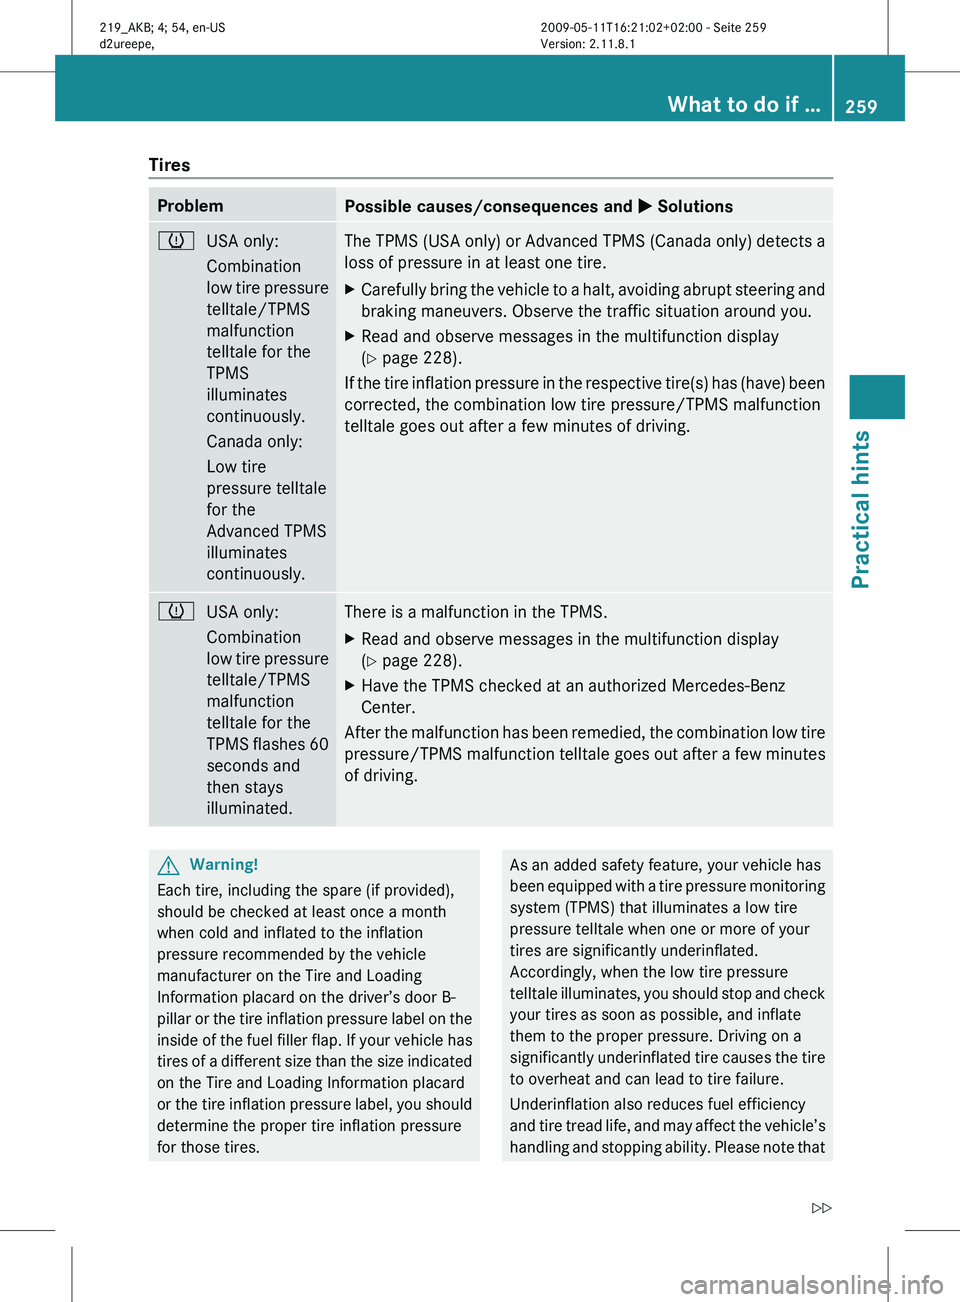
Problem
Possible causes/consequences and
X Solutionsh
USA only:
Combination
low
tire pressure
telltale/TPMS
malfunction
telltale for the
TPMS
illuminates
continuously.
Canada only:
Low tire
pressure telltale
for the
Advanced TPMS
illuminates
continuously. The TPMS (USA only) or Advanced TPMS (Canada only) detects a
loss of pressure in at least one tire.
X
Carefully bring the vehicle to a halt, avoiding abrupt steering and
braking maneuvers. Observe the traffic situation around you.
X Read and observe messages in the multifunction display
(Y page 228).
If the tire inflation pressure in the respective tire(s) has (have) been
corrected, the combination low tire pressure/TPMS malfunction
telltale goes out after a few minutes of driving. h
USA only:
Combination
low
tire pressure
telltale/TPMS
malfunction
telltale for the
TPMS flashes 60
seconds and
then stays
illuminated. There is a malfunction in the TPMS.
X
Read and observe messages in the multifunction display
(Y page 228).
X Have the TPMS checked at an authorized Mercedes-Benz
Center.
After the malfunction has been remedied, the combination low tire
pressure/TPMS
malfunction telltale goes out after a few minutes
of driving. G
Warning!
Each tire, including the spare (if provided),
should be checked at least once a month
when cold and inflated to the inflation
pressure recommended by the vehicle
manufacturer on the Tire and Loading
Information placard on the driver’s door B-
pillar
or the tire inflation pressure label on the
inside of the fuel filler flap. If your vehicle has
tires of a different size than the size indicated
on the Tire and Loading Information placard
or the tire inflation pressure label, you should
determine the proper tire inflation pressure
for those tires. As an added safety feature, your vehicle has
been
equipped with a tire pressure monitoring
system (TPMS) that illuminates a low tire
pressure telltale when one or more of your
tires are significantly underinflated.
Accordingly, when the low tire pressure
telltale illuminates, you should stop and check
your tires as soon as possible, and inflate
them to the proper pressure. Driving on a
significantly underinflated tire causes the tire
to overheat and can lead to tire failure.
Underinflation also reduces fuel efficiency
and tire tread life, and may affect the vehicle’s
handling and stopping ability. Please note that What to do if …
259
Practical hints
219_AKB; 4; 54, en-US
d2ureepe, Version: 2.11.8.1 2009-05-11T16:21:02+02:00 - Seite 259 Z
Page 273 of 308
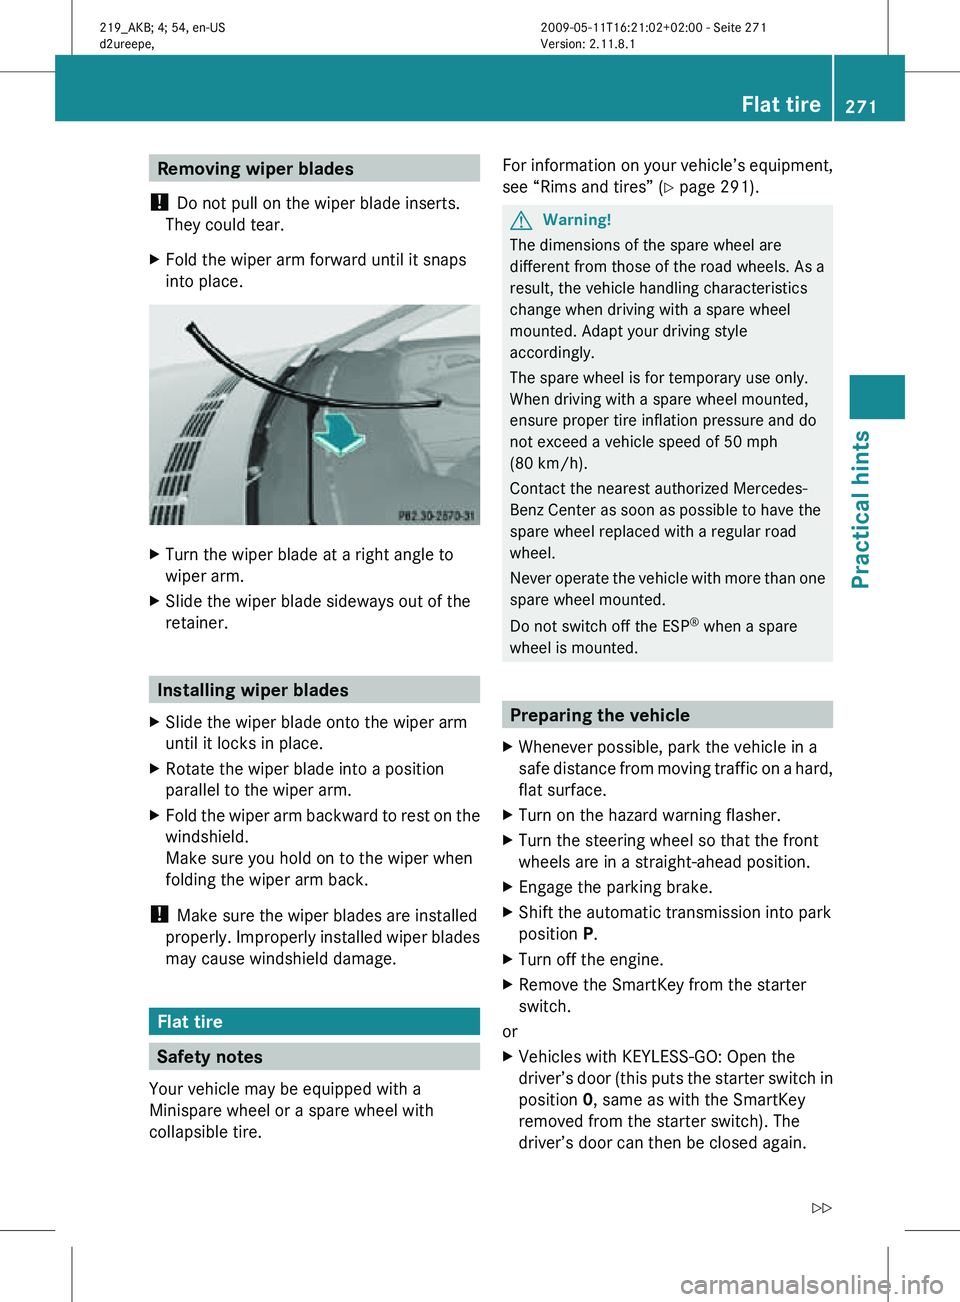
Removing wiper blades
! Do not pull on the wiper blade inserts.
They could tear.
X Fold the wiper arm forward until it snaps
into place. X
Turn the wiper blade at a right angle to
wiper arm.
X Slide the wiper blade sideways out of the
retainer. Installing wiper blades
X Slide the wiper blade onto the wiper arm
until it locks in place.
X Rotate the wiper blade into a position
parallel to the wiper arm.
X Fold the wiper arm backward to rest on the
windshield.
Make sure you hold on to the wiper when
folding the wiper arm back.
! Make sure the wiper blades are installed
properly. Improperly installed wiper blades
may cause windshield damage. Flat tire
Safety notes
Your vehicle may be equipped with a
Minispare wheel or a spare wheel with
collapsible tire. For information on your vehicle’s equipment,
see “Rims and tires” (
Y page 291). G
Warning!
The dimensions of the spare wheel are
different from those of the road wheels. As a
result, the vehicle handling characteristics
change when driving with a spare wheel
mounted. Adapt your driving style
accordingly.
The spare wheel is for temporary use only.
When driving with a spare wheel mounted,
ensure proper tire inflation pressure and do
not exceed a vehicle speed of 50 mph
(80 km/h).
Contact the nearest authorized Mercedes-
Benz Center as soon as possible to have the
spare wheel replaced with a regular road
wheel.
Never operate the vehicle with more than one
spare wheel mounted.
Do not switch off the ESP ®
when a spare
wheel is mounted. Preparing the vehicle
X Whenever possible, park the vehicle in a
safe distance from moving traffic on a hard,
flat surface.
X Turn on the hazard warning flasher.
X Turn the steering wheel so that the front
wheels are in a straight-ahead position.
X Engage the parking brake.
X Shift the automatic transmission into park
position P.
X Turn off the engine.
X Remove the SmartKey from the starter
switch.
or
X Vehicles with KEYLESS-GO: Open the
driver’s door (this puts the starter switch in
position 0, same as with the SmartKey
removed from the starter switch). The
driver’s door can then be closed again. Flat tire
271Practical hints
219_AKB; 4; 54, en-US
d2ureepe, Version: 2.11.8.1 2009-05-11T16:21:02+02:00 - Seite 271 Z
Page 279 of 308
X
Tighten the five wheel bolts evenly,
following
the diagonal sequence illustrated
(: to A), until all bolts are tight. Observe
a tightening torque of 96 lb-ft (130 Nm). G
Warning!
Have the tightening torque checked after
changing a wheel. The wheels could come
loose if they are not tightened to a torque of
96 lb-ft (130 Nm).
X Fully collapse the jack, with handle folded
in (storage position), see
(Y page 225).
X Store the jack and the other vehicle tools
in the designated storage space.
X Wrap the damaged wheel in the protective
wrap
that comes with the spare wheel and
put the wheel in the trunk.
You can also place the damaged wheel
down into the spare wheel well. In this case,
you must store the luggage bowl in the
trunk.
For information on storing the spare wheel
after it has been replaced by a regular road
wheel, see
(Y page 226).
i Vehicles with TPMS or Advanced TPMS:
Do not restart the tire inflation pressure
monitor until a full size wheel/tire with
functioning sensor has been placed back
into service on the vehicle. MOExtended system
The MOExtended system allows you to
continue driving your vehicle even if there is
a total loss of pressure in one or more tires.
You
may only use the MOExtended system in
conjunction with the tire pressure loss
warning system ( Y page 186), the TPMS
(Y page 188), or the Advanced TPMS
(Y page 190).
The maximum distance in emergency mode
depends on the vehicle’s load. It is 50 miles
(80 km) if the vehicle is partially loaded and
18 miles (30 km) if the vehicle is fully loaded.
The point at which the maximum driving distance in emergency mode begins is when
the warning message appears in the
multifunction display indicating that there is
a loss of tire inflation pressure.
X
Do not exceed the maximum speed of
50 mph (80 km/h
). G
Warning!
In emergency mode, your vehicle’s driving
characteristics are diminished in such
situations as:
R driving around curves
R while braking
R while accelerating rapidly
Therefore,
your driving style must be adapted
accordingly. Avoid abrupt steering and driving
maneuvers, as well as driving over obstacles
(road curbs, potholes, or off-road areas). This
is especially important if the vehicle is heavily
loaded.
The emergency driving distance that can be
achieved greatly depends on the demands
placed on the vehicle. Depending on speed,
load, driving maneuvers, road conditions,
outside temperature, etc., the distance can be
significantly shorter or, if the vehicle is driven
cautiously, somewhat longer.
Do not continue driving in emergency mode if
R you notice knocking sounds
R the vehicle starts to shake
R smoke develops and you smell rubber
R ESP ®
is intervening continuously
R you notice tears on the tire sidewalls
After driving in emergency mode, you must
have the rims inspected by an authorized
Mercedes-Benz Center to check if they are
suitable for further use. The failed tire must
be replaced in any case.
When replacing individual or all tires on the
vehicle, make sure only tires marked with
“MOExtended” are mounted in the size
specified for your vehicle ( Y page 291). Flat tire
277
Practical hints
219_AKB; 4; 54, en-US
d2ureepe, Version: 2.11.8.1 2009-05-11T16:21:02+02:00 - Seite 277 Z
Page 284 of 308
using flatbed or appropriate wheel lift/dolly
equipment. This method is preferable to other
types of towing.
!
To prevent damage during transport, do
not tie down vehicle by its chassis or
suspension parts.
If circumstances do not permit the
recommended towing methods, the vehicle
may be towed with all wheels on the ground
or one axle raised only so far as necessary to
have the vehicle moved to a safe location
where the recommended towing methods
can be employed.
! Before towing the vehicle observe the
following instructions:
R Do not tow-start the vehicle. You could
otherwise seriously damage the
automatic transmission which is not
covered by the Mercedes-Benz Limited
Warranty.
R Do not tow with sling-type equipment.
Towing with sling-type equipment over
bumpy roads will damage radiator and
supports.
R Towing of the vehicle should only be
done using the properly installed towing
eye bolt. Never attach a tow cable, tow
rope or tow rod to the vehicle chassis,
frame or suspension parts. G
Warning!
With the engine not running, there is no power
assistance for the brake and steering
systems. In this case, it is important to keep
in mind that a considerably higher degree of
effort is necessary to brake and steer the
vehicle. Adapt your driving accordingly.
! Avoid pulling the vehicle abruptly or
diagonally, since it could result in damage
to the chassis alignment.
! Do not use the towing eye bolt for
recovery, as this could damage the vehicle.
If in doubt, recover the vehicle with a crane. i
If the battery is disconnected or
discharged
R the SmartKey will not turn in the starter
switch
R the automatic transmission will remain in
park position P
For more information see “Battery”
(Y page 278) or “Jump starting”
(Y page 280).
For information on manually unlocking the
gear selector lever, see ( Y page 263). Installing towing eye bolt
Depending on whether you are towing a
vehicle or you are being towed, the towing eye
bolt can be screwed into threaded holes
which are located behind covers on each
bumper.
The towing eye bolt is supplied with the
vehicle tool kit, located underneath the trunk
floor ( Y page 224).
X Take the vehicle tool kit out of the trunk.
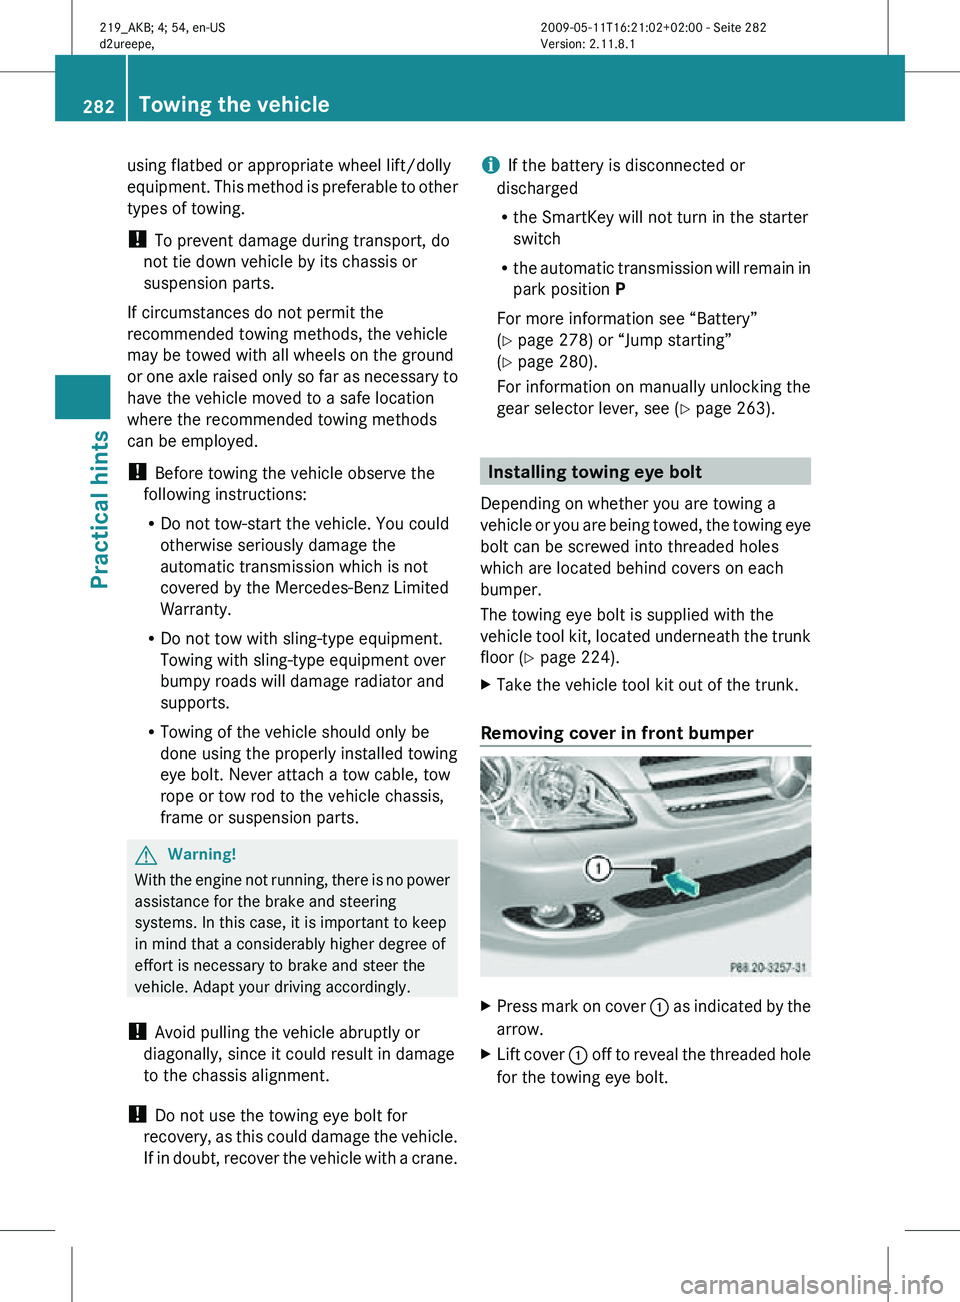
Removing cover in front bumper X
Press mark on cover : as indicated by the
arrow.
X Lift cover : off to reveal the threaded hole
for the towing eye bolt. 282
Towing the vehiclePractical hints
219_AKB; 4; 54, en-US
d2ureepe,
Version: 2.11.8.1 2009-05-11T16:21:02+02:00 - Seite 282
Page 286 of 308
Active braking action through the ESP
®
may otherwise seriously damage the brake
system which is not covered by the
Mercedes-Benz Limited Warranty. Towing with all wheels on the ground
G
Warning!
If circumstances require towing the vehicle
with
all wheels on the ground, always tow with
a tow bar if:
R the engine will not run
R there is a malfunction in the brake system
R there is a malfunction in the power supply
or in the vehicle’s electrical system
This is necessary to adequately control the
towed vehicle.
Prior to towing the vehicle with all wheels on
the ground, make sure the SmartKey is in
starter switch position 2.
If the SmartKey is left in the starter switch
position 0 for an extended period of time, it
can no longer be turned in the switch. In this
case, the steering is locked. To unlock,
remove SmartKey from starter switch and
reinsert. G
Warning!
With the engine not running, there is no power
assistance for the brake and steering
systems. In this case, it is important to keep
in mind that a considerably higher degree of
effort is necessary to brake and steer the
vehicle. Adapt your driving accordingly.
X Make sure the ignition is switched on.
X With the vehicle at a standstill, depress the
brake pedal and keep it pressed.
X Shift the automatic transmission into
neutral position N.
X Release the brake pedal.
X If engaged, release the parking brake.
X Switch on the hazard warning flasher
(Y page 90). !
The vehicle may be towed only for
distances up to 30 miles (50 km) and at a
speed not to exceed 30 mph (50 km/h).
i While being towed with the hazard
warning
flasher in use, use the combination
switch in the usual manner to signal turns.
Only the selected turn signal will operate.
Upon canceling the turn signal, the hazard
warning flasher will operate again. Fuses
Introduction
The electrical fuses in your vehicle serve to
switch off malfunctioning power circuits.
If a fuse is blown, the components and
systems secured by that fuse will stop
operating. G
Warning!
Only use fuses approved by Mercedes-Benz
with
the specified amperage for the system in
question and do not attempt to repair or
bridge a blown fuse. Using other than
approved fuses or using repaired or bridged
fuses may cause an overload leading to a fire,
and/or cause damage to electrical
components and/or systems. Have the cause
determined and remedied by an authorized
Mercedes-Benz Center.
A blown fuse must be replaced by an
appropriate spare fuse (recognizable by its
color or the fuse rating given on the fuse) of
the amperage recommended in the fuse
chart. Any Mercedes-Benz Center will be glad
to advise you on this subject.
i In case of a blown fuse contact Roadside
Assistance or an authorized Mercedes-
Benz Center.
If a newly inserted fuse blows again, have the
cause determined and rectified by an
authorized Mercedes-Benz Center.
The fuse chart is located in the fuse box in the
passenger compartment. The fuse chart 284
Fuses
Practical hints
219_AKB; 4; 54, en-US
d2ureepe,
Version: 2.11.8.1 2009-05-11T16:21:02+02:00 - Seite 284