2011 MERCEDES-BENZ C-CLASS ESTATE window
[x] Cancel search: windowPage 264 of 401

Display messages Possible causes/consequences and
M Solutions
6
Rear centre mal‐
function Consult
workshop G
Risk of injury
SRS has malfunctioned at the rear centre. The 6warning lamp
also lights up in the instrumen tcluster.
X Visit a qualified specialist workshop. 6
Left
windowbag mal‐
function Consult
workshop orRight
windowbag malfunc‐
tion Consult work‐
shop G
Risk of injury
There is a malfunction in the left-hand and/or right-hand window-
bag. The 6warning lamp also lights up in the instrumen tclus-
ter.
X Visit a qualified specialist workshop. Lights (4-button multifunction steering wheel)
i Display messages about LEDs:
This display message will only appear if all LEDs have failed. Displa
ymessages Possible causes/consequences and
M Solutions
b
Left corner. light
or
Right corner. light The left or right-hand cornering light is faulty.
X
Chec kwhether you are permitted to change the bulb yourself
(Y page 125).
or
X Visit a qualified specialist workshop. b
Left dipped beam
or
Right dipped-beam The left or right-hand dipped-beamh
eadlamp is faulty.
X Check whether you are permitted to change the bulb yourself
(Y page 125).
or
X Visit a qualified specialist workshop. b
Trailer left tail
lamp or
Trailer right tail lamp The left or right-hand trailer tail lamp is faulty.
X
Check whether you are permitted to change the bulb yourself.
or
X Visit a qualified specialist workshop. b
Trailer
left indic.
or
Trailer right indic. The left or right-hand trailer turn signal lamp is faulty.
X
Check whether you are permitted to change the bulb yourself.
or
X Visit a qualified specialist workshop. Display messages
261On-board computer and displays Z
Page 312 of 401
accident. You could cause an acciden
tor
cause injury to yoursel fand others.
! Whe nloading the vehicle, make sure that
you do not stack the load in the luggage
compartment higher than the lower edge of
the side windows. Do not place heavy
objects on top of the luggage compartment
cover.
The luggage compartment cover and the
safety net are attached to the rear bench seat
backrest as a combined luggage cover and
net.
Extending and retracting the luggage
compartment cover X
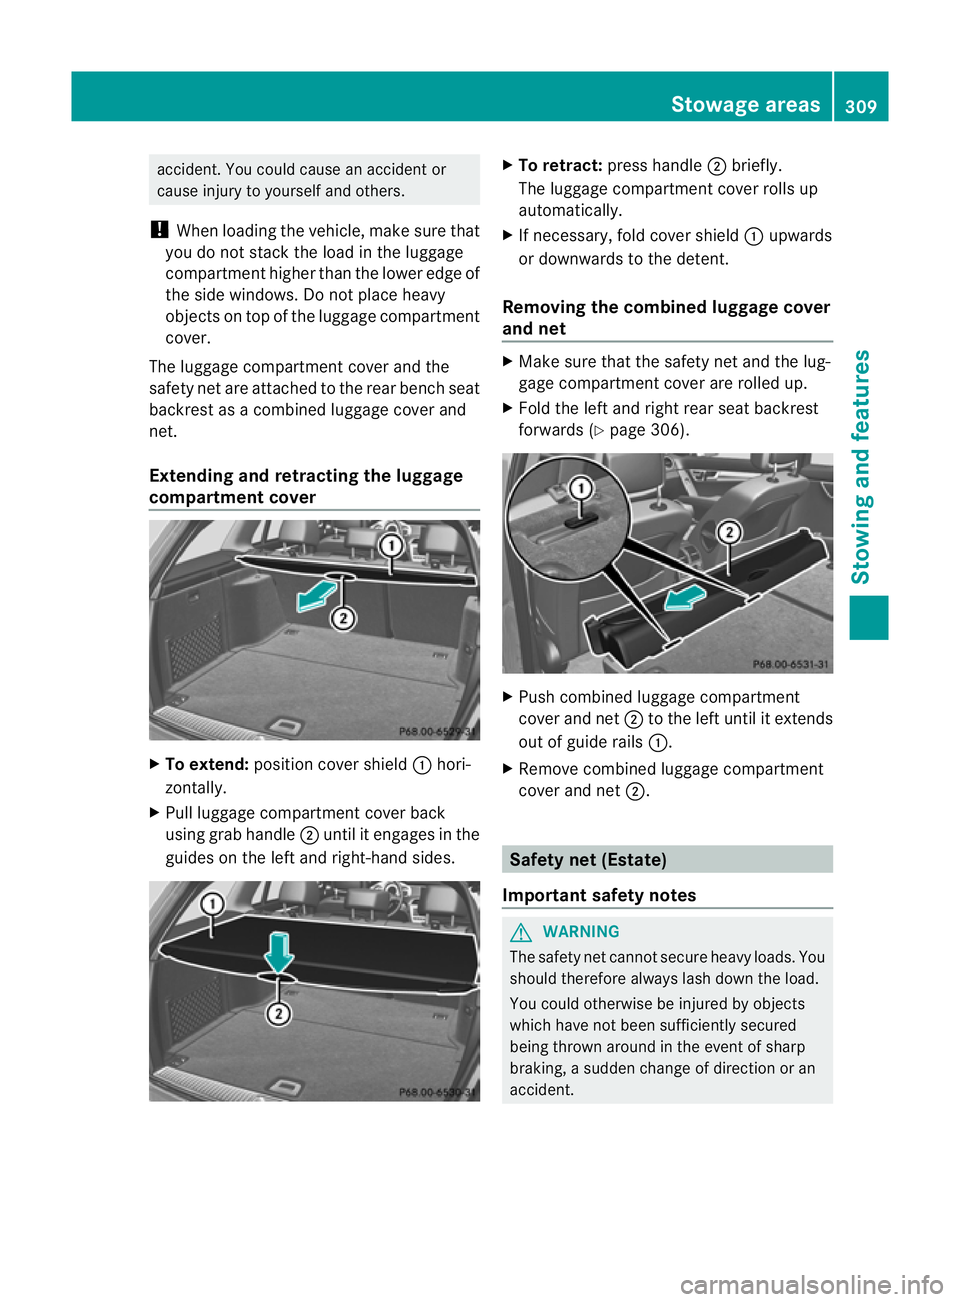
To extend: position cover shield :hori-
zontally.
X Pull luggage compartment cover back
using grab handle ;until it engages in the
guides on the left and right-hand sides. X
To retract: press handle ;briefly.
The luggage compartment cover rolls up
automatically.
X If necessary, fold cover shield :upwards
or downwards to the detent.
Removing the combined luggage cover
and net X
Make sure that the safety net and the lug-
gage compartment cover are rolled up.
X Fold the left and right rear seat backrest
forwards (Y page 306). X
Push combined luggage compartment
cover and net ;to the left until it extends
out of guide rails :.
X Remove combined luggage compartment
cover and net ;. Safety net (Estate)
Important safety notes G
WARNING
The safety net cannot secure heavy loads. You
should therefore always lash down the load.
You could otherwise be injured by objects
which have not been sufficiently secured
being thrown around in the event of sharp
braking, a sudden change of direction or an
accident. Stowage areas
309Stowing and features Z
Page 318 of 401
the uppe
rsection of cup holder :faces
forwards.
X Press the cup holder downwards until it
engages on the front-passenger side.
Cup holder in the rear seat armrest !
Do not sit on or support your body weight
on the rear seat armrest when it is folded
down, as you could otherwise damage it.
! Close the cup holder before folding the
rear seat armrest up. Otherwise, the cup
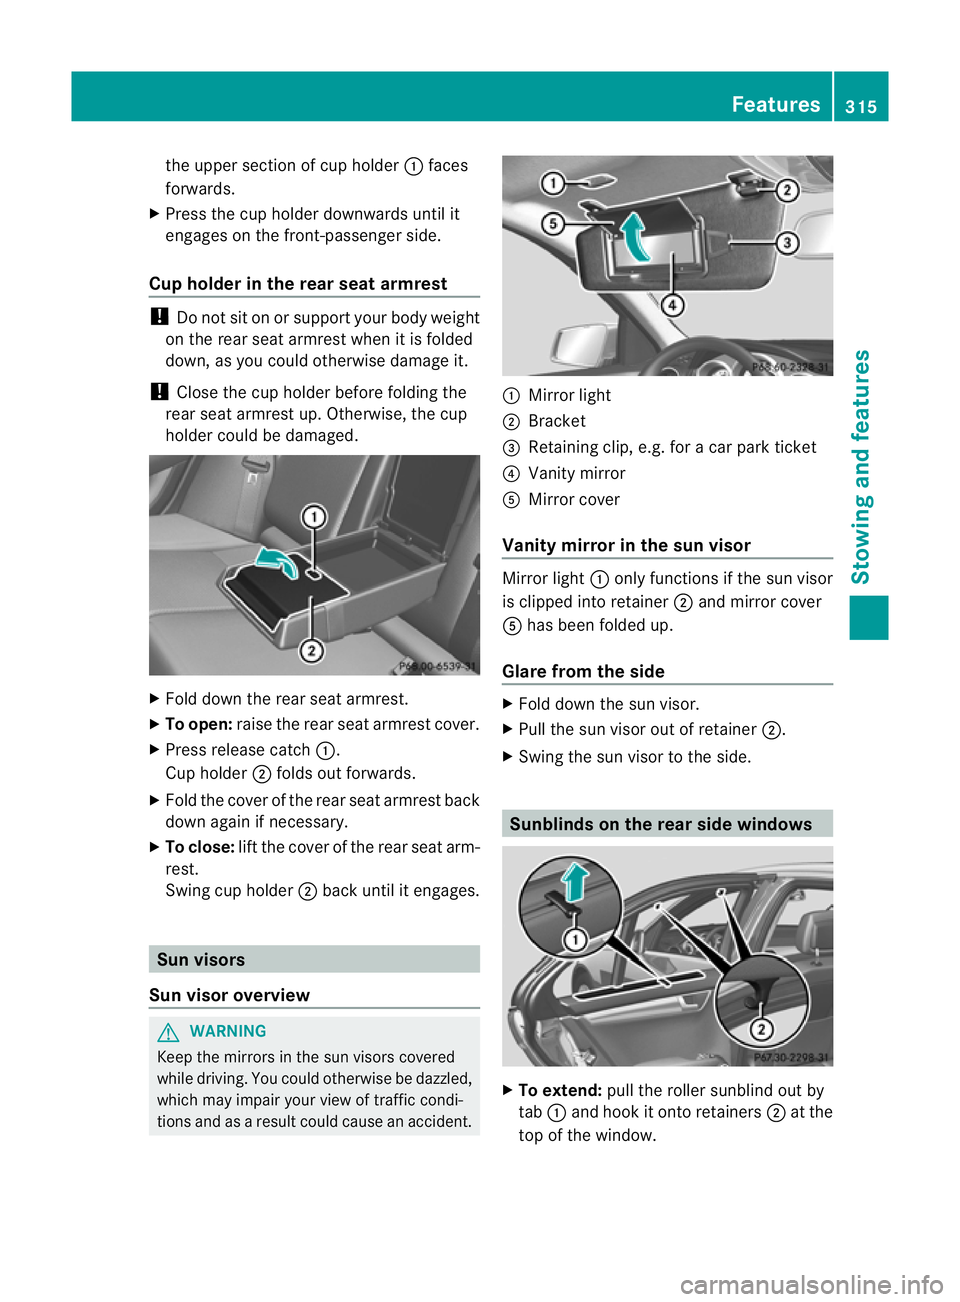
holder could be damaged. X
Fold down the rear seat armrest.
X To open: raise the rear seat armrest cover.
X Press release catch :.
Cup holder ;folds out forwards.
X Fold the cover of the rear seat armrest back
down again if necessary.
X To close: lift the cover of the rear seat arm-
rest.
Swing cup holder ;back until it engages. Sun visors
Sun visor overview G
WARNING
Keep the mirrors in the sun visors covered
while driving. You could otherwise be dazzled,
which may impair your view of traffic condi-
tions and as a result could cause an accident. :
Mirror light
; Bracket
= Retaining clip, e.g. for a car park ticket
? Vanity mirror
A Mirror cover
Vanity mirror in the sun visor Mirror light
:only functions if the sun visor
is clipped into retainer ;and mirror cover
A has been folded up.
Glare from the side X
Fold down the sun visor.
X Pull the sun visor out of retainer ;.
X Swing the sun visor to the side. Sunblinds on the rear side windows
X
To extend: pull the roller sunblind out by
tab :and hook it onto retainers ;at the
top of the window. Features
315Stowing and features Z
Page 319 of 401
!
Always guide the roller sunblind by hand.
Do not let it snap back suddenly as this
would damage the automatic roller mech-
anism.
! Do not drive the vehicle with the roller
sunblind hooked in and the side windows
opened simultaneously. The roller sunblind
can jump out of the retainers and spring
back suddenly when driving at high speeds,
e.g. when driving on the motorway. This
could damage the inertia reel. Therefore,
either close the side window or retract the
roller sunblind before driving at high
speeds. Rear window roller sunblind (Saloon)
Extending/retracting the roller sun-
blind !
Make sure that the roller sunblind can
move freely. Otherwise, the roller sunblind
or other objects could be damaged. X
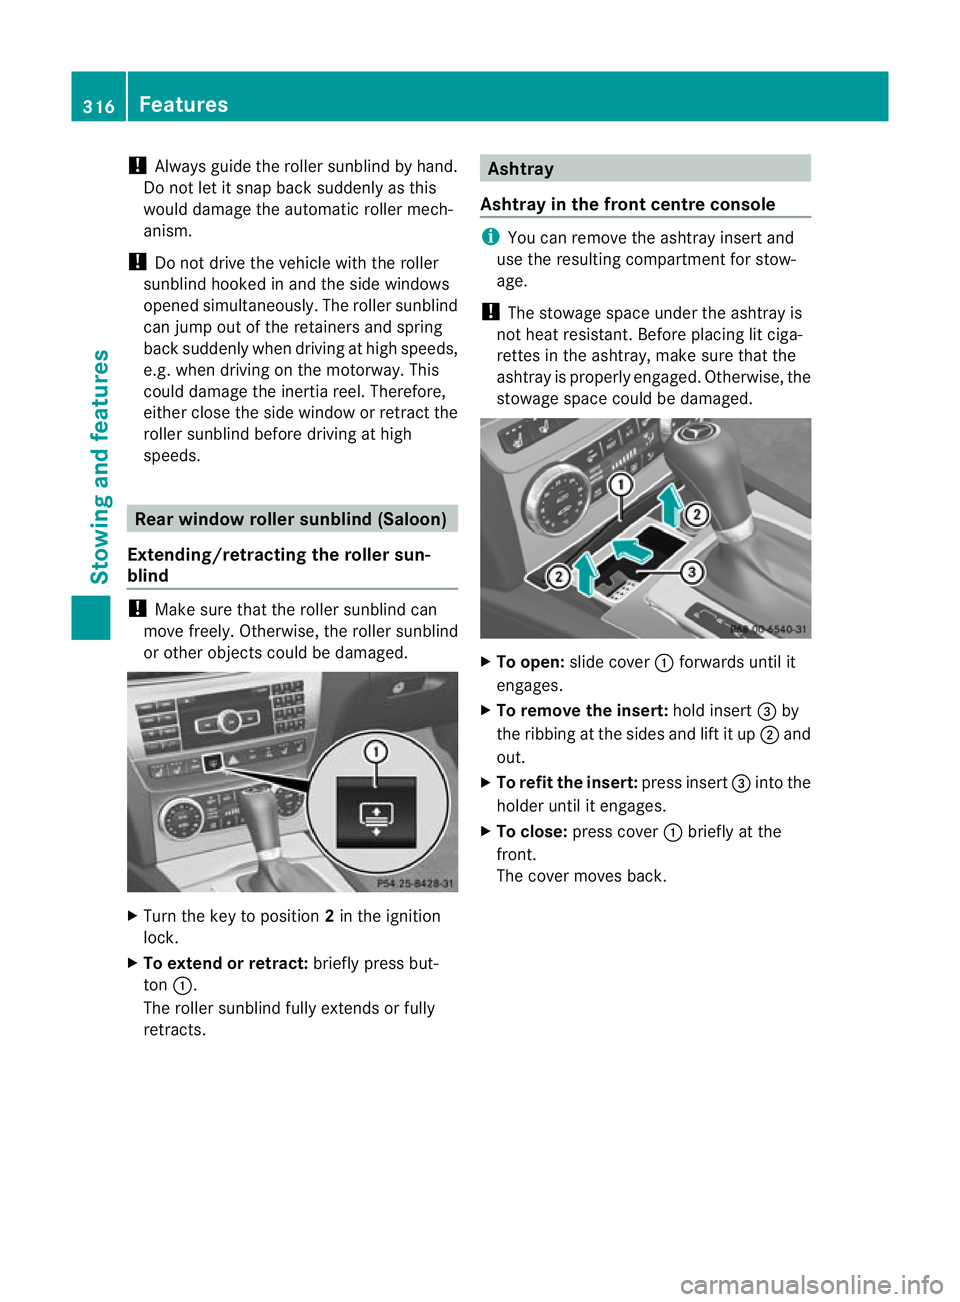
Turn the key to position 2in the ignition
lock.
X To extend or retract: briefly press but-
ton :.
The roller sunblind fully extends or fully
retracts. Ashtray
Ashtray in the front centre console i
You can remove the ashtray insert and
use the resulting compartment for stow-
age.
! The stowage space under the ashtray is
not heat resistant. Before placing lit ciga-
rettes in the ashtray, make sure that the
ashtray is properly engaged. Otherwise, the
stowage space could be damaged. X
To open: slide cover :forwards until it
engages.
X To remove the insert: hold insert=by
the ribbing at the sides and lift it up ;and
out.
X To refit the insert: press insert=into the
holder until it engages.
X To close: press cover :briefly at the
front.
The cover moves back. 316
FeaturesStowing and features
Page 323 of 401
Before you drive off, check the floormats and
secure if necessary.
Afloormat which is not
properly secured can slip and, thereby, inter-
fere with the movemen tofthe pedals.
Do not place floormats on top of one another. X
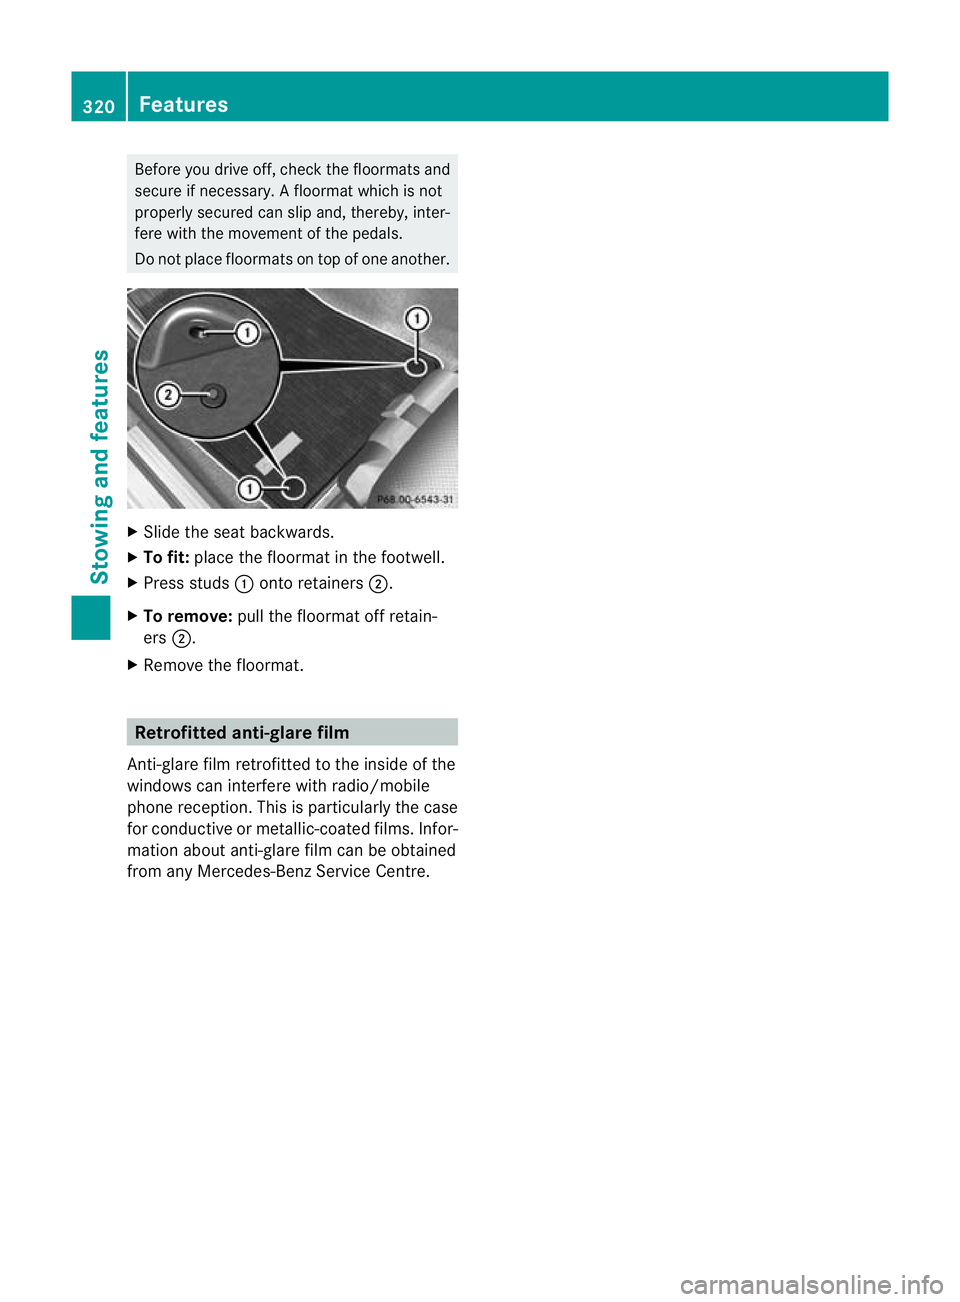
Slide the seat backwards.
X To fit: place the floormat in the footwell.
X Press studs :onto retainers ;.
X To remove: pull the floormat off retain-
ers ;.
X Remove the floormat. Retrofitted anti-glare film
Anti-glare film retrofitted to the inside of the
windows can interfere with radio/mobile
phone reception. This is particularly the case
for conductive or metallic-coated films. Infor-
mation about anti-glare film can be obtained
from any Mercedes-Benz Service Centre. 320
FeaturesStowing and features
Page 330 of 401
the necessary service work has been carried
out.
You can obtain further information, e.g.
regarding service work, fro maMercedes-
Benz Service Centre or directly from
Mercedes-Benz.
! If the ASSYST PLUS service interval dis-
play has been inadvertently reset, this set-
ting can be corrected at a Mercedes-Benz
Service Centre.
Have service work carried out as described
in the Service Booklet. This may otherwise
lead to increased wear and damage to the
major assemblies or the vehicle.
Driving abroad
An extensive Mercedes-Benz Service network
is also available in other countries. The
Service Hotline's current telephone numbers
for use when you are abroad are to be found
in the "Mercedes-Benz Service24h" section
of the Service Booklet. Care
Notes on care
Regular care of your vehicle is a condition for
retaining the quality in the long term.
Use care products and cleaning agents rec-
ommended and approved by Mercedes-Benz.
! For cleaning your vehicle, do not use any
of the following:
R dry, rough or hard cloths
R abrasive cleaning agents
R solvents
R cleaning agents containing solvents
Do not scrub.
Do not touch the surfaces or protective
films with hard objects, e.g. a ring or ice
scraper. You could otherwise scratch or
damage the surfaces and protective film. H
Environmental note
Dispose of empty packaging and cleaning
cloths in an environmentally responsible man-
ner.
! Do not park up the vehicle for an extended
period straight after cleaning it, particularly
after having cleaned the wheels with wheel
cleaner. Wheel cleaners could cause
increased corrosion of the brake discs and
brake pads/linings. For this reason, you
should drive for a few minutes after clean-
ing. Braking heats the brake discs and the
brake pads/linings, thus drying them. The
vehicle can then be parked up. Care of the exterior
Automatic car wash G
WARNING
Braking efficiency is reduced after washing
the vehicle. This could cause an accident. For
this reason, following a car wash, drive with
particular care until the brakes are dry.
You can wash the vehicle in an automatic car
wash from the very start.
If the vehicle is very dirty, pre-wash it before
cleaning it in an automatic car wash.
! Make sure that the automatic transmis-
sion is in position Nwhen washing your
vehicle in a tow-through car wash. The vehi-
cle could be damaged if the transmission is
in another position.
! Make sure that:
R the side windows and sliding sunroof are
closed completely.
R the blower for the ventilation/heating is
switched off (OFF button is depressed).
R the windscreen wiper switch is at posi-
tion 0.
The vehicle could otherwise be damaged.
After using an automatic car wash, wipe off
wax from the windscreen and the wiper Care
327Maintenance and care Z
Page 332 of 401
X
Remove coolant, brake fluid, tree resin,
oils, fuels and greases by rubbing gently
with a cloth soaked in petroleum ether or
lighte rfluid.
X Use tar remover to remove tar stains.
X Use silicone remover to remove wax.
! Do not affix:
R stickers
R films
R magnetic plates or similar items
to painted surfaces. You could otherwise
damage the paintwork.
Care and treatment of matt paintwork If your vehicle has a clear mat
tfinish, observe
the following instructions in order to avoid
damage to the paintwork due to incorrect
care.
These notes also apply to light alloy wheels
with a clear mat tfinish.
! Neve rpolish the vehicle or the light alloy
wheels. Polishing makes the paintwork
shiny.
! The following may cause the paint to
become shiny and thus reduce the matt
effect:
R Vigorous rubbing with unsuitable mate-
rials.
R Frequent use of car washes.
R Washing the vehicle in direct sunlight.
! Never use paint cleaner, buffing or pol-
ishing products, or gloss preserver, e.g.
wax. These products are only suitable for
high-gloss surfaces. Their use on vehicles
with matt finish leads to considerable sur-
face damage (shiny, spotted areas).
Always have paintwork repairs performed
at a qualified specialist workshop, e.g. a
Mercedes-Benz Service Centre.
! Do not use wash programs with a hot wax
treatment under any circumstances. i
The vehicle should preferably be washed
by hand using a soft sponge, car shampoo
and plenty of water.
i Use only insect remover and car shampoo
from the range of recommended and
approved Mercedes-Benz care products.
Cleaning the windows G
WARNING
Switch off the windscreen wipers and remove
the key from the ignition lock before cleaning
the windscreen or the wiper blades. On vehi-
cles with KEYLESS-GO, press the Start/Stop
button repeatedly until all indicator lamps in
the instrument cluster have gone off. The
windscreen wipers could otherwise move and
injure you.
! Only fold the windscreen wipers away
from the windscreen when vertical. Other-
wise, you will damage the bonnet.
X Clean the inside and outside of the win-
dows with a damp cloth and a cleaning
agent that is recommended and approved
by Mercedes-Benz.
! Do not use dry cloths, abrasive products,
solvents or cleaning agents containing sol-
vents to clean the inside of the windows.
Do not touch the insides of the windows
with hard objects, e.g. an ice scraper or
ring. There is otherwise a risk of damaging
the windows.
! Clean the water drainage channels of the
windscreen and the rear window at regular
intervals. Deposits such as leaves, petals
and pollen may under certain circumstan-
ces prevent water from draining away.T his
can lead to corrosion damage and damage
to electronic components.
Cleaning the wiper blades G
WARNING
Switch off the windscreen wipers and remove
the key from the ignition lock before cleaning Care
329Maintenance and care
Z