2011 MERCEDES-BENZ C-CLASS ESTATE window
[x] Cancel search: windowPage 74 of 401
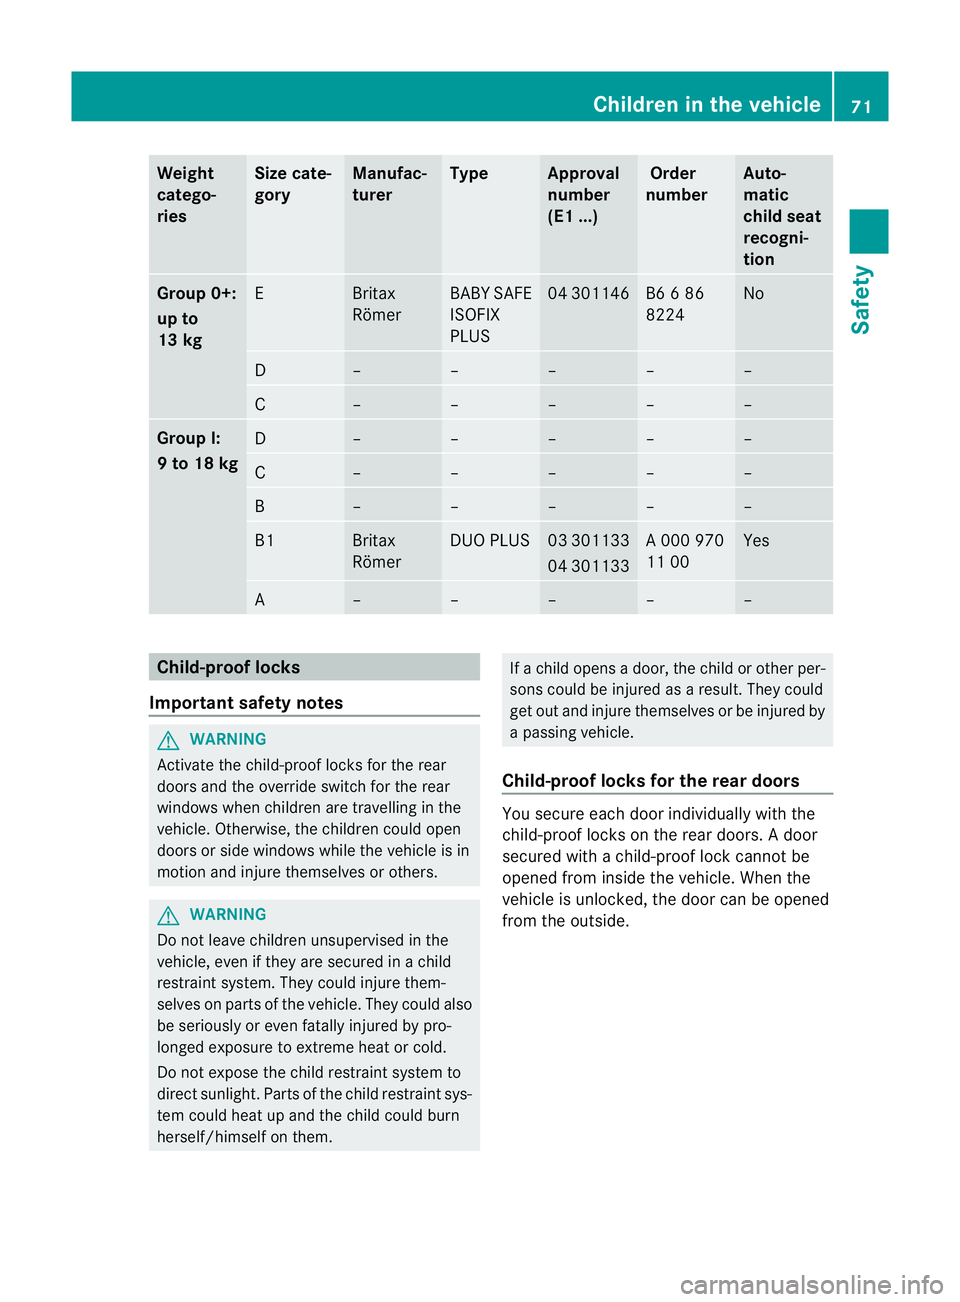
Weight
catego-
ries Size cate-
gory Manufac-
turer Type Approval
number
(E1 ...) Order
number Auto-
matic
chil
dseat
recogni-
tion Group 0+:
up to
13 kg
E Britax
Römer BABY SAFE
ISOFIX
PLUS 04 301146 B6 6 86
8224 No
D – – – – –
C – – – – –
Group I:
9 to 18 kg
D – – – – –
C – – – – –
B – – – – –
B1 Britax
Römer DUO PLUS 03 301133
04 301133 A 000 970
11 00 Yes
A – – – – –
Child-proof locks
Important safety notes G
WARNING
Activate the child-proof locks for the rear
doors and the override switch for the rear
windows when children are travelling in the
vehicle. Otherwise, the children could open
doors or side windows while th evehicle is in
motion and injure themselves or others. G
WARNING
Do not leave children unsupervised in the
vehicle, even if they are secured in a child
restraint system. They could injure them-
selves on parts of the vehicle. They could also
be seriously or even fatally injured by pro-
longed exposure to extreme heat or cold.
Do not expose the child restraint system to
direct sunlight. Parts of the child restraint sys-
tem could heat up and the child could burn
herself/himself on them. If a child opens a door, the child or other per-
sons could be injured as a result. They could
get out and injure themselves or be injured by
a passing vehicle.
Child-proof locks for the rear doors You secure each door individually with the
child-proof locks on the rear doors.
Adoor
secured with a child-proof lock cannot be
opened from inside the vehicle. When the
vehicle is unlocked, the door can be opened
from the outside. Children in the vehicle
71Safety Z
Page 75 of 401
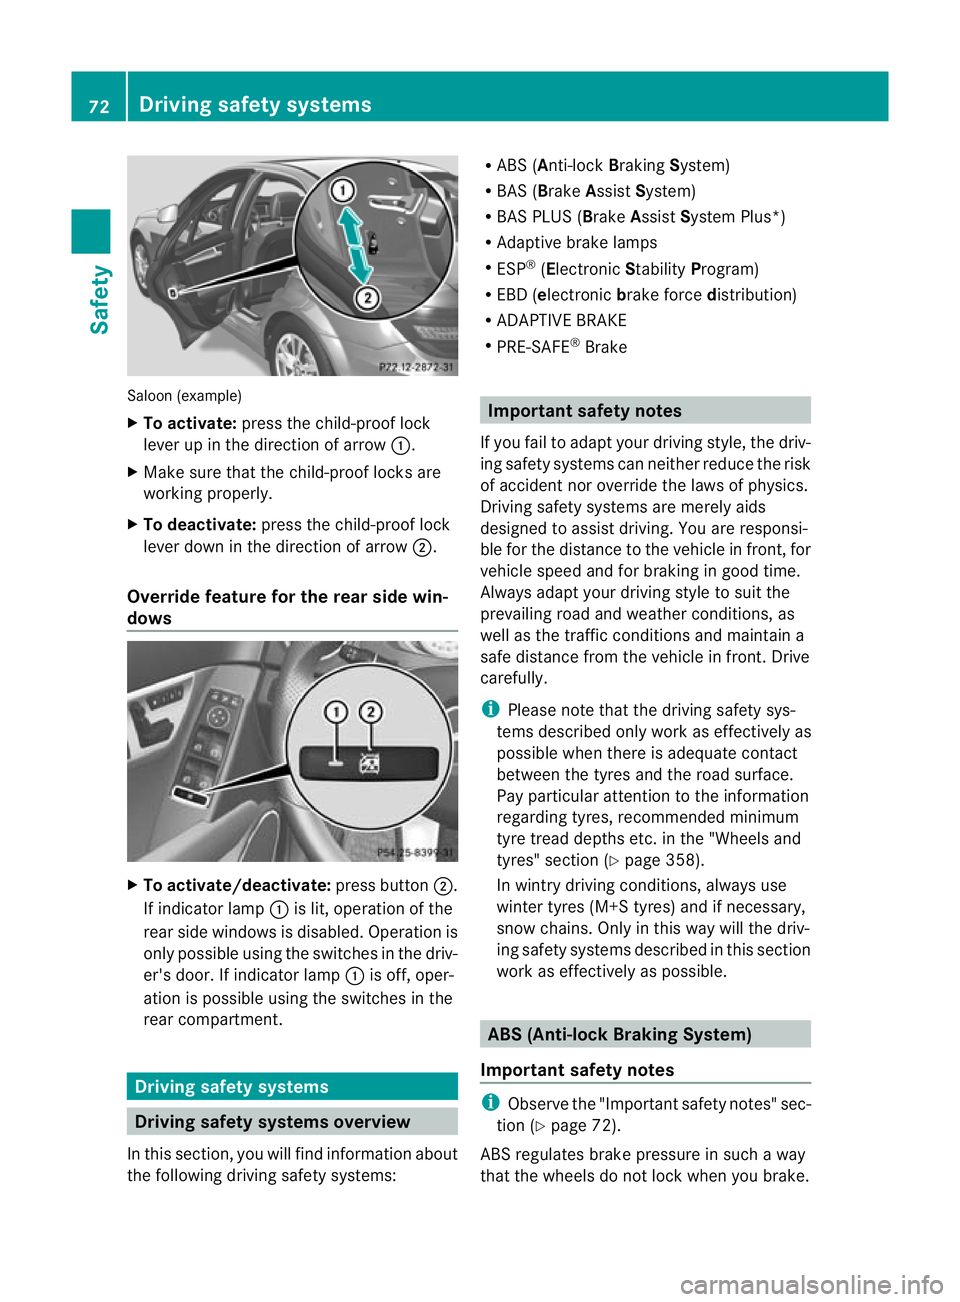
Saloon (example)
X
To activate: press the child-proof lock
lever up in the direction of arrow :.
X Make sure that the child-proof locks are
working properly.
X To deactivate: press the child-proof lock
lever dow ninthe direction of arrow ;.
Override feature for the rear side win-
dows X
To activate/deactivate: press button;.
If indicator lamp :is lit, operation of the
rear side windows is disabled. Operation is
only possible using the switches in the driv-
er's door. If indicator lamp :is off, oper-
ation is possible using the switches in the
rear compartment. Driving safety systems
Driving safety systems overview
In this section, you will find information about
the following driving safety systems: R
ABS ( Anti-lock BrakingSystem)
R BAS ( Brake Assist System)
R BAS PLUS ( BrakeAssist System Plus*)
R Adaptive brake lamps
R ESP ®
(Electronic StabilityProgram)
R EBD ( electronic brake force distribution)
R ADAPTIVE BRAKE
R PRE-SAFE ®
Brake Important safety notes
If you fail to adapt your driving style, the driv-
ing safety systems can neither reduce the risk
of accident nor override the laws of physics.
Driving safety systems are merely aids
designed to assist driving. You are responsi-
ble for the distance to the vehicle in front, for
vehicle speed and for braking in good time.
Always adapt your driving style to suit the
prevailing road and weather conditions, as
well as the traffic conditions and maintain a
safe distance from the vehicle in front. Drive
carefully.
i Please note that the driving safety sys-
tems described only work as effectively as
possible when there is adequate contact
between the tyres and the road surface.
Pay particular attention to the information
regarding tyres, recommended minimum
tyre tread depths etc. in the "Wheels and
tyres" section (Y page 358).
In wintry driving conditions, always use
winter tyres (M+S tyres) and if necessary,
snow chains. Only in this way will the driv-
ing safety systems described in this section
work as effectively as possible. ABS (Anti-lockB
raking System)
Important safety notes i
Observe the "Important safety notes" sec-
tion (Y page 72).
ABS regulates brake pressure in such a way
tha tthe wheels do not lock when you brake. 72
Driving safety systemsSafety
Page 84 of 401
X
To stop the alarm using the key: insert
the key into the ignition lock.
The alar mis switched off.
or
X Press the %or& button on the key.
The alarm is switched off.
X To stop the alarm using KEYLESS-GO:
grasp the outside door handle. The key
must be outside the vehicle.
The alarm is switched off.
or
X Press the Start/Stop button on the dash-
board. The key must be inside the vehicle.
The alarm is switched off. Tow-away protection
An audible and visual alarm is triggered if your
vehicle's angle of inclination is altered while
tow-away protection is primed. This occurs if
the vehicle is jacked up on one side, for exam-
ple.
X To prime: lock the vehicle with the key or
KEYLESS-GO.
Tow-away protection is primed after
approximately 30 seconds.
X To deactivate: unlock the vehicle with the
key or KEYLESS-GO.
Tow-away protection is deactivated auto-
matically.
To prevent a false alarm, deactivate tow-away
protection manually if your vehicle:
R is being transported
R is being loaded onto a ferry or car trans-
porter, for example
R is parked on a movable surface, e.g. in a
split-level garage
Deactivating:
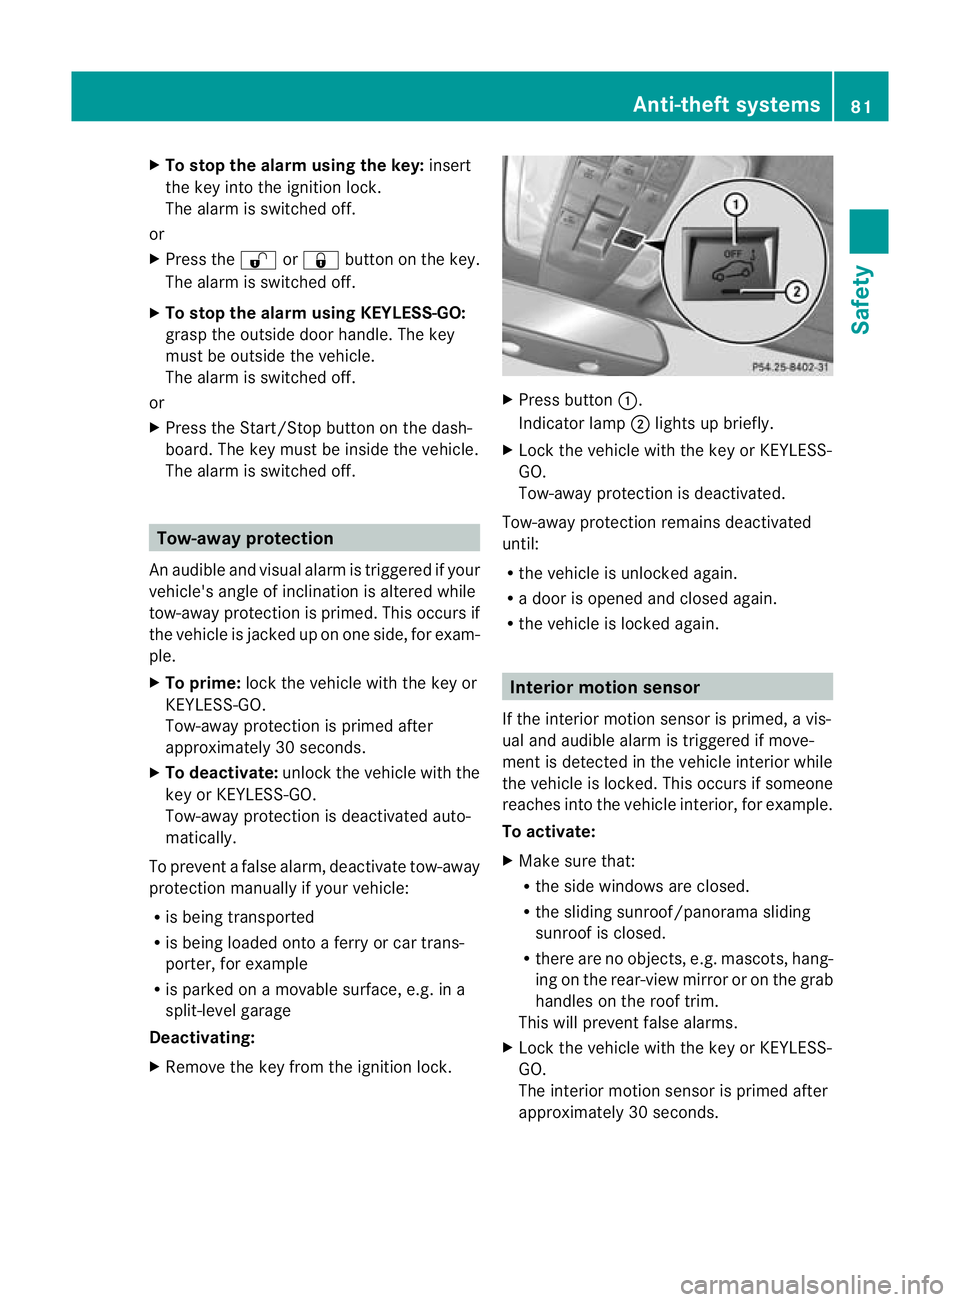
X Remove the key from the ignition lock. X
Press button :.
Indicator lamp ;lights up briefly.
X Lock the vehicle with the key or KEYLESS-
GO.
Tow-away protection is deactivated.
Tow-away protection remains deactivated
until:
R the vehicle is unlocked again.
R a door is opened and closed again.
R the vehicle is locked again. Interior motion sensor
If the interior motion sensor is primed, a vis-
ual and audible alarm is triggered if move-
ment is detected in the vehicle interior while
the vehicle is locked. This occurs if someone
reaches into the vehicle interior, for example.
To activate:
X Make sure that:
R
the side windows are closed.
R the sliding sunroof/panorama sliding
sunroof is closed.
R there are no objects, e.g. mascots, hang-
ing on the rear-view mirror or on the grab
handles on the roof trim.
This will prevent false alarms.
X Lock the vehicle with the key or KEYLESS-
GO.
The interior motion sensor is primed after
approximately 30 seconds. Anti-theft systems
81Safety Z
Page 85 of 401
To switch off:
X
Unlock the vehicle with the key or KEY-
LESS-GO.
The interio rmotion sensor is deactivated
automatically.
To prevent a false alarm, deactivate the inte-
rior motion sensor if you lock your vehicle
and:
R people or animals remain in the vehicle.
R the side windows remain open.
R the sliding sunroof/panorama sliding sun-
roof remains open.
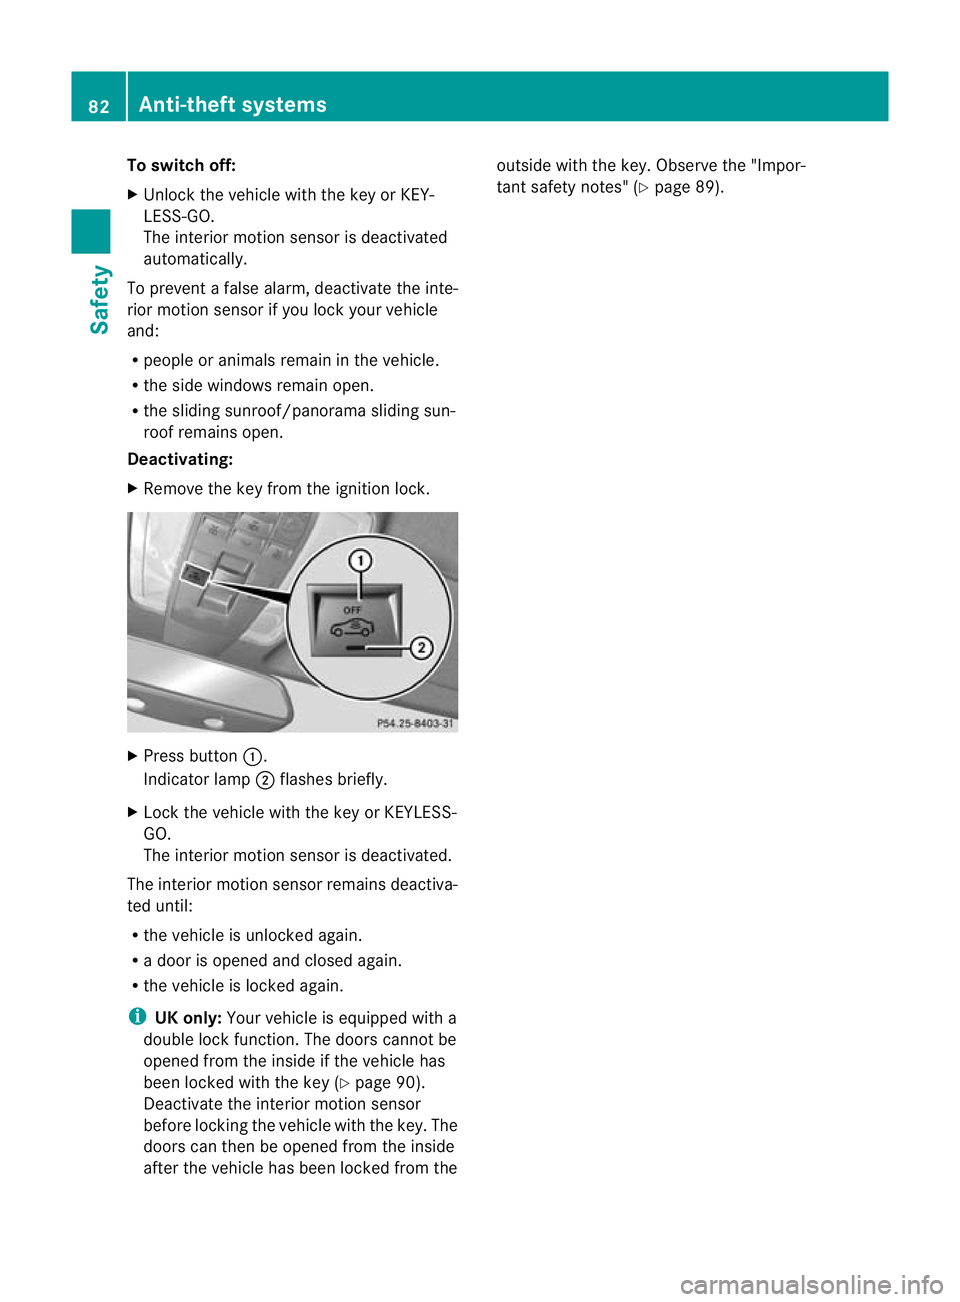
Deactivating:
X Remove the key from the ignition lock. X
Press button :.
Indicator lamp ;flashes briefly.
X Lock the vehicle with the key or KEYLESS-
GO.
The interior motion sensor is deactivated.
The interior motion sensor remains deactiva-
ted until:
R the vehicle is unlocked again.
R a door is opened and closed again.
R the vehicle is locked again.
i UK only: Your vehicle is equipped with a
double lock function. The doors cannot be
opened from the inside if the vehicle has
been locked with the key (Y page 90).
Deactivate the interior motion sensor
before locking the vehicle with the key. The
doors can then be opened from the inside
after the vehicle has been locked from the outside with the key. Observe the "Impor-
tant safety notes" (Y
page 89).82
Anti-theft systemsSafety
Page 86 of 401

Useful information
..............................84
Key ....................................................... 84
Doors .................................................... 89
Boot/luggage compartment ..............92
Side windows ...................................... 96
Sliding sunroof .................................... 99 83Opening and closing
Page 99 of 401
X
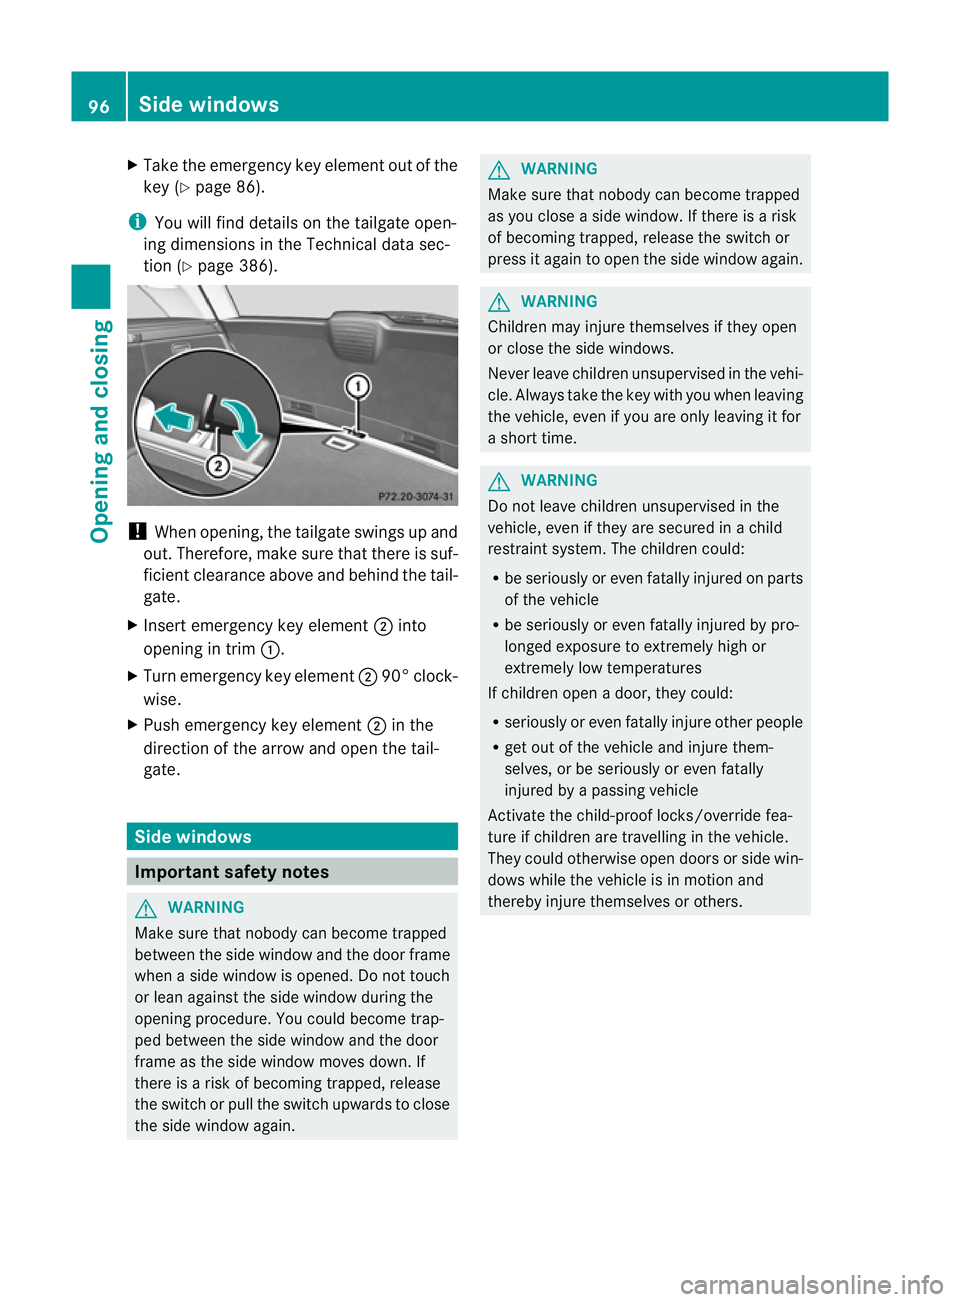
Take the emergency key element out of the
key (Y page 86).
i You will find details on the tailgate open-
ing dimensions in the Technical data sec-
tion (Y page 386). !
When opening, the tailgate swings up and
out. Therefore, make sure that there is suf-
ficient clearance above and behind the tail-
gate.
X Insert emergency key element ;into
opening in trim :.
X Turn emergency key element ;90° clock-
wise.
X Push emergency key element ;in the
direction of the arrow and open the tail-
gate. Side windows
Important safety notes
G
WARNING
Make sure that nobody can become trapped
between the side window and the door frame
when a side window is opened. Do not touch
or lean against the side window during the
opening procedure. You could become trap-
ped between the side window and the door
frame as the side window moves down. If
there is a risk of becoming trapped, release
the switch or pull the switch upwards to close
the side window again. G
WARNING
Make sure that nobody can become trapped
as you close a side window. If there is a risk
of becoming trapped, release the switch or
press it again to open the side window again. G
WARNING
Children may injure themselves if they open
or close the side windows.
Never leave children unsupervised in the vehi-
cle. Always take the key with you when leaving
the vehicle, even if you are only leaving it for
a short time. G
WARNING
Do not leave children unsupervised in the
vehicle, even if they are secured in a child
restraint system. The children could:
R be seriously or even fatally injured on parts
of the vehicle
R be seriously or even fatally injured by pro-
longed exposure to extremely high or
extremely low temperatures
If children open a door, they could:
R seriously or even fatally injure other people
R get out of the vehicle and injure them-
selves, or be seriously or even fatally
injured by a passing vehicle
Activate the child-proof locks/override fea-
ture if children are travelling in the vehicle.
They could otherwise open doors or side win-
dows while the vehicle is in motion and
thereby injure themselves or others. 96
Side windowsOpening and closing
Page 100 of 401
Opening and closing the side win-
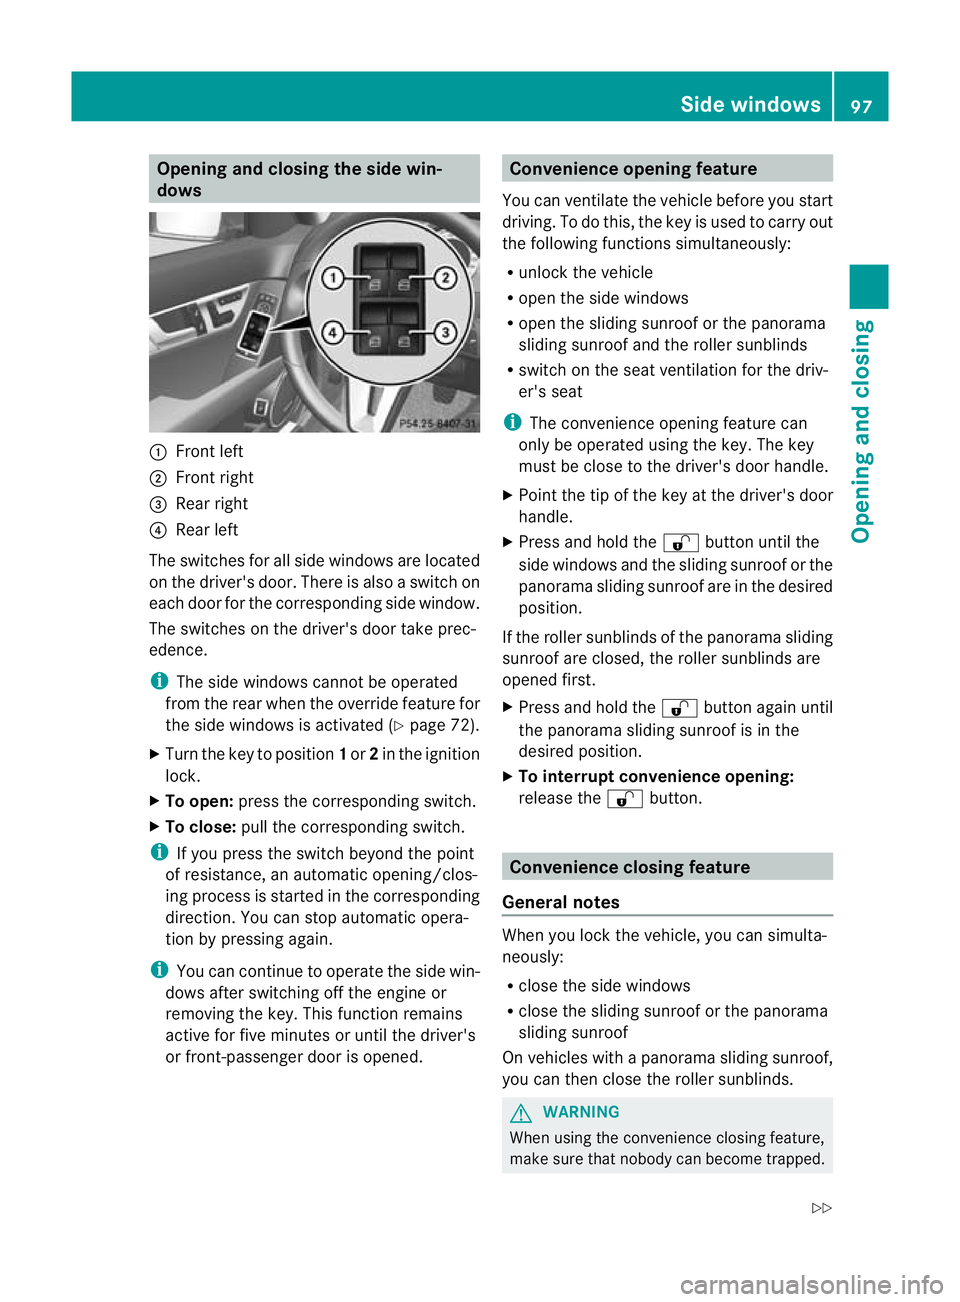
dows :
Front left
; Front right
= Rear right
? Rear left
The switches for all side windows are located
on the driver's door. There is also a switch on
each door for the corresponding side window.
The switches on the driver's door take prec-
edence.
i The side windows cannot be operated
from the rear when the override feature for
the side windows is activated (Y page 72).
X Turn the key to position 1or 2in the ignition
lock.
X To open: press the corresponding switch.
X To close: pull the corresponding switch.
i If you press the switch beyond the point
of resistance, an automatic opening/clos-
ing process is started in the corresponding
direction. You can stop automatic opera-
tion by pressing again.
i You can continue to operate the side win-
dows after switching off the engine or
removing the key. This function remains
active for five minutes or until the driver's
or front-passenger door is opened. Convenience opening feature
You can ventilate the vehicle before you start
driving. To do this, the key is used to carry out
the following functions simultaneously:
R unlock the vehicle
R open the side windows
R open the sliding sunroof or the panorama
sliding sunroof and the roller sunblinds
R switch on the seat ventilation for the driv-
er's seat
i The convenience opening feature can
only be operated using the key. The key
must be close to the driver's door handle.
X Point the tip of the key at the driver's door
handle.
X Press and hold the %button until the
side windows and the sliding sunroof or the
panorama sliding sunroof are in the desired
position.
If the roller sunblinds of the panorama sliding
sunroof are closed, the roller sunblinds are
opened first.
X Press and hold the %button again until
the panorama sliding sunroof is in the
desired position.
X To interrupt convenience opening:
release the %button. Convenience closing feature
General notes When you lock the vehicle, you can simulta-
neously:
R
close the side windows
R close the sliding sunroof or the panorama
sliding sunroof
On vehicles with a panorama sliding sunroof,
you can then close the roller sunblinds. G
WARNING
When using the convenience closing feature,
make sure that nobody can become trapped. Side windows
97Opening and closing
Z
Page 101 of 401

Proceed as follows if there is a risk of entrap-
ment:
With the key:
R
release the &button.
R press and hold the %button until the
side windows and the sliding sunroof or the
panorama sliding sunroof open again.
With KEYLESS-GO:
R release the sensor surface on the door han-
dle.
R pull the door handle immediately and hold
it.
The side windows and the sliding sunroof
or the panorama sliding sunroof open.
Using the key i
The key must be close to the driver's door
handle.
X Point the tip of the key at the driver's door
handle.
X Press and hold the &button until the
side windows and the sliding sunroof or the
panorama sliding sunroof are fully closed.
X Make sure that all the side windows and the
sliding sunroof or panorama sliding sunroof
are closed.
On vehicles with a panorama sliding sunroof:
X Press and hold the &button again until
the roller sunblinds of the panorama sliding
sunroof close.
X To interrupt convenience closing:
release the &button.
Using KEYLESS-GO The KEYLESS-GO key must be outside the
vehicle. All the doors must be closed. X
Touch recessed sensor surface :on the
door handle until the side windows and the
sliding sunroof or the panorama sliding
sunroof are fully closed.
i Make sure you only touch recessed sen-
sor surface :.
X Make sure that all the side windows and the
sliding sunroof or panorama sliding sunroof
are closed.
On vehicles with a panorama sliding sunroof:
X Touch recessed sensor surface :on the
door handle again until the roller sunblinds
of the panorama sliding sunroof close.
X To interrupt convenience closing:
release recessed sensor surface :on the
door handle. Resetting the side windows
You must reset each side window if a side
window can no longer be closed fully.
X Close all the doors.
X Turn the key to position 1or 2in the ignition
lock.
X Pull the corresponding switch on the door
control panel until the side window is com-
pletely closed. (Y page 97).
X Hold the switch for an additional second. 98
Side windowsOpening and closing