2011 MERCEDES-BENZ C-CLASS ESTATE heating
[x] Cancel search: heatingPage 171 of 401
Problems with the transmission
Problem Possible causes/consequences and
M Solutions
The transmission has
problems shifting gear. The transmission is losing oil.
X
Have the transmission checked at a qualified specialist work-
shop, e.g. a Mercedes-Benz Service Centre, immediately. The acceleration ability
is deteriorating.
The transmission no
longer changes gear. The transmission is in emergency mode.
It is only possible to shift into
secondgear and reverse gear.
X Stop the vehicle.
X Shift the transmission to position P.
X Switch off the engine.
X Wait at least 10 seconds before restarting the engine.
X Shift the transmission to position Dor R.
If D is selected, the transmission shifts into secondgear; ifRis
selected, the transmission shifts into reverse gear.
X Have the transmission checked at a qualified specialist work-
shop, e.g. a Mercedes-Benz Service Centre, immediately. Releasing the parking lock manually
In the event of an electrical fault, it is possible
to release the selector lever lock manually to
move it out of position P, e.g. if you wish to
tow the vehicle away. !
Do not use any sharp-edged objects to
remove the selector lever gaiter from the
centre console. This could damage the
selector lever gaiter.
X Apply the parking brake.
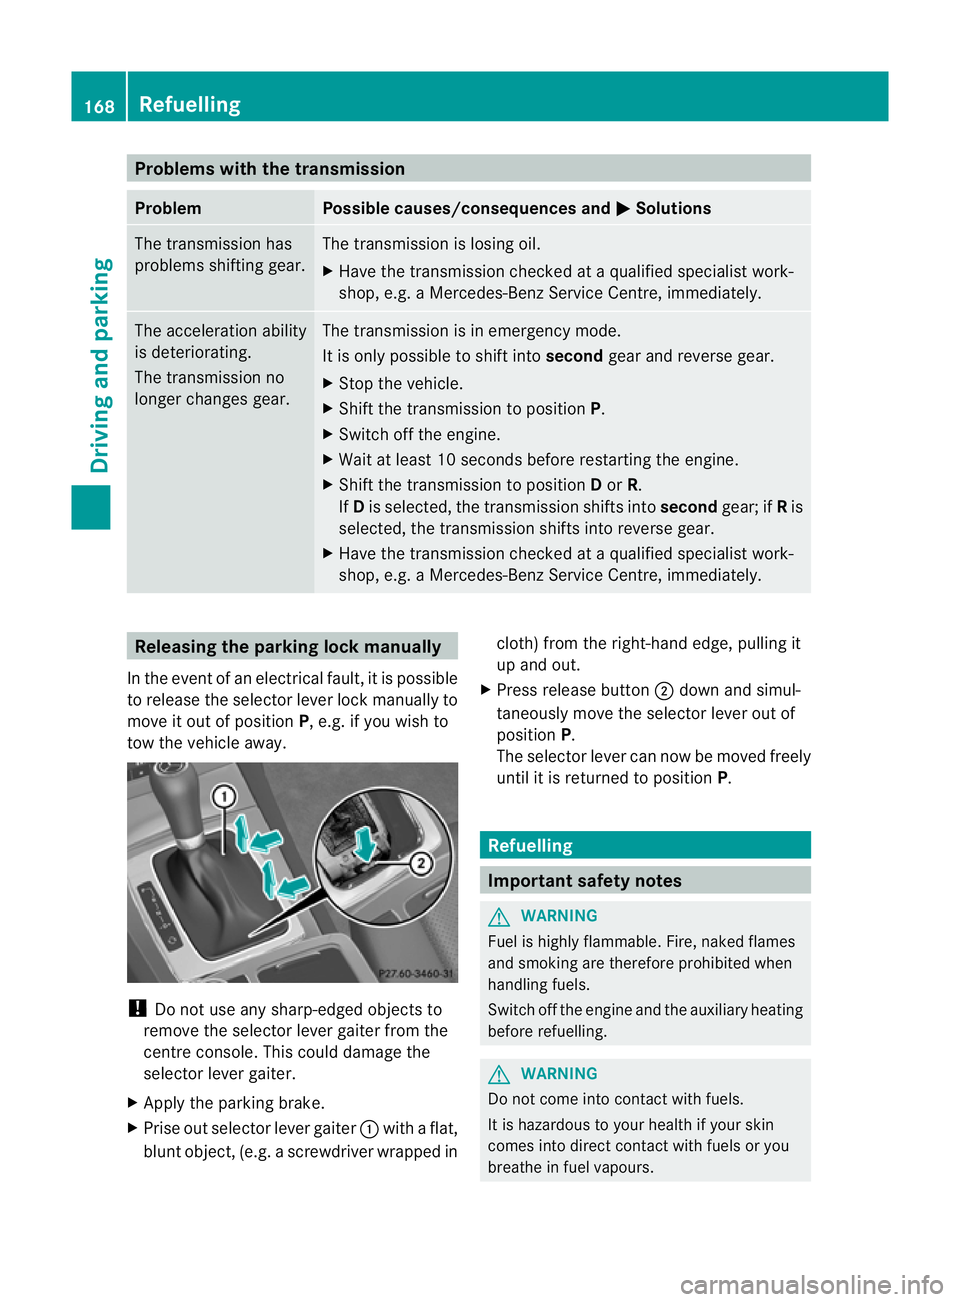
X Prise out selector lever gaiter :with a flat,
blunt object, (e.g. ascrewdriver wrapped in cloth) from the right-hand edge, pulling it
up and out.
X Press release button ;dow nand simul-
taneously move the selecto rlever out of
position P.
The selector lever can now be moved freely
until it is returned to position P. Refuelling
Important safety notes
G
WARNING
Fuel is highly flammable. Fire, naked flames
and smoking are therefore prohibited when
handling fuels.
Switch off the engine and the auxiliary heating
before refuelling. G
WARNING
Do not come into contact with fuels.
It is hazardous to your health if your skin
comes into direct contact with fuels or you
breathe in fuel vapours. 168
RefuellingDriving and parking
Page 173 of 401
However, using this fuel results in consid-
erably higher petrol consumptio
nand sig-
nificantly reduced engine performance.
Avoid driving at full throttle.
If no fuel othe rthan regular petrol with
91 RON/82.5 MON or a lower grade is per-
manently available, you should have the
vehicle adapted to run on this fuel in a
qualified specialist workshop. Mercedes-
Benz recommends that you use a
Mercedes-Ben zService Centre for this pur-
pose.
C 350 BlueEFFICIENCY and C 350
4MATIC BlueEFFICIENCY !
Only refuel using unleaded, sulphur-free
premium-grade petrol with at least
95 RON/85 MON, which conforms to Euro-
pean standard EN 228 or an equivalent
specification.
You can otherwise impair engine output or
damage the emission control system.
i In some countries, the available petrol
may not be sufficiently low in sulphur. This
fuel can temporarily produce unpleasant
odours, especially on short journeys. As
soon as sulphur-free fuel (sulphur content
<10p pm) is used for refuelling, the odours
are reduced. Diesel (EN 590)
Fuel grade !
When refuelling, only use diesel fuel that
conform stothe European standard EN 590
or is of equivalent quality. You can other-
wise impair engine output or damage the
engine.
! Vehicles with diesel particle filters: in
countries outside the EU, only use low sul-
phur Euro diesel with a sulphurc ontent of
under 50 ppm. Otherwise, the emission
control system could be damaged. !
Vehicles without adiesel particle fil-
ter: in countries where only diesel fuels
with a higher sulphur conten tare available,
the vehicle's oil change intervals are
shorter. More information about intervals
for changing the oil can be obtained from
any Mercedes-Benz Service Centre.
! Only use fuel that complies with the EN
590 European standard .Fuel that does not
comply with EN 590 can lead to increased
wear, engine damage and damag eto the
exhaust system.
Do not use the following:
R marine diesel
R heating oil
R bio-diesel
R vegetable oil
R petrol
R paraffin
R kerosene
Do not mix these fuels with diesel fuels and
do not use any special additives. Other-
wise, this can lead to damage to the engine.
This excludes flow improver; see "Low out-
side temperatures".
! Use a filter when adding fuel from a fuel
can. Otherwise, the fuel lines and/or the
diesel injection system could be blocked by
particles from the fuel can.
For further information on "Fuel", see
(Y page 380).
Low outside temperatures Diesel fuel with improved cold flow qualities
is available during the winter months. In
Europe, various climate-dependent low-tem-
perature classes are defined in EN 590. Refu-
elling with diesel fuel which complies with the
climatic specifications of standard EN 590
can help to prevent operating problems. At
exceptionally low temperatures, it is possible
that the flow properties of the fuel may be
inadequate. This also applies to fuel that has 170
RefuellingDriving and parking
Page 174 of 401
not been adapted to suit the climatic condi-
tions, e.g .diesel fuel fro mwarmer regions.
i Further information about country-spe-
cific fuel properties can be obtained from
oil companies, e.g .atfilling stations.
Flow improver Flow improvers can be added to improve the
cold resistance of diesel fuel. The effective-
ness of a flow improver is not guaranteed with
every diesel fuel.
Correct dosage and thorough mixing are deci-
sive factors in ensuring improvement in low-
temperature resistance. Avoid excessive dos-
age. Excessive dosage may actually decrease
low-temperature resistance under certain cir-
cumstances. Follow the manufacturer's dos-
ing instructions.
Mix the additive with the diesel in good time,
before the flow properties of the diesel
become inadequate. Malfunctions can other-
wise only be rectified by heating the entire
fuel system, e.g. by parking the vehicle in a
heated garage.
Observe the information provided by the man-
ufacturer when using a flow improver. Only
use flow improvers that have been tested and
approved by Mercedes-Benz. You can obtain
further information from any Mercedes-Benz
Service Centre. Refuelling
Fuel filler flap The fuel filler flap is unlocked or locked auto-
matically when you open or close the vehicle
with the key or using KEYLESS-GO.
The position of the fuel filler cap is displayed
in the instrument cluster 8.The arrow
next to the filling pump indicates the side of
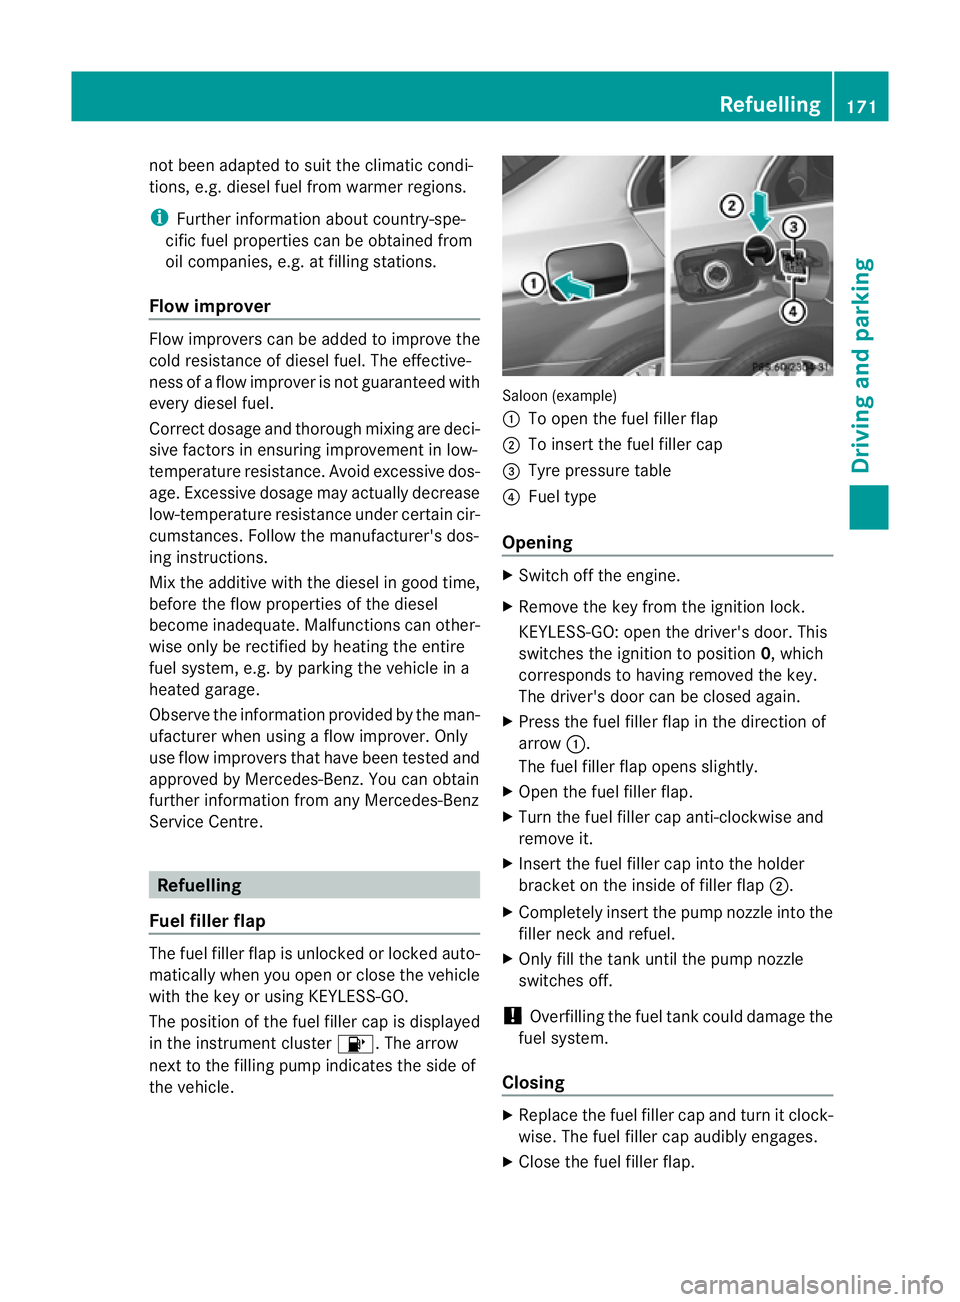
the vehicle. Saloon (example)
:
To open the fuel filler flap
; To insert the fuel filler cap
= Tyre pressure table
? Fuel type
Opening X
Switch off the engine.
X Remove the key from the ignition lock.
KEYLESS-GO: open the driver's door. This
switches the ignition to position 0, which
corresponds to having removed the key.
The driver's door can be closed again.
X Press the fuel filler flap in the direction of
arrow :.
The fuel filler flap opens slightly.
X Open the fuel filler flap.
X Turn the fuel filler cap anti-clockwise and
remove it.
X Insert the fuel filler cap into the holder
bracket on the inside of filler flap ;.
X Completely insert the pump nozzle into the
filler neck and refuel.
X Only fill the tank until the pump nozzle
switches off.
! Overfilling the fuel tank could damage the
fuel system.
Closing X
Replace the fuel filler cap and turn it clock-
wise. The fuel filler cap audibly engages.
X Close the fuel filler flap. Refuelling
171Driving and parking Z
Page 179 of 401
on vehicles with automatic transmission,
select shift range
1,2or 3.
i This also applies if you have activated
cruise control, SPEEDTRONIC or DIS-
TRONIC PLUS.
This will use the braking effect of the engine,
so less braking will be required to maintain
the speed. This relieves the load on the brake
system and prevents the brakes from over-
heating and wearing too quickly.
Heavy and light loads G
WARNING
Never depress the brake pedal continuously
while the vehicle is in motion, e.g. never cause
the brakes to rub by applying constant slight
pedal pressure. This causes the brake system
to overheat, increases the braking distance
and can lead to the brakes failing completely.
If the brakes have been subjected to a heavy
load, do not stop the vehicle immediately, but
drive on for a short while. This allows the air-
flow to cool the brakes more quickly.
If the brakes have been used only moderately,
you should occasionally test their effective-
ness. To do this, brake more firmly from a
higher speed. This improves the grip of the
brakes.
Wet road surface If driving in heavy rain for a prolonged period
of time without braking, there may be a
delayed reaction from the brakes when brak-
ing for the first time. This may also occur after
the vehicle has been washed.
You have to depress the brake pedal more
firmly. Maintain a greater distance from the
vehicle in front.
After driving on a wet road or having the vehi-
cle washed, brake firmly while paying atten-
tion to the traffic conditions. This will warm
up the brake discs, thereby drying them more
quickly and protecting them against corro-
sion. Limited braking performance on salt-
treated roads G
WARNING
The layer of salt on the brake discs and the
brake pads/linings may cause a delay in the
braking effect, resulting in a significantly lon-
ger braking distance, which could lead to an
accident.
To avoid this danger, you should:
R occasionally brake carefully, without put-
ting other road users at risk, when you are
driving on salted roads. This helps to
remove any salt that may have started to
build up on the brake discs and the brake
pads/linings.
R maintain a greater distance to the vehicle
ahead and drive with particular care.
R carefully apply the brakes at the end of a
trip and immediately after commencing a
new trip, so that salt residues are removed
from the brake discs.
New brake pads/linings G
WARNING
New brake pads/linings only reach their opti-
mum braking effect after several hundred kil-
ometres of driving. Before this optimum brak-
ing effect is reached, you should compensate
for the reduced braking effect by applying
greater pressure when braking. This also
applies after the brake discs or the brake
pads/linings have been replaced.
For safety reasons, Mercedes-Benz recom-
mends that you only have brake pads/linings
fitted to your vehicle which have been
approved for Mercedes-Benz vehicles or
which correspond to an equivalent quality
standard. Brake pads/linings which have not
been approved for Mercedes-Benz vehicles or
which are not of an equivalent quality could
affect your vehicle's operating safety. 176
Driving tipsDriving and parking
Page 181 of 401
At the onse
tofwinter, have your vehicle win-
terproofed at a qualified specialist workshop,
e.g. at a Mercedes-Benz Service Centre.
Observe the notes in the "Winter operation"
section (Y page 359).
Driving with summer tyres Observe the notes in the "Winter operation"
section (Y
page 359).
Slippery road surfaces G
WARNING
Do not shift down for additional engine brak-
ing on a slippery road surface. This could
cause the drive wheels to lose their grip and
the vehicle could skid.
You should drive particularly carefully on slip-
pery road surfaces. Avoid sudden accelera-
tion, steering and braking manoeuvres.
If the vehicle threatens to skid or cannot be
stopped when moving at low speed:
X Vehicles with manual transmission :engage
neutral.
X Vehicles with automatic transmission: shift
the transmission to position N.
X Try to bring the vehicl eunde rcontrol by
using corrective steering.
i For more information on driving with
snow chains, see (Y page 360).Driving systems
Cruise control
Important safety notes Cruise control maintains a constant road
speed for you. It brakes automatically in order
to avoid exceeding the set speed. You must
select a low gear in good time on long and
steep downhill gradients, especially if the
vehicle is laden or towing a trailer. On vehicles
with automatic transmission, select shift
range 1,2or 3.B y doing so, you will make use of the braking effec
tofthe engine. This
relieves the load on the brake system and
prevents the brakes from overheating and
wearing too quickly. G
WARNING
Do not change down for additional engine
braking on a slippery road surface. This could
cause the drive wheels to lose their grip and
the vehicle could skid.
Use cruise control only if road and traffic con-
ditions make it appropriate to maintain a
steady speed for a prolonged period. You can
store any road speed above 30 km/h. G
WARNING
Cruise control cannot take account of road
and traffic conditions.
Always pay attention to traffic conditions
even when cruise control is activated.
Cruise control is only an aid designed to assist
driving. You are responsible for the vehicle's
speed and for braking in good time. G
WARNING
Do not use cruise control
R in traffic conditions that do not allow you to
drive at a constant speed (e.g. heavy traffic
or winding roads). You may otherwise
cause an accident.
R on slippery roads. The drive wheels may
lose their grip when braking or accelerating
and the vehicle may skid.
R when there is low visibility, e.g. due to fog,
heavy rain or snow.
Cruise control lever You can operate cruise control and variable
SPEEDTRONIC with the cruise control lever.178
Driving systemsDriving and parking
Page 183 of 401
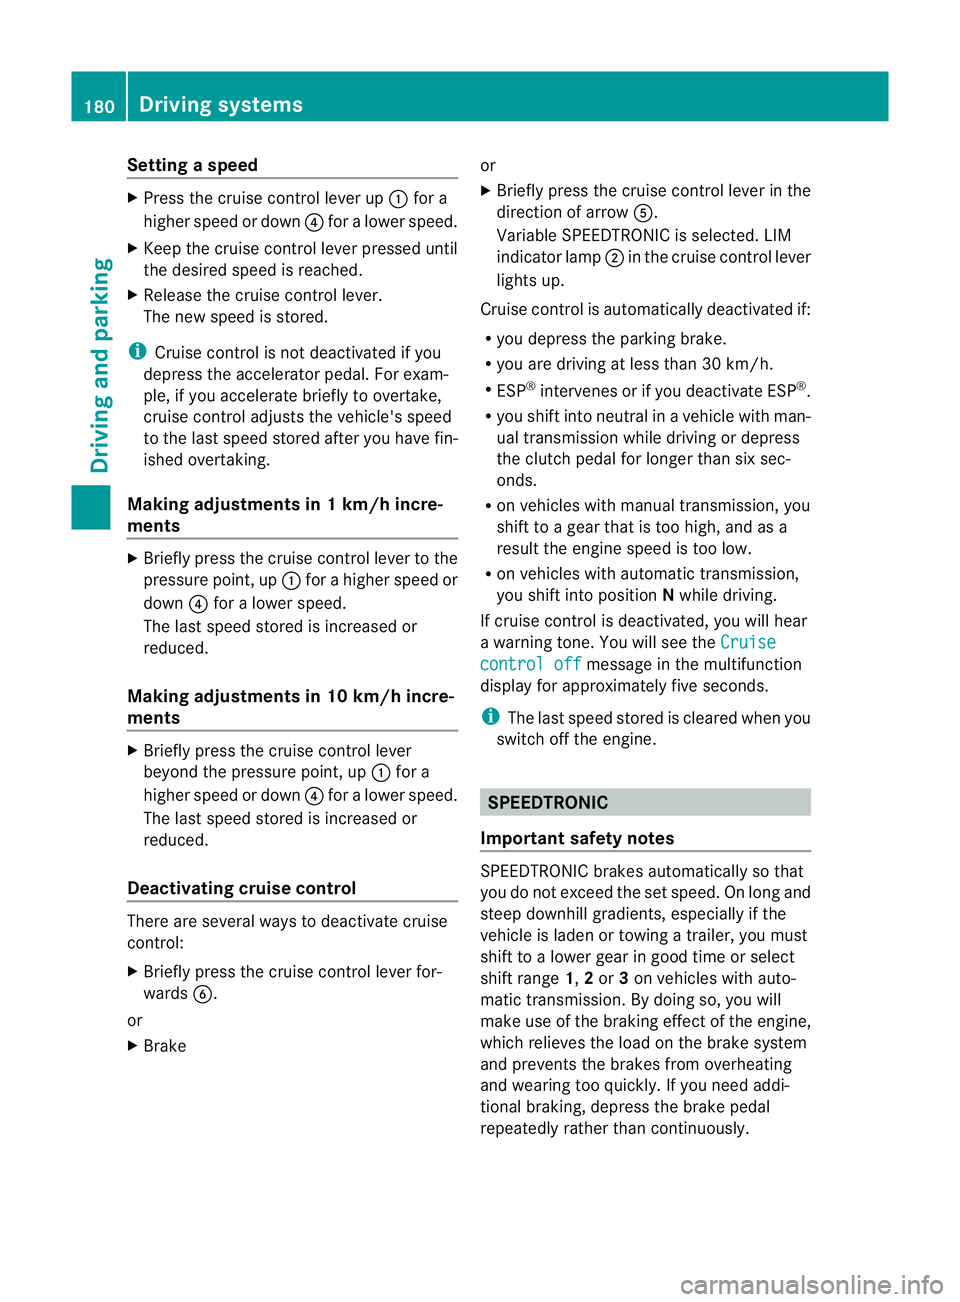
Setting
aspeed X
Press the cruise control lever up :for a
highe rspeed or down ?for a lower speed.
X Keep the cruise control lever pressed until
the desired speed is reached.
X Release the cruise control lever.
The new speed is stored.
i Cruise control is not deactivated if you
depress the accelerator pedal. For exam-
ple, if you accelerate briefly to overtake,
cruise control adjusts the vehicle's speed
to the last speed stored after you have fin-
ished overtaking.
Making adjustments in 1 km/h incre-
ments X
Briefly press the cruise control lever to the
pressure point, up :for a higher speed or
down ?for a lower speed.
The last speed stored is increased or
reduced.
Making adjustments in 10 km/h incre-
ments X
Briefly press the cruise control lever
beyond the pressure point, up :for a
higher speed or down ?for a lower speed.
The last speed stored is increased or
reduced.
Deactivating cruise control There are several ways to deactivate cruise
control:
X Briefly press the cruise control lever for-
wards B.
or
X Brake or
X
Briefly press the cruise control lever in the
direction of arrow A.
Variable SPEEDTRONIC is selected. LIM
indicator lamp ;in the cruise contro llever
lights up.
Cruise control is automatically deactivated if:
R you depress the parking brake.
R you are driving at less than 30 km/h.
R ESP ®
intervenes or if you deactivate ESP ®
.
R you shift into neutral in a vehicle with man-
ual transmission while driving or depress
the clutch pedal for longer than six sec-
onds.
R on vehicles with manual transmission, you
shift to a gear that is too high, and as a
result the engine speed is too low.
R on vehicles with automatic transmission,
you shift into position Nwhile driving.
If cruise control is deactivated, you will hear
a warning tone. You will see the Cruise control off message in the multifunction
display for approximately five seconds.
i The last speed stored is cleared when you
switch off the engine. SPEEDTRONIC
Important safety notes SPEEDTRONIC brakes automatically so that
you do not exceed the set speed. On long and
steep downhill gradients, especially if the
vehicle is laden or towing a trailer, you must
shift to a lower gear in good time or select
shift range 1,2or 3on vehicles with auto-
matic transmission .By doing so, you will
make use of the brakin geffect of the engine,
which relieves the load on the brake system
and prevents the brakes from overheating
and wearing too quickly. If you need addi-
tional braking, depress the brake pedal
repeatedly rather than continuously. 180
Driving systemsDriving and parking
Page 186 of 401
You will hear a warning tone if this is the
case.
R on vehicles with manual transmission, if
you shift to a higher gear and as a result the
engine speed is too low. G
WARNING
It is not possible to deactivate variable Speed-
tronic by braking.
i The last speed stored is cleared when you
switch off the engine.
Permanent SPEEDTRONIC You can use the on-board computer to limit
the speed permanently to avalue between
160 km/h (e.g. for driving on winter tyres)
and the maximum speed ( Ypage 241).
Shortly before the store dspeed is reached, it
appears in the multifunction display.
Permanent SPEEDTRONIC remains active,
even if variable SPEEDTRONIC is deactivated.
You cannot exceed the stored limit speed,
even if you depress the accelerator pedal
beyond the pressure point (kickdown). DISTRONIC PLUS
Important safety notes DISTRONIC PLUS regulates the speed and
automatically helps you maintain the dis-
tance to the vehicle detected in front. It
brakes automatically in order to avoid
exceeding the set speed.
On long and steep downhill gradients, espe-
cially if the vehicle is laden or towing a trailer,
you must select shift range 1,2or 3in good
time. By doing so, you will make use of the
braking effec tofthe engine. This relieves the
load on the brake system and prevents the
brakes from overheating and wearing too
quickly.
If a slower-moving vehicle is detected in front,
DISTRONIC PLUS causes your vehicle to brake and maintain the preset distance to the
vehicle in front. G
WARNING
Do not change down for additional engine
braking on a slippery road surface. This could
cause the drive wheels to lose their grip and
the vehicle could skid. G
WARNING
DISTRONIC PLUS is only an aid designed to
assist driving. The driver remains fully respon-
sible for the vehicle's distance from other
vehicles, the vehicle's speed and for braking
in good time.
DISTRONIC PLUS does not react in particular
to:
R pedestrians
R stationary obstacles on the road, e.g. stop-
ped or parked vehicles
R oncoming and crossing traffic
DISTRONIC PLUS may not detect narrow vehi-
cles driving in front,e .g. motorcycles, or vehi-
cles driving on a different line. Therefore,
always pay attention to traffic conditions even
when DISTRONIC PLUS is activated. Other-
wise, you may fail to recognise dangers in
time, cause an accident and injure yourself
and others. G
WARNING
DISTRONIC PLUS cannot take account of road
and traffic conditions. If DISTRONIC doe snot
recognise or no longer recognises the vehicle
in front, do not activate DISTRONIC or, if it is
already active, deactivate it. This is especially
the case:
R before corners
R on filter lanes
R when changing to a lane with faster moving
traffic
R in complex driving situations or where lanes
are diverted, e.g. at roadworks on a motor-
way Driving systems
183Driving and parking
Z
Page 219 of 401
General information
i
When towing a trailer, set the tyre pres-
sure on the rear axle of the towing vehicle
for a maximu mload; see the tyre pressure
table in the fuel filler flap (Y page 361).
You will find installation dimensions and loads
in the "Technical data" section
(Y page 387).
The maximum permissible trailer drawbar
noseweight on the ball coupling is 75 kg.
However, the actual noseweight must not
exceed the value given on the trailer tow hitch
and trailer identification plates. The lowest
weight applies.
! Use a noseweight as close as possible to
the maximum permissible noseweight. Do
not use a noseweight of less than 50 kg,
otherwise the trailer may come loose.
Bear in mind that the payload and the rear
axle load are reduced by the actual nose-
weight.
Please note that when towing a trailer, PARK-
TRONIC (Y page 196), parking guidance
(Y page 199) and Blind Spot Assist
(Y page 205) are only available with limita-
tions, or not at all.
i The height of the ball coupling changes
with the load of the vehicle. If necessary,
use a trailer with a height-adjustable draw-
bar.
Driving tips i
Observe the notes on ESP ®
trailer stabi-
lisation (Y page 77).
In Germany, the maximum permissible speed
for vehicle/trailer combinations depends on
the type of trailer, and is either 80 km/h or
100 km/h. In some countries, higher maxi-
mum speeds are permissible for vehicle/
trailer combinations. Before beginning the
journey, check the trailer's documents to see
what the maximum permitted speed is.
For certain Mercedes-Benz vehicles, the max-
imum permissible rear axle load is increased when towing a trailer. Refer to the "Technical
data" section to find out whether this applies
to your vehicle. If you utilise any of the added
maximum rear axle load when towing a trailer,
the vehicle/trailer combination may not
exceed a maximum speed of 100 km/h for
reasons concerning the operating permit.
This also applies in countries in which the
permissible maximum speed for vehicle/
trailer combinations is above 100 km/h.
When towing a trailer, your vehicle's handling
characteristics will be different in comparison
to when driving without a trailer.
The vehicle/trailer combination:
R is heavier
R is restricted in its acceleration and gradi-
ent-climbing capability
R has an increased braking distance
R is affected more by strong crosswinds
R demands more sensitive steering
R consumes more fuel
On long and steep downhill gradients, you
must shift to a lower gear in good time, or on
vehicles with automatic transmission, select
the shift range 1,2or 3.
i This also applies if you have activated
cruise control, SPEEDTRONIC or DIS-
TRONIC PLUS.
This will use the braking effect of the engine,
so less braking will be required to maintain
the speed. This relieves the load on the brake
system and prevents the brakes from over-
heating and wearing too quickly. If you need
additional braking, depress the brake pedal
repeatedly rather than continuously. 216
Towing
atrailerDriving an d parking