2011 MERCEDES-BENZ C-CLASS ESTATE light
[x] Cancel search: lightPage 147 of 401
Switching on auxiliary heating/ventila-
tion
X
Press button :.
The red or blue indicator lamp in but-
ton :lights up.
Switching off auxiliary heating/ventila-
tion
X Press button :.
The red or blue indicator lamp in but-
ton :goes out.
Switching the auxiliary heating/venti-
lation on/off using the remote control Your vehicle comes with one remote control.
You may use two additional remote controls
for your vehicle. For further information, con-
sult a qualified specialist workshop, e.g. a
Mercedes-Benz Service Centre.
The remote control has a maximum range of
approximately 300 metres. This range is
reduced by:
R sources of radio interference
R solid objects between the remote control
and the vehicle
R the remote control being in an unfavoura-
ble position in relation to the vehicle
R transmitting from an enclosed space
i The optimum range can be achieved if you
hold the remote control vertically, pointing
upwards when you press one of the but-
tons.
i Abattery symbol appears in the display
when the battery in the remote control is
low. Replace the remote control battery
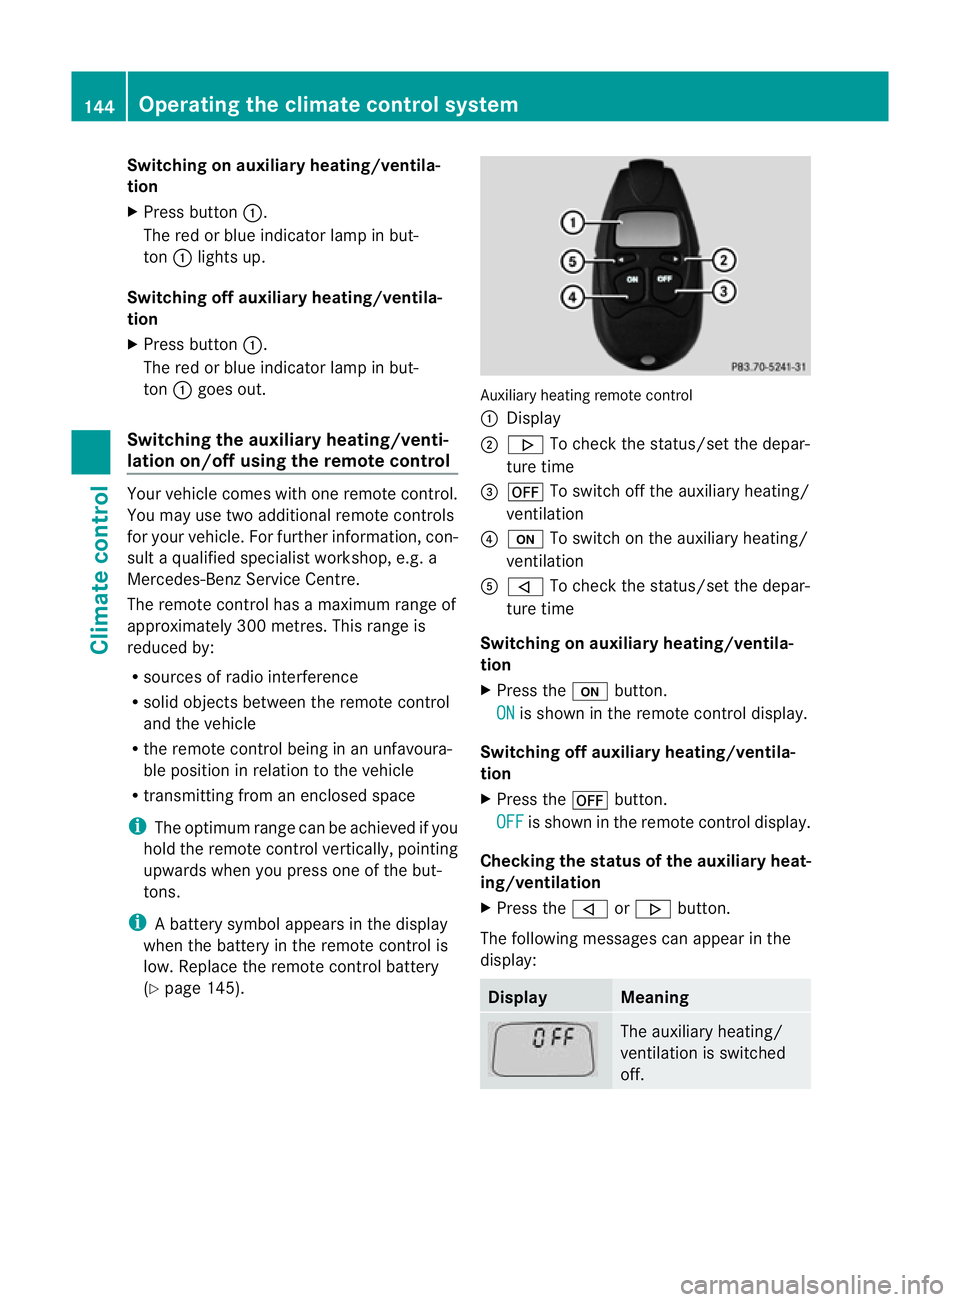
(Y page 145). Auxiliary heating remote control
: Display
; . To check the status/set the depar-
ture time
= ^ To switch off the auxiliary heating/
ventilation
? u To switch on the auxiliary heating/
ventilation
A , To check the status/set the depar-
ture time
Switching on auxiliary heating/ventila-
tion
X Press the ubutton.
ON is shown in the remote control display.
Switching off auxiliary heating/ventila-
tion
X Press the ^button.
OFF is shown in the remote control display.
Checking th estatus of the auxiliary heat-
ing/ventilation
X Press the ,or. button.
The following messages can appear in the
display: Display Meaning
The auxiliary heating/
ventilatio
nis switched
off. 144
Operating the climate control systemClimate control
Page 158 of 401
Automatic transmission
X
Shift the transmission to position P.
The transmission position display in the
multifunction display shows P.
i You can also start the engine when the
transmission is in position N.
Starting procedure with the key i
To start the engine using the key instead
of KEYLESS-GO ,pull th eStart/Stop button
ou toft he ignition lock.
X To start a petrol engine: turn the key to
position 3in the ignition lock
(Y page 153) and release it as soon as the
engine is running.
X To startad iesel engine: turn the key to
position 2in the ignition lock
(Y page 153).
The % preglow indicator lamp in the
instrumen tcluster lights up.
X When the %preglow indicator lamp
goes out, tur nthe key to position 3
(Y page 153) and release it as soon as the
engine is running.
i You can start the engine without preglow
if the engine is warm.
i Vehicles with automatic transmis-
sion: you can also use the touch-start func-
tion. To do this, turn the key to position 3
(Y page 153) and release it immediately.
The engine then starts automatically.
Using KEYLESS-GO to startt he engineG
WARNING
You rvehicle can be started using a valid KEY-
LESS-GO key. For this reason, children should
never be left unsupervised in the vehicle.
Always take the key with you when leaving the
vehicle, even if you are only leaving it for a
short time.
i The Start/Stop button can be used to
start the vehicle manually without inserting the key into the ignition lock. The key must
be in the vehicle and the Start/Stop button
must be inserted in the ignition lock. This
mode for starting the engine operates inde-
pendently of the ECO start/stop automatic
engine start function.
X Depress the brake pedal and keep it
depressed.
X To star tapetrol engine: press the Start/
Stop button (Y page 153) once.
The engine starts.
X To start adiesel engine: press the Start/
Stop button (Y page 153) once.
Preglow is activated and the engine starts. Pulling away
Manual transmission X
Depress the brake pedal and keep it
depressed.
X Fully depress the clutch pedal.
X Shift to either first gear or reverse gear R.
X Release the parking brake (Y page 175).
X Release the brake pedal.
X Slowly release the clutch pedal and gently
depress the accelerato rpedal.
! Change gear in good time and avoid spin-
ning the wheels. Otherwise, you could dam-
age the vehicle.
i Follow the shift recommendations in the
multifunction display for an economical
driving style (Y page 161).
i The vehicle locks centrally once you have
pulled away. The locking knobs in the doors
drop down.
You can open the doors from the inside at
any time.
You can also deactivate the automatic lock-
ing feature (Y page 242). Driving
155Driving and parking Z
Page 161 of 401
R
the brake syste mrequires this.
R the battery's charge status is too low.
R the driver's seat belt is removed or the driv-
er's door is opened.
R the bonnet is opened.
R you shift the transmission from position D
to R.
R you steer the vehicle.
Vehicles with manual transmission
The engine is started automatically if you:
R depress the clutch pedal
R depress the accelerator pedal
! Only engage gear when the clutch pedal
is depressed.
Vehicles with automatic transmission
The engine is started automatically if you:
R release the brakes when in transmission
position Dor N, unless the HOLD function
is activated or
R engage reverse gear Ror
R depress the accelerator pedal
i Shifting the transmission to position P
does not start the engine.
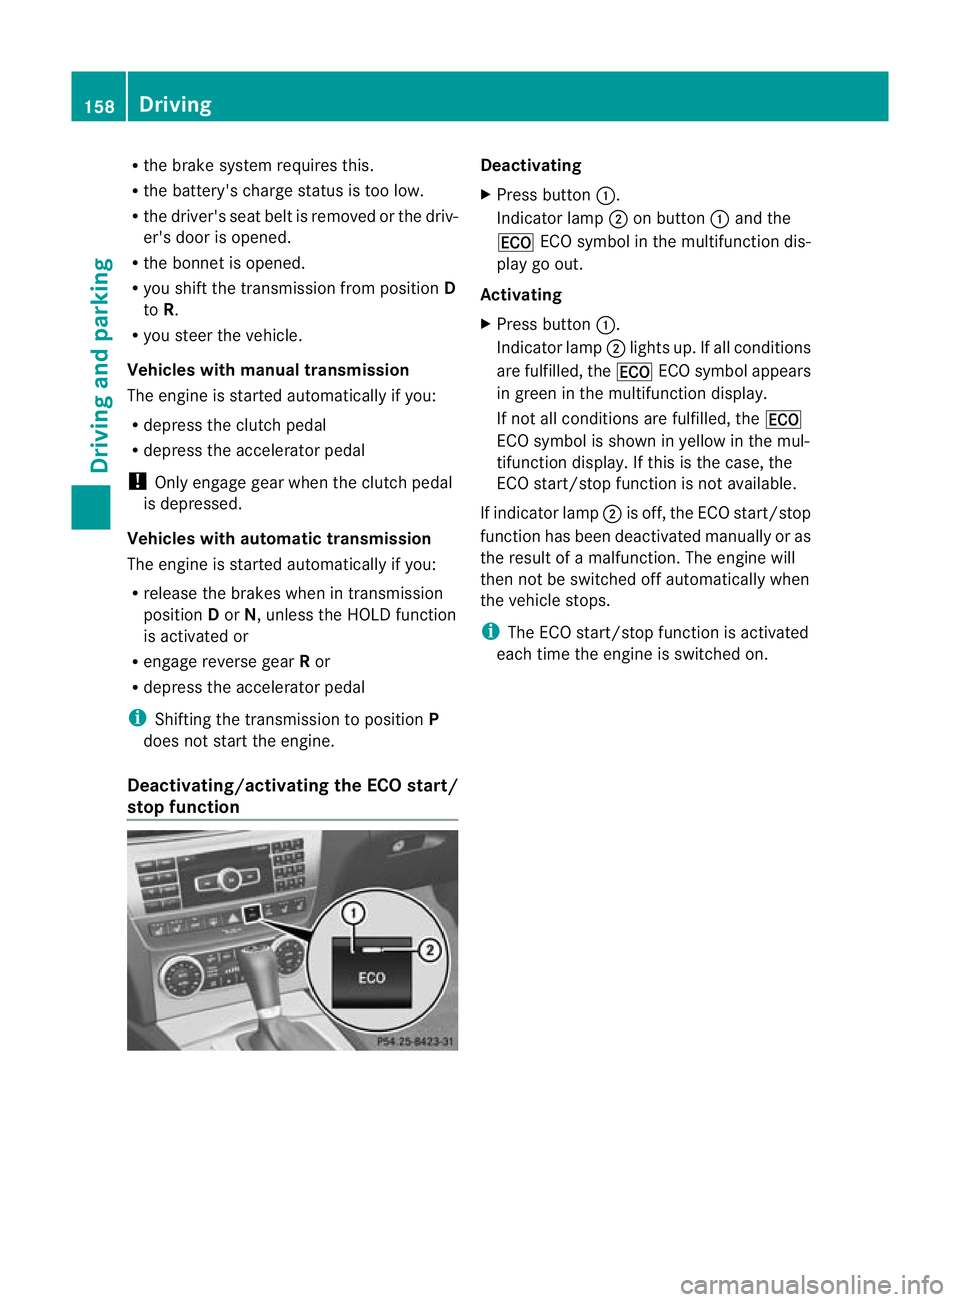
Deactivating/activating the ECO start/
stop function Deactivating
X
Press button :.
Indicator lamp ;on button :and the
¤ ECO symbol in the multifunction dis-
play go out.
Activating
X Press button :.
Indicator lamp ;lights up. If all conditions
are fulfilled, the ¤ECO symbol appears
in green in the multifunction display.
If not all conditions are fulfilled, the ¤
ECO symbol is shown in yellow in the mul-
tifunction display. If this is the case, the
ECO start/stop function is not available.
If indicator lamp ;is off, the ECO start/stop
function has been deactivated manually or as
the result of a malfunction. The engine will
then not be switched off automatically when
the vehicle stops.
i The ECO start/stop function is activated
each time the engine is switched on. 158
DrivingDriving and parking
Page 163 of 401
Problem Possible causes/consequences and
M Solutions
Vehicles with a petrol
engine:
The engine is not run-
ning smoothly and is
misfiring. There is a malfunction in the engine electronics or in a mechanical
component of the engine management system.
X
Only depress the accelerator pedal slightly.
X Have the cause rectified immediately at a qualified specialist
workshop, e.g. a Mercedes-Benz Service Centre.
Otherwise, non-combusted fuel may get into the catalytic con-
verter and damage it. The coolant tempera-
ture display is showing
more than 120 †. The
coolant warning lamp
may also be lit and a
warning tone may
sound. The coolant level is too low. The coolant is too hot and the engine
is no longer being cooled sufficiently.
X
Stop as soon as possible and allow the engine and the coolant
to cool down.
X Check the coolant level (Y page 324). Observe the warning
notes as you do so and top up the coolant if necessary. If the coolant level is correct, the engine radiator fan may be faulty.
The coolant is too hot and the engine is no longer being cooled
sufficiently.
X
At coolant temperatures under 120 †, drive on to the nearest
qualified specialist workshop, e.g. to a Mercedes-Benz Service
Centre.
X Avoid heavy loads on the engine as you do so, e.g. driving on
mountain roads and stop-start traffic. Manual transmission
Important safety notes
G
WARNING
The movement of the pedals must not be
impaired in any way. Do not keep any objects
in the driver's footwell. Make sure that floor-
mats or carpets are correctly secured and
that there is sufficient clearance for the ped-
als.
Do not place several floormats on top of one
another. G
WARNING
Do not change down for additional engine
braking on a slippery road surface. This could
cause the drive wheels to lose their grip and
the vehicle could skid. This could cause you to lose control of your vehicle and cause an
accident.
Gear lever
Gear lever
!
Only engage gear when the clutch pedal
is depressed. 160
Manual transmissionDriving and parking
Page 167 of 401
E
Economy Comfortable, economical
driving
S
Sport Sporty driving style
M
Manual Manual gearshifting
i
For further information on the automatic
drive program, see (Y page 164).
X Press progra mselecto rbutton :repeat-
edly until the lette rfor the desired gearshift
program appears in the multifunction dis-
play.
i The automatic transmission switches to
automatic drive program Eeach time the
engine is started.
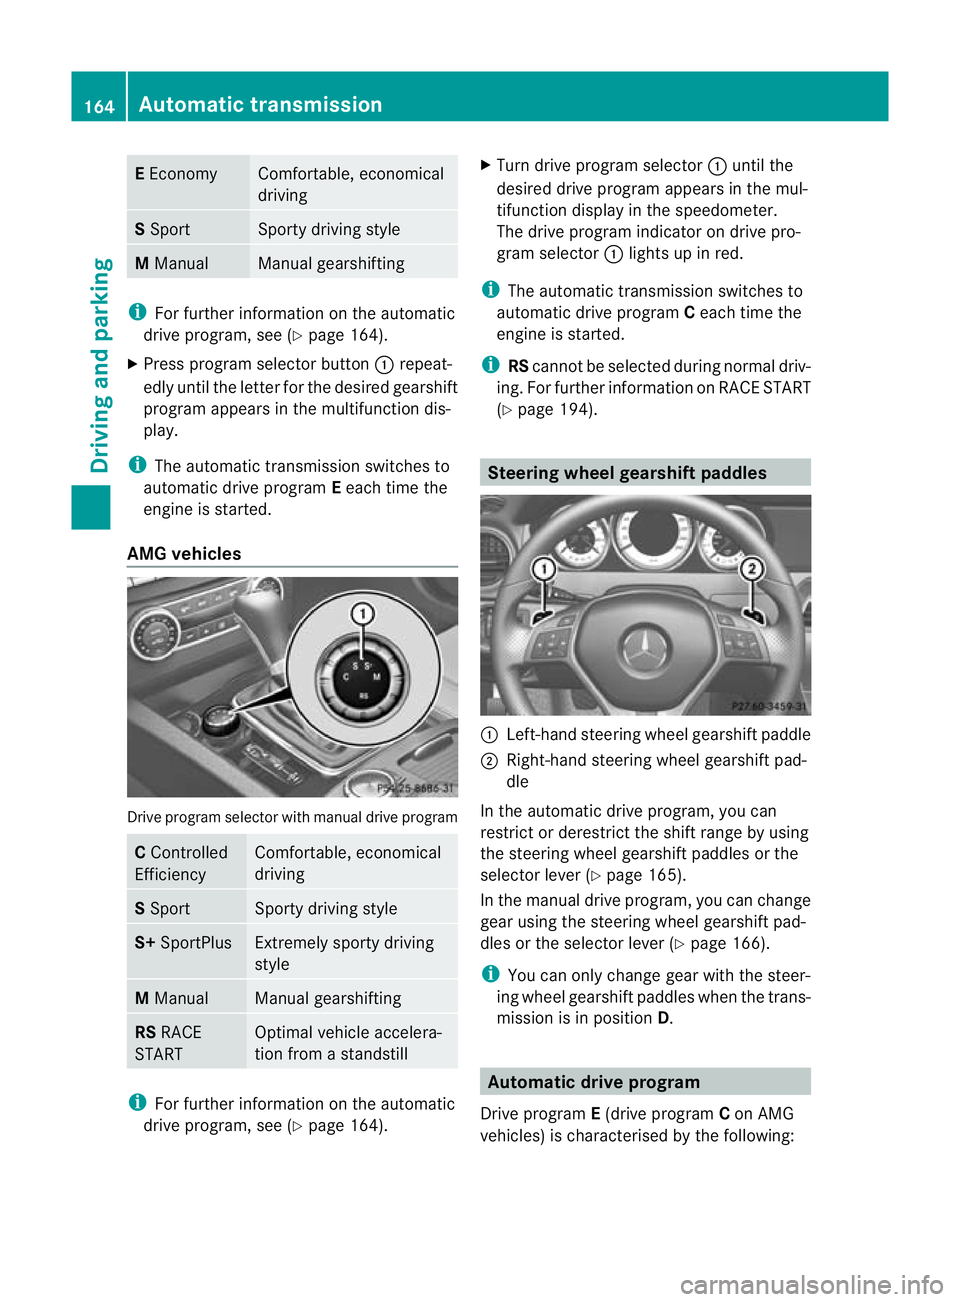
AMG vehicles Drive program selector with manual drive program
C
Controlled
Efficiency Comfortable, economical
driving
S
Sport Sporty driving style
S+
SportPlus Extremely sporty driving
style
M
Manual Manual gearshifting
RS
RACE
START Optimal vehicle accelera-
tion from a standstill
i
For further information on the automatic
drive program, see (Y page 164). X
Turn drive program selector :until the
desired drive program appears in the mul-
tifunction display in the speedometer.
The drive program indicator on drive pro-
gram selector :lights up in red.
i The automatic transmission switches to
automatic drive program Ceach time the
engine is started.
i RScannot be selected during normal driv-
ing. For further information on RACE START
(Y page 194). Steering wheel gearshift paddles
:
Left-hand steering wheel gearshift paddle
; Right-hand steering wheel gearshift pad-
dle
In the automatic drive program, you can
restrict or derestrict the shift range by using
the steering wheel gearshift paddles or the
selector lever (Y page 165).
In the manual drive program, you can change
gear using the steering wheel gearshift pad-
dles or the selector lever (Y page 166).
i You can only change gear with the steer-
ing wheel gearshift paddles when the trans-
mission is in position D. Automatic drive program
Drive program E(drive program Con AMG
vehicles) is characterised by the following: 164
Automatic transmissionDriving and parking
Page 169 of 401

Clearing the shif
trange restriction X
Press and hold the selector leve rtowards
D+ until Dis shown once more in the mul-
tifunction display.
or
X Pull and hold the right-hand steering wheel
gearshift paddle until Dis shown again in
the multifunction display.
The automatic transmission shifts from the
current shift range directly to D.
Selecting the ideal shift range X
Press the selector lever to the left towards
D– and hold it in position.
or
X Pull the left-hand steerin gwheel gearshift
paddle and hold it in position.
The automatic transmission shifts to the
gear which allows optimum acceleration
and deceleration. To do this, the automatic
transmission shifts down one or more
gears. Manual drive program
Switching on the manual drive program Manual drive program
Mcan be selected
using the program selector or the drive pro-
gram selector button. You can change gear
using the steering wheel gearshift paddles or
the selector lever in manual drive program
M if the transmission is in position D.
X Press the program selector button
(Y page 163) repeatedly until Mappears in
the multifunction display.
X AMG vehicles: turn the drive program
selector (Y page 164) until Mappears in the
multifunction display.
The indicator Mon the drive program selec-
tor lights up in red. Upshifting X
Briefly press the selector lever to the right
towards D+.
or
X Pull the right-hand steering wheel gearshift
paddle (Y page 164).
The automatic transmission shifts up to the
next gear.
X Shift up a gear when the ^upshift symbol
appears in the display instead of M.
Vehicles with AMG engines
! In manual gearshift program M, the auto-
matic transmission does not shift up auto-
matically even when the engine limiting
speed for the current gear is reached.
When the engine limiting speed is reached,
the fuel supply is cut to prevent the engine
from overrevving. You must make sure that
the engine speed does not reach the red
area of the rev counter. Otherwise, there is
a risk of engine damage.
X Shift up a gear if the colour in the multi-
function display in the speedometer
changes to red and the UP display message
is shown.
Downshifting X
Briefly press the selector lever to the left
towards D–.
or
X Pull the left-hand steering wheel gearshift
paddle (Y page 164).
The automatic transmission shifts down to
the next gear.
i If you slow down or stop without shifting
down, the automatic transmission auto-
matically shifts down.
i If you desire maximum acceleration, push
the selector lever to the left or pull and hold
the left-hand steering wheel gearshift pad-
dle until the transmission shifts to the opti-
mal gear for the current speed. 166
Automatic transmissionDriving and parking
Page 174 of 401
not been adapted to suit the climatic condi-
tions, e.g .diesel fuel fro mwarmer regions.
i Further information about country-spe-
cific fuel properties can be obtained from
oil companies, e.g .atfilling stations.
Flow improver Flow improvers can be added to improve the
cold resistance of diesel fuel. The effective-
ness of a flow improver is not guaranteed with
every diesel fuel.
Correct dosage and thorough mixing are deci-
sive factors in ensuring improvement in low-
temperature resistance. Avoid excessive dos-
age. Excessive dosage may actually decrease
low-temperature resistance under certain cir-
cumstances. Follow the manufacturer's dos-
ing instructions.
Mix the additive with the diesel in good time,
before the flow properties of the diesel
become inadequate. Malfunctions can other-
wise only be rectified by heating the entire
fuel system, e.g. by parking the vehicle in a
heated garage.
Observe the information provided by the man-
ufacturer when using a flow improver. Only
use flow improvers that have been tested and
approved by Mercedes-Benz. You can obtain
further information from any Mercedes-Benz
Service Centre. Refuelling
Fuel filler flap The fuel filler flap is unlocked or locked auto-
matically when you open or close the vehicle
with the key or using KEYLESS-GO.
The position of the fuel filler cap is displayed
in the instrument cluster 8.The arrow
next to the filling pump indicates the side of
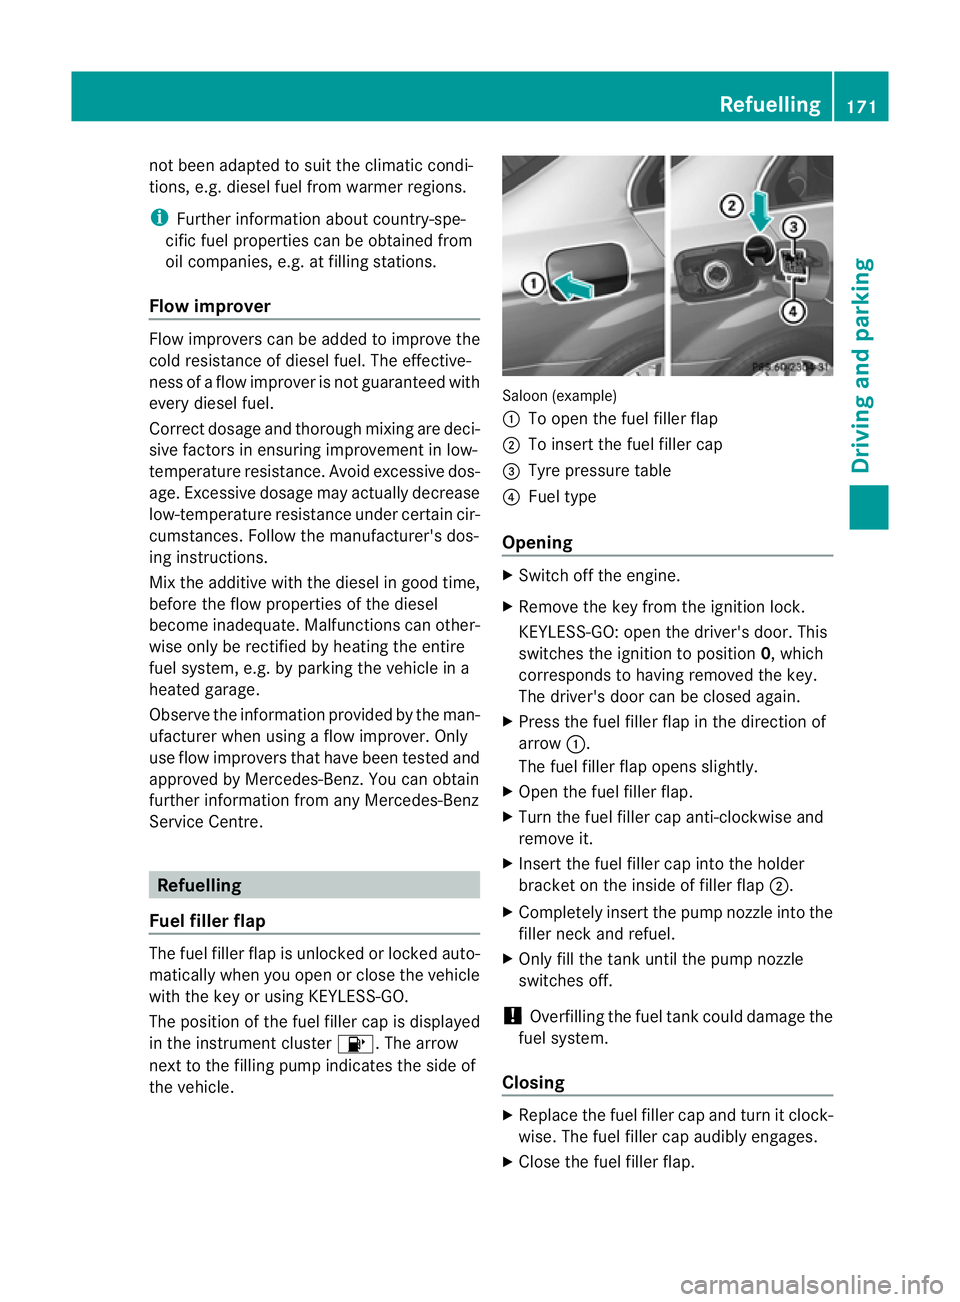
the vehicle. Saloon (example)
:
To open the fuel filler flap
; To insert the fuel filler cap
= Tyre pressure table
? Fuel type
Opening X
Switch off the engine.
X Remove the key from the ignition lock.
KEYLESS-GO: open the driver's door. This
switches the ignition to position 0, which
corresponds to having removed the key.
The driver's door can be closed again.
X Press the fuel filler flap in the direction of
arrow :.
The fuel filler flap opens slightly.
X Open the fuel filler flap.
X Turn the fuel filler cap anti-clockwise and
remove it.
X Insert the fuel filler cap into the holder
bracket on the inside of filler flap ;.
X Completely insert the pump nozzle into the
filler neck and refuel.
X Only fill the tank until the pump nozzle
switches off.
! Overfilling the fuel tank could damage the
fuel system.
Closing X
Replace the fuel filler cap and turn it clock-
wise. The fuel filler cap audibly engages.
X Close the fuel filler flap. Refuelling
171Driving and parking Z
Page 178 of 401
Parking brake
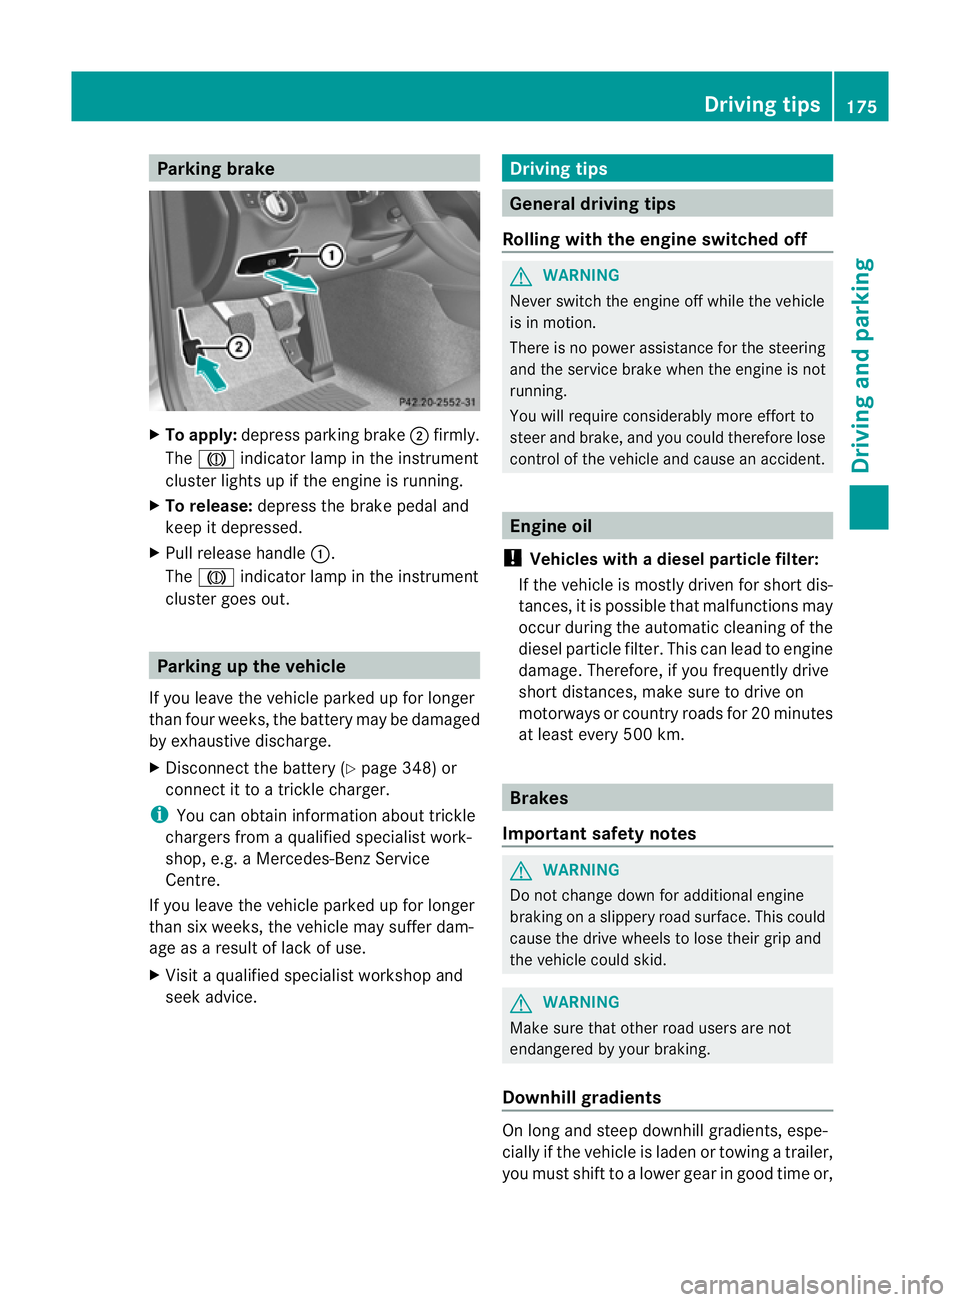
X
To apply: depress parking brake ;firmly.
The J indicator lamp in the instrument
cluster lights up if the engine is running.
X To release: depress the brake pedal and
keep it depressed.
X Pull release handle :.
The J indicator lamp in the instrument
cluster goes out. Parking up the vehicle
If you leave the vehicle parked up for longer
than four weeks, the battery may be damaged
by exhaustive discharge.
X Disconnect the battery (Y page 348) or
connect it to a trickle charger.
i You can obtain information about trickle
chargers from a qualified specialist work-
shop, e.g. a Mercedes-Benz Service
Centre.
If you leave the vehicle parked up for longer
than six weeks, the vehicle may suffer dam-
age as a result of lack of use.
X Visit a qualified specialist workshop and
seek advice. Driving tips
General driving tips
Rolling with the engine switched off G
WARNING
Never switch the engine off while the vehicle
is in motion.
There is no power assistance for the steering
and the service brake when the engine is not
running.
You will require considerably more effort to
steer and brake, and you could therefore lose
control of the vehicle and cause an accident. Engine oil
! Vehicles with adiesel particle filter:
If the vehicle is mostly driven for short dis-
tances, it is possible that malfunctions may
occur during the automatic cleaning of the
diesel particle filter. This can lead to engine
damage. Therefore, if you frequently drive
short distances, make sure to drive on
motorways or country roads for 20 minutes
at least every 500 km. Brakes
Important safety notes G
WARNING
Do not change down for additional engine
braking on a slippery road surface. This could
cause the drive wheels to lose their grip and
the vehicle could skid. G
WARNING
Make sure that other road users are not
endangered by your braking.
Downhill gradients On long and steep downhill gradients, espe-
cially if the vehicle is laden or towing a trailer,
you must shift to a lower gear in good time or, Driving tips
175Driving and parking Z