2011 MERCEDES-BENZ C-CLASS COUPE tire pressure
[x] Cancel search: tire pressurePage 25 of 373

Couplin
gupatrailer...................... 202
Decoupling atrailer ....................... 202
Driving tips .................................... 199
ESP ®
................................................ 70
Folding in the ball coupling ............202
Folding out the ball coupling ..........201
Important safety notes ..................199
Mounting dimensions ....................361
Parking Guidance ........................... 186
Parktroni c...................................... 182
Power supply ................................. 203
Shift range ..................................... 147
Trailer loads ................................... 362
Transmission
see Automatic transmission
see Manual transmission
Transporting the vehicle ..................332
Trim pieces (cleaning instructions) .311
Trip computer On-board computer (12-button
multifunctio nsteering wheel) ........215
On-board computer (4-button
multifunctio nsteering wheel) ........210
Trip meter
Displaying/resetting (4-button
multifunctio nsteering wheel) ........209
Displaying (12-button multifunc-
tion steering wheel) .......................215
Resetting (12-button multifunc-
tion steering wheel) .......................216
Trip odometer
see Trip meter
Turn signal
Display message (12-button mul-
tifunctio nsteering wheel) ..............248
Display message (4-button multi-
function steering wheel) ................245
Turn signals
Switching on/off ........................... 110
Two-way radio
Frequencies ................................... 351
Installatio n..................................... 351
Transmission output (maximum) .... 351
Type identification plate
see Vehicle identification plate Tyre pressure
Calling up (on-board computer) .....342
Display message (12-button mul-
tifunctio nsteering wheel) ..............263
Display message (4-button multi-
function steering wheel) ................262
Not reached (TIREFIT) ....................319
Pressure loss warning ....................340
Reached (TIREFIT) ..........................320
Recommended ............................... 339
Tyre pressure monitor
Function/notes ............................. 342
Restarting ...................................... 343
Warning lamp ................................. 282
Tyres
Checking ........................................ 336
Direction of rotatio n...................... 344
Display message (12-button mul-
tifunctio nsteering wheel) ..............263
Display message (4-button multi-
function steering wheel) ................262
Grip ................................................ 161
Important safety notes ..................336
Replacing ....................................... 344
Service life ..................................... 337
Storing ........................................... 344
Tyr esize (data) .............................. 345
Tyr etread ...................................... 337
see Flat tyre U
Unladen weight see Technical data
Unlocking
Emergency unlocking .......................85
From inside the vehicle (central
unlocking button) ............................. 84 V
Vanity mirror (in sun visor) ..............290
Vehicle Correct use ...................................... 27
Data acquisition ............................... 27
Electronics ..................................... 351
Equipment ....................................... 25
Implied warranty .............................. 27
Individua lsettings .......................... 22322
Index
Page 158 of 373
Flow improver
Flow improvers can be added to improve the
cold resistance of diesel fuel .The effective-
ness of a flow improver is not guaranteed with
every fuel.
Correct dosage and thorough mixing are deci-
sive factors in ensuring improvement in low-
temperature resistance. Under certain cir-
cumstances, an excessive dosage may
actually decrease low-temperature resist-
ance and should therefore be avoided. Follow
the manufacturer's dosing instructions.
Mix the additive with the diesel in good time,
before the flow properties of the diesel
become inadequate. Malfunctions can other-
wise only be rectified by heating the entire
fuel system, e.g. by parking the vehicle in a
heated garage.
Observe the information provided by the man-
ufacturer when using a flow improver. Only
use flow improvers that have been tested and
approved by Mercedes-Benz. You can obtain
further information from any Mercedes-Benz
Service Centre. Refuelling
Fuel filler flap The fuel filler flap is unlocked or locked auto-
matically when you open or close the vehicle
with the key or using KEYLESS-GO.
The position of the fuel filler cap is displayed
in the instrument cluster 8.The arrow
next to the filling pump indicates the side of
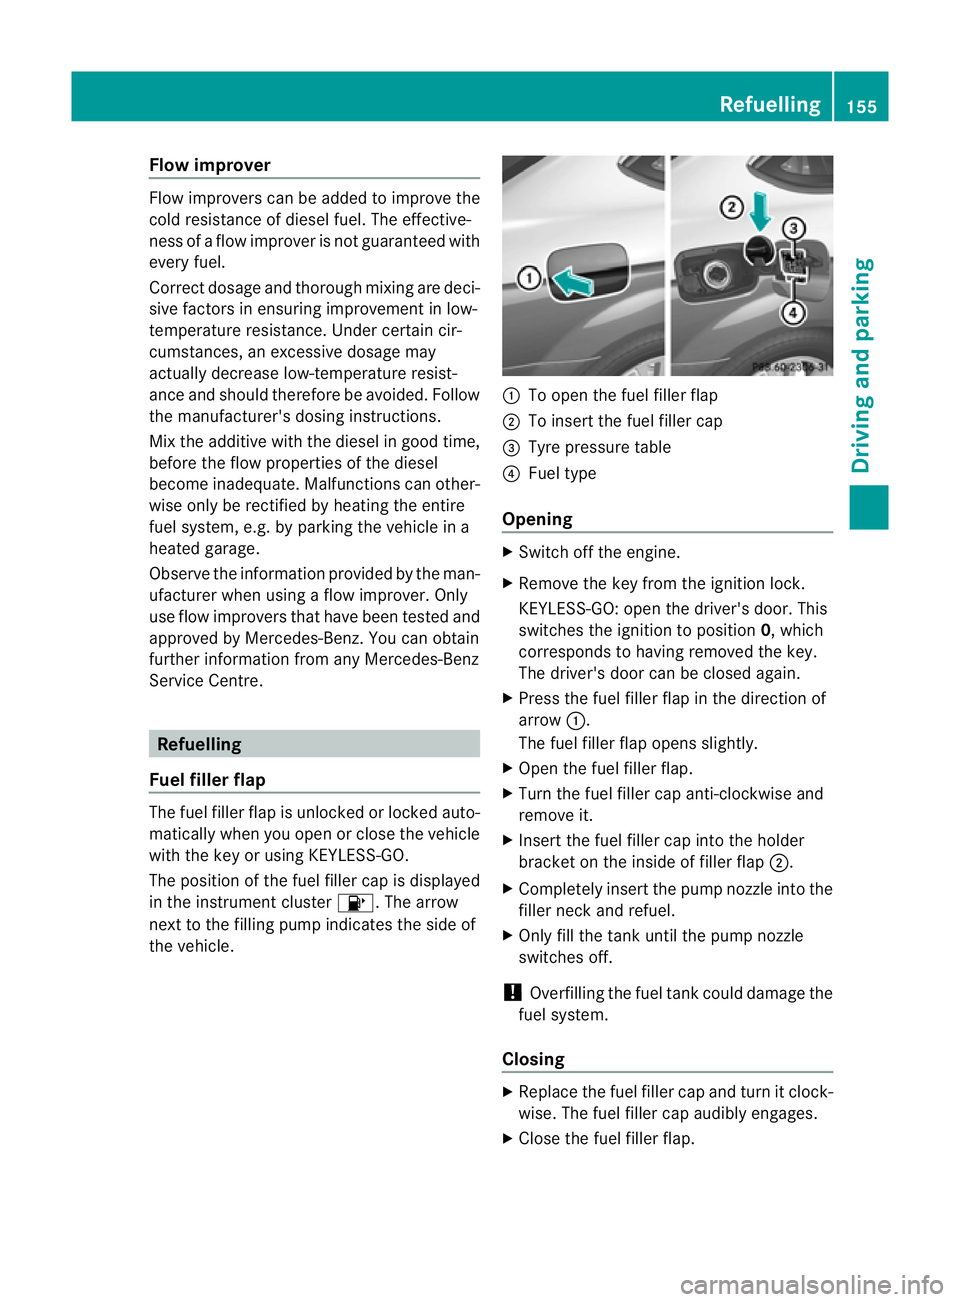
the vehicle. :
To open the fuel filler flap
; To insert the fuel filler cap
= Tyre pressure table
? Fuel type
Opening X
Switch off the engine.
X Remove the key from the ignition lock.
KEYLESS-GO: open the driver's door. This
switches the ignition to position 0, which
corresponds to having removed the key.
The driver's door can be closed again.
X Press the fuel filler flap in the direction of
arrow :.
The fuel filler flap opens slightly.
X Open the fuel filler flap.
X Turn the fuel filler cap anti-clockwise and
remove it.
X Insert the fuel filler cap into the holder
bracket on the inside of filler flap ;.
X Completely insert the pump nozzle into the
filler neck and refuel.
X Only fill the tank until the pump nozzle
switches off.
! Overfilling the fuel tank could damage the
fuel system.
Closing X
Replace the fuel filler cap and turn it clock-
wise. The fuel filler cap audibly engages.
X Close the fuel filler flap. Refuelling
155Driving and parking Z
Page 320 of 373

X
Vehicles withou tKEYLESS-GO: remove
the key from the ignition lock.
X Vehicles with KEYLESS-GO: open the
driver's door.
The on-board electronics have status 0,
which is the same as the key having been
removed.
X Vehicles with KEYLESS-GO: remove the
Start/Stop button from the ignition lock
(Y page 137).
X All occupants must get out of the vehicle.
Make sure that they are no tendangered as
they do so.
X Make sure tha tno one is near the danger
area whilst a wheel is being changed. Any-
one who is not directly assisting in the
wheel change should, for example, stand
behind the barrier.
X Get out of the vehicle. Pay attention to traf-
fic conditions when doing so.
X Close the driver's door.
X Place the warning triangle (Y page 314) a
suitable distance away.O bserve legal
requirements. TIREFIT kit
Using the TIREFIT kit You can use the TIREFIT kit to seal small
punctures, particularly those in the tyre tread.
You can use TIREFIT at outside temperatures
down to -20 †. G
WARNING
In the following situations, your safety is at
particular risk as tyre sealant is unable to pro-
vide sufficient breakdown assistance:
R there are cuts or punctures in the tyre
greater than 4 mm.
R the wheel rim is damaged.
R you have driven at very low tyre pressures
or on a flat tyre.
Do not drive any further. Consult a qualified
specialist workshop which has the necessary specialist knowledge and tools to carry out
the work required.
Mercedes-Benz recommends that you use a
Mercedes-Benz Service Centre for this pur-
pose. In particular, work relevant to safety or
on safety-related system
smust be carried out
at a qualified specialist workshop.
X Do not remove any foreign objects which
have penetrated the tyre, e.g .screws or
nails.
X Remove the tyre sealant bottle, the accom-
panying "max. 80 km/h" sticker and the
tyre inflation compressor from the stowage
well underneath the boo tfloor
(Y page 315). X
Affix part :of the sticker within the driv-
er's field of vision.
X Affix part ;of the sticker near the valve
on the wheel with the defective tyre. G
WARNING
TIREFIT must not com einto contact with your
skin, eyes or clothing.
R If TIREFIT comes into contact with your
eyes or skin, immediately rinse thoroughly
with clean water.
R Change ou tofclothing which has come into
contact with TIREFIT immediately.
R If an allergic reaction occurs, consult a doc-
tor immediately.
Keep TIREFIT away fro mchildren. Flat tyre
317Breakdown assistance
Z
Page 321 of 373
R
If TIREFIT is swallowed, immediately rinse
yourm outh out thoroughly and drink plenty
of water.
R Do not induce vomiting. Consult a doctor
immediately.
R Do not inhale TIREFIT fumes.
i If TIREFIT leaks out, allow it to dry. It can
then be removed like a layer of film.
If you get TIREFIT on your clothing, have it
cleaned as soon as possible with perchloro-
ethylene.
Your vehicle is provided with one of two dif-
ferent TIREFIT kits:
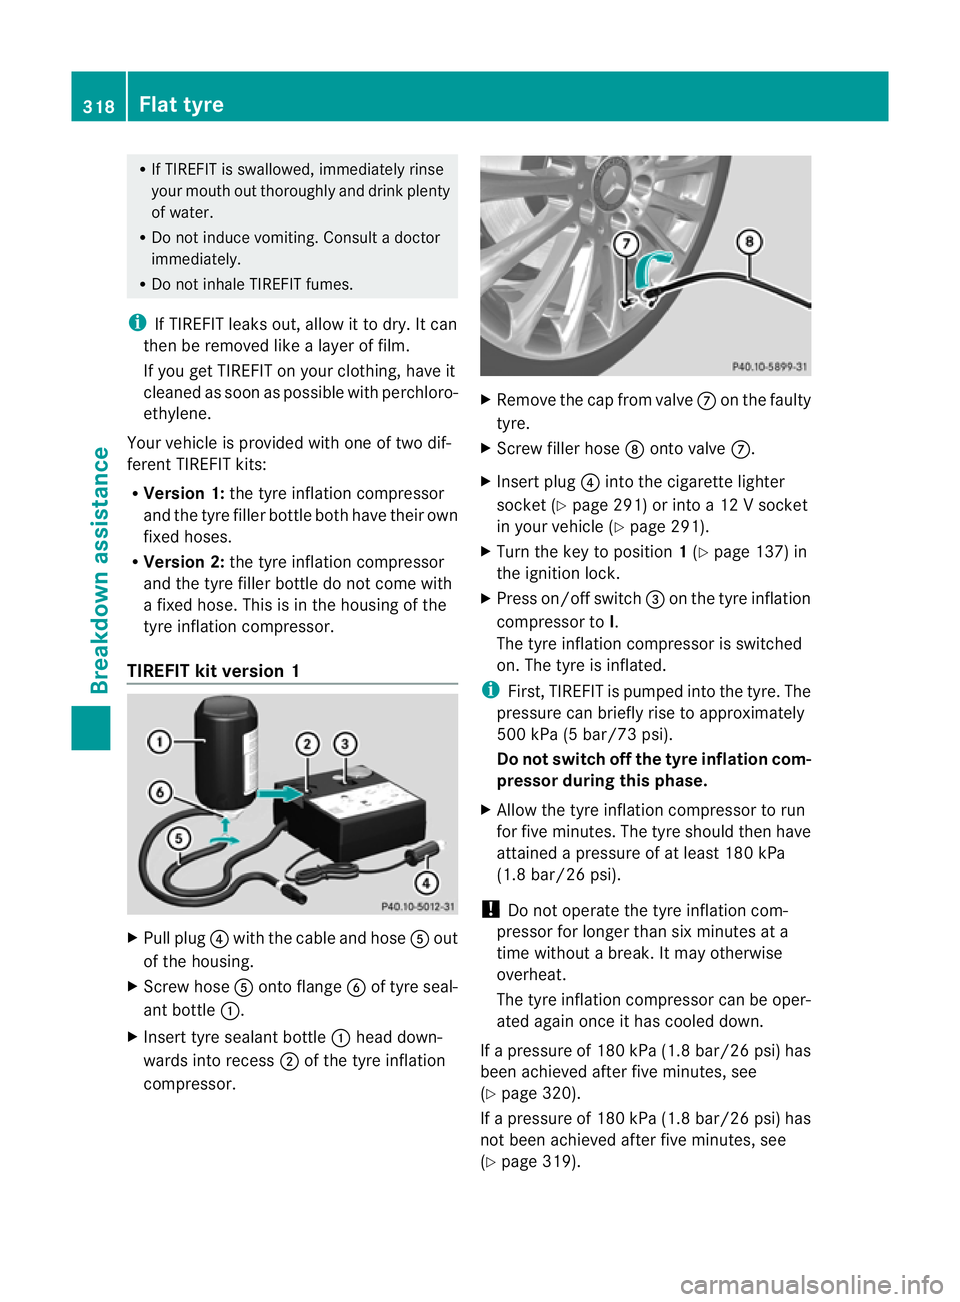
R Version 1: the tyre inflation compressor
and the tyre filler bottle both have their own
fixed hoses.
R Version 2: the tyre inflation compressor
and the tyre filler bottle do not come with
a fixed hose. This is in the housing of the
tyre inflation compressor.
TIREFIT kit version 1 X
Pull plug ?with the cable and hose Aout
of the housing.
X Screw hose Aonto flange Bof tyre seal-
ant bottle :.
X Insert tyre sealant bottle :head down-
wards into recess ;of the tyre inflation
compressor. X
Remove the cap from valve Con the faulty
tyre.
X Screw filler hose Donto valve C.
X Insert plug ?into the cigarette lighter
socket (Y page 291) or into a 12 V socket
in your vehicle (Y page 291).
X Turn the key to position 1(Y page 137) in
the ignition lock.
X Press on/offs witch=on the tyre inflation
compressor to I.
The tyre inflatio ncompressor is switched
on. The tyre is inflated.
i First, TIREFIT is pumped into the tyre. The
pressure can briefly rise to approximately
500 kPa (5 bar/73 psi).
Do not switch off the tyre inflation com-
pressor during this phase.
X Allow the tyre inflation compressor to run
for five minutes. The tyre should then have
attained a pressure of at least 180 kPa
(1.8 bar/26 psi).
! Do not operate the tyre inflation com-
pressor for longer than six minutes at a
time without a break. It may otherwise
overheat.
The tyre inflation compressor can be oper-
ated again once it has cooled down.
If a pressure of 180 kPa (1.8 bar/26 psi) has
been achieved after five minutes, see
(Y page 320).
If a pressure of 180 kPa (1.8 bar/26 psi) has
not been achieved after five minutes, see
(Y page 319). 318
Flat tyreBreakdown assistance
Page 322 of 373
TIREFI
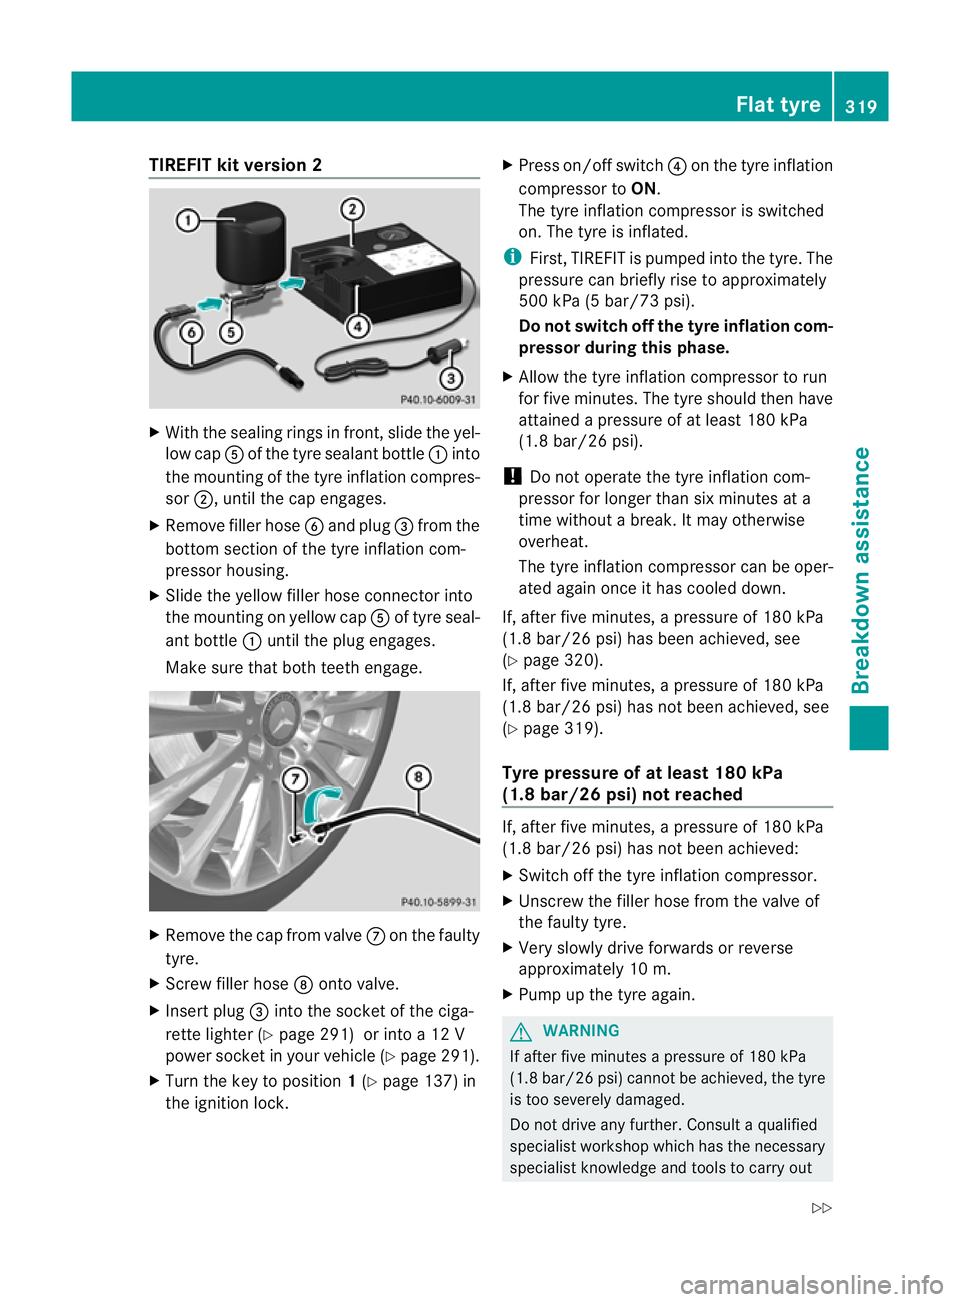
Tkit version 2 X
With the sealing rings in front, slide the yel-
low cap Aof the tyre sealant bottle :into
the mounting of the tyre inflation compres-
sor ;, until the cap engages.
X Remove filler hose Band plug =from the
bottom section of the tyre inflation com-
pressor housing.
X Slide the yellow filler hose connector into
the mounting on yellow cap Aof tyre seal-
ant bottle :until the plug engages.
Make sure that both teeth engage. X
Remove the cap from valve Con the faulty
tyre.
X Screw filler hose Donto valve.
X Insert plug =into the socket of the ciga-
rette lighter (Y page 291) or into a 12 V
power socket in your vehicle (Y page 291).
X Turn the key to position 1(Y page 137) in
the ignition lock. X
Press on/off switch ?on the tyre inflation
compressor to ON.
The tyre inflation compressor is switched
on. The tyre is inflated.
i First, TIREFIT is pumped into the tyre .The
pressure can briefly rise to approximately
500 kPa (5 bar/73 psi).
Do not switch off the tyre inflation com-
pressor during this phase.
X Allow the tyre inflation compressor to run
for five minutes. The tyre should then have
attained a pressure of at least 180 kPa
(1.8 bar/26 psi).
! Do not operate the tyre inflation com-
pressor for longer than six minutes at a
time without a break. It may otherwise
overheat.
The tyre inflation compressor can be oper-
ated again once it has cooled down.
If, after five minutes, a pressure of 180 kPa
(1.8 bar/26 psi) has been achieved, see
(Y page 320).
If, after five minutes, a pressure of 180 kPa
(1.8 bar/26 psi) has not been achieved, see
(Y page 319).
Tyre pressure of at least 180 kPa
(1.8 bar/26 psi) not reached If, after five minutes, a pressure of 180 kPa
(1.8 bar/26 psi) has not been achieved:
X
Switch off the tyre inflation compressor.
X Unscrew the filler hose from the valve of
the faulty tyre.
X Very slowly drive forwards or reverse
approximately 10 m.
X Pump up the tyre again. G
WARNING
If after five minutes apressure of 180 kPa
(1.8 bar/26 psi) cannot be achieved, the tyre
is too severely damaged.
Do not drive any further. Consult a qualified
specialist workshop which has the necessary
specialist knowledge and tools to carry out Flat tyre
319Breakdown assistance
Z
Page 323 of 373
the work required. Mercedes-Benz recom-
mends tha tyou use a Mercedes-Benz Service
Centre for this purpose. In particular, work
relevant to safety or on safety-related sys-
tems must be carried out at a qualified spe-
cialist workshop.
Tyre pressure of 180 kPa (1.8 bar/
26 psi) is reached X
Switch off the tyre inflation compressor.
X Unscrew the filler hose from the valve of
the faulty tyre.
! After use, excess TIREFIT may run out of
the filler hose. This may cause stains.
Therefore, place the filler hose in the plastic
bag which contained the TIREFIT kit.
X Stow the tyre sealant bottle, the tyre infla-
tion compressor and the warning triangle.
X Pull away immediately. G
WARNING
Do not exceed the maximum speed of
80 km/h.
The "max. 80 km/h" label must be affixed in
the driver's field of vision.
The vehicle's handling characteristics may be
affected.
X Stop after driving for approximately ten
minutes and check the tyre pressure with
the tyre inflation compressor. G
WARNING
If the tyre pressure is less than 130 kPa
(1.3 bar/20 psi), the tyre is too severely dam-
aged. Do not drive any further. Consult a
qualified specialist workshop which has the
necessary specialist knowledge and tools to
carry out the work required. Mercedes-Benz
recommends that you use aMercedes-Benz
Service Centre for this purpose. In particular,
work relevant to safety or on safety-related
systems must be carried out at a qualified
specialist workshop. X
Correct the tyre pressure if it is still at least
130 kPa (1.3 bar/20 psi) (for the values,
see the fuel filler flap).
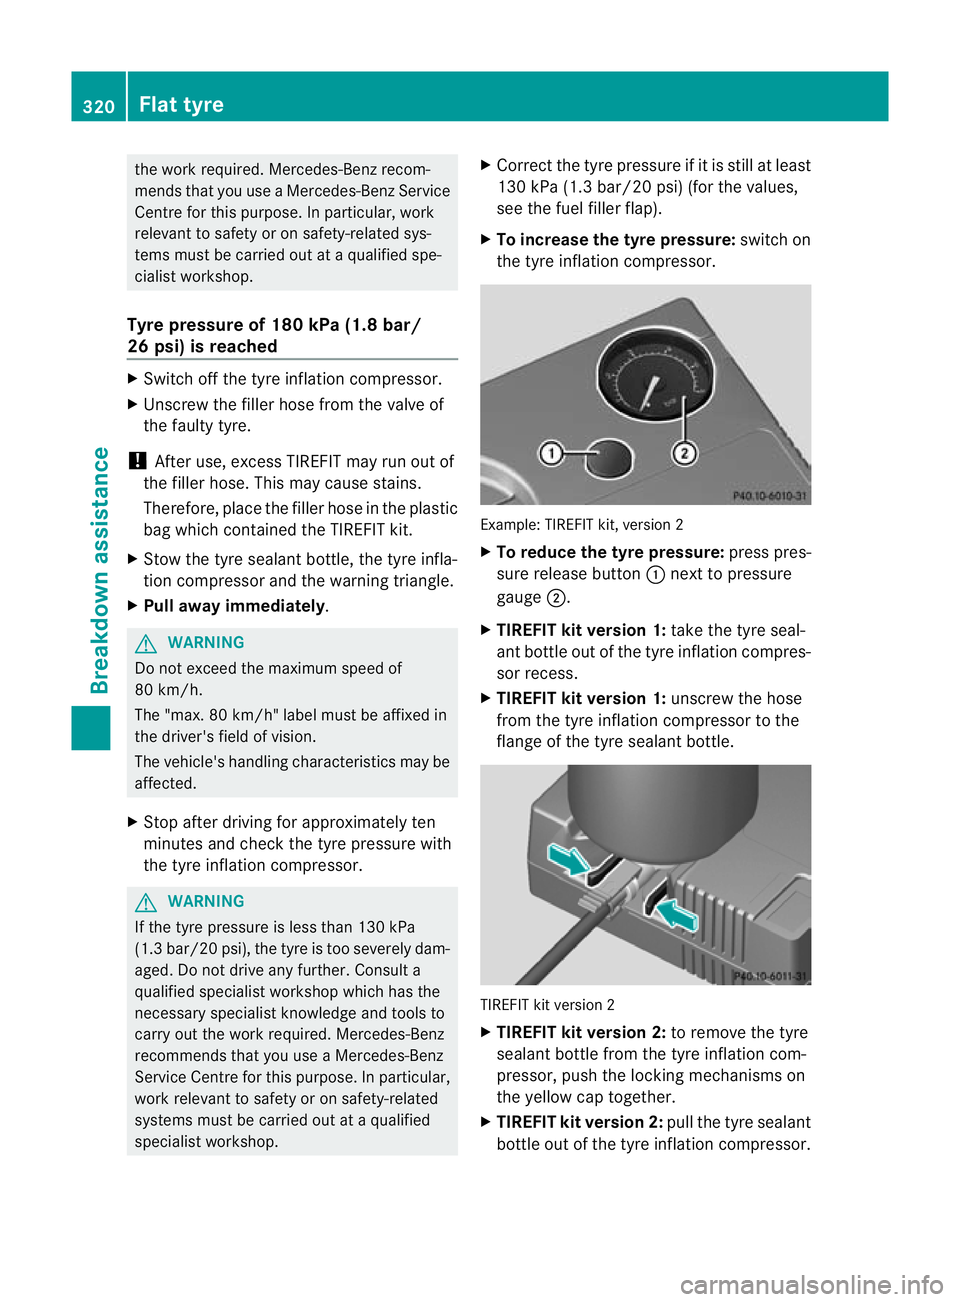
X To increase the tyre pressure: switch on
the tyre inflation compressor. Example: TIREFIT kit, version 2
X
To reduce the tyre pressure: press pres-
sure release button :next to pressure
gauge ;.
X TIREFIT kit version 1: take the tyre seal-
ant bottle out of the tyre inflation compres-
sor recess.
X TIREFIT kit version 1: unscrew the hose
from the tyre inflation compressor to the
flange of the tyre sealant bottle. TIREFIT kit version 2
X
TIREFIT kit version 2: to remove the tyre
sealant bottle from the tyre inflation com-
pressor, push the locking mechanisms on
the yellow cap together.
X TIREFIT kit version 2: pull the tyre sealant
bottle out of the tyre inflation compressor. 320
Flat tyreBreakdown assistance
Page 340 of 373

Tyre tread
G
WARNING
Bear in mind that:
R tyre grip decreases rapidly on we troads
when the tread depth is less than 3mm.
Thus, you should replace tyres that have
insufficient tread.
R winter tyres should be replaced when the
tread depth is 4mmorless as they no lon-
ger provide adequate grip.
R the tread on a tyre may not wear evenly.
Thus, you should regularly check the tread
depth and the condition of the tread across
the entire width of all tyres. If necessary,
turn the fron twheels to full lock in order to
inspect the tyre tread more easily.
Otherwise, you could lose control of the vehi-
cle and cause an accident due to the reduced
grip of the tyres on the road. Notes on selecting, fitting and replac-
ing tyres
R Only fit tyres and wheels of the same type
and make.
R Only fit tyres of the correct size onto the
wheels.
R After fittingn ew tyres, run them in at mod-
erate speeds for the first 100 km, as they
only reach their full performance after this
distance.
R Do not drive with tyres which have too little
tread depth, as this significantly reduces
the traction on wet roads (aquaplaning).
R Replace the tyres after six years at the lat-
est, regardless of wear. This also applies to
the emergency spare wheel/spare wheel. MOExtended tyres (tyres with run-flat
characteristics)
MOExtended tyres (tyres with run-flat char-
acteristics) allow you to continue driving the vehicle even when one or more tyres lose all
air pressure.
MOExtended tyres may only be used in con-
junction with the tyre pressure loss warning
system or with the tyre pressure monitor and
on wheels specifically tested by Mercedes-
Benz.
i Vehicles with MOExtended tyres are not
equipped with a TIREFIT kit at the factory.
It is therefore recommended that you addi-
tionally equip your vehicle with the TIREFIT
kit if you fit tyres that do not feature run-
flat properties, e.g. winter tyres. A TIREFIT
kit can be obtained from a Mercedes-Benz
Service Centre.
You will find notes on driving with a flat tyre
in the "Breakdown assistance" section
(Y page 324). Winter operation
Please bear the following in mind
At the onset of winter, have your vehicle win-
terproofed at a qualified specialist workshop,
e.g. at a Mercedes-Benz Service Centre.
Observe the notes in the "Changing a wheel"
section (Y page 344). Driving with summer tyres
At temperatures below +7 †, summer tyres
lose elasticity and therefore traction and
braking power; change the tyres on your vehi-
cle to M+S tyres. Using summer tyres at very
cold temperatures could cause tears to form,
thereby damaging the tyres permanently.
Mercedes-Benzc annot accept responsibility
for this type of damage. M+S tyres
At temperatures below +7 †, use winter tyres
or all-season tyres. Both types of tyre are
identified by the M+S marking. Winter operation
337Wheels and tyres Z
Page 351 of 373
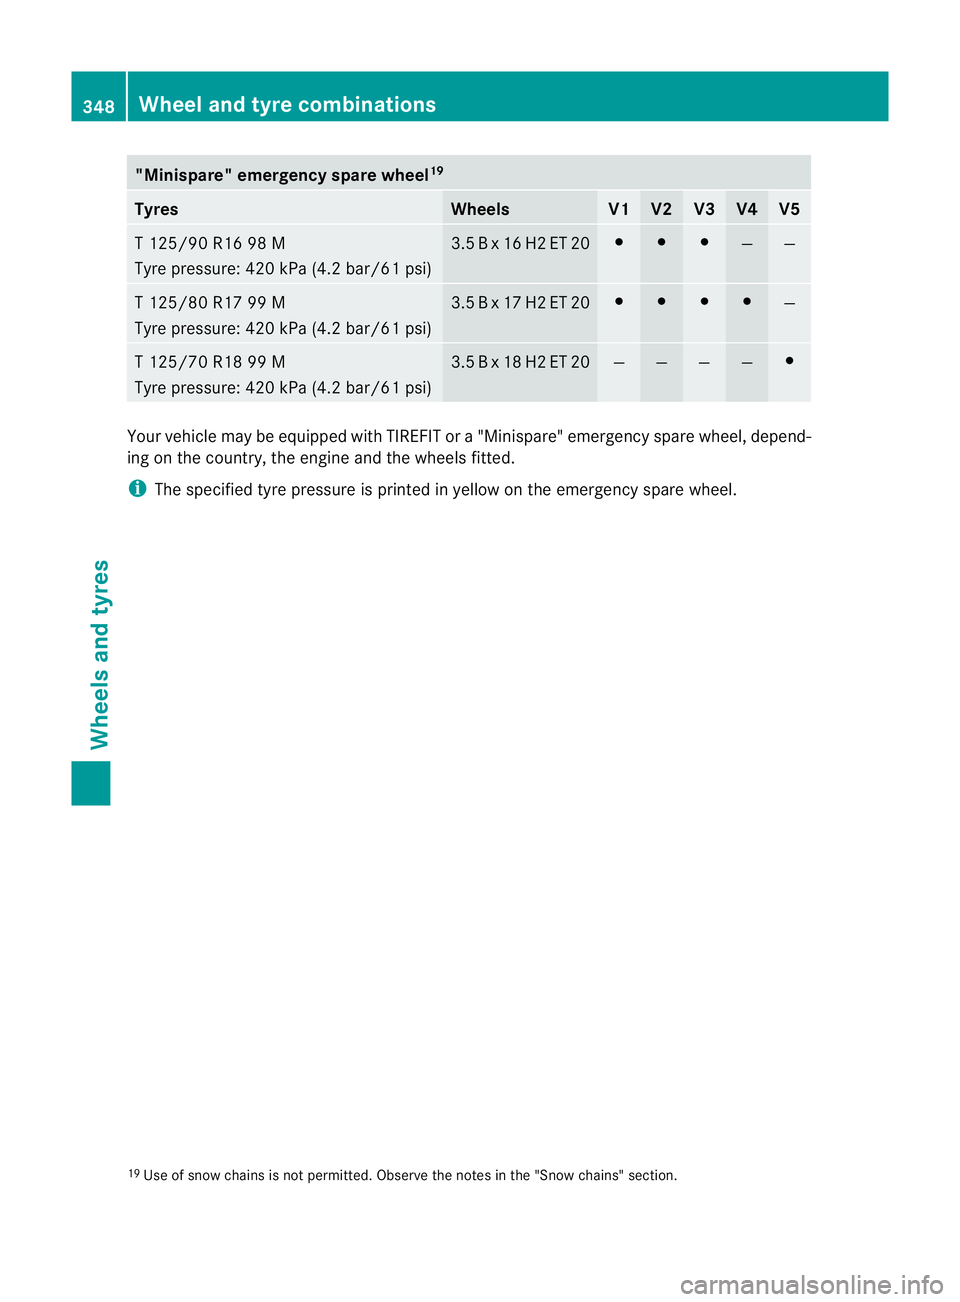
"Minispare" emergency spare wheel
19Tyres Wheels V1 V2 V3 V4 V5
T 125/90 R16 98 M
Tyre pressure: 420 kPa (4.2 bar/61 psi) 3.5 B x 16 H2 ET 20 # # #
— —
T 125/80 R17 99 M
Tyre pressure: 420 kPa (4.2 bar/61 psi) 3.5 B x 17 H2 ET 20 # # # #
—
T 125/70 R18 99 M
Tyre pressure: 420 kPa (4.2 bar/61 psi) 3.5 B x 18 H2 ET 20 — — — — #
Your vehicle may be equipped with TIREFIT or a "Minispare" emergency spare wheel, depend-
ing on the country, the engine and the wheels fitted.
i The specified tyre pressure is printed in yellow on the emergency spare wheel.
19 Use of snow chains is not permitted. Observe the notes in the "Snow chains" section. 348
Wheel and tyre combinationsWheels and tyres