2011 MAZDA MODEL 6 Navigation Manual (in English)
-
 1
1 -
 2
2 -
 3
3 -
 4
4 -
 5
5 -
 6
6 -
 7
7 -
 8
8 -
 9
9 -
 10
10 -
 11
11 -
 12
12 -
 13
13 -
 14
14 -
 15
15 -
 16
16 -
 17
17 -
 18
18 -
 19
19 -
 20
20 -
 21
21 -
 22
22 -
 23
23 -
 24
24 -
 25
25 -
 26
26 -
 27
27 -
 28
28 -
 29
29 -
 30
30 -
 31
31 -
 32
32 -
 33
33 -
 34
34 -
 35
35 -
 36
36 -
 37
37 -
 38
38 -
 39
39 -
 40
40 -
 41
41 -
 42
42 -
 43
43 -
 44
44 -
 45
45 -
 46
46 -
 47
47 -
 48
48 -
 49
49 -
 50
50 -
 51
51 -
 52
52 -
 53
53 -
 54
54 -
 55
55 -
 56
56 -
 57
57 -
 58
58 -
 59
59 -
 60
60 -
 61
61 -
 62
62 -
 63
63 -
 64
64 -
 65
65 -
 66
66 -
 67
67 -
 68
68 -
 69
69 -
 70
70 -
 71
71 -
 72
72 -
 73
73 -
 74
74 -
 75
75 -
 76
76 -
 77
77 -
 78
78 -
 79
79 -
 80
80 -
 81
81 -
 82
82 -
 83
83 -
 84
84 -
 85
85 -
 86
86 -
 87
87 -
 88
88 -
 89
89 -
 90
90 -
 91
91 -
 92
92 -
 93
93 -
 94
94 -
 95
95 -
 96
96 -
 97
97 -
 98
98 -
 99
99 -
 100
100 -
 101
101 -
 102
102 -
 103
103 -
 104
104 -
 105
105 -
 106
106 -
 107
107 -
 108
108 -
 109
109 -
 110
110 -
 111
111 -
 112
112 -
 113
113 -
 114
114 -
 115
115 -
 116
116 -
 117
117 -
 118
118 -
 119
119 -
 120
120 -
 121
121 -
 122
122 -
 123
123 -
 124
124 -
 125
125 -
 126
126 -
 127
127 -
 128
128 -
 129
129 -
 130
130 -
 131
131 -
 132
132 -
 133
133 -
 134
134 -
 135
135 -
 136
136 -
 137
137 -
 138
138 -
 139
139
 25
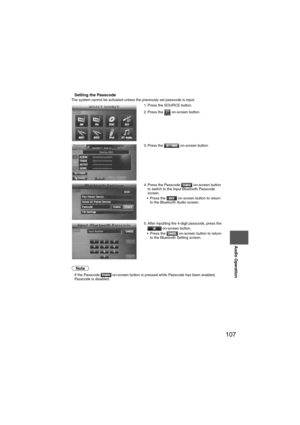
Getting started
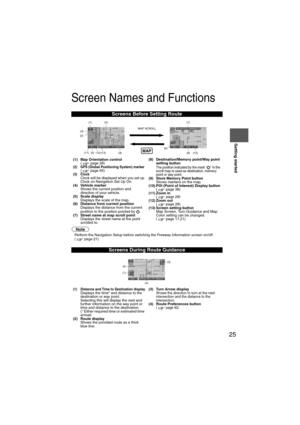
Screen Names and Functions
Note
lPerform the Navigation Setup before switching the Freeway Information screen on/off.
( page 21)
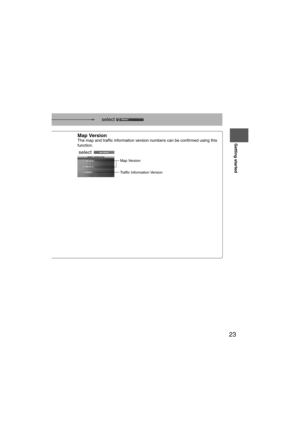
Screens Before Setting Route
(1) Map Orientation co")
 26
RoutingAddress
Book
Getting started
Press the disp button (DISP) to display the display menu.
nAdjusting the screen quality
l
Screen brightness
Press the on-screen button to brighten the screen,")
 27
Getting started
Press the disp button (DISP) followed by the on-screen button to display the
settings menu.
nReturning to the navigation screen from the audio unit screen
l Select the on-screen")
 28
RoutingAddress
Book
Getting started
Screen change
nDo not keep your eyes fixed on the monitor screen or operate the system
while driving
Do not change the settings and destination locations while")
 29
Getting started
Memo")
 30
Before
UseGetting
started
Routing
Destination Entry and Route Search
l
You can set the destination using various methods provided by the system.
Before Steps select
Change
(Change
Search Are")
 31
Before
UseGetting
started
Routing
lFor Character Entry, please refer to page 39.
lDo not keep your eyes fixed on the monitor screen or operate the system while driving.Do not change the settings a")
![MAZDA MODEL 6 2011 Navigation Manual (in English) 32
Before
UseGetting
started
Routing
Destination Entry and Route Search
Address
Open the
[DESTINATION
ENTRY] Menu SelectWhen narrowing
down to city name
Select
:
Cancel the city
selection.
:](/manual-img/28/13564/w960_13564-31.png "MAZDA MODEL 6 2011 Navigation Manual (in English) 32
Before
UseGetting
started
Routing
Destination Entry and Route Search
Address
Open the
[DESTINATION
ENTRY] Menu SelectWhen narrowing
down to city name
Select
:
Cancel the city
selection.
:")