Page 140 of 347
•The filter can be accessed from the 2nd row foot-well area. Move the
front seats all the way to the full front and full up positions to ease
access.
To remove an air filter:
1. Turn the vehicle off.
2. Push up on the outside rigid edge
of the filter and rotate toward the
front of the vehicle once tabs are
released.
•Remove filter.
To install a filter:
•First, position the filter in its
housing making sure that the far
forward end is all the way up in
the housing. Then push in on the
center of the outside edge of the
filter and rotate up into the
housing until it clips into position.
Easy access/easy out feature
This feature automatically moves the driver’s seat rearward 2 in (5 cm)
when:
•the transmission is in N (Neutral) or P (Park)
•the key is removed from the ignition
The seat will move to the original position when:
•the transmission is in N (Neutral) or P (Park)
Seating and Safety Restraints
140
2011 MKZ Hybrid(hkz)
Owners Guide, 2nd Printing
USA(fus)
Page 141 of 347

•the key is placed in the ignition.
The easy entry feature can be turned off or on through the vehicle
message center. Refer toMessage centerin theInstrument Cluster
chapter.
REAR SEATS
Note:Do not block the air inlet at the front facing of the rear seat
cushion. The air needs to be able to flow through the air inlet without
any obstruction in order to ventilate the high voltage battery.
Obstructions to the air inlet may cause vehicle performance to decrease.
Second-row adjustable head restraints
Your vehicle is equipped with outboard and center head restraints that
are vertically adjustable.
WARNING:To minimize the risk of neck injury in the event of a
crash, the driver and passenger occupants should not sit in
and/or operate the vehicle, until the head restraint is placed in its
proper position. The driver should never adjust the head restraint
while the vehicle is in motion.
Outboard head restraints
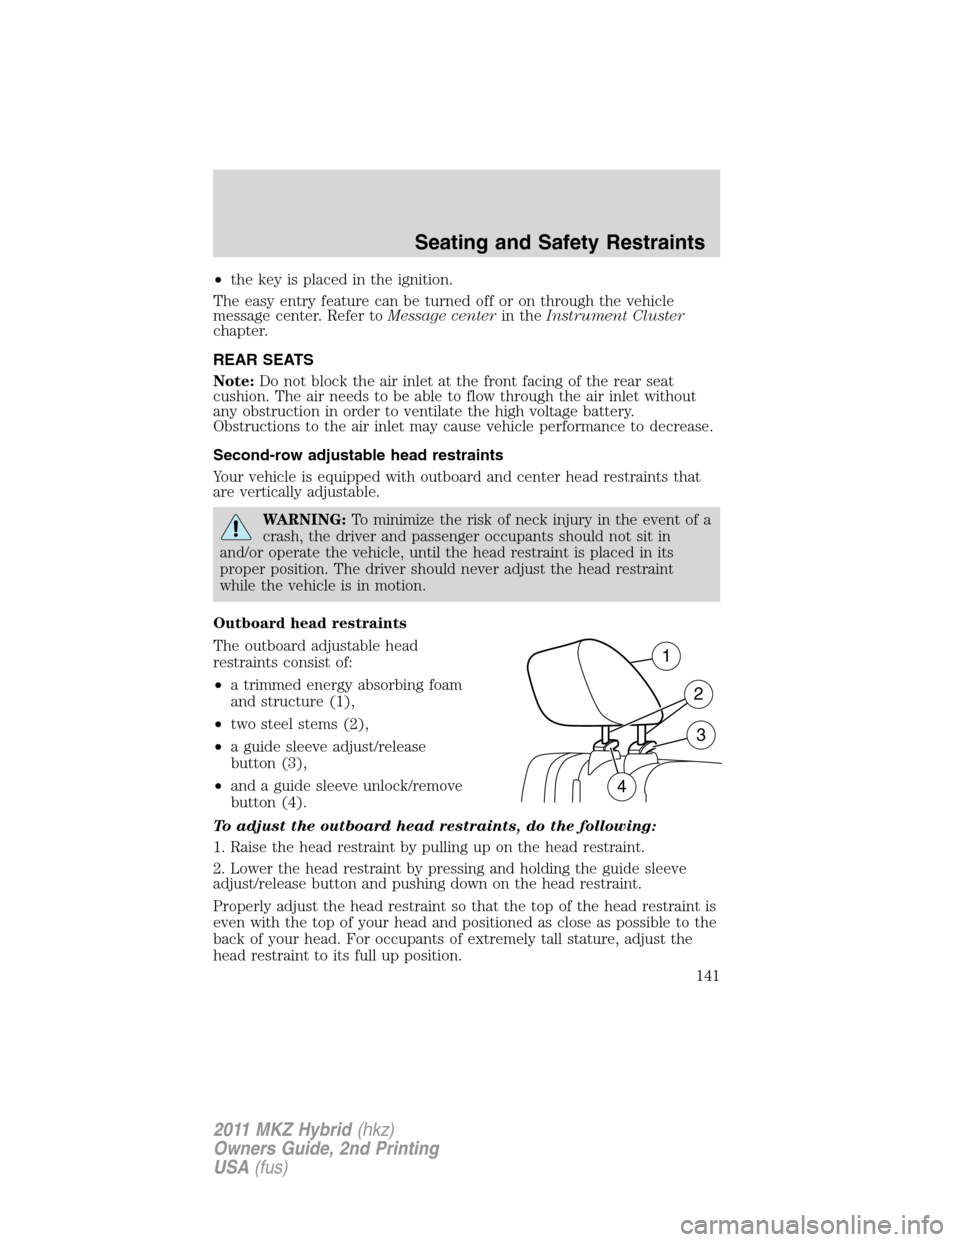
The outboard adjustable head
restraints consist of:
•a trimmed energy absorbing foam
and structure (1),
•two steel stems (2),
•a guide sleeve adjust/release
button (3),
•and a guide sleeve unlock/remove
button (4).
To adjust the outboard head restraints, do the following:
1. Raise the head restraint by pulling up on the head restraint.
2. Lower the head restraint by pressing and holding the guide sleeve
adjust/release button and pushing down on the head restraint.
Properly adjust the head restraint so that the top of the head restraint is
even with the top of your head and positioned as close as possible to the
back of your head. For occupants of extremely tall stature, adjust the
head restraint to its full up position.
1
2
3
4
Seating and Safety Restraints
141
2011 MKZ Hybrid(hkz)
Owners Guide, 2nd Printing
USA(fus)
Page 150 of 347

WARNING:Failure to inspect and replace if necessary the belt
and retractor assembly after an accident could increase the risk
of injury in a collision.
Safety belt locking modes
All safety restraints in the vehicle are combination lap and shoulder
belts. The driver safety belt has the first locking mode and the front
outboard passenger and rear seat safety belts have both types of locking
modes described as follows:
Vehicle sensitive mode
This is the normal retractor mode, which allows free shoulder belt length
adjustment to your movements and locking in response to vehicle
movement. For example, if the driver brakes suddenly or turns a corner
sharply, or the vehicle receives an impact of approximately 5 mph
(8 km/h) or more, the combination safety belts will lock to help reduce
forward movement of the driver and passengers.
In addition, the retractor is designed to lock if the webbing is pulled out
too quickly. If this occurs, let the belt retract slightly and pull webbing
out again in a slow and controlled manner.
Automatic locking mode
In this mode, the shoulder belt is automatically pre-locked. The belt will
still retract to remove any slack in the shoulder belt. The automatic
locking mode is not available on the driver safety belt.
When to use the automatic locking mode
This mode should be usedany timea child safety seat, except a
booster, is installed in passenger front or rear seating positions. Children
12 years old and under should be properly restrained in a rear seating
position whenever possible. Refer toSafety restraints for childrenor
Safety seats for childrenlater in this chapter.
Seating and Safety Restraints
150
2011 MKZ Hybrid(hkz)
Owners Guide, 2nd Printing
USA(fus)
Page 179 of 347

Airbags can kill or injure a child in a child seat. NEVER place a
rear-facing child seat in front of an active airbag. If you must use a
forward-facing child seat in the front seat, move the vehicle seat all the
way back.
Children 12 and under should be properly restrained in a rear seating
position whenever possible. If all children cannot be seated and
restrained properly in a rear seating position, properly restrain the
largest child in the front seat.
Installing child safety seats with combination lap and shoulder
belts
If needed, when installing some high back child restraints, the head
restraints of the second row seating positions can be removed.
To remove the head restraint(s), seeSecond-row adjustable head
restraintsin this chapter for more information.
WARNING:If the head restraint has been removed from a
seating position to accommodate a high back child restraint, the
head restraint must be re-installed prior to use of the seat by any other
occupant in order to reduce the risk of personal injury in the event of
a collision.
Check to make sure the child seat is properly secured before each use.
Children 12 and under should be properly restrained in a rear seating
position whenever possible. If all children cannot be seated and
restrained properly in a rear seating position, properly restrain the
largest child in the front seat.
When installing a child safety seat with combination lap/shoulder belts:
•Use the correct safety belt buckle for that seating position.
•Insert the belt tongue into the proper buckle until you hear a snap
and feel it latch. Make sure the tongue is securely fastened in the
buckle.
•Keep the buckle release button pointing up and away from the safety
seat, with the tongue between the child seat and the release button,
to help prevent accidental unbuckling.
•Place vehicle seat back in upright position.
•Put the safety belt in the automatic locking mode. Refer to Step 5
below. This vehicle does not require the use of a locking clip.
Seating and Safety Restraints
179
2011 MKZ Hybrid(hkz)
Owners Guide, 2nd Printing
USA(fus)