Page 9 of 78
9
Seats (Manual)
■Adjusting seat position
With the lever raised, slide the seat forward or
backward.
■Adjusting seatback angle
With the lever raised, tilt the seatback forward or
backward.
■Adjusting seat height
Raises the seat
Lowers the seat
■Adjusting the front of the seat cushion
Raises the front of the seat cushion
Lowers the front of the seat cushion
1
2
1
2
Page 10 of 78
10
Seats (Power)
■Adjusting seat position
Moves the seat forward
Moves the seat backward
■Adjusting seatback angle
Tilts the seatback forward
Reclines the seatback
■Adjusting the seat cushion
Raises and lowers the front of the cushion
Raises and lowers the entire seat
■Adjusting the lumbar support (driver’s seat only)
Firmer
Softer
1
2
1
2
1
2
1
2
Page 11 of 78
 11
Driving Position Memory System (If Equipped)
■Setting memory positions
Press the SET button, then within 3 seconds press
one of the memory buttons (1, 2, or 3) until you
hear a beep.
The current")
11
Driving Position Memory System (If Equipped)
■Setting memory positions
Press the SET button, then within 3 seconds press
one of the memory buttons (1, 2, or 3) until you
hear a beep.
The current position of the seat, as well as the
position of the steering wheel and the outside
rear view mirrors is recorded.
■Recalling memory positions
Press one of the memory buttons (1, 2, or 3).
■Linking driving position memory with door unlock operation
While holding down the desired memory button,
press and hold the button on the wireless
remote control or door lock switch until you hear a
beep.
To prevent triggering of the alarm, open one of
the doors within 180 seconds after the beep is
heard.
The seats can be returned to a previously set position by simply pressing a button.
The position of the steering wheel and the outside rear view mirrors is adjusted along with the
driver's seat.
Positions can be conveniently recorded for the vehicle's primary drivers.
Linking driving position memory to the door unlock operation allows the memory position
to be recalled automatically when the driver's door is opened. (The linked function does not
operate if the driver's door is unlocked using the mechanical key or manually from inside
the vehicle.)
Page 12 of 78
12
Head Restraints
■Vertical adjustment
To r a i s e: push the head restraint upward.
To lower (front and center rear seats): push the
head restraint down while pressing the lock
release button.
To lower (outside rear seats): push the head
restraint down.
■Folding (outside rear seats only)
Pull the head restraint up while pressing the lock
release button.
Seat Belts
■Adjusting shoulder belt height (front seats only)
To r a i s e: pull the anchor upward.
To l o w e r: depress the button and push the anchor
down.
■Seat belt comfort guides (outside rear seats only)
If the shoulder belt sits close to the neck, slide the
comfort guide forward.
Lock
release
button
Lock release button
Page 13 of 78
13
Outside Rear View Mirrors
To select the mirror you wish to adjust (L or R),
use the master switch.
To adjust mirror angle, use the control switch.
On some models, the mirrors will automatically
angle downwards when the vehicle is reversing.
To disable this function, set the master switch in
the neutral position (between L and R).
Anti-glare Inside Rear View Mirror
Without compass
Turns automatic mode on
Turns automatic mode off
The indicator comes on when automatic mode
is turned on.
With compass
Turns automatic mode on/off
The indicator comes on when automatic mode
is turned on.
The anti-glare mirror uses a sensor to detect light from vehicles behind and automatically
reduces glare.
1
2
Page 14 of 78
14
Steering Wheel
■Manually adjustable type
To adjust the steering wheel, press the lever down
and move the steering wheel to the desired posi-
tion. Lock the steering wheel in place by pulling
the lever up.
■Power-adjustable type
Up
Down
Aw a y f ro m t h e d r i v e r
Toward the driver1
2
3
4
The power-adjustable type steering wheel retracts automatically when the “ENGINE
START STOP” switch is turned OFF to allow for easy exit and entry. The steering wheel
returns automatically to its previously set position when the “ENGINE START STOP”
switch is switched to ACCESSORY or IGNITION ON mode.
Page 15 of 78
15
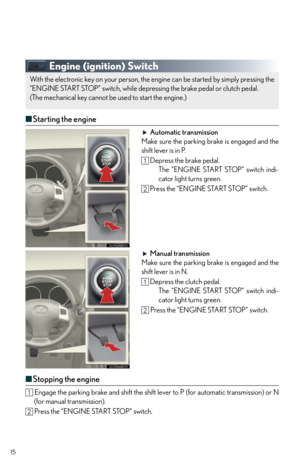
Engine (ignition) Switch
■Starting the engine
Automatic transmission
Make sure the parking brake is engaged and the
shift lever is in P.
Depress the brake pedal.
The “ENGINE START STOP” switch indi-
cator light turns green.
Press the “ENGINE START STOP” switch.
Manual transmission
Make sure the parking brake is engaged and the
shift lever is in N.
Depress the clutch pedal.
The “ENGINE START STOP” switch indi-
cator light turns green.
Press the “ENGINE START STOP” switch.
■Stopping the engine
Engage the parking brake and shift the shift lever to P (for automatic transmission) or N
(for manual transmission).
Press the “ENGINE START STOP” switch.
With the electronic key on your person, the engine can be started by simply pressing the
“ENGINE START STOP” switch, while depressing the brake pedal or clutch pedal.
(The mechanical key cannot be used to start the engine.)
Page 16 of 78
16
■Changing power modes
To change power modes without turning on the engine, press the “ENGINE START STOP”
switch without depressing the brake pedal (for automatic transmission) or the clutch pedal
(for manual transmission). The modes can be changed in the following order:
Automatic Transmission (If Equipped)
■Shift positions
PPa r k
RReverse
NNeutral (drive not engaged)
DDrive
SS mode
The vehicle can only be shifted out of P when
the “ENGINE START STOP” switch is in
IGNITION ON mode and the brake pedal is
depressed.
ACCE SSORY modeIGNITION ON mode
(Indicator light: amber) OFF
(Indicator light: off)


 9
Seats (Manual)
■Adjusting seat position
With the lever raised, slide the seat forward or
backward.
■Adjusting seatback angle
With the lever raised, tilt the seatback forward or
backward.
■Adju")
 10
Seats (Power)
■Adjusting seat position
Moves the seat forward
Moves the seat backward
■Adjusting seatback angle
Tilts the seatback forward
Reclines the seatback
■Adjusting the seat cushion")
 12
Head Restraints
■Vertical adjustment
To r a i s e: push the head restraint upward.
To lower (front and center rear seats): push the
head restraint down while pressing the lock
release button.
To")
 13
Outside Rear View Mirrors
To select the mirror you wish to adjust (L or R),
use the master switch.
To adjust mirror angle, use the control switch.
On some models, the mirrors will automatically
ang")
 14
Steering Wheel
■Manually adjustable type
To adjust the steering wheel, press the lever down
and move the steering wheel to the desired posi-
tion. Lock the steering wheel in place by pulling
the")
 15
Engine (ignition) Switch
■Starting the engine
Automatic transmission
Make sure the parking brake is engaged and the
shift lever is in P.
Depress the brake pedal.
The “ENGINE START STOP” switc")
 16
■Changing power modes
To change power modes without turning on the engine, press the “ENGINE START STOP”
switch without depressing the brake pedal (for automatic transmission) or the clutch p")