Page 2 of 90

AUDIO/VIDEO SYSTEM
180
Operations such as selecting a preset station and adjusting the sound balance are car-
ried out on the screen. To display the audio screen, push the “AUDIO” button.
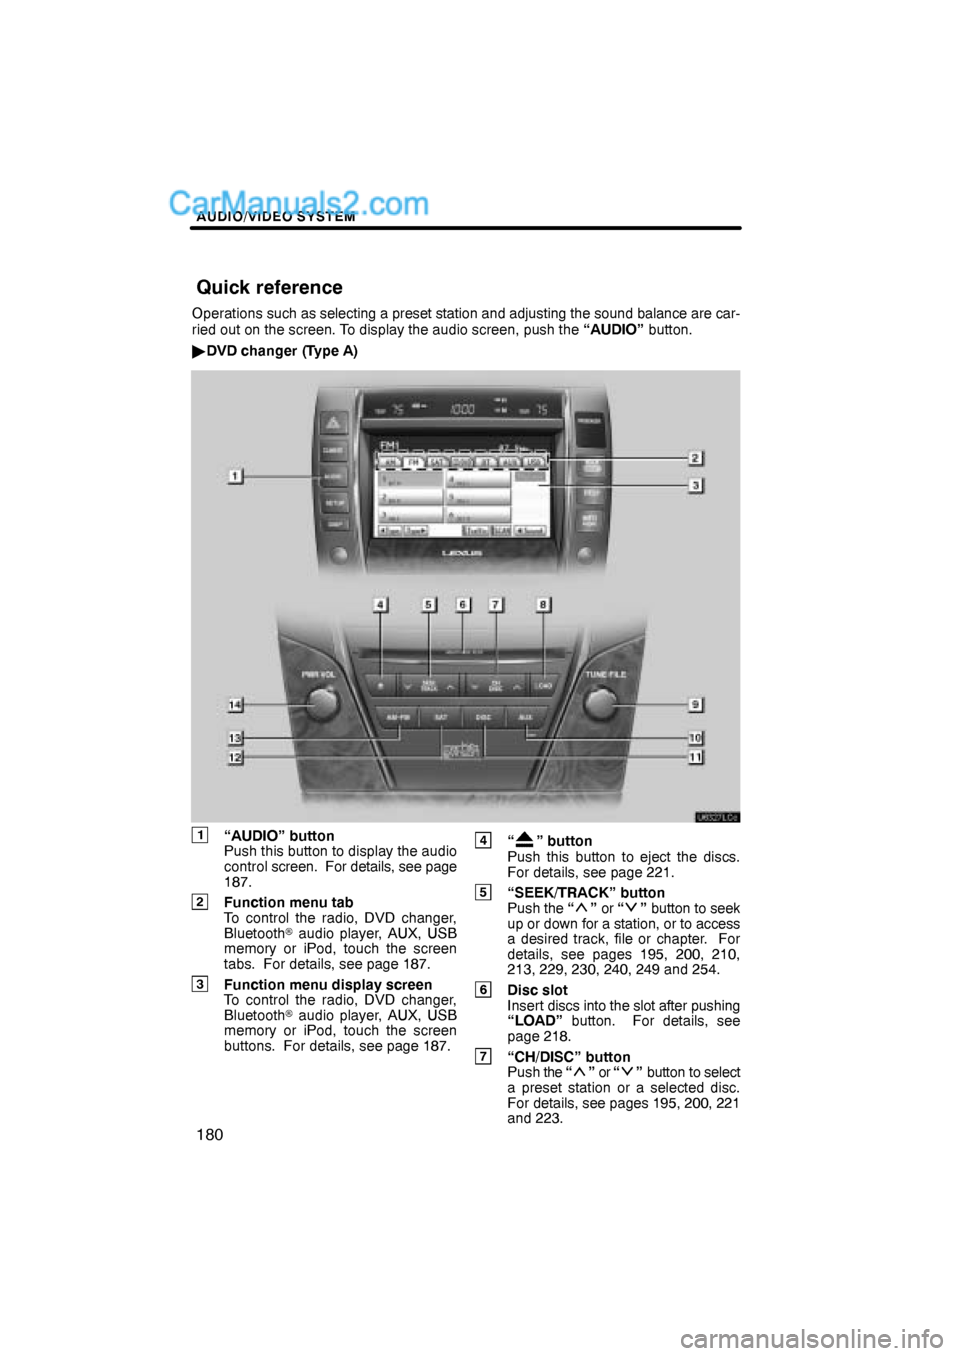
�DVD changer (Type A)
1“AUDIO” button
Push this button to display the audio
control screen. For details, see page
187.
2Function menu tab
To control the radio, DVD changer,
Bluetooth� audio player, AUX, USB
memory or iPod, touch the screen
tabs. For details, see page 187.
3Function menu display screen
To control the radio, DVD changer,
Bluetooth� audio player, AUX, USB
memory or iPod, touch the screen
buttons. For details, see page 187.
4“” button
Push this button to eject the discs.
For details, see page 221.
5“SEEK/TRACK” button
Push the “” or “” button to seek
up or down for a station, or to access
a desired track, file or chapter. For
details, see pages 195, 200, 210,
213, 229, 230, 240, 249 and 254.
6Disc slot
Insert discs into the slot after pushing
“LOAD” button. For details, see
page 218.
7“CH/DISC” button
Push the “” or “” button to select
a preset station or a selected disc.
For details, see pages 195, 200, 221
and 223.
Quick reference
Page 4 of 90
AUDIO/VIDEO SYSTEM
182
�DVD changer (Type B)
1“AUDIO” button
Push this button to display the audio
control screen. For details, see page
187.
2Function menu tab
To control the radio, DVD changer,
Bluetooth� audio player, AUX, USB
memory or iPod, touch the screen
tabs. For details, see page 187.
3Function menu display screen
To control the radio, DVD changer,
Bluetooth� audio player, AUX, USB
memory or iPod, touch the screen
buttons. For details, see page 187.
4“” button
Push this button to eject the discs.
For details, see page 221.
5“SEEK/TRACK” button
Push the “” or “” button to seek
up or down for a station, or to access
a desired track, file or chapter. For
details, see pages 195, 200, 210,
213, 229, 230, 240, 249 and 254.
6Disc slot
Insert discs into the slot after pushing
“LOAD” button. For details, see
page 218.
7“CH/DISC” button
Push the “” or “” button to select
a preset station or a selected disc.
For details, see pages 195, 200, 221
and 223.
Page 6 of 90

AUDIO/VIDEO SYSTEM
184
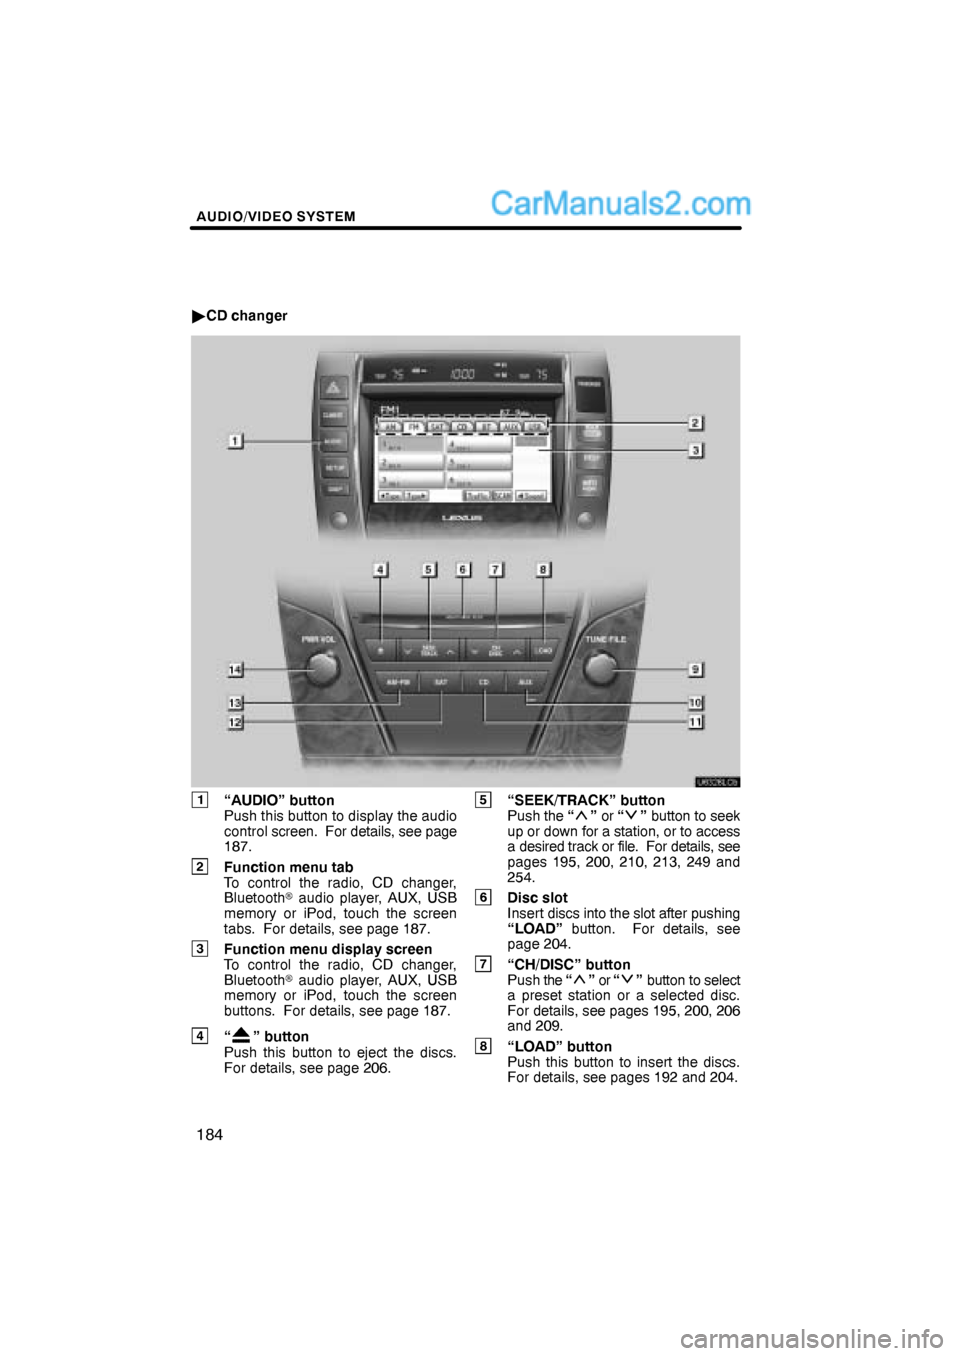
�CD changer
1“AUDIO” button
Push this button to display the audio
control screen. For details, see page
187.
2Function menu tab
To control the radio, CD changer,
Bluetooth� audio player, AUX, USB
memory or iPod, touch the screen
tabs. For details, see page 187.
3Function menu display screen
To control the radio, CD changer,
Bluetooth� audio player, AUX, USB
memory or iPod, touch the screen
buttons. For details, see page 187.
4“” button
Push this button to eject the discs.
For details, see page 206.
5“SEEK/TRACK” button
Push the “” or “” button to seek
up or down for a station, or to access
a desired track or file. For details, see
pages 195, 200, 210, 213, 249 and
254.
6Disc slot
Insert discs into the slot after pushing
“LOAD” button. For details, see
page 204.
7“CH/DISC” button
Push the “” or “” button to select
a preset station or a selected disc.
For details, see pages 195, 200, 206
and 209.
8“LOAD” button
Push this button to insert the discs.
For details, see pages 192 and 204.
Page 9 of 90
AUDIO/VIDEO SYSTEM
187
(b) Turning the system on and off
“AUDIO”: Push this button to display
touch−screen buttons for audio system
(audio control mode).
“PWR·VOL”: Push this knob to turn the
audio system on and off. Turn this knob to
adjust the volume. The system turns on in
the last mode used.
You can select the function that enables
automatic return to the previous screen
from the audio screen. See page 294 for
details.(c) Switching between functions
�CD changer image
Push the “AM·FM”, “AM”, “FM”, “SAT”,
“DISC”, “CD” or “AUX” button to turn
on the desired mode.
Page 11 of 90
AUDIO/VIDEO SYSTEM
189
The screen buttons for radio, CD
changer, DVD changer, Bluetooth� au-
dio player, AUX, USB memory and iPod
operation are displayed on the screen
when the audio control mode is se-
lected.
Touch the tab to select the desired mode
when the audio control mode is selected.
INFORMATION
You cannot operate dimmed screen
buttons.
Page 12 of 90

AUDIO/VIDEO SYSTEM
190
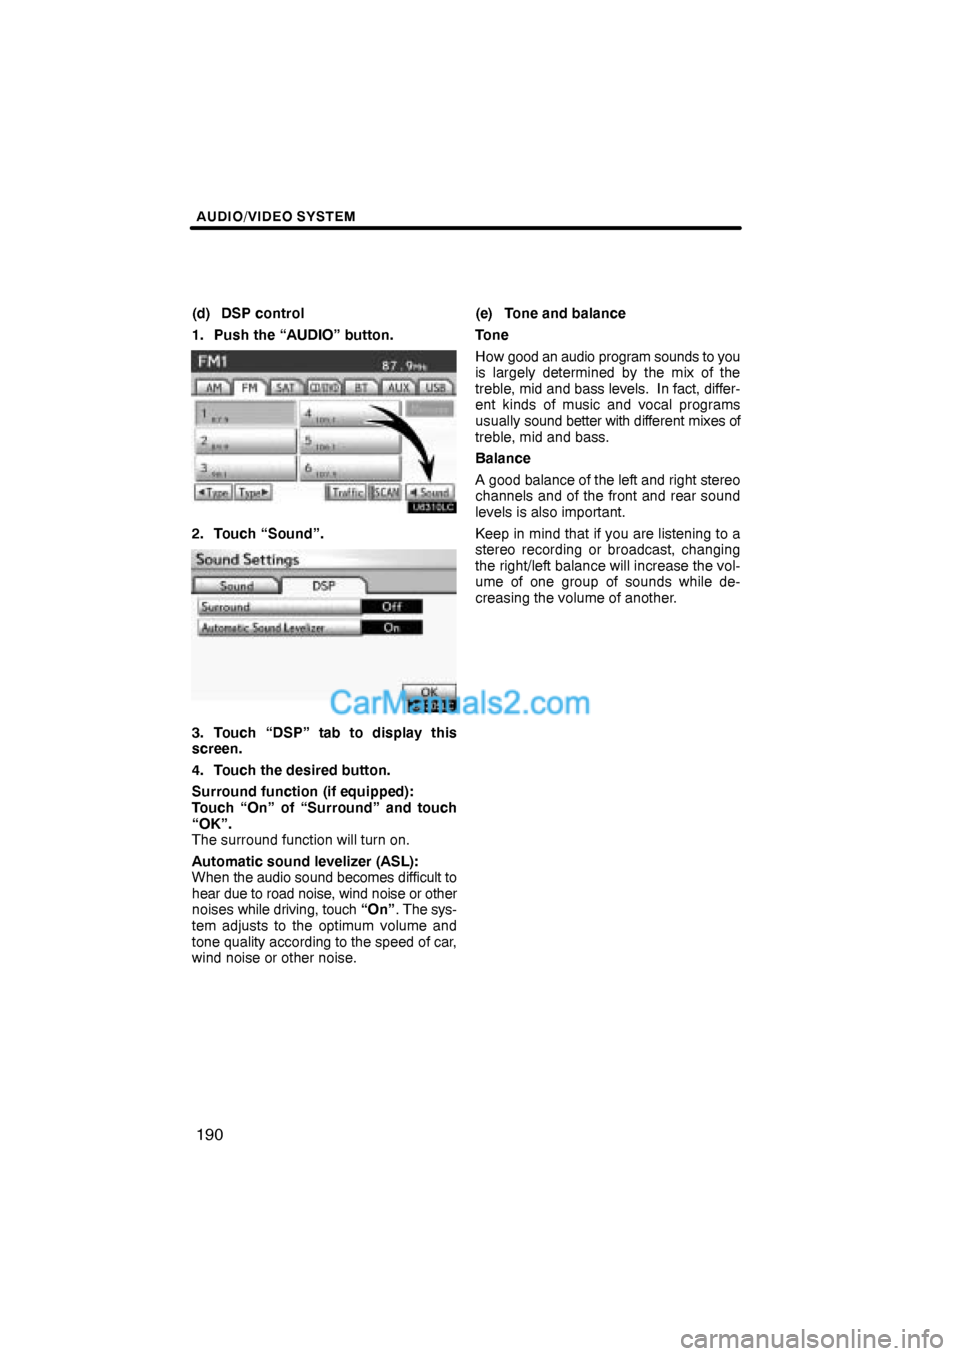
(d) DSP control
1. Push the “AUDIO” button.
2. Touch “Sound”.
3. Touch “DSP” tab to display this
screen.
4. Touch the desired button.
Surround function (if equipped):
Touch “On” of “Surround” and touch
“OK”.
The surround function will turn on.
Automatic sound levelizer (ASL):
When the audio sound becomes difficult to
hear due to road noise, wind noise or other
noises while driving, touch “On”. The sys-
tem adjusts to the optimum volume and
tone quality according to the speed of car,
wind noise or other noise.(e) Tone and balance
Tone
How good an audio program sounds to you
is largely determined by the mix of the
treble, mid and bass levels. In fact, differ-
ent kinds of music and vocal programs
usually sound better with different mixes of
treble, mid and bass.
Balance
A good balance of the left and right stereo
channels and of the front and rear sound
levels is also important.
Keep in mind that if you are listening to a
stereo recording or broadcast, changing
the right/left balance will increase the vol-
ume of one group of sounds while de-
creasing the volume of another.
Page 13 of 90
AUDIO/VIDEO SYSTEM
191
1. Touch “Sound” tab to display this
screen.
2. Touch the desired button.
“Treble” “
+” or “–”: Adjust high−pitched
tones.
“Mid” “
+” or “–”: Adjust mid−pitched
tones.
“Bass” “
+” or “–”: Adjusts low−pitched
tones.
“Front” or “Rear”: Adjusts sound bal-
ance between the front and rear speakers.
“L” or “R”: Adjusts sound balance be-
tween the left and right speakers.
3. Touch “OK”.
The tone of each mode (for such as AM,
FM, CD changer and DVD changer) can
be adjusted.(f) Selecting screen size (DVD chan-
ger only)
Before selecting screen size, it is neces-
sary to insert a DVD disc and select DVD
mode.
1. Push the “AUDIO” button.
2. Touch “CD/DVD” tab.3. Touch “Settings”.
4. Touch “Wide”.
Page 14 of 90
AUDIO/VIDEO SYSTEM
192
5. Touch the desired button.
“Normal”:Displays a 3 : 4 screen, with
either side in black.
“Wide 1”:Widens the 3 : 4 screen hori-
zontally to fill the screen.
“Wide 2”:Widens the 3 : 4 screen ver-
tically and horizontally, in
the same ratio, to fill the
screen.
When you touch
, the previous
screen returns.
6. Touch “OK”.(g) Your CD or DVD changer
When you insert a disc, push the “LOAD”
button and gently push the disc in with the
label side up. This CD or DVD changer
can store up to six discs.
The changer is intended for use with 4.7 in.
(12 cm) discs only.
NOTICE
�Do not stack up two discs for inser-
tion, or it will cause damage to the
changer. Insert only one disc into
the slot at a time.
�Never try to disassemble or oil any
part of the changer. Do not insert
anything other than a disc into the
slot.