Page 2 of 90

AUDIO/VIDEO SYSTEM
180
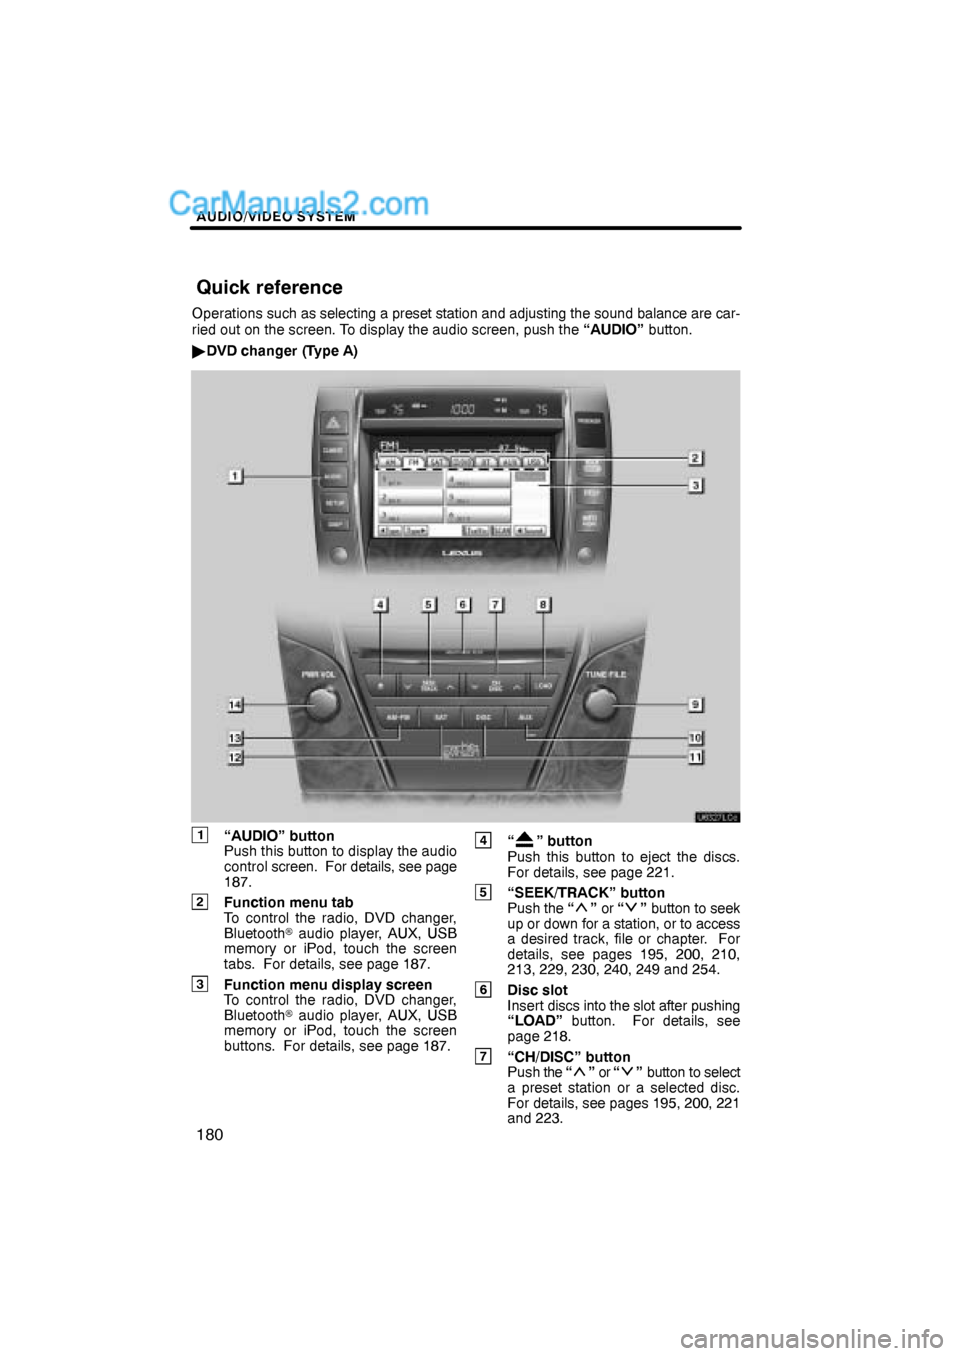
Operations such as selecting a preset station and adjusting the sound balance are car-
ried out on the screen. To display the audio screen, push the “AUDIO” button.
�DVD changer (Type A)
1“AUDIO” button
Push this button to display the audio
control screen. For details, see page
187.
2Function menu tab
To control the radio, DVD changer,
Bluetooth� audio player, AUX, USB
memory or iPod, touch the screen
tabs. For details, see page 187.
3Function menu display screen
To control the radio, DVD changer,
Bluetooth� audio player, AUX, USB
memory or iPod, touch the screen
buttons. For details, see page 187.
4“” button
Push this button to eject the discs.
For details, see page 221.
5“SEEK/TRACK” button
Push the “” or “” button to seek
up or down for a station, or to access
a desired track, file or chapter. For
details, see pages 195, 200, 210,
213, 229, 230, 240, 249 and 254.
6Disc slot
Insert discs into the slot after pushing
“LOAD” button. For details, see
page 218.
7“CH/DISC” button
Push the “” or “” button to select
a preset station or a selected disc.
For details, see pages 195, 200, 221
and 223.
Quick reference
Page 4 of 90
AUDIO/VIDEO SYSTEM
182
�DVD changer (Type B)
1“AUDIO” button
Push this button to display the audio
control screen. For details, see page
187.
2Function menu tab
To control the radio, DVD changer,
Bluetooth� audio player, AUX, USB
memory or iPod, touch the screen
tabs. For details, see page 187.
3Function menu display screen
To control the radio, DVD changer,
Bluetooth� audio player, AUX, USB
memory or iPod, touch the screen
buttons. For details, see page 187.
4“” button
Push this button to eject the discs.
For details, see page 221.
5“SEEK/TRACK” button
Push the “” or “” button to seek
up or down for a station, or to access
a desired track, file or chapter. For
details, see pages 195, 200, 210,
213, 229, 230, 240, 249 and 254.
6Disc slot
Insert discs into the slot after pushing
“LOAD” button. For details, see
page 218.
7“CH/DISC” button
Push the “” or “” button to select
a preset station or a selected disc.
For details, see pages 195, 200, 221
and 223.
Page 6 of 90

AUDIO/VIDEO SYSTEM
184
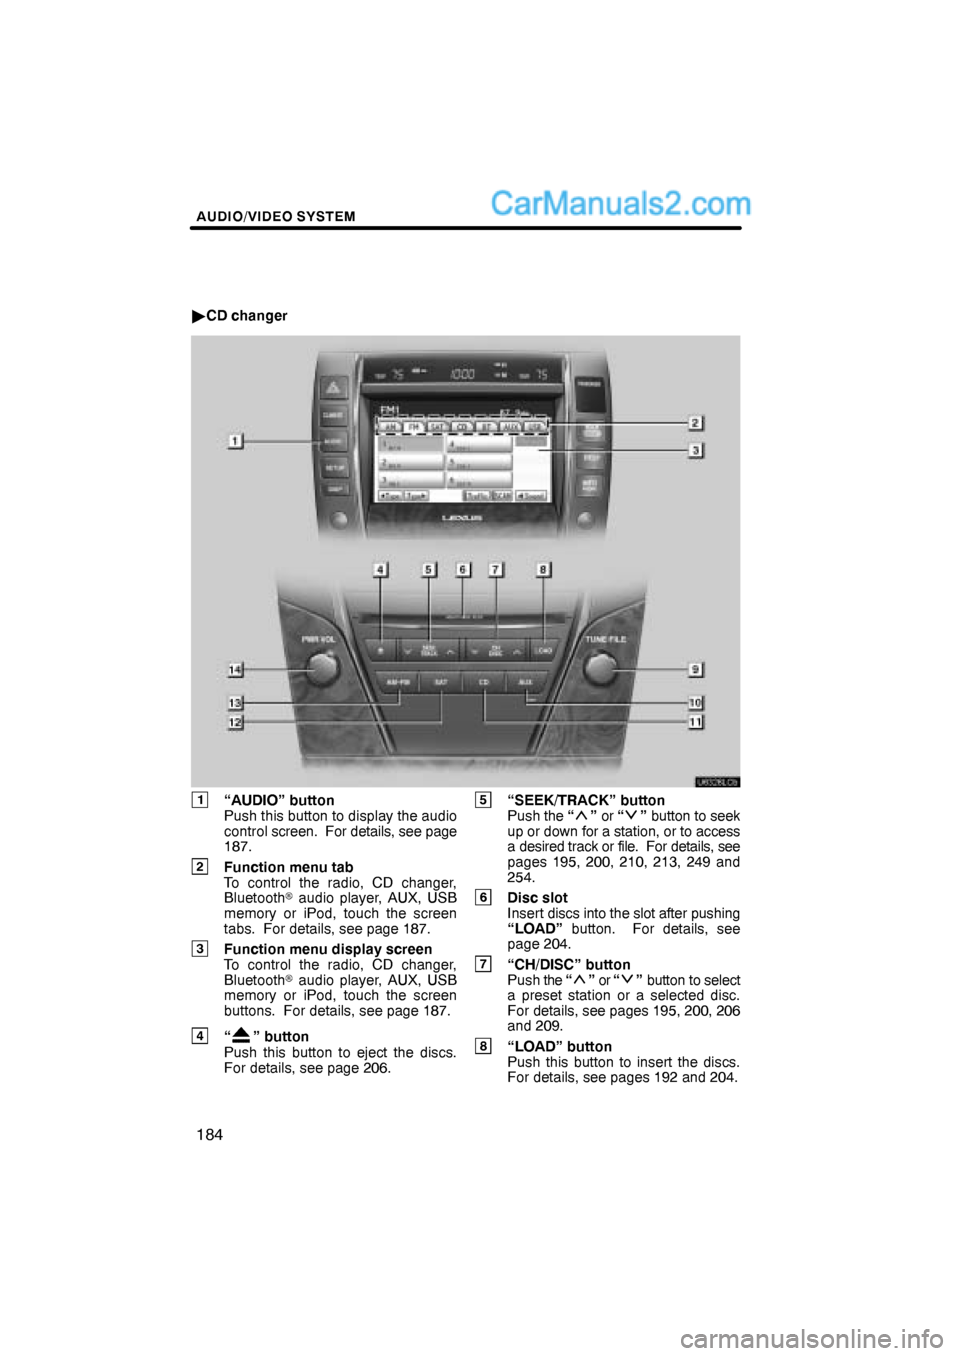
�CD changer
1“AUDIO” button
Push this button to display the audio
control screen. For details, see page
187.
2Function menu tab
To control the radio, CD changer,
Bluetooth� audio player, AUX, USB
memory or iPod, touch the screen
tabs. For details, see page 187.
3Function menu display screen
To control the radio, CD changer,
Bluetooth� audio player, AUX, USB
memory or iPod, touch the screen
buttons. For details, see page 187.
4“” button
Push this button to eject the discs.
For details, see page 206.
5“SEEK/TRACK” button
Push the “” or “” button to seek
up or down for a station, or to access
a desired track or file. For details, see
pages 195, 200, 210, 213, 249 and
254.
6Disc slot
Insert discs into the slot after pushing
“LOAD” button. For details, see
page 204.
7“CH/DISC” button
Push the “” or “” button to select
a preset station or a selected disc.
For details, see pages 195, 200, 206
and 209.
8“LOAD” button
Push this button to insert the discs.
For details, see pages 192 and 204.
Page 10 of 90
AUDIO/VIDEO SYSTEM
188
1. Push the “AUDIO” button.
2. Touch “AM”, “FM”, “SAT”, “CD”,
“CD/DVD”, “BT”, “AUX” or “USB” tab
to turn on the desired mode.
Push these buttons or tabs if you want to
switch from one mode to another.
If the disc is not set, the CD changer/DVD
changer does not turn on.
You can turn off the CD changer/DVD
changer by ejecting a disc.