2011 KIA Sportage door lock
[x] Cancel search: door lockPage 9 of 385
Introduction
61
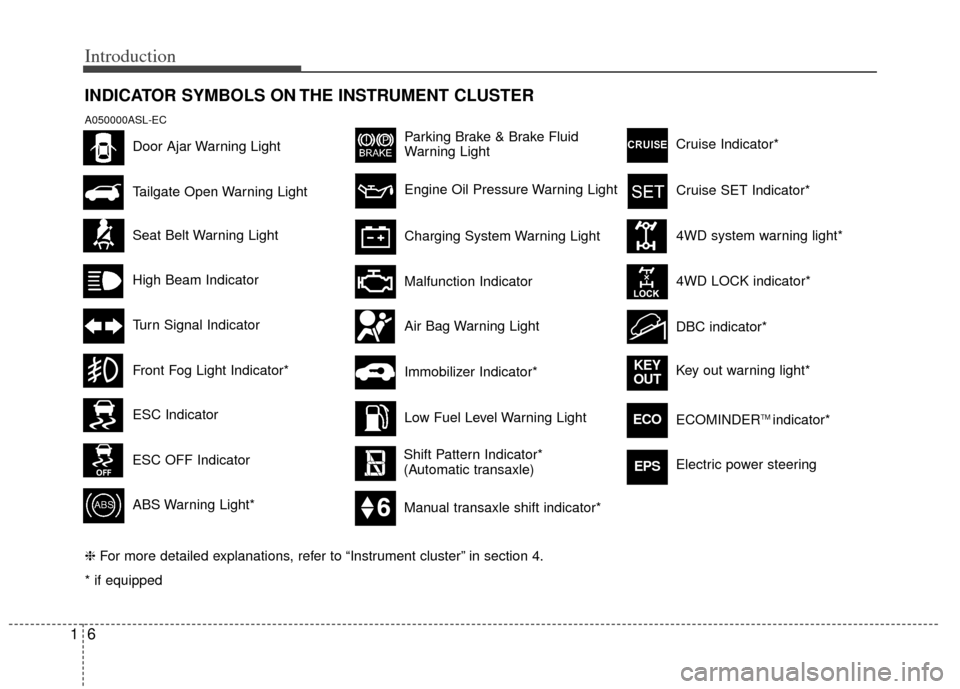
INDICATOR SYMBOLS ON THE INSTRUMENT CLUSTER
Seat Belt Warning Light
Turn Signal Indicator
ABS Warning Light*
Parking Brake & Brake Fluid
Warning Light
Malfunction Indicator
Low Fuel Level Warning Light
* if equipped Tailgate Open Warning Light
❈ For more detailed explanations, refer to “Instrument cluster” in section 4.
Charging System Warning Light
Door Ajar Warning Light
A050000ASL-EC
Front Fog Light Indicator*
Engine Oil Pressure Warning Light
Air Bag Warning Light
Shift Pattern Indicator*
(Automatic transaxle)
ESC Indicator
ESC OFF Indicator Cruise Indicator*
4WD system warning light*
4WD LOCK indicator*
DBC indicator*
Key out warning light*
KEY
OUT
ECOECOMINDERTM indicator*
Cruise SET Indicator*
High Beam Indicator
Manual transaxle shift indicator*
Electric power steeringEPS
Immobilizer Indicator*
Page 11 of 385
Your vehicle at a glance
22
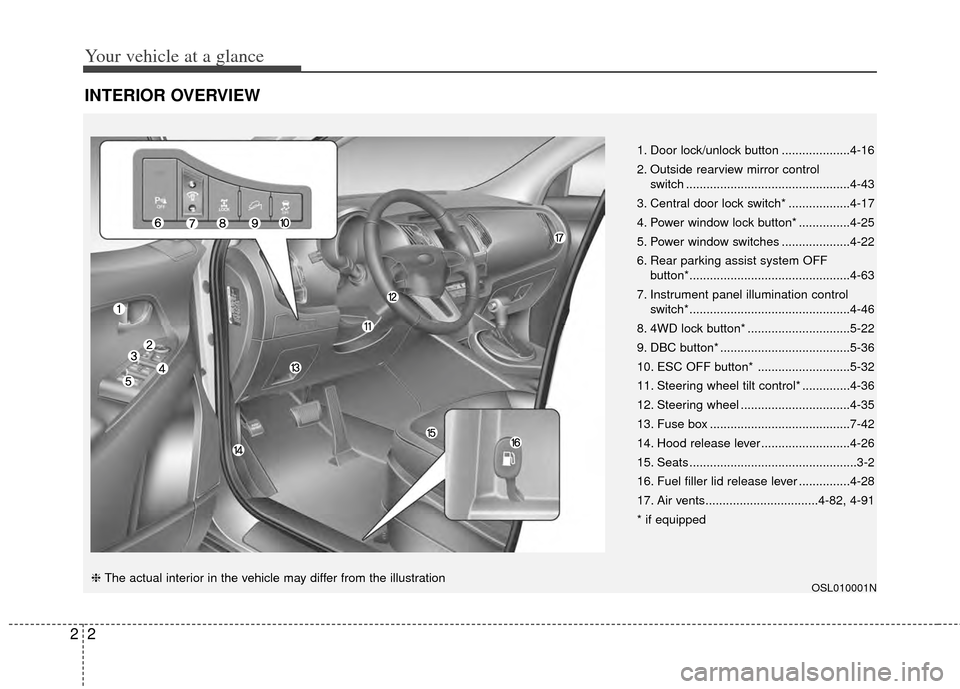
INTERIOR OVERVIEW
OSL010001N
1. Door lock/unlock button ....................4-16
2. Outside rearview mirror control switch ................................................4-43
3. Central door lock switch* ..................4-17
4. Power window lock button* ...............4-25
5. Power window switches ....................4-22
6. Rear parking assist system OFF button*...............................................4-63
7. Instrument panel illumination control switch*...............................................4-46
8. 4WD lock button* ..............................5-22
9. DBC button* ......................................5-36
10. ESC OFF button* ...........................5-32
11. Steering wheel tilt control* ..............4-36
12. Steering wheel ................................4-35
13. Fuse box .........................................7-42
14. Hood release lever ..........................4-26
15. Seats .................................................3-2
16. Fuel filler lid release lever ...............4-28
17. Air vents.................................4-82, 4-91
* if equipped
❈ The actual interior in the vehicle may differ from the illustration
Page 34 of 385
321
Safety features of your vehicle
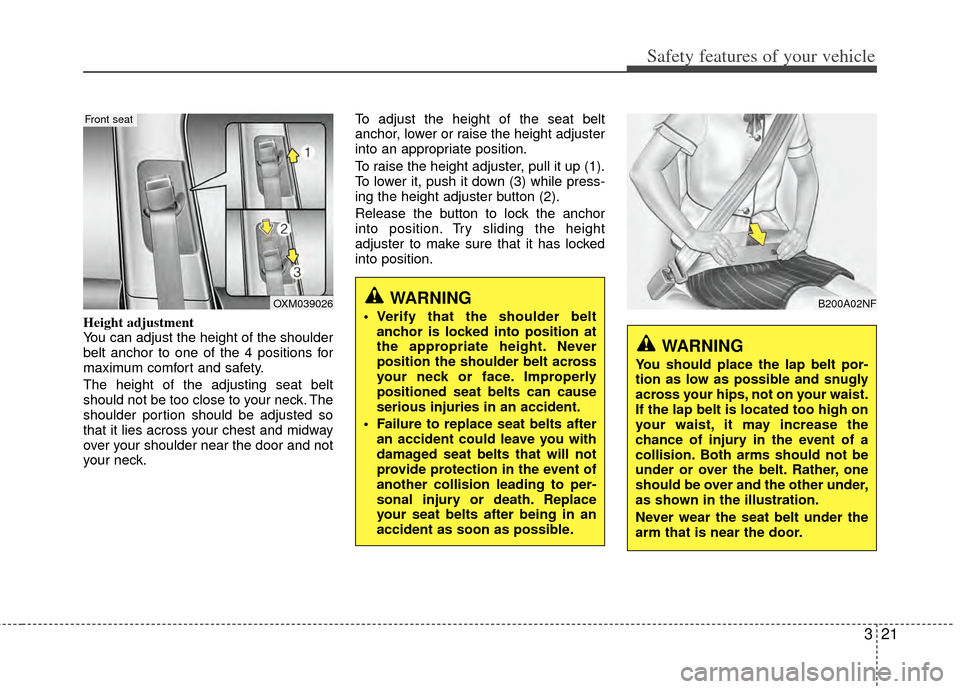
Height adjustment
You can adjust the height of the shoulder
belt anchor to one of the 4 positions for
maximum comfort and safety.
The height of the adjusting seat belt
should not be too close to your neck. The
shoulder portion should be adjusted so
that it lies across your chest and midway
over your shoulder near the door and not
your neck.To adjust the height of the seat belt
anchor, lower or raise the height adjuster
into an appropriate position.
To raise the height adjuster, pull it up (1).
To lower it, push it down (3) while press-
ing the height adjuster button (2).
Release the button to lock the anchor
into position. Try sliding the height
adjuster to make sure that it has locked
into position.
B200A02NF
WARNING
You should place the lap belt por-
tion as low as possible and snugly
across your hips, not on your waist.
If the lap belt is located too high on
your waist, it may increase the
chance of injury in the event of a
collision. Both arms should not be
under or over the belt. Rather, one
should be over and the other under,
as shown in the illustration.
Never wear the seat belt under the
arm that is near the door.
WARNING
Verify that the shoulder belt
anchor is locked into position at
the appropriate height. Never
position the shoulder belt across
your neck or face. Improperly
positioned seat belts can cause
serious injuries in an accident.
Failure to replace seat belts after an accident could leave you with
damaged seat belts that will not
provide protection in the event of
another collision leading to per-
sonal injury or death. Replace
your seat belts after being in an
accident as soon as possible.OXM039026
Front seat
Page 58 of 385
345
Safety features of your vehicle
C041000AAM
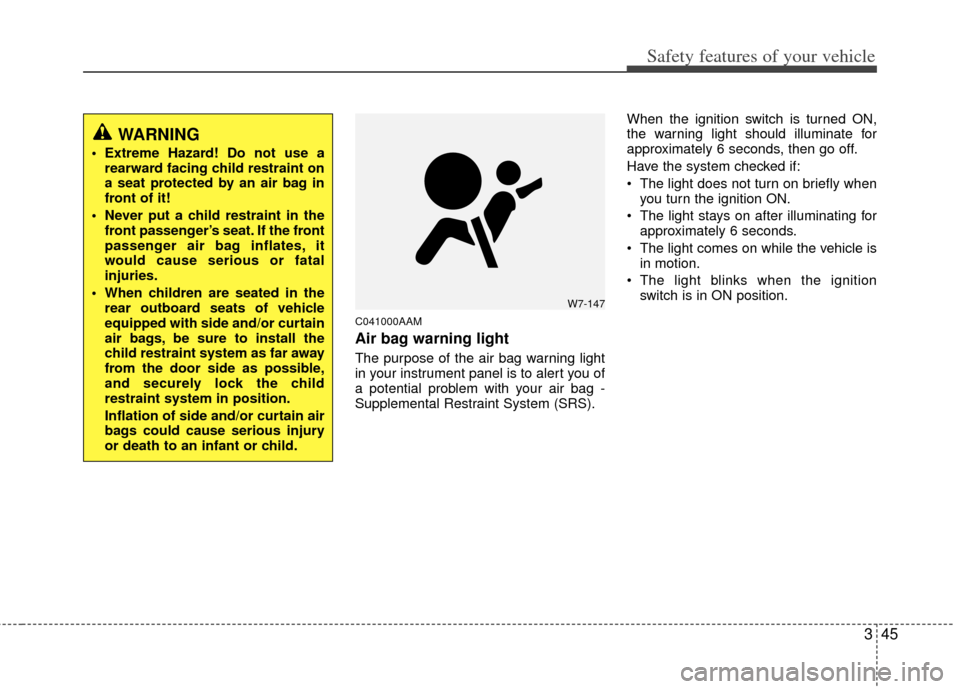
Air bag warning light
The purpose of the air bag warning light
in your instrument panel is to alert you of
a potential problem with your air bag -
Supplemental Restraint System (SRS).When the ignition switch is turned ON,
the warning light should illuminate for
approximately 6 seconds, then go off.
Have the system checked if:
The light does not turn on briefly when
you turn the ignition ON.
The light stays on after illuminating for approximately 6 seconds.
The light comes on while the vehicle is in motion.
The light blinks when the ignition switch is in ON position.
WARNING
Extreme Hazard! Do not use arearward facing child restraint on
a seat protected by an air bag in
front of it!
Never put a child restraint in the front passenger’s seat. If the front
passenger air bag inflates, it
would cause serious or fatal
injuries.
When children are seated in the rear outboard seats of vehicle
equipped with side and/or curtain
air bags, be sure to install the
child restraint system as far away
from the door side as possible,
and securely lock the child
restraint system in position.
Inflation of side and/or curtain air
bags could cause serious injury
or death to an infant or child.
W7-147
Page 73 of 385
Safety features of your vehicle
60
3
C040700AUN
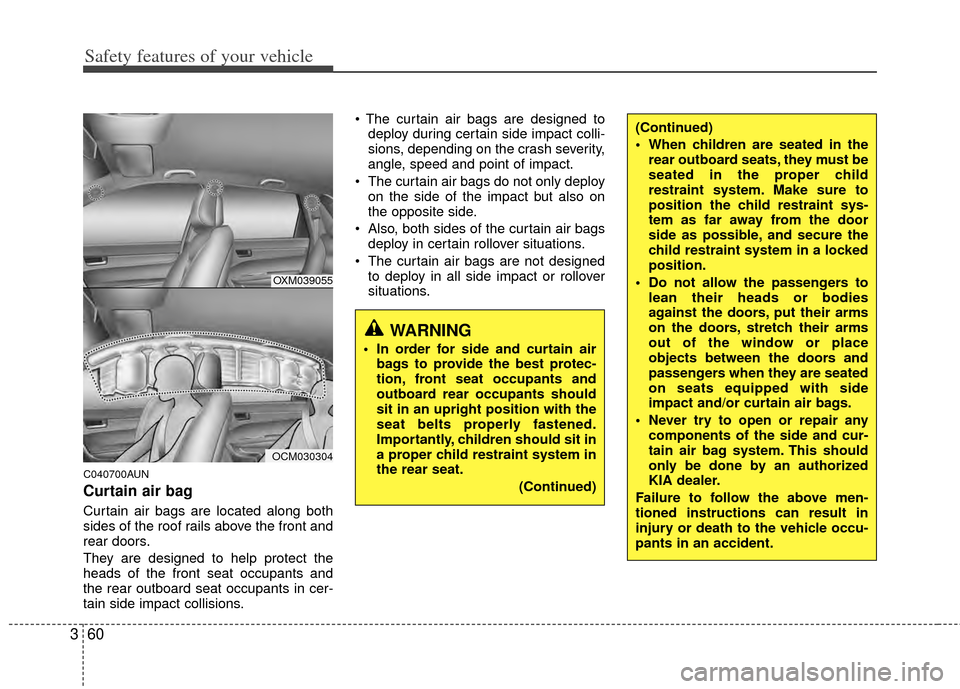
Curtain air bag
Curtain air bags are located along both
sides of the roof rails above the front and
rear doors.
They are designed to help protect the
heads of the front seat occupants and
the rear outboard seat occupants in cer-
tain side impact collisions.
deploy during certain side impact colli-
sions, depending on the crash severity,
angle, speed and point of impact.
The curtain air bags do not only deploy on the side of the impact but also on
the opposite side.
Also, both sides of the curtain air bags deploy in certain rollover situations.
The curtain air bags are not designed to deploy in all side impact or rollover
situations.
WARNING
In order for side and curtain airbags to provide the best protec-
tion, front seat occupants and
outboard rear occupants should
sit in an upright position with the
seat belts properly fastened.
Importantly, children should sit in
a proper child restraint system in
the rear seat.
(Continued)
(Continued)
When children are seated in therear outboard seats, they must be
seated in the proper child
restraint system. Make sure to
position the child restraint sys-
tem as far away from the door
side as possible, and secure the
child restraint system in a locked
position.
Do not allow the passengers to lean their heads or bodies
against the doors, put their arms
on the doors, stretch their arms
out of the window or place
objects between the doors and
passengers when they are seated
on seats equipped with side
impact and/or curtain air bags.
Never try to open or repair any components of the side and cur-
tain air bag system. This should
only be done by an authorized
KIA dealer.
Failure to follow the above men-
tioned instructions can result in
injury or death to the vehicle occu-
pants in an accident.
OXM039055
OCM030304
Page 82 of 385
4
Keys / 4-2
Remote keyless entry / 4-6
Smart key / 4-9
Theft-alarm system / 4-13
Door locks / 4-15
Tailgate / 4-20
Windows / 4-22
Hood / 4-26
Fuel filler lid / 4-28
Panoramic sunroof / 4-31
Steering wheel / 4-35
Mirrors / 4-37
Instrument cluster / 4-45
Rear parking assist system / 4-63
Rearview camera / 4-66
Hazard warning flasher / 4-66
Lighting / 4-67
Wipers and washers / 4-72
Interior lights / 4-76
Defroster / 4-79
Manual climate control system / 4-80
Automatic climate control system / 4-88
Windshield defrosting and defogging / 4-95
Storage compartments / 4-98
Interior features / 4-101
Exterior features / 4-107
Audio system / 4-108
Sirius satellite radio information / 4-128
Features of your vehicle
Page 83 of 385
Features of your vehicle
24
D010100AUN
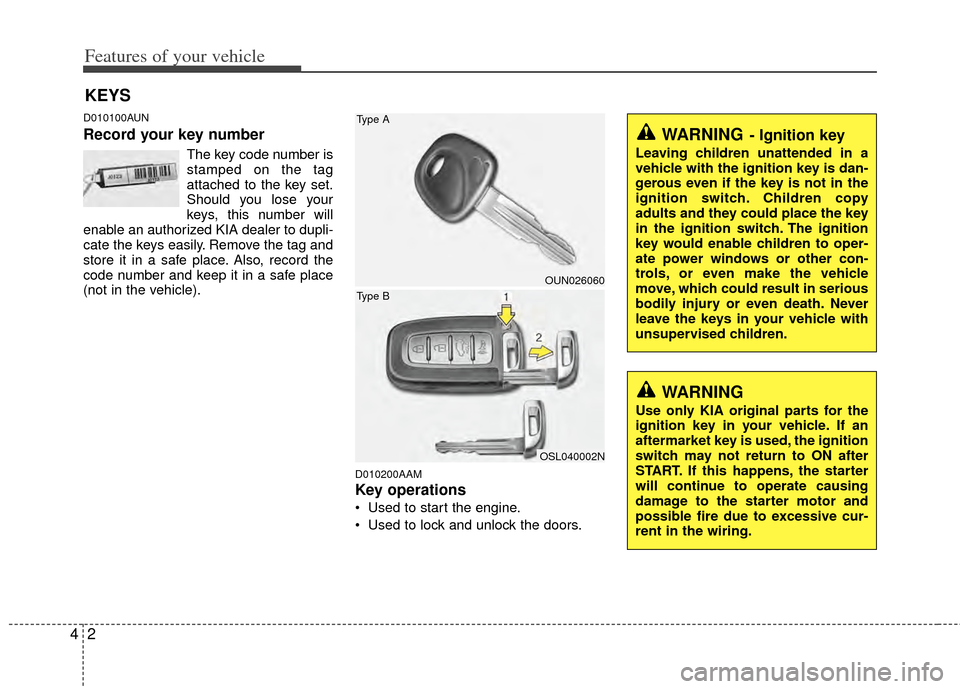
Record your key number
The key code number is
stamped on the tag
attached to the key set.
Should you lose your
keys, this number will
enable an authorized KIA dealer to dupli-
cate the keys easily. Remove the tag and
store it in a safe place. Also, record the
code number and keep it in a safe place
(not in the vehicle).
D010200AAM
Key operations
• Used to start the engine.
Used to lock and unlock the doors.
KEYS
WARNING- Ignition key
Leaving children unattended in a
vehicle with the ignition key is dan-
gerous even if the key is not in the
ignition switch. Children copy
adults and they could place the key
in the ignition switch. The ignition
key would enable children to oper-
ate power windows or other con-
trols, or even make the vehicle
move, which could result in serious
bodily injury or even death. Never
leave the keys in your vehicle with
unsupervised children.
WARNING
Use only KIA original parts for the
ignition key in your vehicle. If an
aftermarket key is used, the ignition
switch may not return to ON after
START. If this happens, the starter
will continue to operate causing
damage to the starter motor and
possible fire due to excessive cur-
rent in the wiring.
OUN026060
OSL040002N
Type A
Type B
Page 87 of 385
Features of your vehicle
64
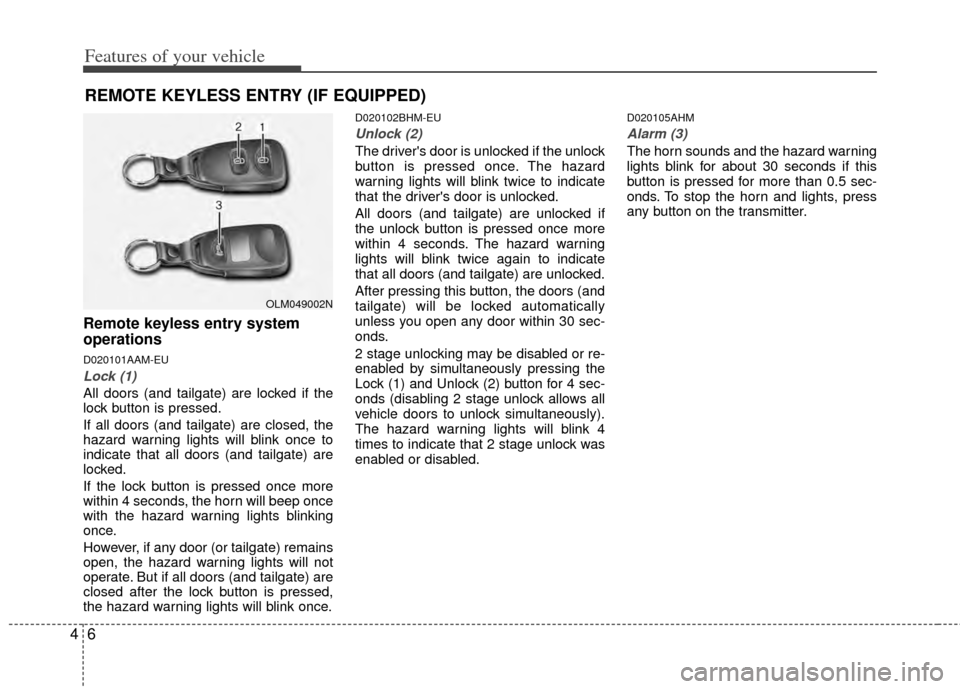
Remote keyless entry system
operations
D020101AAM-EU
Lock (1)
All doors (and tailgate) are locked if the
lock button is pressed.
If all doors (and tailgate) are closed, the
hazard warning lights will blink once to
indicate that all doors (and tailgate) are
locked.
If the lock button is pressed once more
within 4 seconds, the horn will beep once
with the hazard warning lights blinking
once.
However, if any door (or tailgate) remains
open, the hazard warning lights will not
operate. But if all doors (and tailgate) are
closed after the lock button is pressed,
the hazard warning lights will blink once.
D020102BHM-EU
Unlock (2)
The driver's door is unlocked if the unlock
button is pressed once. The hazard
warning lights will blink twice to indicate
that the driver's door is unlocked.
All doors (and tailgate) are unlocked if
the unlock button is pressed once more
within 4 seconds. The hazard warning
lights will blink twice again to indicate
that all doors (and tailgate) are unlocked.
After pressing this button, the doors (and
tailgate) will be locked automatically
unless you open any door within 30 sec-
onds.
2 stage unlocking may be disabled or re-
enabled by simultaneously pressing the
Lock (1) and Unlock (2) button for 4 sec-
onds (disabling 2 stage unlock allows all
vehicle doors to unlock simultaneously).
The hazard warning lights will blink 4
times to indicate that 2 stage unlock was
enabled or disabled.
D020105AHM
Alarm (3)
The horn sounds and the hazard warning
lights blink for about 30 seconds if this
button is pressed for more than 0.5 sec-
onds. To stop the horn and lights, press
any button on the transmitter.
REMOTE KEYLESS ENTRY (IF EQUIPPED)
OLM049002N