2011 KIA Sportage Knob
[x] Cancel search: KnobPage 148 of 385
467
Features of your vehicle
D190100APB
Battery saver function
The purpose of this feature is to pre-vent the battery from being discharged
if the lights are left in the ON position.
The system automatically shuts off the
parking lights 30 seconds after the
ignition key is removed and the driver’s
door is opened and closed.
With this feature, the parking lights will turn off automatically if the driver parks
on the side of the road at night and
opens the driver’s side door.
If necessary, to keep the parking lights
on when the ignition key is removed,
perform the following:
1) Open the driver-side door.
2) Turn the parking lights OFF and ON again using the light switch on the
steering column.
Headlight escort function
(if equipped)
The headlights (and/or taillights) remain
on for approximately 20 minutes after the
ignition key is removed or turned to the
ACC or LOCK position. However, if the
driver’s door (and tailgate) is opened and
closed, the headlights are turned off after
30 seconds.
The headlights can be turned off by
pressing the lock button on the transmit-
ter (or smart key) twice or turning off the
light switch from the headlight or Auto
light position.
Headlight welcome function
(if equipped)
When the headlight switch is in the ON or
AUTO position and all doors (and tail-
gate) are closed and locked, if you press
the door unlock button on the transmitter
(or smart key), the headlights will come
on for about 15 seconds.
If the headlight switch is in the AUTO
position, the function can only operate at
night.
At this time, if you press the door lock
button or unlock button (once or twice) on
the transmitter (or smart key), the head-
lights will turn off immediately.
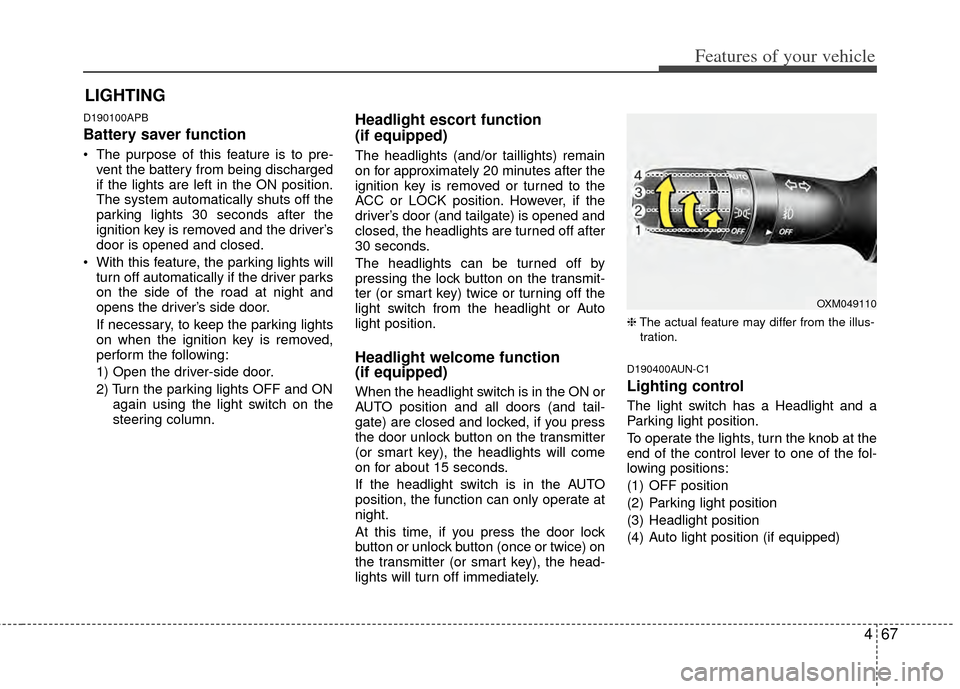
❈The actual feature may differ from the illus-
tration.
D190400AUN-C1
Lighting control
The light switch has a Headlight and a
Parking light position.
To operate the lights, turn the knob at the
end of the control lever to one of the fol-
lowing positions:
(1) OFF position
(2) Parking light position
(3) Headlight position
(4) Auto light position (if equipped)
LIGHTING
OXM049110
Page 153 of 385
Features of your vehicle
72
4
D200000AAM-EE D200100AAM
Front windshield wipers
Operates as follows when the ignition
switch is turned ON.
MIST : For a
single wiping cycle, push the
lever upward and release it with
the lever in the OFF position. The
wipers will operate continuously if
the lever is pushed upward and
held.
OFF : Wiper is not in operation
INT : Wiper operates intermittently at the same wiping intervals. Use this
mode in light rain or mist. To vary
the speed setting, turn the speed
control knob.
LO : Normal wiper speed
HI : Fast wiper speed
✽ ✽ NOTICE
If there is heavy accumulation of snow
or ice on the windshield, defrost the
windshield for about 10 minutes, or
until the snow and/or ice is removed
before using the windshield wipers to
ensure proper operation.
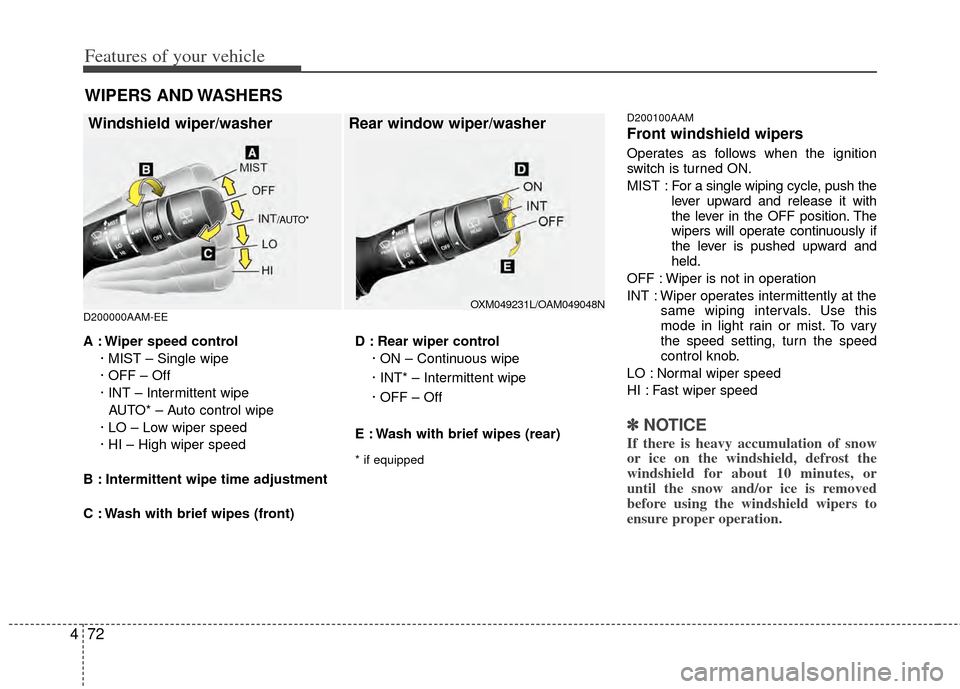
A : Wiper speed control
· MIST – Single wipe
· OFF – Off
· INT – Intermittent wipe AUTO* – Auto control wipe
· LO – Low wiper speed
· HI – High wiper speed
B : Intermittent wipe time adjustment
C : Wash with brief wipes (front) D : Rear wiper control
· ON – Continuous wipe
· INT* – Intermittent wipe
· OFF – Off
E : Wash with brief wipes (rear)
* if equipped
WIPERS AND WASHERS
Windshield wiper/washer Rear window wiper/washer
/AUTO*
OXM049231L/OAM049048N
Page 154 of 385
473
Features of your vehicle
Auto control (if equipped)
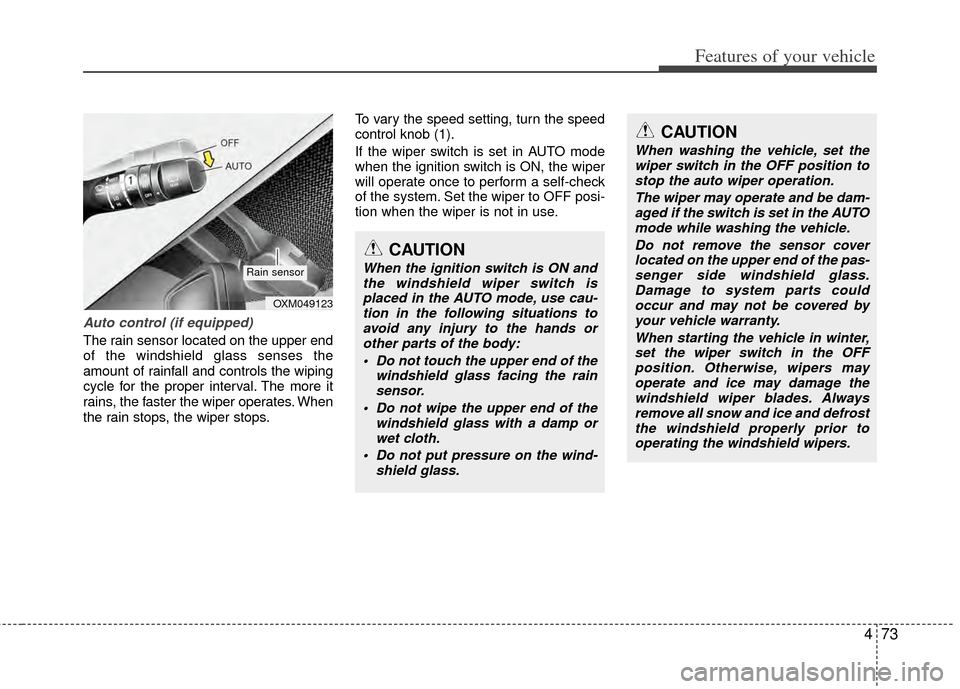
The rain sensor located on the upper end
of the windshield glass senses the
amount of rainfall and controls the wiping
cycle for the proper interval. The more it
rains, the faster the wiper operates. When
the rain stops, the wiper stops.To vary the speed setting, turn the speed
control knob (1).
If the wiper switch is set in AUTO mode
when the ignition switch is ON, the wiper
will operate once to perform a self-check
of the system. Set the wiper to OFF posi-
tion when the wiper is not in use.
CAUTION
When the ignition switch is ON and
the windshield wiper switch isplaced in the AUTO mode, use cau-tion in the following situations toavoid any injury to the hands orother parts of the body:
Do not touch the upper end of the windshield glass facing the rainsensor.
Do not wipe the upper end of the windshield glass with a damp orwet cloth.
Do not put pressure on the wind- shield glass.
OXM049123
Rain sensor
CAUTION
When washing the vehicle, set thewiper switch in the OFF position tostop the auto wiper operation.
The wiper may operate and be dam-aged if the switch is set in the AUTOmode while washing the vehicle.
Do not remove the sensor coverlocated on the upper end of the pas- senger side windshield glass.Damage to system parts couldoccur and may not be covered by your vehicle warranty.
When starting the vehicle in winter,set the wiper switch in the OFF position. Otherwise, wipers mayoperate and ice may damage the windshield wiper blades. Alwaysremove all snow and ice and defrost the windshield properly prior tooperating the windshield wipers.
Page 161 of 385
Features of your vehicle
80
4
Heating and air conditioning
1. Start the engine.
2. Set the mode to the desired position.
For improving the effectiveness of
heating and cooling;
- Heating:
- Cooling:
3. Set the temperature control to the desired position.
4. Set the air intake control to the outside (fresh) air position (if equipped).
5. Set the fan speed control to the desired speed.
6. If air conditioning is desired, turn the air conditioning system (if equipped)
on.
MANUAL CLIMATE CONTROL SYSTEM (IF EQUIPPED)
OSL040070
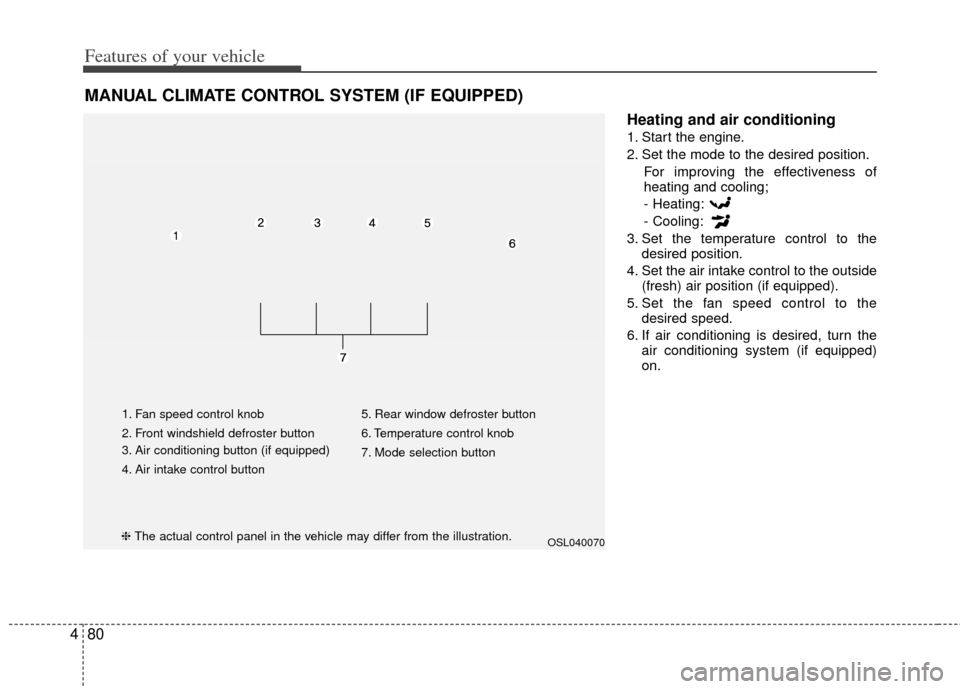
1. Fan speed control knob
2. Front windshield defroster button
3. Air conditioning button (if equipped)
4. Air intake control button 5. Rear window defroster button
6. Temperature control knob
7. Mode selection button
❈
The actual control panel in the vehicle may differ from the illustration.
Page 164 of 385
483
Features of your vehicle
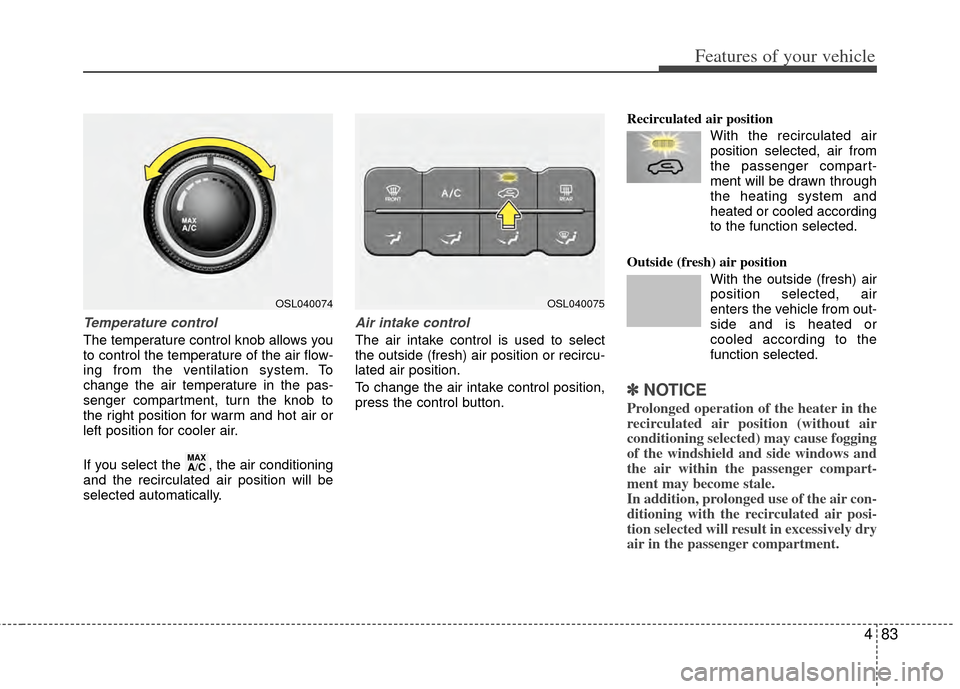
Temperature control
The temperature control knob allows you
to control the temperature of the air flow-
ing from the ventilation system. To
change the air temperature in the pas-
senger compartment, turn the knob to
the right position for warm and hot air or
left position for cooler air.
If you select the , the air conditioning
and the recirculated air position will be
selected automatically.
Air intake control
The air intake control is used to select
the outside (fresh) air position or recircu-
lated air position.
To change the air intake control position,
press the control button.Recirculated air position
With the recirculated airposition selected, air from
the passenger compart-
ment will be drawn through
the heating system and
heated or cooled according
to the function selected.
Outside (fresh) air position With the outside (fresh) air
position selected, air
enters the vehicle from out-
side and is heated or
cooled according to the
function selected.
✽ ✽NOTICE
Prolonged operation of the heater in the
recirculated air position (without air
conditioning selected) may cause fogging
of the windshield and side windows and
the air within the passenger compart-
ment may become stale.
In addition, prolonged use of the air con-
ditioning with the recirculated air posi-
tion selected will result in excessively dry
air in the passenger compartment.
MAXA/C
OSL040074OSL040075
Page 165 of 385
Features of your vehicle
84
4
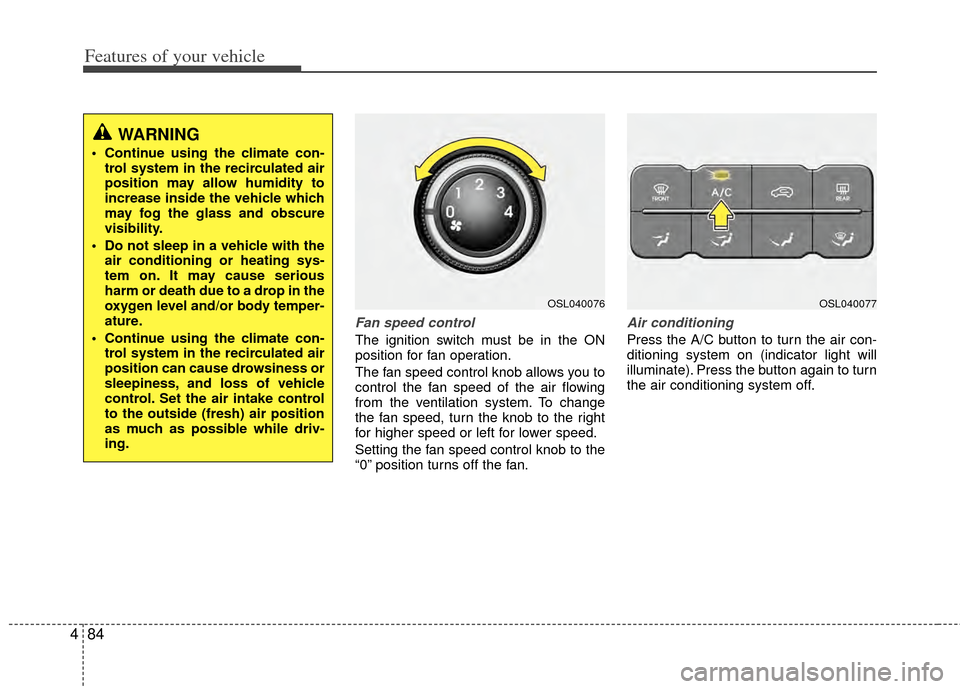
Fan speed control
The ignition switch must be in the ON
position for fan operation.
The fan speed control knob allows you to
control the fan speed of the air flowing
from the ventilation system. To change
the fan speed, turn the knob to the right
for higher speed or left for lower speed.
Setting the fan speed control knob to the
“0” position turns off the fan.
Air conditioning
Press the A/C button to turn the air con-
ditioning system on (indicator light will
illuminate). Press the button again to turn
the air conditioning system off.
WARNING
Continue using the climate con-
trol system in the recirculated air
position may allow humidity to
increase inside the vehicle which
may fog the glass and obscure
visibility.
Do not sleep in a vehicle with the air conditioning or heating sys-
tem on. It may cause serious
harm or death due to a drop in the
oxygen level and/or body temper-
ature.
Continue using the climate con- trol system in the recirculated air
position can cause drowsiness or
sleepiness, and loss of vehicle
control. Set the air intake control
to the outside (fresh) air position
as much as possible while driv-
ing.
OSL040076OSL040077
Page 169 of 385
Features of your vehicle
88
4
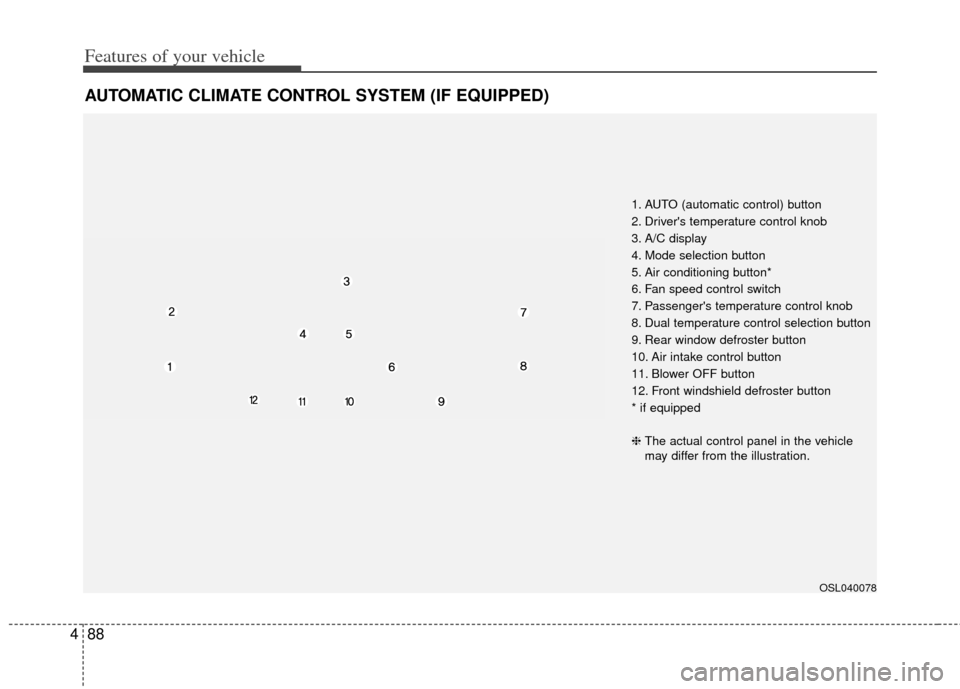
AUTOMATIC CLIMATE CONTROL SYSTEM (IF EQUIPPED)
OSL040078
1. AUTO (automatic control) button
2. Driver's temperature control knob
3. A/C display
4. Mode selection button
5. Air conditioning button*
6. Fan speed control switch
7. Passenger's temperature control knob
8. Dual temperature control selection button
9. Rear window defroster button
10. Air intake control button
11. Blower OFF button
12. Front windshield defroster button
* if equipped
❈ The actual control panel in the vehicle
may differ from the illustration.
Page 171 of 385
Features of your vehicle
90
4
Manual heating and air condition-
ing
The heating and cooling system can be
controlled manually by pressing buttons
or turning knob(s) other than the AUTO
button. In this case, the system works
sequentially according to the order of
buttons or knob(s) selected.
1. Start the engine.
2. Set the mode to the desired position.
For improving the effectiveness of
heating and cooling;
- Heating:
- Cooling:
3. Set the temperature control to the desired position.
4. Set the air intake control to the outside (fresh) air position.
5. Set the fan speed control to the desired speed.
6. If air conditioning is desired, turn the air conditioning system on.
Press the AUTO button in order to con-
vert to full automatic control of the sys-
tem.
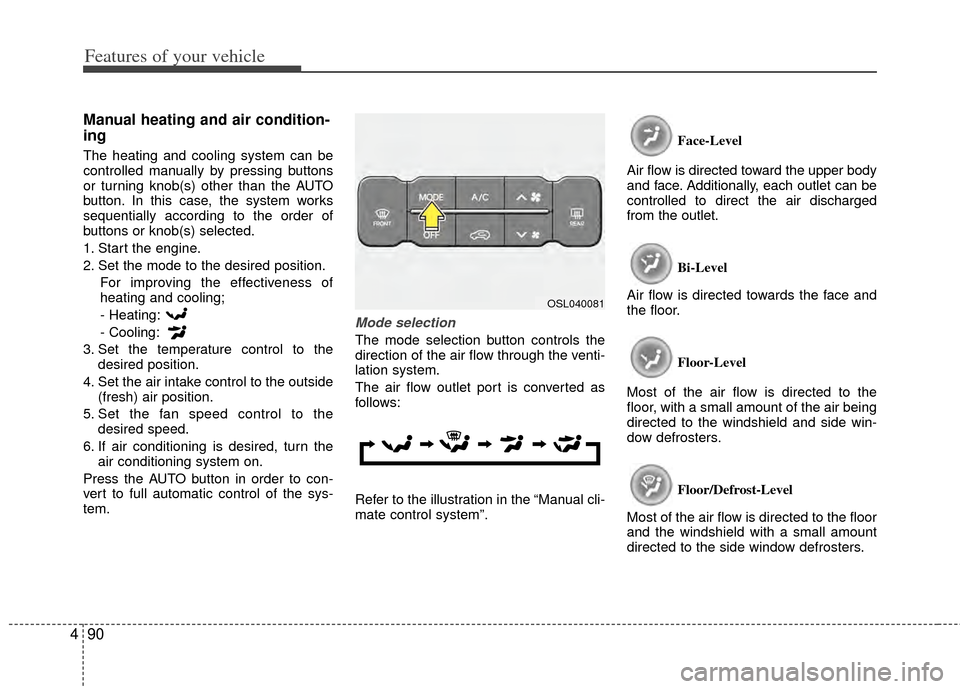
Mode selection
The mode selection button controls the
direction of the air flow through the venti-
lation system.
The air flow outlet port is converted as
follows:
Refer to the illustration in the “Manual cli-
mate control system”. Face-Level
Air flow is directed toward the upper body
and face. Additionally, each outlet can be
controlled to direct the air discharged
from the outlet.
Bi-Level
Air flow is directed towards the face and
the floor.
Floor-Level
Most of the air flow is directed to the
floor, with a small amount of the air being
directed to the windshield and side win-
dow defrosters.
Floor/Defrost-Level
Most of the air flow is directed to the floor
and the windshield with a small amount
directed to the side window defrosters.
OSL040081