Page 355 of 385
Maintenance
46
7
✽
✽
NOTICE
Not all fuse panel descriptions in this
manual may be applicable to your vehi-
cle. It is accurate at the time of printing.
When you inspect the fuse panel in your
vehicle, refer to the fuse panel label.
G210300AAM-EU
Fuse/relay panel description
Inside the fuse/relay panel covers, you can find the fuse/relay label describing fuse/relay name and capacity.
Inner fuse panel
Engine compartment fuse panel
OSL070026/OLM079027N/OLM079053N
Page 356 of 385
747
Maintenance
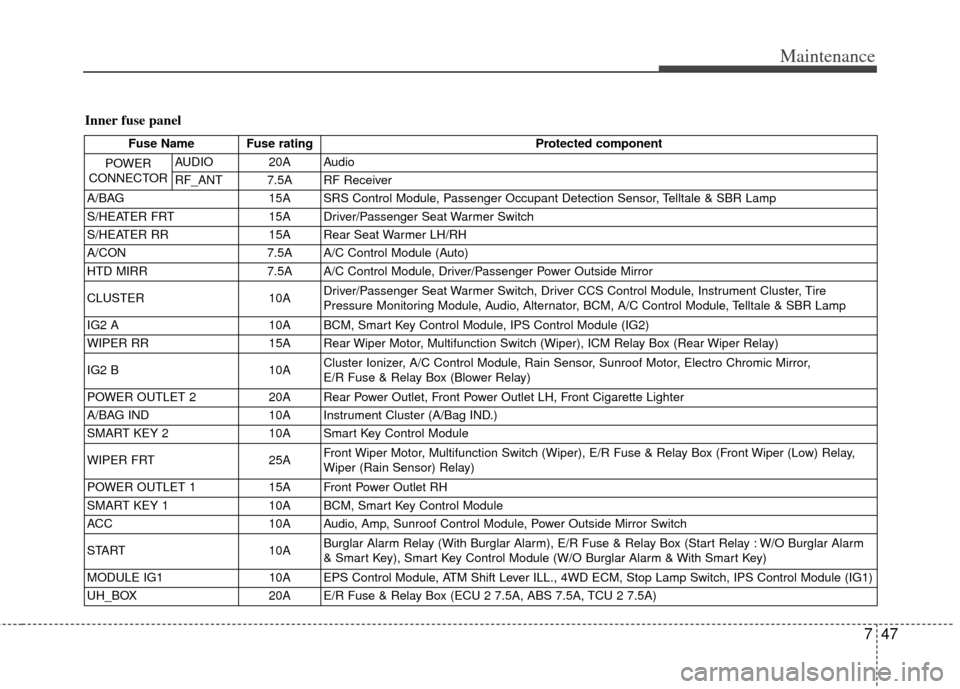
Inner fuse panel
Fuse Name Fuse ratingProtected component
POWER
CONNECTOR
AUDIO 20A Audio
RF_ANT 7.5A RF Receiver
A/BAG 15A SRS Control Module, Passenger Occupant Detection Sensor, Telltale & SBR Lamp
S/HEATER FRT 15A Driver/Passenger Seat Warmer Switch
S/HEATER RR 15A Rear Seat Warmer LH/RH
A/CON 7.5A A/C Control Module (Auto)
HTD MIRR 7.5A A/C Control Module, Driver/Passenger Power Outside Mirror
CLUSTER 10A Driver/Passenger Seat Warmer Switch, Driver CCS Control Module, Instrument Cluster, Tire
Pressure Monitoring Module, Audio, Alternator, BCM, A/C Control Module, Telltale & SBR Lamp
IG2 A 10A BCM, Smart Key Control Module, IPS Control Module (IG2)
WIPER RR 15A Rear Wiper Motor, Multifunction Switch (Wiper), ICM Relay Box (Rear Wiper Relay)
IG2 B 10A Cluster Ionizer, A/C Control Module, Rain Sensor, Sunroof Motor, Electro Chromic Mirror,
E/R Fuse & Relay Box (Blower Relay)
POWER OUTLET 2 20A Rear Power Outlet, Front Power Outlet LH, Front Cigarette Lighter
A/BAG IND 10A Instrument Cluster (A/Bag IND.)
SMART KEY 2 10A Smart Key Control Module
WIPER FRT 25A Front Wiper Motor, Multifunction Switch (Wiper), E/R Fuse & Relay Box (Front Wiper (Low) Relay,
Wiper (Rain Sensor) Relay)
POWER OUTLET 1 15A Front Power Outlet RH
SMART KEY 1 10A BCM, Smart Key Control Module
ACC 10A Audio, Amp, Sunroof Control Module, Power Outside Mirror Switch
START 10A Burglar Alarm Relay (With Burglar Alarm), E/R Fuse & Relay Box (Start Relay : W/O Burglar Alarm
& Smart Key), Smart Key Control Module (W/O Burglar Alarm & With Smart Key)
MODULE IG1 10A EPS Control Module, ATM Shift Lever ILL., 4WD ECM, Stop Lamp Switch, IPS Control Module (IG1)
UH_BOX 20A E/R Fuse & Relay Box (ECU 2 7.5A, ABS 7.5A, TCU 2 7.5A)
Page 357 of 385
Maintenance
48
7
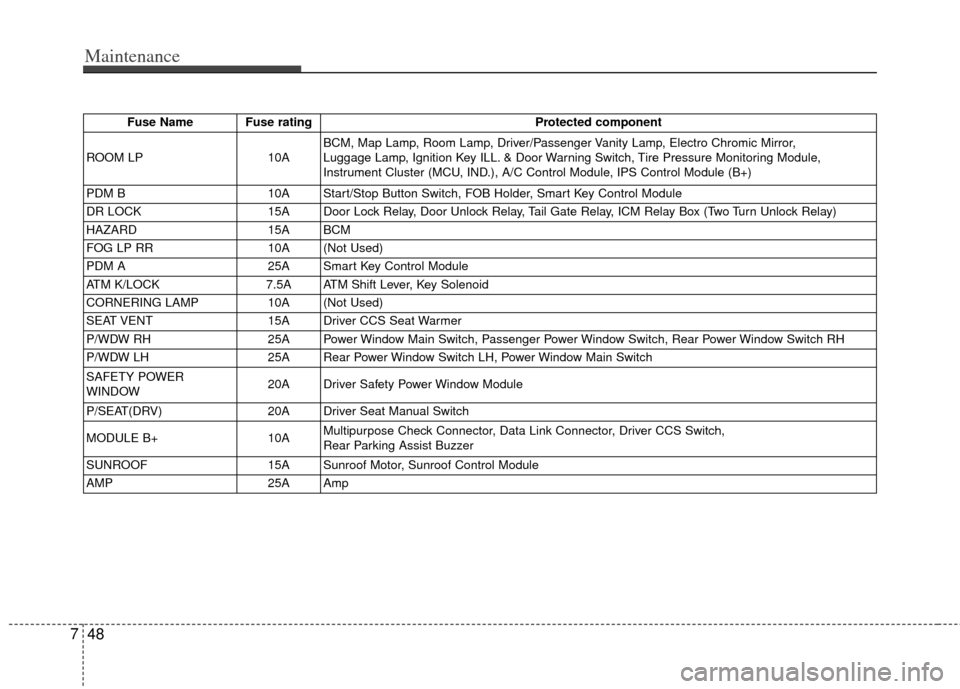
Fuse Name Fuse rating Protected component
ROOM LP 10ABCM, Map Lamp, Room Lamp, Driver/Passenger Vanity Lamp, Electro Chromic Mirror,
Luggage Lamp, Ignition Key ILL. & Door Warning Switch, Tire Pressure Monitoring Module,
Instrument Cluster (MCU, IND.), A/C Control Module, IPS Control Module (B+)
PDM B 10A Start/Stop Button Switch, FOB Holder, Smart Key Control Module
DR LOCK 15A Door Lock Relay, Door Unlock Relay, Tail Gate Relay, ICM Relay Box (Two Turn Unlock Relay)
HAZARD 15A BCM
FOG LP RR 10A (Not Used)
PDM A 25A Smart Key Control Module
ATM K/LOCK 7.5A ATM Shift Lever, Key Solenoid
CORNERING LAMP 10A (Not Used)
SEAT VENT 15A Driver CCS Seat Warmer
P/WDW RH 25A Power Window Main Switch, Passenger Power Window Switch, Rear Power Window Switch RH
P/WDW LH 25A Rear Power Window Switch LH, Power Window Main Switch
SAFETY POWER
WINDOW 20A Driver Safety Power Window Module
P/SEAT(DRV) 20A Driver Seat Manual Switch
MODULE B+ 10AMultipurpose Check Connector, Data Link Connector, Driver CCS Switch,
Rear Parking Assist Buzzer
SUNROOF 15A Sunroof Motor, Sunroof Control Module
AMP 25A Amp
Page 358 of 385
749
Maintenance
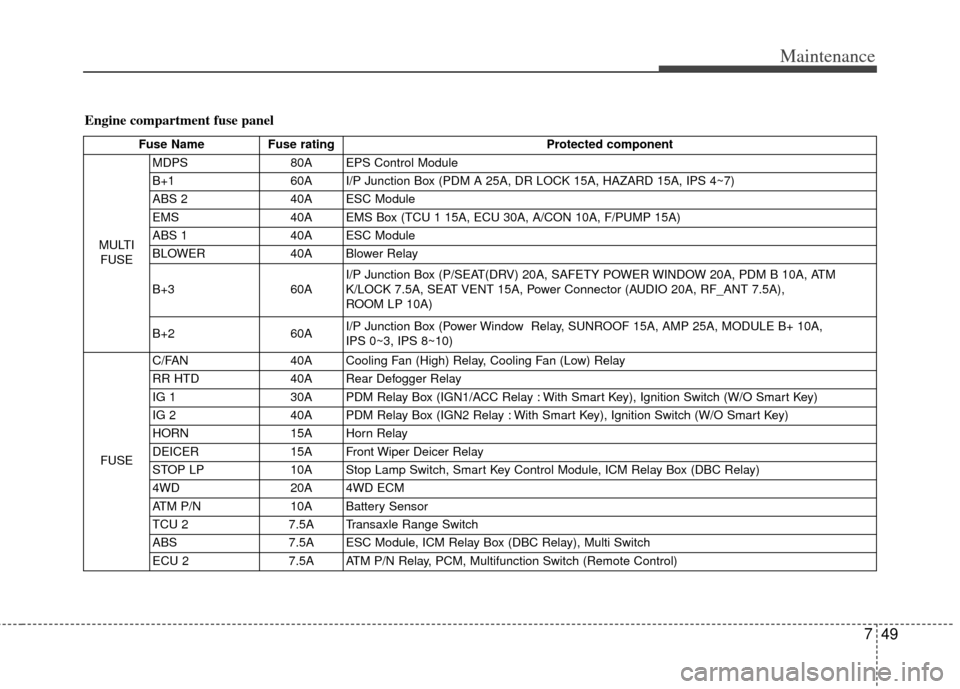
Engine compartment fuse panel
Fuse NameFuse rating Protected component
MULTI FUSE MDPS
80A EPS Control Module
B+1 60A I/P Junction Box (PDM A 25A, DR LOCK 15A, HAZARD 15A, IPS 4~7)
ABS 2 40A ESC Module
EMS 40A EMS Box (TCU 1 15A, ECU 30A, A/CON 10A, F/PUMP 15A)
ABS 1 40A ESC Module
BLOWER 40A Blower Relay
B+3 60AI/P Junction Box (P/SEAT(DRV) 20A, SAFETY POWER WINDOW 20A, PDM B 10A, ATM
K/LOCK 7.5A, SEAT VENT 15A, Power Connector (AUDIO 20A, RF_ANT 7.5A),
ROOM LP 10A)
B+2 60AI/P Junction Box (Power Window Relay, SUNROOF 15A, AMP 25A, MODULE B+ 10A,
IPS 0~3, IPS 8~10)
FUSE C/FAN
40A Cooling Fan (High) Relay, Cooling Fan (Low) Relay
RR HTD 40A Rear Defogger Relay
IG 1 30A PDM Relay Box (IGN1/ACC Relay : With Smart Key), Ignition Switch (W/O Smart Key)
IG 2 40A PDM Relay Box (IGN2 Relay : With Smart Key), Ignition Switch (W/O Smart Key)
HORN 15A Horn Relay
DEICER 15A Front Wiper Deicer Relay
STOP LP 10A Stop Lamp Switch, Smart Key Control Module, ICM Relay Box (DBC Relay)
4WD 20A 4WD ECM
ATM P/N 10A Battery Sensor
TCU 2 7.5A Transaxle Range Switch
ABS 7.5A ESC Module, ICM Relay Box (DBC Relay), Multi Switch
ECU 2 7.5A ATM P/N Relay, PCM, Multifunction Switch (Remote Control)
Page 359 of 385
Maintenance
50
7
Fuse Name Fuse rating Protected component
F/PUMP 15A Fuel Pump Relay
SENSOR 4 15AFuel Pump Relay, PCM, Oxygen Sensor (Up)/(Down),
E/R Fuse & Relay Box (Cooling Fan (High)/(Low) Relay)
SENSOR 3 10A A/CON Relay, Injector #1~#4
SENSOR 2 10A (Not Used)
TCU 1 15A PCM
A/CON 10A A/CON Relay
SENSOR 1 10AImmobilizer Module, Crankshaft Position Sensor, Camshaft Position Sensor #1/#2, Oil Control Valve
#1/#2Canister Purge Control Solenoid Valve, Variable Intake Solenoid Valve, Canister Close Valve
ECU 1 20A Ignition Coil #1~#4, Condenser
ECU 30A Engine Control Relay
Engine compartment main fuse panel (EMS Box)
Page 360 of 385
751
Maintenance
APPEARANCE CARE
Exterior care
G230101AUN
Exterior general caution
It is very important to follow the label
directions when using any chemical
cleaner or polish. Read all warning and
caution statements that appear on the
label.
G230102BUN
Finish maintenance
Washing
To help protect your vehicle’s finish from
rust and deterioration, wash it thoroughly
and frequently at least once a month with
lukewarm or cold water.
If you use your vehicle for off-road driv-
ing, you should wash it after each off-
road trip. Pay special attention to the
removal of any accumulation of salt, dirt,
mud, and other foreign materials. Make
sure the drain holes in the lower edges of
the doors and rocker panels are kept
clear and clean.
Insects, tar, tree sap, bird droppings,
industrial pollution and similar deposits
can damage your vehicle’s finish if not
removed immediately.
Even prompt washing with plain water
may not completely remove all these
deposits. A mild soap, safe for use on
painted surfaces, may be used.
After washing, rinse the vehicle thor-
oughly with lukewarm or cold water. Do
not allow soap to dry on the finish.
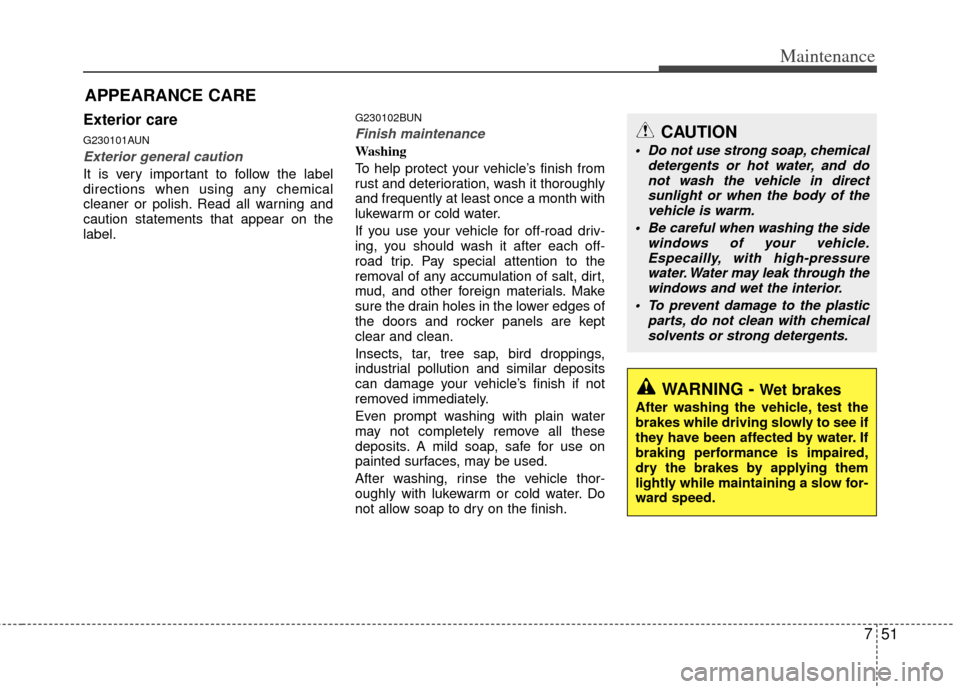
CAUTION
Do not use strong soap, chemicaldetergents or hot water, and donot wash the vehicle in direct sunlight or when the body of thevehicle is warm.
Be careful when washing the side windows of your vehicle.Especailly, with high-pressurewater. Water may leak through the windows and wet the interior.
To prevent damage to the plastic parts, do not clean with chemicalsolvents or strong detergents.
WARNING - Wet brakes
After washing the vehicle, test the
brakes while driving slowly to see if
they have been affected by water. If
braking performance is impaired,
dry the brakes by applying them
lightly while maintaining a slow for-
ward speed.
Page 361 of 385
Maintenance
52
7
Waxing
Wax the vehicle when water will no
longer bead on the paint.
Always wash and dry the vehicle before
waxing. Use a good quality liquid or
paste wax, and follow the manufacturer’s
instructions. Wax all metal trim to protect
it and to maintain its luster.
Removing oil, tar, and similar materials
with a spot remover will usually strip the
wax from the finish. Be sure to re-wax
these areas even if the rest of the vehicle
does not yet need waxing.G230103AUN
Finish damage repair
Deep scratches or stone chips in the
painted surface must be repaired
promptly. Exposed metal will quickly rust
and may develop into a major repair
expense.
✽ ✽
NOTICE
If your vehicle is damaged and requires
any metal repair or replacement, be sure
the body shop applies anti-corrosion
materials to the parts repaired or
replaced.
G230104AUN
Bright-metal maintenance
To remove road tar and insects, use a
tar remover, not a scraper or other
sharp object.
To protect the surfaces of bright-metal parts from corrosion, apply a coating of
wax or chrome preservative and rub to
a high luster.
During winter weather or in coastal areas, cover the bright metal parts with
a heavier coating of wax or preserva-
tive. If necessary, coat the parts with
non-corrosive petroleum jelly or other
protective compound.
CAUTION
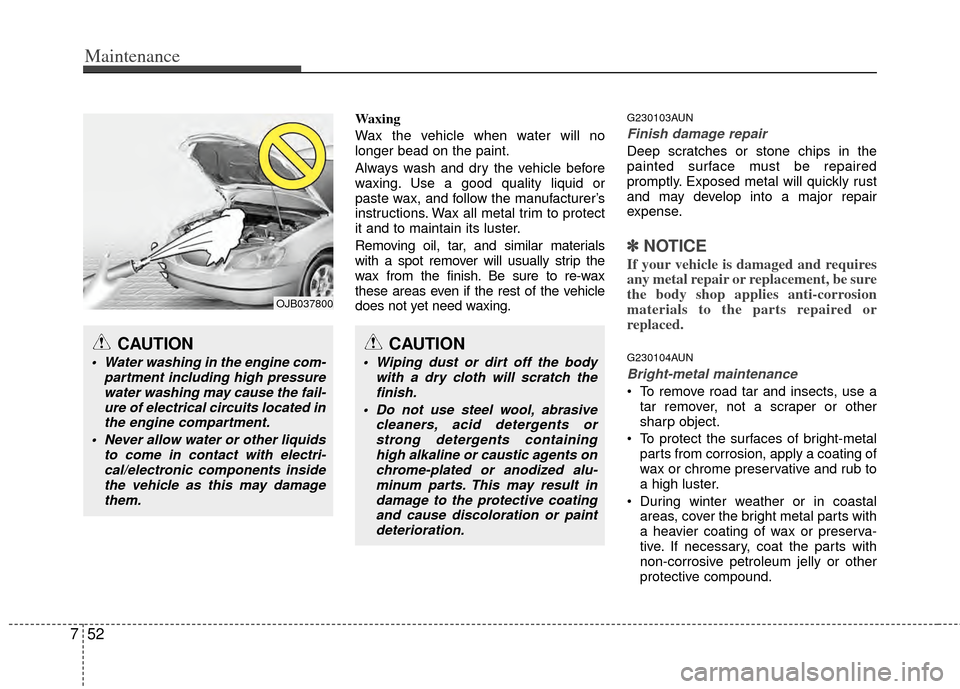
Water washing in the engine com- partment including high pressurewater washing may cause the fail-ure of electrical circuits located inthe engine compartment.
Never allow water or other liquids to come in contact with electri-cal/electronic components insidethe vehicle as this may damagethem.
CAUTION
Wiping dust or dirt off the body with a dry cloth will scratch thefinish.
Do not use steel wool, abrasive cleaners, acid detergents orstrong detergents containinghigh alkaline or caustic agents onchrome-plated or anodized alu-minum parts. This may result indamage to the protective coatingand cause discoloration or paintdeterioration.
OJB037800
Page 362 of 385
753
Maintenance
G230105ASA
Underbody maintenance
Corrosive materials used for ice and
snow removal and dust control may col-
lect on the underbody. If these materials
are not removed, accelerated rusting can
occur on underbody parts such as the
fuel lines, frame, floor pan and exhaust
system, even though they have been
treated with rust protection.
Thoroughly flush the vehicle underbody
and wheel openings with lukewarm or
cold water once a month, after off-road
driving and at the end of each winter. Pay
special attention to these areas because
it is difficult to see all the mud and dirt. It
will do more harm than good to wet down
the road grime without removing it. The
lower edges of the doors, rocker panels,
and frame members have drain holes
that should not be allowed to clog with
dirt; trapped water in these areas can
cause rusting.
G230106AAM
Aluminum wheel maintenance
The aluminum wheels are coated with a
clear protective finish.
Do not use any abrasive cleaner, pol-ishing compound, solvent, or wire
brushes on aluminum wheels. They
may scratch or damage the finish.
Use only mild soap or neutral deter- gent, and rinse thoroughly with water.
Also, be sure to clean the wheels after
driving on salted roads. This helps pre-
vent corrosion.
Avoid washing the wheels with high- speed car wash brushes.
Do not use any cleaners containing acid or acid detergents. It may damage
and corrode the aluminum wheels
coated with a clear protective finish.
WARNING
After washing the vehicle, test the
brakes while driving slowly to see if
they have been affected by water. If
braking performance is impaired,
dry the brakes by applying them
lightly while maintaining a slow for-
ward speed.