Page 85 of 356

413
Features of your vehicle
D050100AAM-EU
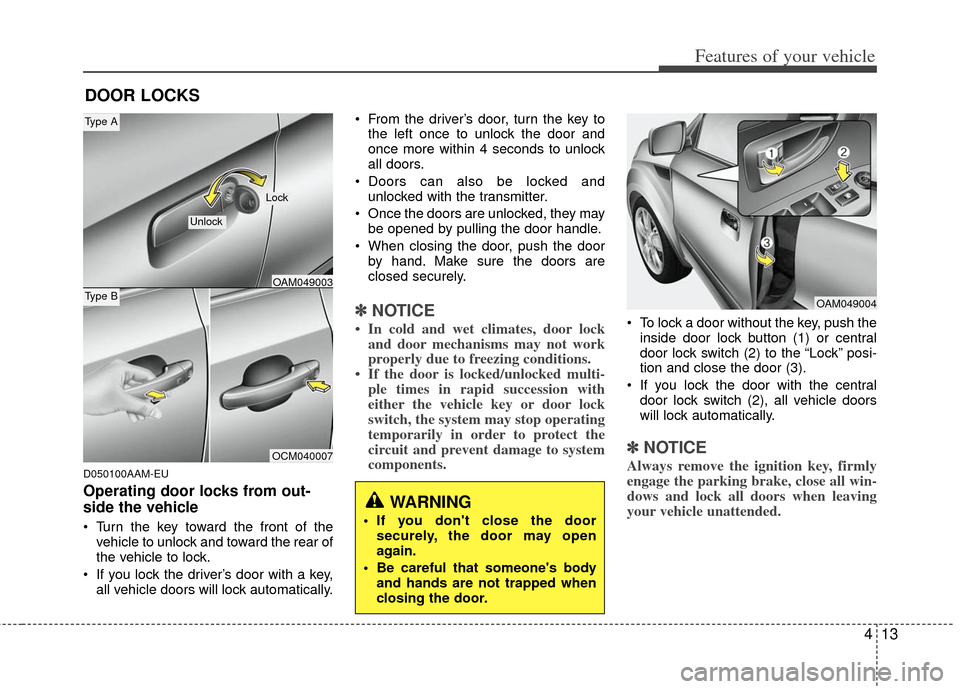
Operating door locks from out-
side the vehicle
Turn the key toward the front of thevehicle to unlock and toward the rear of
the vehicle to lock.
If you lock the driver’s door with a key, all vehicle doors will lock automatically. From the driver’s door, turn the key to
the left once to unlock the door and
once more within 4 seconds to unlock
all doors.
Doors can also be locked and unlocked with the transmitter.
Once the doors are unlocked, they may be opened by pulling the door handle.
When closing the door, push the door by hand. Make sure the doors are
closed securely.
✽ ✽ NOTICE
• In cold and wet climates, door lock
and door mechanisms may not work
properly due to freezing conditions.
• If the door is locked/unlocked multi- ple times in rapid succession with
either the vehicle key or door lock
switch, the system may stop operating
temporarily in order to protect the
circuit and prevent damage to system
components. To lock a door without the key, push the
inside door lock button (1) or central
door lock switch (2 ) to the “Lock” posi-
tion and close the door (3).
If you lock the door with the central door lock switch (2), all vehicle doors
will lock automatically.
✽ ✽ NOTICE
Always remove the ignition key, firmly
engage the parking brake, close all win-
dows and lock all doors when leaving
your vehicle unattended.
DOOR LOCKS
OAM049004
OCM040007
Type BOAM049003
Type A
Unlock
Lock
WARNING
If you don't close the door
securely, the door may open
again.
Be careful that someone's body and hands are not trapped when
closing the door.
Page 105 of 356

433
Features of your vehicle
D140100AHM
Inside rearview mirror
Adjust the rearview mirror so that the
center view through the rear window is
seen. Make this adjustment before you
start driving.
D140101AHM
Day/night rearview mirror (if equipped)
Make this adjustment before you start
driving and while the day/night lever is in
the day position.
Pull the day/night lever toward you to
reduce the glare from the headlights of
the vehicles behind you during night driv-
ing.
Remember that you lose some rearviewclarity in the night position.
D140102AHM-EE-C1
Electric chromic mirror (ECM) (if equipped)
The electric rearview mirror automatical-
ly controls the glare from the headlights
of the vehicles behind you in nighttime or
low light driving conditions. The sensor
mounted in the mirror senses the light
level around the vehicle, and automati-
cally controls the headlight glare from the
vehicles behind you.
When the engine is running, the glare is
automatically controlled by the sensor
mounted in the rearview mirror.
Whenever the shift lever is shifted into
reverse (R), the mirror will automatically
go to the brightest setting in order to
improve the drivers view behind the vehi-
cle.
MIRRORS
WARNING - Rear visibility
Do not place objects in the rear
seat or cargo area which would
interfere with your vision through
the rear window.
CAUTION
When cleaning the mirror, use apaper towel or similar materialdampened with glass cleaner. Donot spray glass cleaner directly on the mirror. It may cause the liquidcleaner to enter the mirror housing.
OAM049023
Day
Night
WARNING
Do not modify the inside mirror and
do not install a wide mirror. It could
result in injury, during an accident
or deployment of the air bag.
Page 108 of 356
Features of your vehicle
36
4
D140202AHM-EU
Folding the outside rearview mirror
To fold the outside rearview mirror, grasp
the housing of the mirror and then fold it
toward the rear of the vehicle.
CAUTION
The mirrors stop moving when
they reach the maximum adjust-ing angles, but the motor contin-ues to operate while the switch isdepressed. Do not depress the switch longer than necessary, themotor may be damaged.
Do not attempt to adjust the out- side rearview mirror by hand.Doing so may damage the parts.
OAM049028
Page 111 of 356

439
Features of your vehicle
When the door is opened, or if the engine
is not started within 1 minute, the
tachometer pointer may move slightly in
the ON position with the engine OFF.
This movement is normal and will not
affect the accuracy of the tachometer
once the engine is running.
D150203AUN
Engine temperature gauge
This gauge shows the temperature of the
engine coolant when the ignition switch
is ON.
Do not continue driving with an overheat-
ed engine. If your vehicle overheats, refer
to “If the engine overheats” in section 6.
CAUTION
If the gauge pointer moves beyondthe normal range area toward the“H” position, it indicates overheat- ing that may damage the engine.
CAUTION
Do not operate the engine withinthe tachometer's RED ZONE.
This may cause severe engine dam-age.
WARNING
Never remove the radiator cap
when the engine is hot. The engine
coolant is under pressure and
could cause severe burns. Wait
until the engine is cool before
adding coolant to the reservoir.OAM049033
OAM040033
Type A
Type B
Page 120 of 356

Features of your vehicle
48
4
D150308AHM-EE
Parking brake & brake
fluid warning light
Parking brake warning
This light is illuminated when the parking
brake is applied with the ignition switch in
the START or ON position. The warning
light should go off after a few seconds
when the parking brake is released.
Low brake fluid level warning
If the warning light remains on, it may
indicate that the brake fluid level in the
reservoir is low.
If the warning light remains on:
1. Drive carefully to the nearest safe location and stop your vehicle.
2. With the engine stopped, check the brake fluid level immediately and add
fluid as required. Then check all brake
components for fluid leaks.
3. Do not drive the vehicle if leaks are found, the warning light remains on or
the brakes do not operate properly.
Have the vehicle towed to any author-
ized KIA dealer for a brake system
inspection and necessary repairs. Your vehicle is equipped with dual-diago-
nal braking systems. This means you still
have braking on two wheels even if one
of the brake circuits is damaged or mal-
functions. With only one of the circuits
working, more than normal pedal travel
and greater pedal pressure are required
to stop the vehicle. Also, the vehicle will
not stop in as short a distance with only
a portion of the brake system working. If
the brakes fail while you are driving, shift
to a lower gear for additional engine
braking and stop the vehicle as soon as
it is safe to do so.
To check bulb operation, check whether
the parking brake and brake fluid warning
light illuminates when the ignition switch
is in the ON position.
WARNING
Driving the vehicle with a warning
light on is dangerous. If the brake
warning light remains on, have the
brakes checked and repaired imme-
diately by an authorized KIA dealer.
CAUTION
If the oil pressure warning light
stays on while the engine is run-ning, serious engine damage mayresult. The oil pressure warninglight comes on whenever there is insufficient oil pressure. In normaloperation, it should come on whenthe ignition switch is turned on,then go out when the engine isstarted. If the oil pressure warninglight stays on while the engine isrunning, there is a serious malfunc-tion.
If this happens, stop the vehicle assoon as it is safe to do so, turn off the engine and check the oil level. Ifthe oil level is low, fill the engine oilto the proper level and start theengine again. If the light stays onwith the engine running, turn theengine off immediately. In anyinstance where the oil light stays onwhen the engine is running, theengine should be checked by an authorized KIA dealer before thevehicle is driven again.
Page 131 of 356
459
Features of your vehicle
D190402AHM
Headlight position ( )
When the light switch is in the headlight
position (2nd position), the head, tail,
license and instrument panel lights will
turn ON.
✽ ✽NOTICE
The ignition switch must be in the ON
position to turn on the headlights.
D190500AUN
High beam operation
To turn on the high beam headlights,
push the lever away from you. Pull it back
for low beams.
The high beam indicator will light when
the headlight high beams are switched
on.
To prevent the battery from being dis-
charged, do not leave the lights on for a
prolonged time while the engine is not
running. To flash the headlights, pull the lever
towards you. It will return to the normal
(low beam) position when released. The
headlight switch does not need to be on
to use this flashing feature.
OAM049042OAM049044OAM049043
WARNING
Do not use high beam when there
are other vehicles. Using high
beam could obstruct the other dri-
ver's vision.
Page 135 of 356

463
Features of your vehicle
D200100AAM
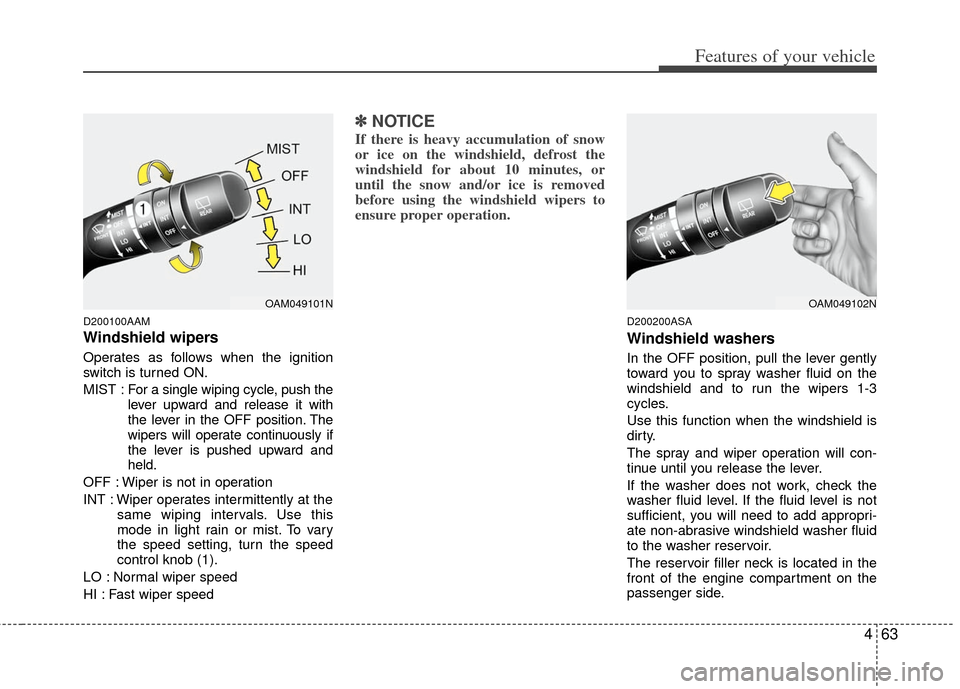
Windshield wipers
Operates as follows when the ignition
switch is turned ON.
MIST : For a single wiping cycle, push the
lever upward and release it with
the lever in the OFF position. The
wipers will operate continuously if
the lever is pushed upward and
held.
OFF : Wiper is not in operation
INT : Wiper operates intermittently at the same wiping intervals. Use this
mode in light rain or mist. To vary
the speed setting, turn the speed
control knob (1).
LO : Normal wiper speed
HI : Fast wiper speed
✽ ✽ NOTICE
If there is heavy accumulation of snow
or ice on the windshield, defrost the
windshield for about 10 minutes, or
until the snow and/or ice is removed
before using the windshield wipers to
ensure proper operation.
D200200ASA
Windshield washers
In the OFF position, pull the lever gently
toward you to spray washer fluid on the
windshield and to run the wipers 1-3
cycles.
Use this function when the windshield is
dirty.
The spray and wiper operation will con-
tinue until you release the lever.
If the washer does not work, check the
washer fluid level. If the fluid level is not
sufficient, you will need to add appropri-
ate non-abrasive windshield washer fluid
to the washer reservoir.
The reservoir filler neck is located in the
front of the engine compartment on the
passenger side.
OAM049101NOAM049102N
Page 142 of 356

Features of your vehicle
70
4
D230101AAM
Mode selection
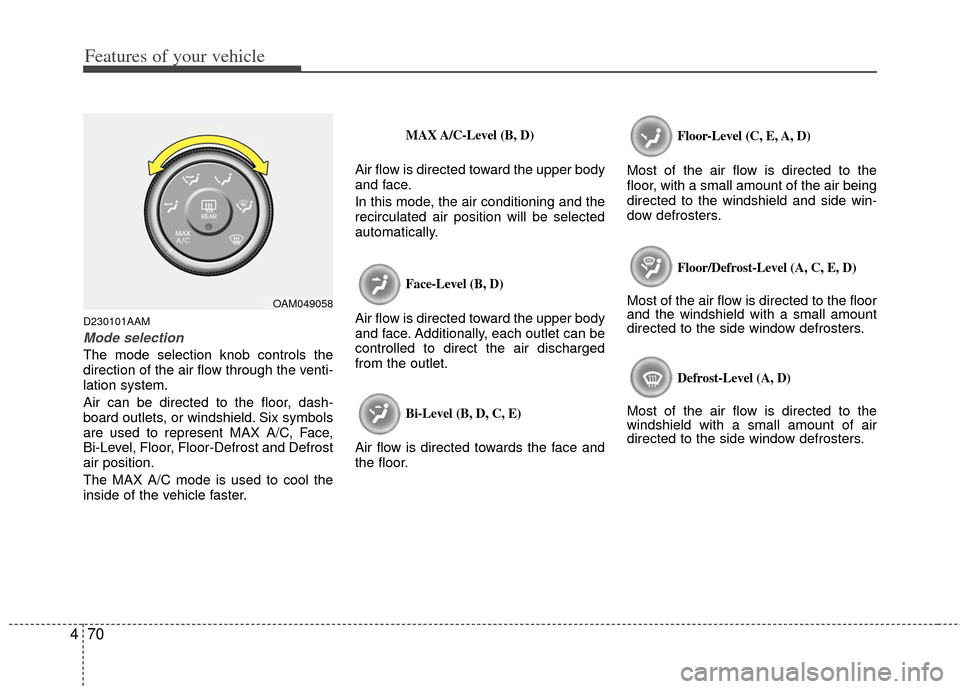
The mode selection knob controls the
direction of the air flow through the venti-
lation system.
Air can be directed to the floor, dash-
board outlets, or windshield. Six symbols
are used to represent MAX A/C, Face,
Bi-Level, Floor, Floor-Defrost and Defrost
air position.
The MAX A/C mode is used to cool the
inside of the vehicle faster.
MAX A/C-Level (B, D)
Air flow is directed toward the upper body
and face.
In this mode, the air conditioning and the
recirculated air position will be selected
automatically.
Face-Level (B, D)
Air flow is directed toward the upper body
and face. Additionally, each outlet can be
controlled to direct the air discharged
from the outlet.
Bi-Level (B, D, C, E)
Air flow is directed towards the face and
the floor.
Floor-Level (C, E, A, D)
Most of the air flow is directed to the
floor, with a small amount of the air being
directed to the windshield and side win-
dow defrosters.
Floor/Defrost-Level (A, C, E, D)
Most of the air flow is directed to the floor
and the windshield with a small amount
directed to the side window defrosters.
Defrost-Level (A, D)
Most of the air flow is directed to the
windshield with a small amount of air
directed to the side window defrosters.
OAM049058