2011 KIA Soul ECO mode
[x] Cancel search: ECO modePage 116 of 356

Features of your vehicle
44
4
✽
✽
NOTICE
• If the vehicle is not on level ground or
the battery power has been interrupt-
ed, the “Distance to empty” function
may not operate correctly.
The trip computer may not register
additional fuel if less than 6 liters (1.6
gallons) of fuel are added to the vehi-
cle.
• The fuel consumption and distance to empty values may vary significantly
based on driving conditions, driving
habits, and condition of the vehicle.
• The distance to empty value is an esti- mate of the available driving distance.
This value may differ from the actual
driving distance available.
ECOMINDERTMINDICATOR
ECO ON/OFF mode (if equipped)
You can turn the ECOMINDER
TMindica-
tor on/off on the instrument cluster in this
mode. If you push the TRIP button more than 1
second in the ECO ON mode, ECOMIN-
DER
TMOFF is displayed in the screen
and the ECO indicator turns off.
If you want to display the ECO indicator
again, press the TRIP button more than 1
second in the ECO OFF mode and then
ECO ON mode is displayed in the
screen.
When you press the TRIP button less
than 1 second in the ECO mode, the
mode is changed to odometer.
D150300AAM
Warnings and indicators
All warning lights are checked by turning
the ignition switch ON (do not start the
engine). Any light that does not illuminate
should be checked by an authorized KIA
dealer.
After starting the engine, check to make
sure that all warning lights are off. If any
warning lights are still on, this indicates a
situation that needs attention. When
releasing the parking brake, the brake
system warning light should go off. The
fuel warning light will stay on if the fuel
level is low.
OAM049105N
Type A
OAM040277
Type B
Page 117 of 356

445
Features of your vehicle
D150301AAM-EU
ECOMINDERTMindicator
(if equipped)
The ECOMINDERTMindicator is a system
that helps you to drive economically.
It is displayed if you drive fuel efficiently
to help you improve fuel efficiency.
The ECOMINDER
TMindicator (green)
will turn on when you are driving fuel
efficiently in the ECO ON mode.
If you don't want the indicator dis-
played, you can turn the ECO ON
mode to OFF mode by pressing the
TRIP button.
As per ECO ON/OFF Mode operation,
refer to the previous page.
The fuel-efficiency can be changed by the driver's driving habit and road con-
dition.
It doesn't work at the condition which doesn't meet economical driving such
as P (Park), and N (Neutral), R
(Reverse).
D150302AUN
Air bag warning light
This warning light will illuminate for
approximately 6 seconds each time you
turn the ignition switch to the ON posi-
tion.
This light also comes on when the
Supplemental Restraint System (SRS) is
not working properly. If the AIR BAG
warning light does not come on, or con-
tinuously remains on after operating for
about 6 seconds when you turned the
ignition switch to the ON position or start-
ed the engine, or if it comes on while
driving, have the SRS inspected by an
authorized KIA dealer.
ECOECOMINDERTM WARNING
Don't keep watching the “ECO”
ECOMINDERTM indicator while driv-
ing. It may distract you while driving
and cause an accident that could
result in severe personal injury.
Page 147 of 356
475
Features of your vehicle
Air conditioning system operation tips
If the vehicle has been parked in directsunlight during hot weather, open the
windows for a short time to let the hot
air inside the vehicle escape.
To help reduce moisture inside of the windows on rainy or humid days,
decrease the humidity inside the vehi-
cle by operating the air conditioning
system.
During air conditioning system opera- tion, you may occasionally notice a
slight change in engine speed as the
air conditioning compressor cycles.
This is a normal system operation
characteristic.
Use the air conditioning system every month only for a few minutes to ensure
maximum system performance. When using the air conditioning sys-
tem, you may notice clear water drip-
ping (or even puddling) on the ground
under the passenger side of the vehi-
cle. This is a normal system operation
characteristic.
Operating the air conditioning system in the recirculated air position provides
maximum cooling, however, continual
operation in this mode may cause the
air inside the vehicle to become stale.
During cooling operation, you may occasionally notice a misty air flow
because of rapid cooling and humid air
intake. This is a normal system opera-
tion characteristic.
D230300AHM-EC
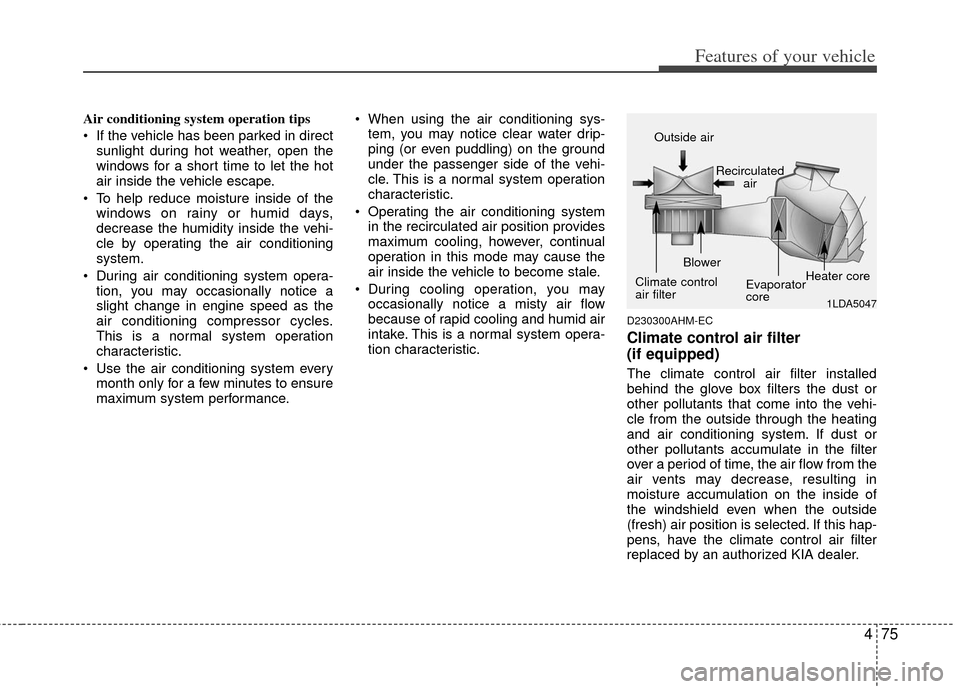
Climate control air filter
(if equipped)
The climate control air filter installed
behind the glove box filters the dust or
other pollutants that come into the vehi-
cle from the outside through the heating
and air conditioning system. If dust or
other pollutants accumulate in the filter
over a period of time, the air flow from the
air vents may decrease, resulting in
moisture accumulation on the inside of
the windshield even when the outside
(fresh) air position is selected. If this hap-
pens, have the climate control air filter
replaced by an authorized KIA dealer.
1LDA5047
Outside air
Recirculatedair
Climate control
air filter Blower
Evaporator
coreHeater core
Page 153 of 356
481
Features of your vehicle
Temperature conversion
If the battery has been discharged or dis-
connected, the temperature mode dis-
play will reset to Centigrade.
This is normal condition. You can switch
the temperature mode between
Centigrade to Fahrenheit as follows;
While depressing the AUTO button,
depress the OFF button for 3 seconds or
more. The display will change from
Centigrade to Fahrenheit, or from
Fahrenheit to Centigrade.
D240203AFD
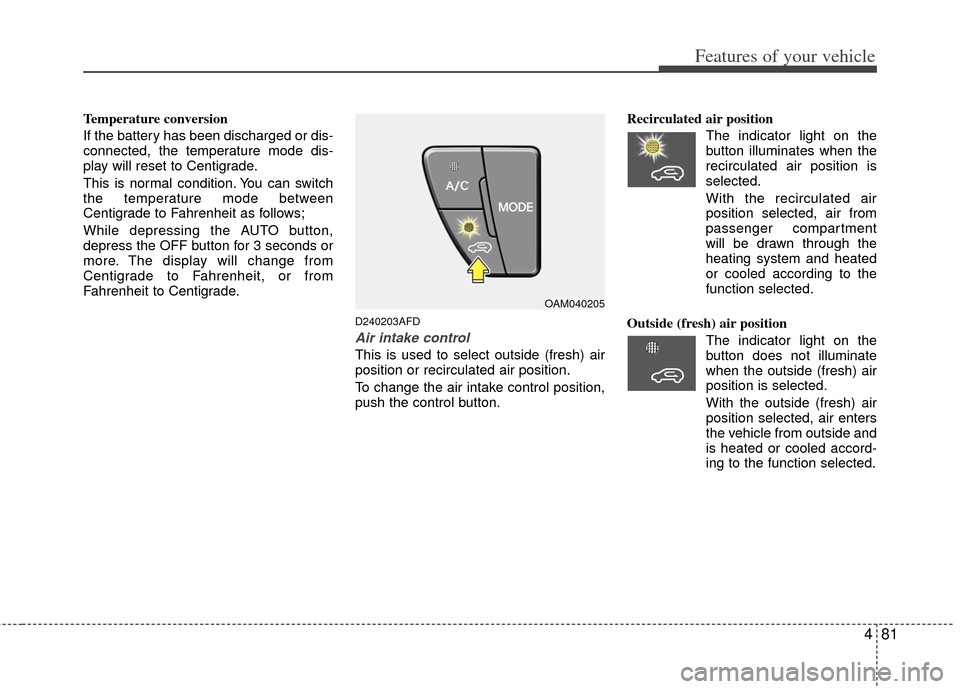
Air intake control
This is used to select outside (fresh) air
position or recirculated air position.
To change the air intake control position,
push the control button.Recirculated air position
The indicator light on the
button illuminates when the
recirculated air position is
selected.
With the recirculated air position selected, air from
passenger compartment
will be drawn through the
heating system and heated
or cooled according to the
function selected.
Outside (fresh) air position The indicator light on the
button does not illuminate
when the outside (fresh) air
position is selected.
With the outside (fresh) air
position selected, air enters
the vehicle from outside and
is heated or cooled accord-
ing to the function selected.
OAM040205
Page 158 of 356
Features of your vehicle
86
4
D250300AUN-U1
Defogging logic
To reduce the possibility of fogging up
the inside of the windshield, the air intake
or air conditioning are controlled auto-
matically according to certain conditions
such as or position. To cancel or
return to the defogging logic, do the fol-
lowing.
D250301AUN
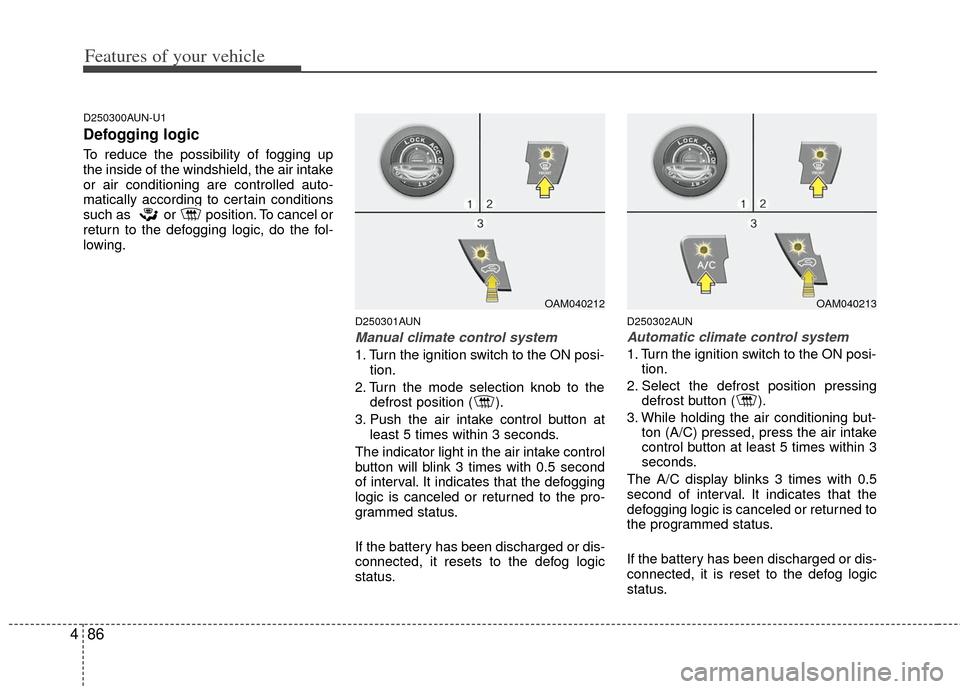
Manual climate control system
1. Turn the ignition switch to the ON posi-
tion.
2. Turn the mode selection knob to the defrost position ( ).
3. Push the air intake control button at least 5 times within 3 seconds.
The indicator light in the air intake control
button will blink 3 times with 0.5 second
of interval. It indicates that the defogging
logic is canceled or returned to the pro-
grammed status.
If the battery has been discharged or dis-
connected, it resets to the defog logic
status.
D250302AUN
Automatic climate control system
1. Turn the ignition switch to the ON posi- tion.
2. Select the defrost position pressing defrost button ( ).
3. While holding the air conditioning but- ton (A/C) pressed, press the air intake
control button at least 5 times within 3
seconds.
The A/C display blinks 3 times with 0.5
second of interval. It indicates that the
defogging logic is canceled or returned to
the programmed status.
If the battery has been discharged or dis-
connected, it is reset to the defog logic
status.
OAM040212OAM040213
Page 167 of 356
495
Features of your vehicle
D300200BUN-AM
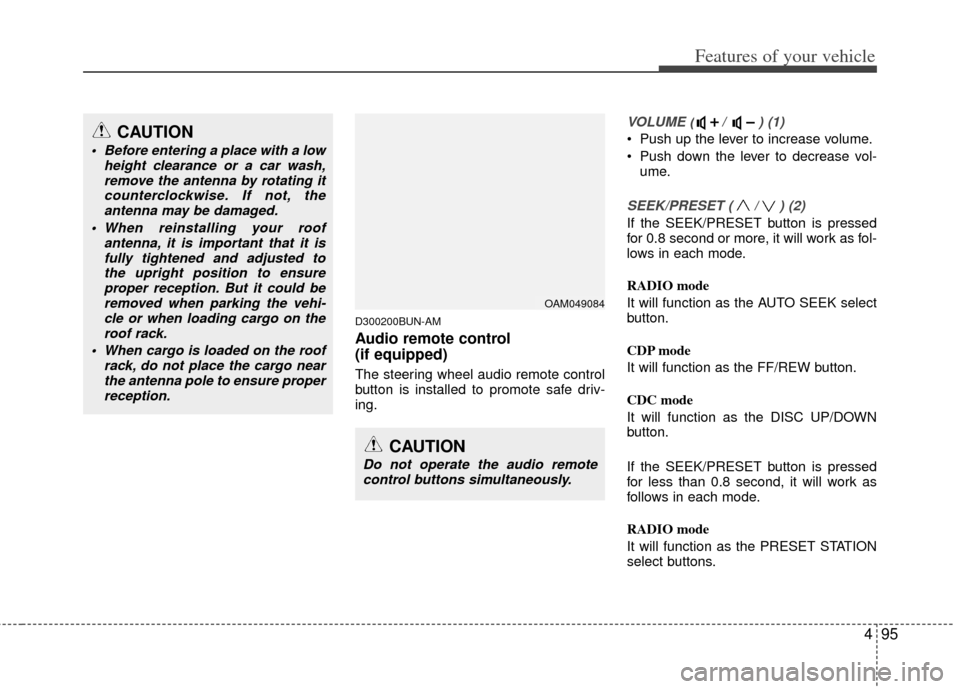
Audio remote control
(if equipped)
The steering wheel audio remote control
button is installed to promote safe driv-
ing.
VOLUME ( / ) (1)
• Push up the lever to increase volume.
Push down the lever to decrease vol-ume.
SEEK/PRESET ( / ) (2)
If the SEEK/PRESET button is pressed
for 0.8 second or more, it will work as fol-
lows in each mode.
RADIO mode
It will function as the AUTO SEEK select
button.
CDP mode
It will function as the FF/REW button.
CDC mode
It will function as the DISC UP/DOWN
button.
If the SEEK/PRESET button is pressed
for less than 0.8 second, it will work as
follows in each mode.
RADIO mode
It will function as the PRESET STATION
select buttons.
OAM049084
CAUTION
Do not operate the audio remotecontrol buttons simultaneously.
CAUTION
Before entering a place with a low height clearance or a car wash,remove the antenna by rotating itcounterclockwise. If not, theantenna may be damaged.
When reinstalling your roof antenna, it is important that it isfully tightened and adjusted tothe upright position to ensureproper reception. But it could beremoved when parking the vehi-cle or when loading cargo on theroof rack.
When cargo is loaded on the roof rack, do not place the cargo nearthe antenna pole to ensure properreception.
Page 174 of 356

Features of your vehicle
102
4
1. FM/AM Selection ButtonTurns to FM or AM mode, and toggles in
the order of FM1
➟ FM2 ➟ AM ➟ FM1...
when the button is pressed each time.
2. CD/AUX Selection Button
If there is a CD in the CDP DECK it turns
to CD mode. If a device is connected to
AUX, then it toggles in the order of CD
➟AUX ➟CD... when the button is pressed
each time. (It will not turn to AUX if there
is no auxiliary device connected.)
3. Power ON/OFF Button & Volume Control Knob
Turns on/off the set when the IGNITION
SWITCH is on ACC or ON. If the button
is turned to the right, it increases the vol-
ume and left, decreases the volume.
4. Automatic Channel SelectionButton
] button is pressed,
it reduces the band frequency by
200kHz to automatically select a chan-
nel. Stops at the previous frequency if
no channel is found. ] button is pressed,
it increases the band frequency by
200kHz to automatically select a chan-
nel. Stops at the previous frequency if no
channel is found.
5. SCAN Button
If this button is pressed, the frequencies
will become increased and receive the
corresponding broadcasts. This function
will play the frequencies for 5 seconds
(SIRIUS MODE:10 seconds) each and
find other broadcasts as the frequency
increases. Press the button again when
desiring to continue listening to the cur-
rently playing broadcast.
6. SETUP Button & Clock Control Button
Press this button to turn to the SIRIUS
option and the other adjustment mode.
If no action is taken for 5 seconds after
pressing the button, it will return to the
play mode. (After entering SETUP mode,
move between items using the left, right
and PUSH functions of the [TUNE]
knob.)
■ PA710 AMAB is an internal AMP
MODEL with Bluetooth®feature.
The setup changes in the order of
CLOCK
↔ SAT ↔ SCROLL ↔ P.BASS↔ RETURN ↔ TEMP ↔PHONE ↔SDVC ↔ CLOCK...
■ PA710 AMA is an internal AMP MODEL
without Bluetooth®feature.
The setup changes in the order of
CLOCK
↔ SAT ↔ SCROLL ↔ P.BASS↔ TEMP ↔ SDVC ↔ CLOCK...
■ PA715 AMAB is an external AMP
MODEL with Bluetooth®feature.
The setup changes in the order of
CLOCK
↔ SAT ↔ SCROLL ↔ TEMP ↔PHONE ↔ SDVC ↔ CLOCK...
■ PA715 AMA is an external AMP MODEL
without Bluetooth®feature.
The setup changes in the order of
CLOCK
↔ SAT ↔ SCROLL ↔ RETURN↔ TEMP ↔ SDVC ↔ CLOCK...
Page 178 of 356
Features of your vehicle
106
4
1. CD Loading Slot
Please face printed side upward and gen-
tly push in. When the ignition switch is on
ACC or ON and power is off, power is auto-
matically turned on if the CD is loaded.
This CDP supports only 12 cm CD. If VCD
or Data CD are loaded, a "Reading Error"
message will be displayed and the CD will
be ejected.
2. CD Eject Button
Push button to eject the CD during
CD playback. This button is enabled
when ignition switch is off.
3. CD/AUX Selection Button
switches to AUX mode from the other
mode to play the sounds from the aux-
iliary player.
and if a device is connected to AUX
then it toggles in the order of CD
➟AUX➟CD... when the button is pressed
each time.(It will not turn to AUX if the
auxiliary device is not connected.)
then it displays the message "No
Media" for 3 seconds and returns to the
previous mode.
4. Automatic Track Selection Button
] button for less than
0.8 second to play from the beginning
of current song.
] button for less than 0.8 second and press again within 1
second to play the previous song.
Continue to press down the [TRACK ] button to initiate reverse direction high
speed sound search of current song.
] button for less than 0.8 second to play the next song.
Continue to press down the [TRACK ] button to initiate high speed sound
search of current song.
5. REPEAT Button
Repeats current song when the button is
pressed for less than 0.8 second.
Repeats the entire DISC when the button
is pressed for 0.8 second or longer.
(In the case of MP3, the Repeat function
will operate only within folder.)
6. RANDOM Play Button
Press this button for less than 0.8 second
to activate ‘RDM’ mode and longer than
0.8 second to activate ‘A.RDM’ mode.
Only files/tracks in a folder/disc are played back in a random sequence.
All files in a disc are played back in the random
sequence.
7. CD Indicator
When car ignition switch is ACC or ON
and if the CD is loaded, this indicator is
lighted. If the CD is ejected, the light is
turned off.
8. SCAN Play Button
Scans first 10 seconds of each song in
the DISC. To cancel the mode, press the
button once again.
9. INFO Button
Displays the information of the current
CD TRACK(FILE) in the order shown
below each time the button is pressed.
Disc Title
➟ Disc Artist ➟Tr a c k
Title ➟ Track Artist ➟Total Track...