Page 272 of 356

621
What to do in an emergency
10. To install the wheel, hold it on thestuds, put the wheel nuts on the
studs and tighten them finger
tight. Jiggle the tire to be sure it is
completely seated, then tighten
the nuts as much as possible
with your fingers again.
11. Lower the vehicle to the ground by turning the wheel nut wrench
counterclockwise.
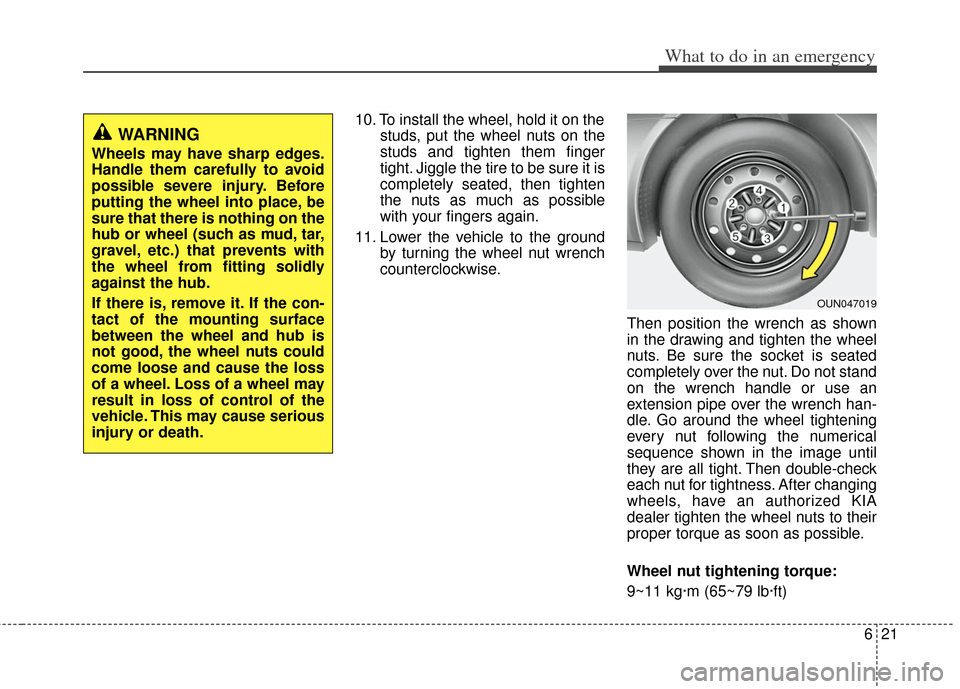
Then position the wrench as shown
in the drawing and tighten the wheel
nuts. Be sure the socket is seated
completely over the nut. Do not stand
on the wrench handle or use an
extension pipe over the wrench han-
dle. Go around the wheel tightening
every nut following the numerical
sequence shown in the image until
they are all tight. Then double-check
each nut for tightness. After changing
wheels, have an authorized KIA
dealer tighten the wheel nuts to their
proper torque as soon as possible.
Wheel nut tightening torque:
9~11 kg·m (65~79 lb·ft)
WARNING
Wheels may have sharp edges.
Handle them carefully to avoid
possible severe injury. Before
putting the wheel into place, be
sure that there is nothing on the
hub or wheel (such as mud, tar,
gravel, etc.) that prevents with
the wheel from fitting solidly
against the hub.
If there is, remove it. If the con-
tact of the mounting surface
between the wheel and hub is
not good, the wheel nuts could
come loose and cause the loss
of a wheel. Loss of a wheel may
result in loss of control of the
vehicle. This may cause serious
injury or death.
OUN047019
Page 277 of 356
What to do in an emergency
26
6
When towing your vehicle in an emer-
gency without wheel dollies :
1. Set the ignition switch in the ACC posi-
tion.
2. Place the transaxle shift lever in N (Neutral).
3. Release the parking brake.
F080200AAM
Removable towing hook (front)
(if equipped)
1. Remove the towing hook from the tool case.
2. Remove the hole cover pressing the lower part of the cover on the front
bumper. 3. Install the towing hook by turning it
clockwise into the hole until it is fully
secured.
4. Remove the towing hook and install the cover after use.
CAUTION
Failure to place the transaxle shiftlever in N (Neutral) may cause inter-nal damage to the transaxle.
OAM069010OAM069011
Page 279 of 356

What to do in an emergency
28
6
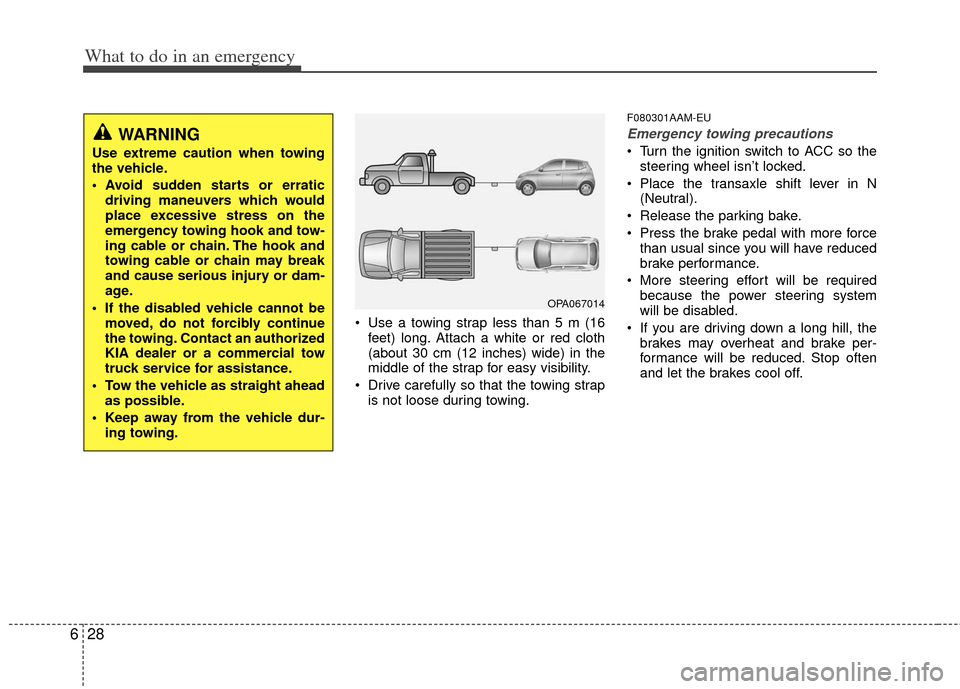
Use a towing strap less than 5 m (16
feet) long. Attach a white or red cloth
(about 30 cm (12 inches) wide) in the
middle of the strap for easy visibility.
Drive carefully so that the towing strap is not loose during towing.
F080301AAM-EU
Emergency towing precautions
Turn the ignition switch to ACC so thesteering wheel isn’t locked.
Place the transaxle shift lever in N (Neutral).
Release the parking bake.
Press the brake pedal with more force than usual since you will have reduced
brake performance.
More steering effort will be required because the power steering system
will be disabled.
If you are driving down a long hill, the brakes may overheat and brake per-
formance will be reduced. Stop often
and let the brakes cool off.
WARNING
Use extreme caution when towing
the vehicle.
driving maneuvers which would
place excessive stress on the
emergency towing hook and tow-
ing cable or chain. The hook and
towing cable or chain may break
and cause serious injury or dam-
age.
If the disabled vehicle cannot be moved, do not forcibly continue
the towing. Contact an authorized
KIA dealer or a commercial tow
truck service for assistance.
Tow the vehicle as straight ahead as possible.
Keep away from the vehicle dur- ing towing.
OPA067014
Page 280 of 356
629
What to do in an emergency
F080400AHM
Tie-down hook
(for flatbed towing, if equipped)
WARNING
Do not use the hooks under the
rear of the vehicle for towing pur-
poses. These hooks are designed
ONLY for transport tie-down. If the
tie-down hooks are used for tow-
ing, the tie-down hooks or rear
bumper will be damaged and this
could lead to serious injury.
CAUTION - Automatic
transaxle
If the vehicle is being towed with
all four wheels on the ground, itcan be towed only from the front.Be sure that the transaxle is inneutral. Do not tow at speeds greater than 25 mph (40 km/h)and for more than 15 mile (25 km).Be sure the steering wheel isunlocked by placing the ignitionswitch in the ACC position. Adriver must be in the towed vehi-cle to operate the steering wheeland brakes.
Before towing, check the auto- matic transaxle fluid leak underyour vehicle. If the automatictransaxle fluid is leaking, aflatbed equipment or towing dollymust be used.
OAM060017L
Page 286 of 356

Maintenance
67
G030102AAM
While operating your vehicle:
Note any changes in the sound of theexhaust or any smell of exhaust fumes
in the vehicle.
Check for vibrations in the steering wheel. Notice any increased steering
effort or looseness in the steering
wheel, or change in its straight-ahead
position.
Notice if your vehicle constantly turns slightly or “pulls” to one side when trav-
eling on smooth, level road.
When stopping, listen and check for unusual sounds, pulling to one side,
increased brake pedal travel or “hard-
to-push” brake pedal.
If any slipping or changes in the oper- ation of your transaxle occurs, check
the transaxle fluid level.
Check the automatic transaxle P (Park) function.
Check the parking brake.
Check for fluid leaks under your vehicle (water dripping from the air condition-
ing system during or after use is nor-
mal).
G030103AHM
At least monthly:
Check the coolant level in the enginecoolant reservoir.
Check the operation of all exterior lights, including the stoplights, turn sig-
nals and hazard warning flashers.
Check the inflation pressures of all tires including the spare.
G030104AHM
At least twice a year (i.e., every Spring and Fall):
Check the radiator, heater and air con- ditioning hoses for leaks or damage.
Check the windshield washer spray and wiper operation. Clean the wiper
blades with clean cloth dampened with
washer fluid.
Check the headlight alignment.
Check the muffler, exhaust pipes, shields and clamps.
Check the lap/shoulder belts for wear and function.
Check for worn tires and loose wheel lug nuts.
G030105AHM-C1
At least once a year:
Clean the body and door drain holes.
Lubricate the door hinges and checks,and hood hinges.
Lubricate the door and hood locks and latches.
Lubricate the door rubber weather- strips.
Check the air conditioning system.
Check the power steering fluid level.
Inspect and lubricate the automatic transaxle linkage and controls.
Clean the battery and terminals.
Check the brake/clutch fluid level.
Page 289 of 356
79
Maintenance
Chassis and body (Continued)
Kilometers or time in months, whichever comes first
× 1,000 km 8 16 24 32 40 48 56 64 72 80 88 96 104 112 120 128
# Months 4 8 12 16 20 24 28 32 36 40 44 48 52 56 60 64
Automatic transaxle fluid* (1) I I I I I I IIIIIRI III
Chassis & underbody bolts & nuts I I I I I I IIIIIII III
Tire condition & inflation pressure I I I I I I IIIIIII III
Wheel alignment (4)
Tire rotation
Steering operation & linkage I I I I I I IIIIIII III
Power steering fluid & lines* I I I IIIII
Driveshaft dust boots I I I I I
Seat belts, buckles & anchors I I I I I I IIIIIII III
Lock, hinges & hood latch L L L L L L LLLLLLL LLL
MAINTENANCE
INTERVALS
MAINTENANCE
ITEM
Inspect when abnormal condition noted
Rotate the tires every 12,000 km
* : if equipped
Page 295 of 356

715
Maintenance
G060200AHM
Changing the engine oil and filter
Have engine oil and filter changed by an
authorized KIA dealer according to the
Maintenance Schedule at the beginning
of this section.
G070000AHM
The high-pressure cooling system has a
reservoir filled with year round antifreeze
coolant. The reservoir is filled at the fac-
tory.
Check the antifreeze protection and
coolant level at least once a year, at the
beginning of the winter season, and
before traveling to a colder climate.
G070100AHM
Checking the coolant level
ENGINE COOLANT
WARNING- Removing
radiator cap
Never attempt to remove the radi-
ator cap while the engine is oper-
ating or hot. Doing so might lead
to cooling system and engine
damage. Also, hot coolant or
steam could cause serious per-
sonal injury.
Turn the engine off and wait until it cools down. Use extreme care
when removing the radiator cap.
Wrap a thick towel around it, and
turn it counterclockwise slowly to
the first stop. Step back while the
pressure is released from the
cooling system.
(Continued)
(Continued)When you are sure all the pres-
sure has been released, press
down on the cap, using a thick
towel, and continue turning coun-
terclockwise to remove it.
Even if the engine is not operat- ing, do not remove the radiator
cap or the drain plug while the
engine and radiator are hot. Hot
coolant and steam may still blow
out under pressure, causing seri-
ous injury.
WARNING
Used engine oil may cause skin irri-
tation or cancer if left in contact
with the skin for prolonged periods
of time. Used engine oil contains
chemicals that have caused cancer
in laboratory animals. Always pro-
tect your skin by washing your
hands thoroughly with soap and
warm water as soon as possible
after handling used oil.
WARNING
The electric motor (cooling fan) is
controlled by engine coolant tem-
perature, refrigerant pressure and
vehicle speed. It may sometimes
operate even when the engine is
not running. Use extreme caution
when working near the blades of
the cooling fan so that you are not
injured by a rotating fan blades. As
the engine coolant temperature
decreases, the electric motor will
automatically shut off. This is a nor-
mal condition.
Page 305 of 356
725
Maintenance
G180201AUN
Front windshield wiper blade
1. Raise the wiper arm and turn the wiperblade assembly to expose the plastic
locking clip. 2. Compress the clip and slide the blade
assembly downward.
3. Lift it off the arm. 4. Install the blade assembly in the
reverse order of removal.
1LDA50231JBA7037
CAUTION
Do not allow the wiper arm to fallagainst the windshield, since it maychip or crack the windshield.
1JBA7038