Page 113 of 394

Features of your vehicle
42
4
To train rolling code devices, follow these
instructions:
1. At the garage door opener receiver
(motor-head unit) in the garage, locate
the "learn" or "smart" button. This can
usually be found where the hanging
antenna wire is attached to the motor-
head unit. Exact location and color of
the button may vary by garage door
opener brand.
If there is difficulty locating the training
button, reference the device owner's
manual or please visit our Web site at
www.homelink.com.
2. Firmly press and release the "learn" or "smart" button (which activates the
"training light").
✽ ✽NOTICE
There are 30 seconds in which to initiate
step3.
3. Return to the vehicle, firmly press and
hold for two seconds the desired
HomeLink
®button then release.
Repeat the "press/hold/release"
sequence a second time to complete
the programming. (Some devices may
require you to repeat this sequence a
third time to complete the program-
ming.)
4. Press and hold the just-trained HomeLink
®button and observe the red
Status Indicator LED. If the indicator
light stays on constantly, programming
is complete and your device should
activate.
5. To program the remaining two HomeLink
®buttons, follow either steps
1 through 4 above for other Rolling
Code devices or steps 2 through 5 in
Standard Programming for standard
devices. Gate operator & Canadian program-
ming
During programming, your handheld
transmitter may automatically stop trans-
mitting. Continue to press the Integrated
HomeLink
®Wireless Control System but-
ton (note steps 2 through 4 in the
Standard Programming portion of this
document) while you press and re-press
("cycle") your handheld transmitter every
two seconds until the frequency signal
has been learned. The indicator light will
flash slowly and then rapidly after sever-
al seconds upon successful training.
Operating HomeLink
®
To operate, simply press and release the
programmed HomeLink®button.
Activation will now occur for the trained
device (i.e. garage door opener, gate
operator, security system, entry door
lock, home/office lighting, etc.). For con-
venience, the hand-held transmitter of
the device may also be used at any time.
Page 138 of 394

467
Features of your vehicle
Charging system warninglight
This warning light indicates a malfunction
of either the generator or electrical
charging system.
If the warning light illuminates while the
vehicle is in motion:
1. Drive to the nearest safe location.
2. With the engine off, check the genera- tor drive belt for looseness or break-
age.
3. If the belt is adjusted properly, a prob- lem exists somewhere in the electrical
charging system. Have an authorized
Kia dealer correct the problem as soon
as possible.
Trunk lid open warninglight
This warning light illuminates when the
trunk lid is not closed securely with the
engine start/stop button in any position.
Door ajar warning light
This warning light illuminates when a
door is not closed securely with the
engine start/stop button in any position.
Tail light indicator
This indicator illuminates when the tail
lights are on.
Immobilizer indicator
With smart key system
If any of the following occurs in a vehicle
equipped with the smart key, the immobi-
lizer indicator illuminates, blinks or the
light goes off.
When the smart key is in the vehicle, if the engine start/stop button is turned to
the ON position, the indicator will illumi-
nate until the engine is started. However,
when the smart key is not in the vehicle,
if the engine start/stop button is
depressed, the indicator will blink for a
few minutes to indicate that you will not
be able to start the hybrid system.
When the engine start/stop button is turned to the ON position and the indica-
tor turns off after 2 seconds, the system
may need repair. Have the vehicle
checked by an authorized Kia dealer.
When the battery is weak, if the engine start/stop button is depressed, the indica-
tor will blink and you will not be able to
start the hybrid system. However, you
may still be able to start the hybrid system
by inserting the smart key in the smart
key holder. If smart key system related
parts need repair, the indi cator blinks.
Page 147 of 394
Features of your vehicle
76
4
Door open
This indicator displays which door is
opened. Trunk open
This indicator displays when the trunk is
not closed securely.Illumination
The illumination intensity of the instru-
ment panel is shown when adjusting it
with the illumination control switch.
OTFH040096NOTFH040098NOTFH040097N
Page 165 of 394
Features of your vehicle
94
4
Room lamp
To turn the room lamp push lens (3).
Trunk room lamp (if equipped)
The trunk room lamp comes on when the
trunk is opened.
Glove box lamp (if equipped)
The glove box lamp comes on when the
glove box is opened.
The parking lights or headlights must be
ON for the glove box lamp to function.
OVG049111OTF040110
CAUTION
The trunk room lamp comes on as
long as the trunk lid opens. To pre- vent unnecessary charging systemdrain, close the trunk lid securelyafter using the trunk.
OTF040112
CAUTION
To prevent unnecessary chargingsystem drain, close the glove boxsecurely after using the glove box.
Page 182 of 394
4111
Features of your vehicle
These compartments can be used to
store small items.
To avoid possible theft, do not leave valu-
ables in the storage compartment.
Always keep the storage compartment
covers closed while driving. Do not
attempt to place so many items in the
storage compartment that the storage
compartment cover can not close
securely.
Center console storage
(if equipped)
To open the center console storage, pull
up the lever.
Glove box
To open the glove box, pull the handle
and the glove box will automatically
open. Close the glove box after use.
STORAGE COMPARTMENT
WARNING- Flammable
materials
Do not store, propane cylinders, or
other flammable/explosive materi-
als in the vehicle. These items may
catch fire and/or explode if the
vehicle is exposed to hot tempera-
tures for extended periods.
OTF040152N
OTF040171
OTF040153
Page 185 of 394

Features of your vehicle
114
4
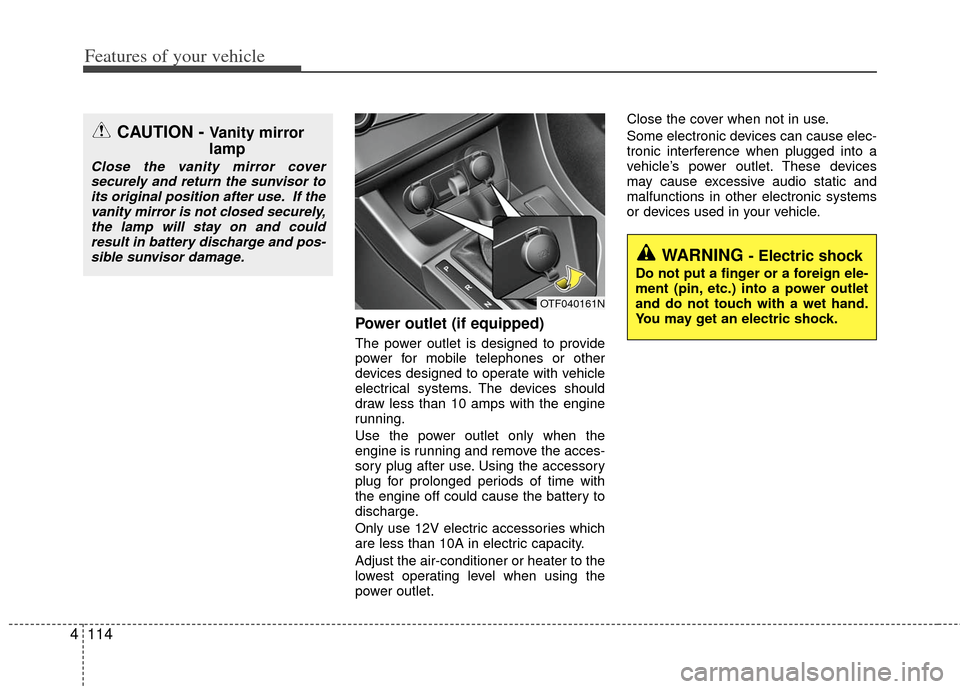
Power outlet (if equipped)
The power outlet is designed to provide
power for mobile telephones or other
devices designed to operate with vehicle
electrical systems. The devices should
draw less than 10 amps with the engine
running.
Use the power outlet only when the
engine is running and remove the acces-
sory plug after use. Using the accessory
plug for prolonged periods of time with
the engine off could cause the battery to
discharge.
Only use 12V electric accessories which
are less than 10A in electric capacity.
Adjust the air-conditioner or heater to the
lowest operating level when using the
power outlet. Close the cover when not in use.
Some electronic devices can cause elec-
tronic interference when plugged into a
vehicle’s power outlet. These devices
may cause excessive audio static and
malfunctions in other electronic systems
or devices used in your vehicle.
CAUTION - Vanity mirror
lamp
Close the vanity mirror cover
securely and return the sunvisor toits original position after use. If thevanity mirror is not closed securely,the lamp will stay on and could result in battery discharge and pos-sible sunvisor damage.
OTF040161N
WARNING - Electric shock
Do not put a finger or a foreign ele-
ment (pin, etc.) into a power outlet
and do not touch with a wet hand.
You may get an electric shock.
Page 187 of 394

Floor mat anchor(s)
When using a floor mat on the front floor
carpet, make sure it attaches to the floor
mat anchor(s) in your vehicle. This keeps
the floor mat from sliding forward.The following must be observed when
installing ANY floor mat to the vehicle.
Ensure that the floor mats are secure-
ly attached to the vehicle's floor mat
anchor(s) before driving the vehicle.
Do not use ANY floor mat that cannot be firmly attached to the vehicle's floor
mat anchors.
Do not stack floor mats on top of one another (e.g. all-weather rubber mat on
top of a carpeted floor mat). Only a sin-
gle floor mat should be installed in
each position.
IMPORTANT - Your vehicle was manu-
factured with driver's side floor mat
anchors that are designed to securely
hold the floor mat in place. To avoid any
interference with pedal operation, Kia
recommends that only the Kia floor mat
designed for use in your vehicle be
installed.
Navigation system (if equipped)
The navigation system ascertains the
present position of your vehicle by using
information from satellites and guides
you to the place you assign as the desti-
nation.
Detailed information for the navigation
system is described in a separately sup-
plied manual.
OEL049222
WARNING - After market floor mat
Do not install aftermarket floor
mats that are not capable of being
securely attached to the vehicle's
floor mat anchors. Unsecured floor
mats can interfere with pedal oper-
ation.
For driver’s sideFor passenger’s side
4116
Features of your vehicle
Page 217 of 394

Features of your vehicle
146
4
■Voice Recognition Activation
in the Bluetooth®wireless technology
System can be activated in the follow-
ing conditions:
- Button Activation
The voice recognition system will be
active when the button is pressed
and after the sound of a Beep.
- Active Listening The voice recognition system will be
active for a period of time when the
Voice Recognition system has asked
for a customer response.
from zero to nine while number greater
than ten will not be recognized.
tion mode in following cases : When
pressing the button and saying
“cancel” following the beep. When not
making a call and pressing the
button. When voice recognition has
failed 3 consecutive times.
will announce what commands are
available.
■Menu tree
The menu tree identifies available voice
recognition Bluetooth®wireless technol-
ogy functions.
✽
✽ Tip
■Voice Operation
To get the best performance out of the
Voice Recognition System, observe the
followings:
- Keep the interior of the vehicle as quiet as possible. Close the window
to eliminate surrounding noise
(traffic noise, vibration sounds,
etc), which may disturb recogniz-
ing the voice command correctly.
- Speak a command after a beep sound within 5 seconds. Otherwise
the command will not be received
properly.
- Speak in a natural voice without pausing between words.
- While receiving voice commands, press the button on the steer-
ing wheel remote controller to ter-
minate guidance. Voice command
will convert back to waiting mode
to allow the user to say a new voice
command.
Call [Name]Ex) Call John (at Home)
Ex) Dial 911
Dial [Number]
Redial
Call Back
Add entryPhonebook
Change name
Delete name
By phone
By voice
CallBy name
By number