Page 49 of 88

Flashing Lights With Lock• The turn signal lights flashing, when the doors are locked or unlocked, feature can be turned on or off. To turn this feature on or off:
• Press and hold the UNLOCK button for at least 4 seconds, but no longer than
10 seconds. Then, press and hold the LOCK button while still holding the
UNLOCK button.
• Release both buttons at the same time.
POWER INVERTER
• A 115 Volt, 150 Watt AC power inverter is located on the front of the center
console.
• This outlet can power cellular phones, electronics and other low power
devices requiring power up to 150
Watts.
• The power inverter switch is located on the instrument panel below the climate controls. To turn on the power outlet, press the switch once. The indicator light will
illuminate. Press the switch a second time to turn the power inverter outlet off.
NOTE: The power inverter is designed with built-in overload protection. If the power
rating of 150 Watts is exceeded, the power inverter will automatically shut down. Once
the electrical device has been removed from the outlet, the inverter should automatically
reset. If the power rating exceeds approximately 170 Watts, the power inverter may have
to be reset manually. To reset the inverter manually, unplug the device and plug it in
again. To avoid overloading the circuit, check the power ratings on electrical devices prior
to using the inverter.
WARNING!
To avoid being severely injured or killed: Do not use a three-prong adaptor. Do
not insert any objects into the receptacles. Do not touch with wet hands. Close
the lid when not in use. If this outlet is mishandled, it may cause an electric shock
and failure.
ELECTRONICS
47
Page 50 of 88
POWER OUTLETS
• There are three possible 12–Volt Power Outlets in this vehicle.
• The front power outlet, located in the lower portion of the instrument panel, ispowered when the key is in the ON or ACC position.
• A second power outlet is located inside the center console bin and is powered directly from the vehicle battery.
• On vehicles equipped with a rear subwoofer, there is a power outlet located in the right rear cargo area.
NOTE:
• Do not exceed the maximum power of 160 Watts (13 Amps) at 12 Volts. If the 160 Watt (13 Amp) power rating is exceeded the fuse protecting the system will need to be
replaced.
• Power outlets are designed for accessory plugs only. Do not insert any other object in the power outlet as this will damage the outlet and blow the fuse. Improper use of the
power outlet can cause damage not covered by your warranty.
ELECTRONICS
48
Page 51 of 88
, 4H (Four-wheel drive high
range), N (Neutral), and 4L
(Four-wheel drive low range).
�")
COMMAND-TRAC®/
ROCK-TRAC
®
• The transfer case provides four mode positions: 2H (Two-wheel drive high
range), 4H (Four-wheel drive high
range), N (Neutral), and 4L
(Four-wheel drive low range).
• The transfer case is intended to be driven in the 2H position for normal
street and highway conditions such
as hard-surfaced roads.
• Shifting between 2H and 4H can be made with the vehicle stopped or in
motion. Shift the transfer case lever
firmly to 4H at any speed up to
50 mph (80 km/h).
• Shifting between 4H and 4L can be made with the vehicle rolling at 2 to
3 mph (3 to 5 km/h). Shift the
automatic transmission into
NEUTRAL or fully depress the clutch
pedal on a manual transmission. Shift
the transfer case lever firmly to 4L (do
not pause with the transfer case in
NEUTRAL). Once the shift is
completed, place the automatic
transmission into DRIVE or release
the clutch pedal on a manual
transmission.
NOTE: To enhance off-road performance
in 4L mode, manual transmission vehicles will start regardless of whether or not the
clutch pedal is depressed.
AXLE LOCK (TRU-LOK®)
RUBICON ONLY
• The AXLE LOCK switch is located on the instrument panel (to the left of the
steering column).
• This feature will only activate when the following conditions are met:
• Key in ignition, vehicle in 4L (Low)
range.
• Vehicle speed at 10 mph (16 km/h) or less.
• Press the bottom of the AXLE LOCK switch once to lock the rear axle only
and a second time to lock the front
axle (the rear and front axle lock
indicator lights will illuminate).
• To unlock the axles, press the top of the AXLE LOCK switch.
• The indicator light will flash until the axles are fully locked or unlocked.
ELECTRONIC SWAY BAR
DISCONNECT – RUBICON
ONLY
Off-Road
• Press the SWAY BAR switch, locatedon the instrument panel (to the left of
the steering column), once to
disconnect the Sway Bar.
• The Sway Bar indicator light will illuminate in the instrument cluster.
On-Road
• Press the SWAY BAR switch asecond time to reconnect the Sway
Bar.
• The Sway Bar should remain in on-road mode during normal driving
conditions.
OFF-ROAD CAPABILITIES
49
Page 52 of 88

Engine/
Transmission Axle Model
GCWR (Gross
Combined Wt.
Rating) Frontal Area
Max. GTW (Gross
Trailer Wt.) Max. Trailer
Tongue Wt. (See
Note)
3.")
TRAILER TOWING WEIGHTS (MAXIMUM TRAILER WEIGHT RATINGS)
Engine/
Transmission Axle Model
GCWR (Gross
Combined Wt.
Rating) Frontal Area
Max. GTW (Gross
Trailer Wt.) Max. Trailer
Tongue Wt. (See
Note)
3.8L/Manual 3.21 Two–Door Sport Model (4WD)5,329 lbs (2 417 kg) 25 sq ft (2.32 sq m) 1,000 lbs (453 kg) 100 lbs (45 kg)
3.8L/Manual 3.73 Two–Door Sport Model (4WD)6,329 lbs (2 871 kg) 25 sq ft (2.32 sq m) 2,000 lbs (907 kg) 200 lbs (91 kg)
3.8L/
Automatic 3.73 Two–Door Sport
Model (4WD) 6,353 lbs (2 881 kg) 25 sq ft (2.32 sq m) 2,000 lbs (907 kg) 200 lbs (91 kg)
3.8L/Manual 3.21 Two–Door Sahara Model(4WD) 5,430 lbs (2 463 kg) 25 sq ft (2.32 sq m) 1,000 lbs (453 kg) 100 lbs (45 kg)
3.8L/Manual 3.73 Two–Door Sahara Model(4WD) 6,430 lbs (2 916 kg) 25 sq ft (2.32 sq m) 2,000 lbs (907 kg) 200 lbs (91 kg)
3.8L/
Automatic 3.73 Two–Door
Sahara Model(4WD) 6,454 lbs (2 927 kg) 25 sq ft (2.32 sq m) 2,000 lbs (907 kg) 200 lbs (91 kg)
3.8L/Manual 4.10 2–Door Rubicon Model (4WD)6,507 lbs (2 951 kg) 25 sq ft (2.32 sq m) 2,000 lbs (907 kg) 200 lbs (91 kg)
3.8L/
Automatic 4.10 Two–Door
Rubicon Model(4WD) 6,533 lbs (2 963 kg) 25 sq ft (2.32 sq m) 2,000 lbs (907 kg) 200 lbs (91 kg)
3.8L/Manual 3.21 Four–Door Sport Model (4WD)5,742 lbs (2 604 kg) 32 sq ft (2.97 sq m) 1,000 lbs (453 kg) 100 lbs (45 kg)
3.8L/Manual 3.73 Four–Door SportModel(4WD) 8,242 lbs (3 738 kg) 32 sq ft (2.97 sq m) 3,500 lbs (1 587 kg) 350 lbs (159 kg)
UTILITY
50
Page 53 of 88
 Frontal Area
Max. GTW (Gross
Trailer Wt.) Max. Trailer
Tongue Wt. (See
Note)
3.8L/
Automatic 3.73 Four–Door Sport
Model (4WD) 8,257 l")
Engine/
Transmission Axle Model
GCWR (Gross
Combined Wt.
Rating) Frontal Area
Max. GTW (Gross
Trailer Wt.) Max. Trailer
Tongue Wt. (See
Note)
3.8L/
Automatic 3.73 Four–Door Sport
Model (4WD) 8,257 lbs (3 745 kg) 32 sq ft (2.97 sq m) 3,500 lbs (1 587 kg) 350 lbs (159 kg)
3.8L/Manual 3.21 Four–Door Sahara Model(4WD) 5,782 lbs (2 623 kg) 32 sq ft (2.97 sq m) 1,000 lbs (453 kg) 100 lbs (45 kg)
3.8L/Manual 3.73 Four–Door Sahara Model(4WD) 8,282 lbs (3 757 kg) 32 sq ft (2.97 sq m) 3,500 lbs (1 587 kg) 350 lbs (159 kg)
3.8L/
Automatic 3.73 Four–Door
Sahara Model(4WD) 8,297 lbs (3 763 kg) 32 sq ft (2.97 sq m) 3,500 lbs (1 587 kg) 350 lbs (159 kg)
3.8L/Manual 4.10 Four–Door Rubicon Model(4WD) 8,406 lbs (3 813 kg) 32 sq ft (2.97 sq m) 3,500 lbs (1 587 kg) 350 lbs (159 kg)
3.8L/
Automatic 4.10 Four–Door
Rubicon Model(4WD) 8,431 lbs (3 824 kg) 32 sq ft (2.97 sq m) 3,500 lbs (1 587 kg) 350 lbs (159 kg)
Refer to local laws for maximum trailer towing speeds.
NOTE: The trailer tongue weight must be considered as part of the combined weight of occupants and cargo (ie. the GVWR),
and the GVWR should never exceed the weight referenced on the Tire and Loading Information placard.
UTILITY
51
Page 54 of 88

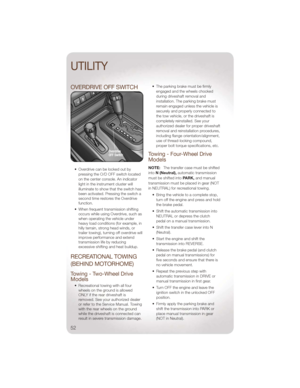
OVERDRIVE OFF SWITCH
• Overdrive can be locked out bypressing the O/D OFF switch located
on the center console. An indicator
light in the instrument cluster will
illuminate to show that the switch has
been activated. Pressing the switch a
second time restores the Overdrive
function.
• When frequent transmission shifting occurs while using Overdrive, such as
when operating the vehicle under
heavy load conditions (for example, in
hilly terrain, strong head winds, or
trailer towing), turning off overdrive will
improve performance and extend
transmission life by reducing
excessive shifting and heat buildup.
RECREATIONAL TOWING
(BEHIND MOTORHOME)
Towing - Two-Wheel Drive
Models
• Recreational towing with all fourwheels on the ground is allowed
ONLY if the rear driveshaft is
removed. See your authorized dealer
or refer to the Service Manual. Towing
with the rear wheels on the ground
while the driveshaft is connected can
result in severe transmission damage. • The parking brake must be firmly
engaged and the wheels chocked
during driveshaft removal and
installation. The parking brake must
remain engaged unless the vehicle is
securely and properly connected to
the tow vehicle, or the driveshaft is
completely reinstalled. See your
authorized dealer for proper driveshaft
removal and reinstallation procedures,
including flange orientation/alignment,
use of thread-locking compound,
proper bolt torque specifications, etc.
Towing - Four-Wheel Drive
Models
NOTE: The transfer case must be shifted
into N (Neutral), automatic transmission
must be shifted into PARK,and manual
transmission must be placed in gear (NOT
in NEUTRAL) for recreational towing.
• Bring the vehicle to a complete stop,turn off the engine and press and hold
the brake pedal.
• Shift the automatic transmission into NEUTRAL or depress the clutch
pedal on a manual transmission.
• Shift the transfer case lever into N (Neutral).
• Start the engine and shift the transmission into REVERSE.
• Release the brake pedal (and clutch pedal on manual transmissions) for
five seconds and ensure that there is
no vehicle movement.
• Repeat the previous step with automatic transmission in DRIVE or
manual transmission in first gear.
• Turn OFF the engine and leave the ignition switch in the unlocked OFF
position.
• Firmly apply the parking brake and shift the transmission into PARK or
place manual transmission in gear
(NOT in Neutral).
UTILITY
52
Page 55 of 88

• Attach the vehicle to the tow vehicleusing a suitable tow bar and release
the parking brake.
• Disconnect the negative battery cable, and secure it away from the
negative battery post.
• Refer to your Owner's Manual on the DVD for further details.
CAUTION!
• Front or rear wheel lifts should notbe used. Internal damage to the
transmission or transfer case will
occur if a front or rear wheel lift is
used when recreational towing.
• Tow only in the forward direction. Towing this vehicle backwards can
cause severe damage to the
transfer case.
• Automatic transmissions must be placed in the PARK position for
recreational towing.
• Manual transmissions must be placed in gear (not in Neutral) for
recreational towing.
• Before recreational towing, perform the procedure outlined under
“Shifting Into NEUTRAL” to be
certain that the transfer case is
fully in NEUTRAL. Otherwise,
internal damage will result.
(Continued)
CAUTION!(Continued)
• Towing this vehicle in violation ofthe above requirements can cause
severe transmission and/or transfer
case damage. Damage from
improper towing is not covered
under the New Vehicle Limited
Warranty.
• Do not use a bumper-mounted clamp-on tow bar on your vehicle.
The bumper face bar will be
damaged.
• It is necessary to follow these steps to be certain that the transfer
case is fully in N (Neutral) before
recreational towing to prevent
damage to internal parts.
WARNING!
• You or others could be injured ifyou leave the vehicle unattended
with the transfer case in the N
(Neutral) position without first fully
engaging the parking brake. The
transfer case N (Neutral) position
disengages both the front and rear
driveshafts from the powertrain
and will allow the vehicle to move,
even if the transmission is in PARK.
The parking brake should always
be applied when the driver is not in
the vehicle.
UTILITY
53
Page 56 of 88

24-HOUR TOWING ASSISTANCE
• Dial toll-free 1-800-521-2779 or 1-800-363-4869 for Canadian residents.
• Provide your name, vehicle identification number and license plate number.
• Provide your location, including telephone number, from which you are calling.
• Briefly describe the nature of the problem and answer a few simple questions.
• You will be given the name of the service provider and an estimated time of arrival. Ifyou feel you are in an “unsafe situation”, please let us know. With your consent, we
will contact local police or safety authorities.
INSTRUMENT CLUSTER WARNING LIGHTS
- Electronic Stability Control (ESC) Activation/MalfunctionIndicator Light
• If the “ESC Activation/Malfunction Indicator Light” comes on continuously with the
engine running, a malfunction has been detected in the ESC system. If this light
remains on after several ignition cycles, and the vehicle has been driven several
miles (kilometers) at speeds greater than 30 mph (48 km/h), we recommend you
drive to the nearest service center and have the vehicle serviced immediately.
• The “ESC Activation/Malfunction Indicator Light” starts to flash as soon as the tires lose traction and the ESC system becomes active. If the light begins to flash during
acceleration, ease up on the accelerator and apply as little throttle as possible. Be
sure to adapt your speed and driving to the prevailing road conditions. The light also
flashes when TCS is active. To improve the vehicle's traction when starting off in
deep snow, sand or gravel, it may be desirable to switch the ESC system to Partial
Off mode by momentarily pressing the ESC Off
switch.
- Tire Pressure Monitoring System (TPMS) Light
• Each tire, including the spare (if provided), should be checked monthly, when coldand inflated to the inflation pressure recommended by the vehicle manufacturer on
the vehicle placard or tire inflation pressure label. (If your vehicle has tires of a
different size than the size indicated on the vehicle placard or tire inflation pressure
label, you should determine the proper tire inflation pressure for those tires.)
• As an added safety feature, your vehicle has been equipped with a Tire Pressure Monitoring System (TPMS) that illuminates a low tire pressure telltale when one or
more of your tires is significantly under-inflated. Accordingly, when the low tire
pressure telltale illuminates, you should stop and check your tires as soon as
possible, and inflate them to the proper pressure. Driving on a significantly
under-inflated tire causes the tire to overheat and can lead to tire failure.
Under-inflation also reduces fuel efficiency and tire tread life, and may affect the
vehicle’s handling and stopping ability.
• IF THE LIGHT STARTS FLASHING INDICATING A LOW TIRE PRESSURE,
ADJUST THE AIR PRESSURE IN THE LOW TIRE TO THE AIR PRESSURE
SHOWN ON THE VEHICLE PLACARD OR TIRE INFLATION PRESSURE
LABEL LOCATED ON THE DRIVER'S DOOR. NOTE: AFTER INFLATION, THE
VEHICLE MAY NEED TO BE DRIVEN FOR 20 MINUTES BEFORE THE
FLASHING LIGHT WILL TURN OFF.
WHAT TO DO IN EMERGENCIES
54