Page 91 of 603

•Always make sure that objects cannot fall into the
driver footwell while the vehicle is moving. Ob-
jects can become trapped under the brake pedal
and accelerator pedal causing")
WARNING! (Continued)
•Always make sure that objects cannot fall into the
driver footwell while the vehicle is moving. Ob-
jects can become trapped under the brake pedal
and accelerator pedal causing a loss of vehicle
control.
•If required, mounting posts must be properly
installed, if not equipped from the factory.
Failure to properly follow floor mat installation or
mounting can cause interference with the brake
pedal and accelerator pedal operation causing loss
of control of the vehicle.
Periodic Safety Checks You Should Make Outside
The Vehicle
Tires
Examine tires for excessive tread wear and uneven wear
patterns. Check for stones, nails, glass, or other objectslodged in the tread or sidewall. Inspect the tread for cuts
and cracks. Inspect sidewalls for cuts, cracks and bulges.
Check the wheel nuts for tightness. Check the tires
(including spare) for proper cold inflation pressure.
Lights
Have someone observe the operation of exterior lights
while you work the controls. Check turn signal and high
beam indicator lights on the instrument panel.
Door Latches
Check for positive closing, latching, and locking.
Fluid Leaks
Check area under vehicle after overnight parking for fuel,
engine coolant, oil, or other fluid leaks. Also, if gasoline
fumes are detected or if fuel, power steering fluid, or
brake fluid leaks are suspected, the cause should be
located and corrected immediately.
2
THINGS TO KNOW BEFORE STARTING YOUR VEHICLE 89
Page 210 of 603
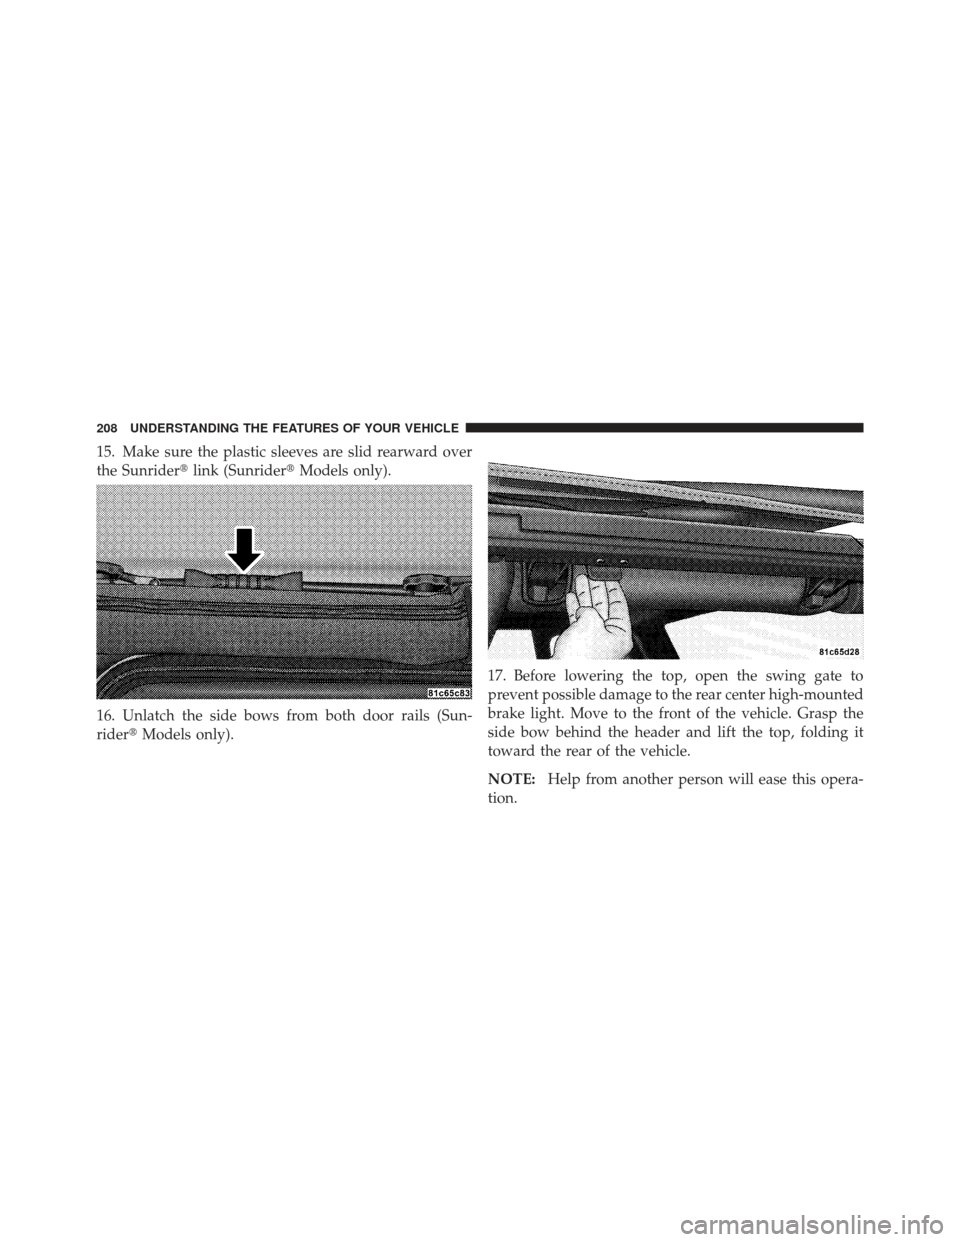
15. Make sure the plastic sleeves are slid rearward over
the Sunrider�link (Sunrider� Models only).
16. Unlatch the side bows from both door rails (Sun-
rider� Models only). 17. Before lowering the top, open the swing gate to
prevent possible damage to the rear center high-mounted
brake light. Move to the front of the vehicle. Grasp the
side bow behind the header and lift the top, folding it
toward the rear of the vehicle.
NOTE:
Help from another person will ease this opera-
tion.
208 UNDERSTANDING THE FEATURES OF YOUR VEHICLE
Page 238 of 603
17. Release the side bows by pressing down on the latch
above the front of the rear door. Push the top rearward to
disengage. Repeat this step on the other side.
18. Before lowering the top, open the swing gate to
prevent possible damage to the rear center high-mounted
brake light. Grasp the folded side bows and slide the top
along the door frame track to the rear door frame.19. Gently slide the side bows off the door frame track
and lower the top down into the vehicle.
NOTE:
Help from another person will ease this opera-
tion.
236 UNDERSTANDING THE FEATURES OF YOUR VEHICLE
Page 270 of 603

11. Brake Warning LightThis light monitors various brake functions,
including brake fluid level and parking brake
application. If the brake light turns on it may
indicate that the parking brake is applied, that
the brake fluid level is low, or that there is a problem with
the anti-lock brake system reservoir.
If the light remains on when the parking brake has been
disengaged, and the fluid level is at the full mark on the
master cylinder reservoir, it indicates a possible brake
hydraulic system malfunction or that a problem with the
Brake Booster has been detected by the Anti-Lock Brake
System (ABS) / Electronic Stability Control (ESC) system.
In this case, the light will remain on until the condition
has been corrected. If the problem is related to the brake
booster, the ABS pump will run when applying the brake
and a brake pedal pulsation may be felt during each stop. The dual brake system provides a reserve braking capac-
ity in the event of a failure to a portion of the hydraulic
system. A leak in either half of the dual brake system is
indicated by the Brake Warning Light, which will turn on
when the brake fluid level in the master cylinder has
dropped below a specified level.
The light will remain on until the cause is corrected.
NOTE:
The light may flash momentarily during sharp
cornering maneuvers, which change fluid level condi-
tions. The vehicle should have service performed, and
the brake fluid level checked.
If brake failure is indicated, immediate repair is neces-
sary.
268 UNDERSTANDING YOUR INSTRUMENT PANEL
Page 271 of 603

WARNING!
Driving a vehicle with the red brake light on is
dangerous. Part of the brake system may have failed.
It will take longer to stop the vehicle. You could have
a collision. Have the vehicle checked immediately.
Vehicles equipped with the Anti-Lock Brake System
(ABS), are also equipped with Electronic Brake Force
Distribution (EBD). In the event of an EBD failure, the
Brake Warning Light will turn on along with the ABS
Light. Immediate repair to the ABS system is required.
Operation of the Brake Warning Light can be checked by
turning the ignition switch from the OFF position to the
ON/RUN position. The light should illuminate for ap-
proximately two seconds. The light should then turn off
unless the parking brake is applied or a brake fault is
detected. If the light does not illuminate, have the light
inspected by an authorized dealer. The light also will turn on when the parking brake is
applied with the ignition switch in the ON/RUN posi-
tion.
NOTE:
This light shows only that the parking brake is
applied. It does not show the degree of brake application.
12. Anti-Lock Brake (ABS) Light After the ignition is turned on, the Anti-Lock
Brake System (ABS) light illuminates to indicate
function check at vehicle start-up. If the light remains on
after start-up or comes on and stays on at road speeds, it
may indicate that the ABS has detected a malfunction or
has become inoperative. The system reverts to standard
non-anti-lock brakes.
If both the Brake Warning Light and the ABS Warning
Light are on, see an authorized dealer immediately. Refer
to “Anti-Lock Brake System” in “Starting And Operat-
ing”.
4
UNDERSTANDING YOUR INSTRUMENT PANEL 269
Page 369 of 603
 .............. 411
▫ Hill Start Assist (HSA) ................ 412
▫ Electronic Roll Mitigation (ERM) ......... 416
▫ Electronic Stability Control (ESC) ......... 417")
▫Brake Assist System (BAS) .............. 411
▫ Hill Start Assist (HSA) ................ 412
▫ Electronic Roll Mitigation (ERM) ......... 416
▫ Electronic Stability Control (ESC) ......... 417
▫ ESC Activation/Malfunction Indicator Light
And ESC Off Indicator Light ............ 422
▫ Trailer Sway Control (TSC) ............. 423
▫ Hill Descent Control (HDC) – If Equipped . . 424
� Tire Safety Information ................. 426
▫ Tire Markings ....................... 426
▫ Tire Identification Number (TIN) ......... 429
▫ Tire Terminology And Definitions ......... 430
▫ Tire Loading And Tire Pressure .......... 431�
Tires — General Information ............. 436
▫ Tire Pressure ....................... 436
▫ Tire Inflation Pressures ................ 437
▫ Tire Pressures For High-Speed Operation . . . 438
▫ Radial-Ply Tires ..................... 439
▫ Spare Tire Matching Original Equipped Tire
And Wheel – If Equipped .............. 439
▫ Compact Spare Tire – If Equipped ........ 440
▫ Full Size Spare – If Equipped ............ 440
▫ Limited-Use Spare – If Equipped ......... 441
▫ Tire Spinning ....................... 441
▫ Tread Wear Indicators ................. 442
▫ Life Of Tire ........................ 443
5
STARTING AND OPERATING 367
Page 372 of 603

STARTING PROCEDURES
Before starting your vehicle, adjust your seat, adjust both
inside and outside mirrors, and fasten your seat belts.
WARNING!
Never leave children in the vehicle alone. Leaving
unattended children in a vehicle is dangerous for a
number of reasons. The child or others could be
seriously or fatally injured. The child could operate
power windows, other controls or move the vehicle.
Manual Transmission – If Equipped
Apply the parking brake, place the shift lever in NEU-
TRAL, and press the clutch pedal before starting the
vehicle. This vehicle is equipped with a clutch interlock-
ing ignition system. It will not start unless the clutch
pedal is pressed to the floor.Four-Wheel Drive Models Only
In 4L mode, this vehicle will start regardless of whether
or not the clutch pedal is pressed to the floor. This feature
enhances off-road performance by allowing the vehicle to
start when in 4L without having to press the clutch pedal.
The “4WD Indicator Light” will illuminate when the
transfer case has been shifted into this mode.
Automatic Transmission – If Equipped
Start the vehicle with the shift lever in the PARK position
(vehicle can also be started in NEUTRAL). Apply the
brake before shifting to any driving range.
Normal Starting
NOTE:
Normal starting of either a cold or a warm
engine is obtained without pumping or pressing the
accelerator pedal.
370 STARTING AND OPERATING
Page 396 of 603
 Range
When off-road driving, shift into 4L (Low) fo")
WARNING!
Always wear your seat belt and firmly tie down
cargo. Unsecured cargo can become projectiles in an
off-road situation.
When To Use 4L (Low) Range
When off-road driving, shift into 4L (Low) for additional
traction and control on slippery or difficult terrain,
ascending or descending steep hills, and to increase low
speed pulling power. This range should be limited to
extreme situations such as deep snow, mud, steep in-
clines, or sand where additional low speed pulling power
is needed. Vehicle speeds in excess of 25 mph (40 km/h)
should be avoided when in 4L (Low) range.
Simultaneous Brake And Throttle Operation
Many off-road driving conditions require the simultane-
ous use of the brake and throttle (two-footed driving).
When climbing rocks, logs, or other stepped objects,using light brake pressure with light throttle will keep the
vehicle from jerking or lurching. This technique is also
used when you need to stop and restart a vehicle on a
steep incline.
Driving In Snow, Mud And Sand
Snow
In heavy snow or for additional control and traction at
slower speeds, shift the transmission into a low gear and
the transfer case into 4L (Low) if necessary. Do not shift to
a lower gear than necessary to maintain headway. Over-
revving the engine can spin the wheels and traction will
be lost. If you start to slow to a stop, try turning your
steering wheel no more than a 1/4 turn quickly back and
forth, while still applying throttle. This will allow the
tires to get a fresh
�bite�and help maintain your momen-
tum.
394 STARTING AND OPERATING