Page 256 of 603

•Do not drive your vehicle unless the windshield is
securely fastened, either up or down.
•Eye protection, such as goggles, should be worn at
all times when the windshield is")
WARNING! (Continued)
•Do not drive your vehicle unless the windshield is
securely fastened, either up or down.
•Eye protection, such as goggles, should be worn at
all times when the windshield is down.
•Be sure that you carefully follow the instructions
for raising the windshield. Make sure that the
folding windshield, windshield wipers, side bars,
and all associated hardware and fasteners are
correctly and tightly assembled before driving
your vehicle. Failure to follow these instructions
may prevent your vehicle from providing you and
your passengers protection in some accidents.
•If you remove the doors, store them outside the
vehicle. In the event of an accident, a loose door
may cause personal injury.
Lowering The Windshield And Removing Side
Bars
1. Lower the fabric top or remove the hard top following
the instructions in this manual.
NOTE:To assist in properly reinstalling side bars, mark
the original locations prior to removing.
2. Remove the two top hex bolts (13 mm), and the one
side hex bolt (13 mm) visible through the trim (Do not
remove plastic corner trim, sun visor bolts, or sport bar
covering).
254 UNDERSTANDING THE FEATURES OF YOUR VEHICLE
Page 258 of 603

CAUTION!
Do not remove the head impact foam from the side
bars, as damage to the foam may result.
NOTE: Store all of the mounting bolts in their original
threaded holes and tighten for safekeeping.
8. Remove the side bar assembly, and reattach the sport
bar Velcro� covering.
9. To safely store the side bars in your vehicle, use four
cinch straps (available from your authorized dealer).
Attach the straps through the slots located on the floor
behind the folded rear seat at the front of the storage bin
cover.
WARNING!
You or others could be injured if you carry the side
bars loose in your vehicle. Remove the side bars from
the vehicle or securely store them as described or
they may cause personal injury if an accident occurs.
See your authorized dealer for the cinch straps.
10. Remove the windshield wiper arms by first pulling
the wiper away from the windshield and out to the
“lock” position. Unsnap the wiper arm nut caps, and
remove the retaining nuts. Lift the wiper arms off and
store them in the center console or securely behind the
rear seat.
NOTE: It may be necessary to use a battery terminal
puller tool in order to separate the wiper arms from the
shaft after the nuts have been removed.
256 UNDERSTANDING THE FEATURES OF YOUR VEHICLE
Page 259 of 603
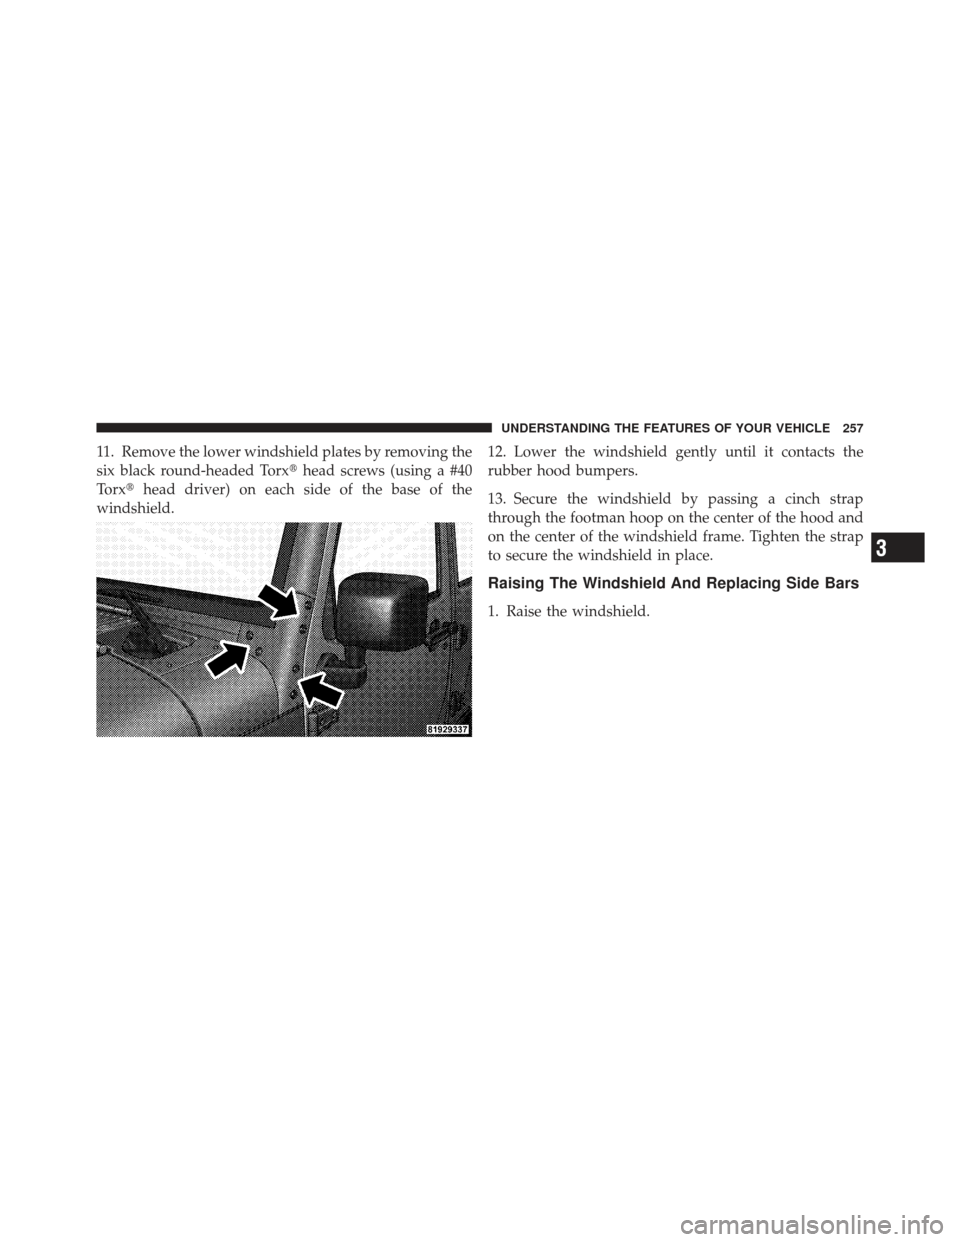
11. Remove the lower windshield plates by removing the
six black round-headed Torx�head screws (using a #40
Torx� head driver) on each side of the base of the
windshield. 12. Lower the windshield gently until it contacts the
rubber hood bumpers.
13. Secure the windshield by passing a cinch strap
through the footman hoop on the center of the hood and
on the center of the windshield frame. Tighten the strap
to secure the windshield in place.
Raising The Windshield And Replacing Side Bars
1. Raise the windshield.
3
UNDERSTANDING THE FEATURES OF YOUR VEHICLE 257
Page 273 of 603

17. Vehicle Security Light — If EquippedThis light will flash at a fast rate for approxi-
mately 15 seconds, when the vehicle security
alarm is arming, and then will flash slowly
until the vehicle is disarmed.
18. Temperature Gauge
The temperature gauge shows engine coolant tempera-
ture. Any reading within the normal range indicates that
the engine cooling system is operating satisfactorily.
The gauge pointer will likely indicate a higher tempera-
ture when driving in hot weather, up mountain grades,
or when towing a trailer. It should not be allowed to
exceed the upper limits of the normal operating range.CAUTION!
Driving with a hot engine cooling system could
damage your vehicle. If the temperature gauge reads
“H” pull over and stop the vehicle. Idle the vehicle
with the air conditioner turned off until the pointer
drops back into the normal range. If the pointer
remains on the “H” and you hear continuous chimes,
turn the engine off immediately and call an autho-
rized dealership for service.
4
UNDERSTANDING YOUR INSTRUMENT PANEL 271
Page 396 of 603
 Range
When off-road driving, shift into 4L (Low) fo")
WARNING!
Always wear your seat belt and firmly tie down
cargo. Unsecured cargo can become projectiles in an
off-road situation.
When To Use 4L (Low) Range
When off-road driving, shift into 4L (Low) for additional
traction and control on slippery or difficult terrain,
ascending or descending steep hills, and to increase low
speed pulling power. This range should be limited to
extreme situations such as deep snow, mud, steep in-
clines, or sand where additional low speed pulling power
is needed. Vehicle speeds in excess of 25 mph (40 km/h)
should be avoided when in 4L (Low) range.
Simultaneous Brake And Throttle Operation
Many off-road driving conditions require the simultane-
ous use of the brake and throttle (two-footed driving).
When climbing rocks, logs, or other stepped objects,using light brake pressure with light throttle will keep the
vehicle from jerking or lurching. This technique is also
used when you need to stop and restart a vehicle on a
steep incline.
Driving In Snow, Mud And Sand
Snow
In heavy snow or for additional control and traction at
slower speeds, shift the transmission into a low gear and
the transfer case into 4L (Low) if necessary. Do not shift to
a lower gear than necessary to maintain headway. Over-
revving the engine can spin the wheels and traction will
be lost. If you start to slow to a stop, try turning your
steering wheel no more than a 1/4 turn quickly back and
forth, while still applying throttle. This will allow the
tires to get a fresh
�bite�and help maintain your momen-
tum.
394 STARTING AND OPERATING
Page 463 of 603

The entire vehicle should first be weighed on a commer-
cial scale to ensure that the GVWR has not been ex-
ceeded. The weight on the front and rear of the vehicle
should then be determined separately to be sure that the
load is properly distributed over front and rear axle.
Weighing the vehicle may show that the GAWR of either
the front or rear axles has been exceeded, but the total
load is within the specified GVWR. If so, weight must be
shifted from front to rear, or rear to front, as appropriate
until the specified weight limitations are met. Store the
heavier items down low and be sure that the weight is
distributed equally. Stow all loose items securely before
driving.
Improper weight distributions can have an adverse affect
on the way your vehicle steers and handles, and the way
the brakes operate.CAUTION!
Do not load your vehicle any heavier than the GVWR
or the maximum front and rear GAWR. If you do,
parts on your vehicle can break, or it can change the
way your vehicle handles. This could cause you to
lose control. Also, overloading can shorten the life of
your vehicle.
TRAILER TOWING
In this section, you will find safety tips and information
on limits to the type of towing you can reasonably do
with your vehicle. Before towing a trailer, carefully
review this information to tow your load as efficiently
and safely as possible.
To maintain warranty coverage, follow the requirements
and recommendations in this Owner’s Manual concern-
ing vehicles used for trailer towing.
5
STARTING AND OPERATING 461
Page 474 of 603

•Make certain that the load is secured in the trailer
and will not shift during travel. When trailering
cargo that is not fully secured, dynamic load shifts
can occur that may b")
WARNING! (Continued)
•Make certain that the load is secured in the trailer
and will not shift during travel. When trailering
cargo that is not fully secured, dynamic load shifts
can occur that may be difficult for the driver to
control. You could lose control of your vehicle and
have a collision.
•When hauling cargo or towing a trailer, do not
overload your vehicle or trailer. Overloading can
cause a loss of control, poor performance or dam-
age to the brakes, axle, engine, transmission, steer-
ing, suspension, chassis structure or tires.
•Safety chains must always be used between your
vehicle and trailer. Always connect the chains to
the frame or hook retainers of the vehicle hitch.
Cross the chains under the trailer tongue and
allow enough slack for turning corners.(Continued)
WARNING! (Continued)
•Vehicles with trailers should not be parked on a
grade. When parking, apply the parking brake on
the tow vehicle. Put the tow vehicle automatic
transmission in PARK. With a manual transmis-
sion, shift the transmission into first gear. And
with four-wheel-drive vehicles, make sure the
transfer case is not in N (Neutral). Always, block
or�chock� the trailer wheels.
•GCWR must not be exceeded.
•Total weight must be distributed between the tow
vehicle and the trailer such that the following four
ratings are not exceeded:
1. GVWR
2. GTW
3. GAWR
(Continued)
472 STARTING AND OPERATING
Page 483 of 603
 for five seconds and ensure that there is
no vehicle movement.
9. Repeat steps 7 and 8 with automatic transmission in
DRIVE or man")
8. Release the brake pedal (and clutch pedal on manual
transmissions) for five seconds and ensure that there is
no vehicle movement.
9. Repeat steps 7 and 8 with automatic transmission in
DRIVE or manual transmission in first gear.
10. Turn OFF the engine and leave the ignition switch in
the unlocked OFF position.
11. Firmly apply the parking brake.
12. Shift the transmission into PARK or place manual
transmission in gear (NOT in Neutral).
CAUTION!
Damage to the transmission may occur if the trans-
mission is shifted into PARK with the transfer case in
N (Neutral) and the engine running. With the trans-
fer case in N (Neutral) ensure that the engine is OFF
prior to shifting the transmission into PARK.13. Attach the vehicle to the tow vehicle using a suitable
tow bar.
14. Release the parking brake.
15. Disconnect the negative battery cable, and secure it
away from the negative battery post.
Shifting Out of Neutral (N)
Use the following procedure to prepare your vehicle for
normal usage.
1. Bring the vehicle to a complete stop, leaving it con-
nected to the tow vehicle.
2. Firmly apply the parking brake.
3. Reconnect the negative battery cable.
4. Turn the ignition key/fob to the LOCK/OFF position
(if it has been moved or the engine has been started).
5
STARTING AND OPERATING 481