Page 145 of 542
Front Seat — Manual Recline
To recline the seatback, lean forward slightly and lift the
lever. Then lean back to the position desired and release
the lever. To return the seatback to its normal upright
position, lean forward and lift the lever. Release the lever
once the seatback is in the upright position.WARNING!
Do not ride with the seatback reclined so that the
shoulder belt is no longer resting against your chest.
In a collision you could slide under the seat belt,
which could result in serious injury or death.
Recline Lever
3
UNDERSTANDING THE FEATURES OF YOUR VEHICLE 143
Page 151 of 542
•Refer to “Occupant Restraints” in “Things To Know
Before Starting Your Vehicle” for information on tether
routing.
WARNING!
Driving a vehicle with the head restraints removed or
improperly adjusted could cause serious injury or
death in the event of a collision. The head restraints
should be checked prior to operating the vehicle and
never adjusted while the vehicle is in motion.
60/40 Split Folding Rear Seat With Fold-Flat
Feature
To provide additional storage area, each rear seat can be
folded flat. This allows for extended cargo space and still
maintains some rear seating room.
NOTE:Prior to folding the rear seat, it may be necessary
to position the front seat to its mid-track position. Also, be sure that the front seats are fully upright and posi-
tioned forward. This will allow the rear seat to fold down
easily.
WARNING!
•It is extremely dangerous to ride in a cargo area,
inside or outside of a vehicle. In a collision, people
riding in these areas are more likely to be seri-
ously injured or killed.
•Do not allow people to ride in any area of your
vehicle that is not equipped with seats and seat
belts.
•Be sure everyone in your vehicle is in a seat and
using a seat belt properly.
To Lower The Rear Seat
1. Locate the release strap on the lower outboard side of
each rear seatback.
3
UNDERSTANDING THE FEATURES OF YOUR VEHICLE 149
Page 153 of 542
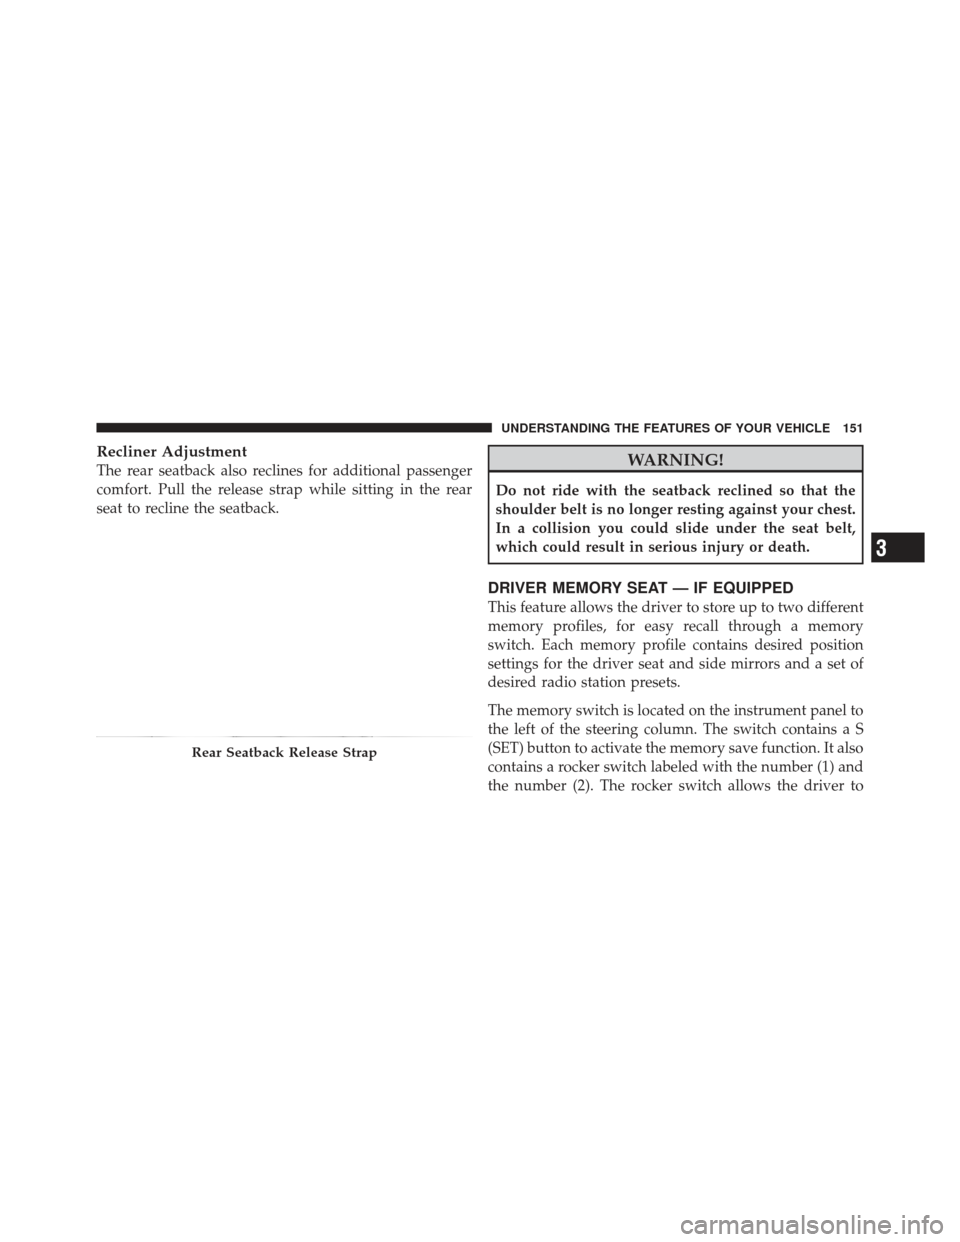
Recliner Adjustment
The rear seatback also reclines for additional passenger
comfort. Pull the release strap while sitting in the rear
seat to recline the seatback.WARNING!
Do not ride with the seatback reclined so that the
shoulder belt is no longer resting against your chest.
In a collision you could slide under the seat belt,
which could result in serious injury or death.
DRIVER MEMORY SEAT — IF EQUIPPED
This feature allows the driver to store up to two different
memory profiles, for easy recall through a memory
switch. Each memory profile contains desired position
settings for the driver seat and side mirrors and a set of
desired radio station presets.
The memory switch is located on the instrument panel to
the left of the steering column. The switch contains a S
(SET) button to activate the memory save function. It also
contains a rocker switch labeled with the number (1) and
the number (2). The rocker switch allows the driver to
Rear Seatback Release Strap
3
UNDERSTANDING THE FEATURES OF YOUR VEHICLE 151
Page 192 of 542
POWER SUNROOF — IF EQUIPPED
The power sunroof switch is located between the sun
visors on the overhead console.WARNING!
•Never leave unattended children in a vehicle with
the key in the ignition switch. Occupants, particu-
larly unattended children, can become entrapped
by the power sunroof while operating the power
sunroof switch. Such entrapment may result in
serious injury or death.
•In a collision, there is a greater risk of being
thrown from a vehicle with an open sunroof. You
could also be seriously injured or killed. Always
fasten your seat belt properly and make sure all
passengers are properly secured too.
•Do not allow small children to operate the sun-
roof. Never allow your fingers, other body parts, or
any object to project through the sunroof opening.
Injury may result.
Power Sunroof Switch
190 UNDERSTANDING THE FEATURES OF YOUR VEHICLE
Page 196 of 542
CAUTION! (Continued)
•Opening the Sky Slider™ when damp, wet, or
dirty can cause stains, mildew, and damage to the
soft-top material and the inside of your vehicle.
Make sure the Sky Slider™ is dry before opening.
•Always close the Sky Slider™ when leaving your
vehicle, damage to the vehicle interior can occur.
•Do not leave the Sky Slider™ open for several
weeks at a time. Close it occasionally to prevent
discoloration in the folds of the fabric and to allow
the creases to smooth out. This is especially im-
portant if the Sky Slider™ was opened when not
completely dry.
WARNING!
Failure to follow these warnings can result in injuries
that are serious or fatal to you, your passengers, and
others around you:
•In an accident, there is a greater risk of being
thrown from a vehicle with the Sky Slider™ open.
Always fasten your seat belt properly and make
sure all passengers are properly secured too.
•Before operating the Sky Slider™ make sure that
no moving parts of the Sky Slider™ can injure a
person or animal.
•Never place any extremities (hands, feet, etc.) near
the Sky Slider™ components or the roof area
while operating the Sky Slider™.(Continued)
194 UNDERSTANDING THE FEATURES OF YOUR VEHICLE
Page 209 of 542
WARNING!
•Cargo tie-downs are not safe anchors for a child
seat tether strap. In a sudden stop or accident, a
tie-down could pull loose and allow the child seat
to come loose. A child could be badly injured. Use
only the anchors provided for child seat tethers.
•To help protect against personal injury, passengers
should not be seated in the rear cargo area. The
rear cargo space is intended for load carrying
purposes only, not for passengers, who should sit
in seats and use seat belts.
WARNING!
The weight and position of cargo and passengers can
change the vehicle center of gravity and vehicle
handling. To avoid loss of control resulting in per-
sonal injury, follow these guidelines for loading your
vehicle:
•Do not carry loads that exceed the load limits
described on the label attached to the left door or
left door center pillar.
•Always place cargo evenly on the cargo floor. Put
heavier objects as low and as far forward as
possible.
•Place as much cargo as possible in front of the rear
axle. Too much weight or improperly placed
weight over or behind the rear axle can cause the
vehicle to sway.(Continued)
3
UNDERSTANDING THE FEATURES OF YOUR VEHICLE 207
Page 234 of 542

CHAngE OIL Message (Base And Mid Line Clusters
Only)
Your vehicle is equipped with an engine oil change
indicator system. The “CHANgE OIL” message will flash
in the instrument cluster odometer for approximately
12 seconds after a single chime has sounded to indicate
the next scheduled oil change interval. The engine oil
change indicator system is duty cycle based, which
means the engine oil change interval may fluctuate
dependent upon your personal driving style.
Unless reset, this message will continue to display each
time you turn the ignition switch to the ON/RUN
position. To turn off the message temporarily, press and
release the Trip Odometer button on the instrument
cluster. To reset the oil change indicator system (after
performing the scheduled maintenance) perform the
following procedure:1. Turn the ignition switch to the ON/RUN position.
Do not start the engine. 2. Fully depress the accelerator pedal slowly three
times within 10 seconds.
3. Turn the ignition switch to the LOCK position.
NOTE: If the indicator message illuminates when you
start the vehicle, the oil change indicator system did not
reset. If necessary, repeat this procedure.
28. Cruise Indicator — If Equipped This indicator lights when the electronic speed
control system is turned on.
29. Shift Lever Indicator
The Shift Lever Indicator is self-contained within the
instrument cluster. It displays the gear position of the
automatic transmission.
30. Seat Belt Reminder Light When the ignition switch is first turned to ON/
RUN, this light will turn on for four to eight
seconds as a bulb check. During the bulb check, if
232 UNDERSTANDING YOUR INSTRUMENT PANEL
Page 235 of 542
the driver’s seat belt is unbuckled, a chime will sound.
After the bulb check or when driving, if the driver seat
belt remains unbuckled, the Seat Belt Warning Light will
flash or remain on continuously. Refer to “Occupant
Restraints” in “Things To Know Before Starting Your
Vehicle” for further information.
31. Brake Warning LightThis light monitors various brake functions,
including brake fluid level and parking brake
application. If the brake light turns on it may
indicate that the parking brake is applied, that
the brake fluid level is low, or that there is a problem with
the anti-lock brake system reservoir.
If the light remains on when the parking brake has been
disengaged, and the fluid level is at the full mark on the
master cylinder reservoir, it indicates a possible brake
hydraulic system malfunction or that a problem with the
Brake Booster has been detected by the Anti-Lock Brake System (ABS) / Electronic Stability Control (ESC) system.
In this case, the light will remain on until the condition
has been corrected. If the problem is related to the brake
booster, the ABS pump will run when applying the brake
and a brake pedal pulsation may be felt during each stop.
The dual brake system provides a reserve braking capac-
ity in the event of a failure to a portion of the hydraulic
system. A leak in either half of the dual brake system is
indicated by the Brake Warning Light, which will turn on
when the brake fluid level in the master cylinder has
dropped below a specified level.
The light will remain on until the cause is corrected.
NOTE:
The light may flash momentarily during sharp
cornering maneuvers, which change fluid level condi-
tions. The vehicle should have service performed, and
the brake fluid level checked.
4
UNDERSTANDING YOUR INSTRUMENT PANEL 233