Page 61 of 587
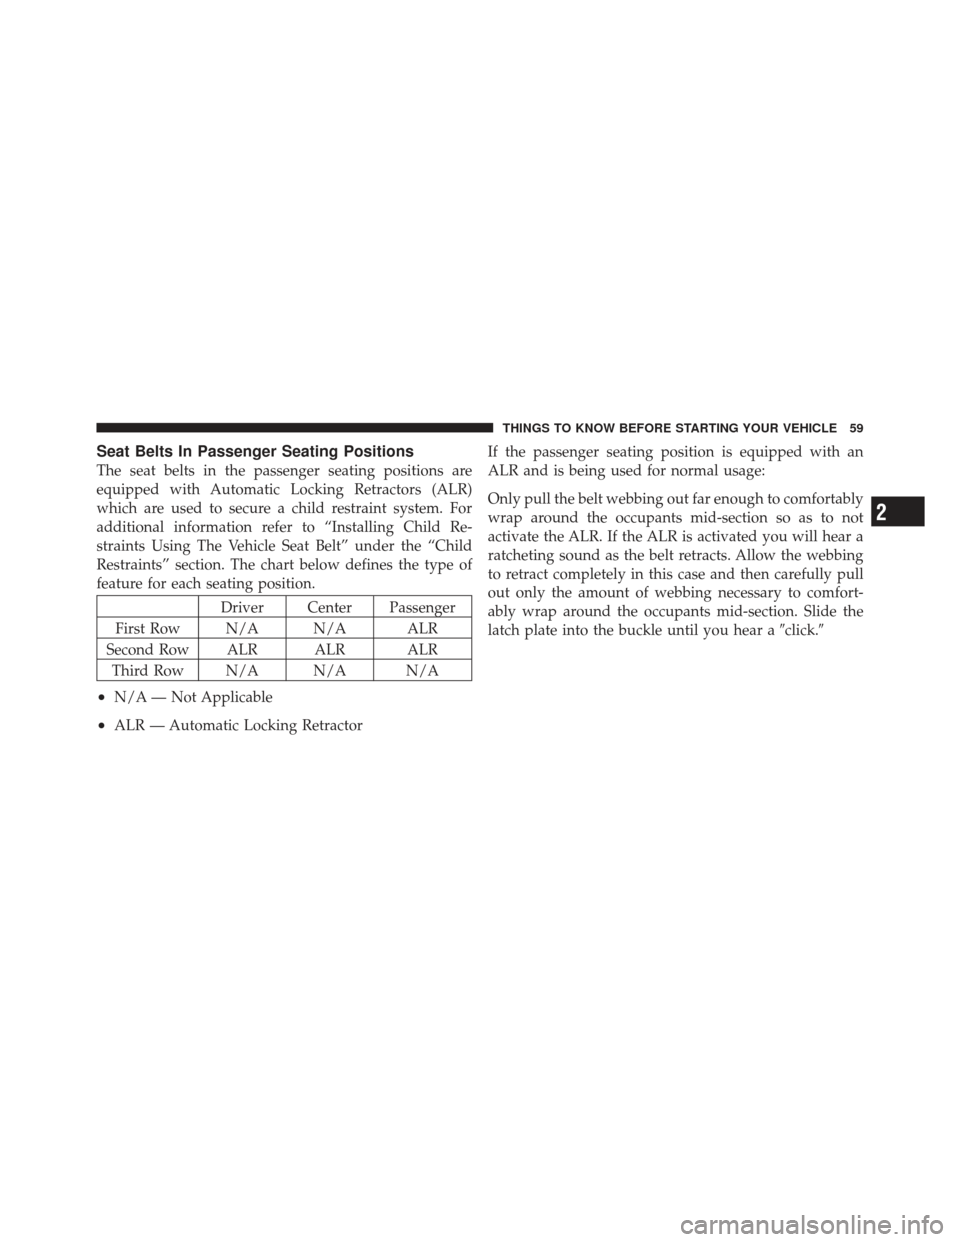
Seat Belts In Passenger Seating Positions
The seat belts in the passenger seating positions are
equipped with Automatic Locking Retractors (ALR)
which are used to secure a child restraint system. For
additional information refer to “Installing Child Re-
straints Using The Vehicle Seat Belt” under the “Child
Restraints” section. The chart below defines the type of
feature for each seating position.
Driver Center Passenger
First Row N/A N/A ALR
Second Row ALR ALR ALR Third Row N/A N/A N/A
•N/A — Not Applicable
•ALR — Automatic Locking Retractor If the passenger seating position is equipped with an
ALR and is being used for normal usage:
Only pull the belt webbing out far enough to comfortably
wrap around the occupants mid-section so as to not
activate the ALR. If the ALR is activated you will hear a
ratcheting sound as the belt retracts. Allow the webbing
to retract completely in this case and then carefully pull
out only the amount of webbing necessary to comfort-
ably wrap around the occupants mid-section. Slide the
latch plate into the buckle until you hear a
�click.�
2
THINGS TO KNOW BEFORE STARTING YOUR VEHICLE 59
Page 62 of 587
Automatic Locking Retractor Mode (ALR) —
If Equipped
In this mode, the shoulder belt is automatically pre-
locked. The belt will still retract to remove any slack in
the shoulder belt. The Automatic Locking Mode is avail-
able on all passenger-seating positions with a combina-
tion lap/shoulder belt. Use the Automatic Locking Mode
anytime a child safety seat is installed in a seating
position that has a belt with this feature. Children
12 years old and under should always be properly
restrained in the rear seat.
How To Engage The Automatic Locking Mode
1. Buckle the combination lap and shoulder belt.
2. Grasp the shoulder portion and pull downward until
the entire belt is extracted.3. Allow the belt to retract. As the belt retracts, you will
hear a clicking sound. This indicates the safety belt is
now in the Automatic Locking Mode.
How To Disengage The Automatic Locking Mode
Unbuckle the combination lap/shoulder belt and allow it
to retract completely to disengage the Automatic Locking
Mode and activate the vehicle sensitive (emergency)
locking mode.
WARNING!
•The belt and retractor assembly must be replaced
if the seat belt assembly Automatic Locking Re-
tractor (ALR) feature or any other seat belt func-
tion is not working properly when checked ac-
cording to the procedures in the Service Manual.
•Failure to replace the belt and retractor assembly
could increase the risk of injury in collisions.
60 THINGS TO KNOW BEFORE STARTING YOUR VEHICLE
Page 86 of 587
WARNING!
•Rearward-facing child seats must never be used in
the front seat of a vehicle with the front passenger
airbag unless the airbag is turned off. An airbag
deployment could cause severe injury or death to
infants in this position.
•Improper installation can lead to failure of an
infant or child restraint. It could come loose in a
collision. The child could be badly injured or
killed. Follow the manufacturer’s directions ex-
actly when installing an infant or child restraint.
•A rearward-facing infant restraint should only be
used in a rear seat. A rearward-facing infant re-
straint in the front seat may be struck by a deploy-
ing passenger airbag which may cause severe or
fatal injury to the infant.Here are some tips for getting the most out of your child
restraint:
•Before buying any restraint system, make sure that it
has a label certifying that it meets all applicable Safety
Standards. Chrysler Group LLC also recommends that
you try a child restraint in the vehicle seats where you
will use it before you buy it.
•The restraint must be appropriate for your child’s
weight and height. Check the label on the restraint for
weight and height limits.
•Carefully follow the instructions that come with the
restraint. If you install the restraint improperly, it may
not work when you need it.
•The second row seating positions are equipped with
Automatic Locking Retractors (ALR). To install child
restraint seats pull the belt from the retractor until
there is enough allowance to pass it through the child
84 THINGS TO KNOW BEFORE STARTING YOUR VEHICLE
Page 87 of 587
restraint and slide the latch plate into the buckle. Then,
pull the shoulder belt until it is fully extended from the
retractor. Allow the belt to return into the retractor,
pulling on the excess webbing to tighten the lap
portion around the child restraint. For additional
information refer to�Automatic Locking Retractors
Mode� earlier in the Occupant Restraints Section of the
owners’ manual.
•Buckle the child into the restraint exactly as the
manufacturer’s instructions tell you.
WARNING!
When your child restraint is not in use, secure it in
the vehicle with the seat belt or remove it from the
vehicle. Do not leave it loose in the vehicle. In a
sudden stop or accident, it could strike the occupants
or seatbacks and cause serious personal injury. NOTE: For additional information, refer to
www.seatcheck.org or call 1–866–SEATCHECK. Cana-
dian residents, should refer to Transport Canada’s web-
site for additional information. http://www.tc.gc.ca/
roadsafety/safedrivers/childsafety/index.htm
Older Children And Child Restraints
Children who weigh more than 20 lbs (9 kg), and who are
older than one year, can ride forward-facing in the
vehicle. Forward-facing child seats and convertible child
seats used in the forward-facing direction are for children
who weigh 20 to 40 lbs (9 to 18 kg), and who are older
than one year. These child seats are also held in the
vehicle by the lap/shoulder belt or the LATCH child
restraint anchorage system (Refer to LATCH — Child
Seat Anchorage System.)
2
THINGS TO KNOW BEFORE STARTING YOUR VEHICLE 85
Page 93 of 587
Installing Child Restraints Using The Vehicle Seat
Belts
The passenger seat belts are equipped with either cinch-
ing latch plates or Automatic Locking Retractors (ALR),
which are designed to keep the lap portion tight around
the child restraint so that it is not necessary to use a
locking clip. If the seat belt has a cinching latch plate,
pulling up on the shoulder portion of the lap/shoulder
belt will tighten the belt. The cinching latch plate will
keep the belt tight; however, any seat belt system will
loosen with time, so check the belt occasionally and pull
it tight if necessary.For seat belts having an Automatic Locking Retractor
(ALR), pull the belt from the retractor until there is
enough allowance to pass it through the child restraint
and slide the latch plate into the buckle. Then, pull the
belt until it is fully extended from the retractor. Allow the
belt to return into the retractor, pulling on the excess
webbing to tighten the lap portion around the child
restraint. Refer to “Automatic Locking Mode”.
2
THINGS TO KNOW BEFORE STARTING YOUR VEHICLE 91
Page 140 of 587
2. Fold the rear seat completely forward.
To Raise Rear Seat
Raise the rear seatback and lock it into place. If interfer-
ence from the cargo area prevents the seatback from fully
locking, you will have difficulty returning the seat to its
proper position.
WARNING!
•Be certain that the seatback is securely locked into
position. If the seatback is not securely locked into
position the seat will not provide the proper
stability for child seats and/or passengers. An
improperly latched seat could cause serious injury.
•The cargo area in the rear of the vehicle (with the
rear seatbacks in the locked-up or folded down
position) should not be used as a play area by
children when the vehicle is in motion. They could
be seriously injured in a collision. Children
should be seated and using the proper restraint
system.
Rear Seat Folded
138 UNDERSTANDING THE FEATURES OF YOUR VEHICLE
Page 382 of 587
NOTE:
•When the parking brake is applied and the transmis-
sion is placed in gear, the “Brake Warning Light” will
flash. If vehicle speed is detected, a chime will sound
to alert the driver. Fully release the parking brake
before attempting to move the vehicle.
•This light only shows that the parking brake is ap-
plied. It does not show the degree of brake application.
When parking on a hill, it is important to turn the front
wheels toward the curb on a downhill grade and away
from the curb on an uphill grade. Apply the parking
brake before placing the shift lever in PARK, otherwise
the load on the transmission locking mechanism may
make it difficult to move the shift lever out of PARK. The
parking brake should always be applied whenever the
driver is not in the vehicle.
WARNING!
•Never use the PARK position as a substitute for
the parking brake. Always apply the parking
brake fully when parked to guard against vehicle
movement and possible injury or damage.
•Never leave children alone in a vehicle. Leaving
unattended children in a vehicle is dangerous for a
number of reasons. A child or others could be
seriously or fatally injured.
•Do not leave the key fob in the ignition switch. A
child could operate power windows, other con-
trols, or move the vehicle.
•Be sure the parking brake is fully disengaged
before driving; failure to do so can lead to brake
failure and a collision. (Continued)
380 STARTING AND OPERATING
Page 568 of 587

Cargo Area Cover....................... 234
Cargo Area Features ...................... 231
Cargo Compartment ...................... 231
Light ............................... 233
Cargo Light ............................ 233
Cargo Tie-Downs ........................ 236
Cellular Phone ....................... 121,323
Center High Mounted Stop Light ............ 532
Certification Label ....................... 436
Chains, Tire ............................ 412
Changing A Flat Tire ..................... 463
Chart, Tire Sizing ........................ 395
Check Engine Light
(Malfunction Indicator Light) ............... 486
Checking Your Vehicle For Safety ............. 96
Checks, Safety ........................... 96
Child Restraint .................... 82,83,88,91
Child Restraint Tether Anchors .............86,88
Child Safety Locks ........................ 35 Clean Air Gasoline
....................... 425
Climate Control ......................... 323
Clock ............................. 289,298
Cold Weather Operation ................... 346
Compact Disc (CD) Maintenance ............. 323
Compact Spare Tire ...................... 407
Compass .............................. 277
Compass Calibration ..................... 278
Compass Variance ....................... 279
Computer, Trip/Travel .................... 274
Connector UCI ................................ 313
Universal Consumer Interface (UCI) ......... 313
Conserving Fuel ........................ 273
Console, Overhead ....................... 206
Contract, Service ........................ 557
Cooling System ......................... 502
Adding Coolant (Antifreeze) .............. 504
Coolant Capacity ...................... 533
566 INDEX