2011 INFINITI QX56 cooling
[x] Cancel search: coolingPage 2658 of 5598
EM-96
< REMOVAL AND INSTALLATION >
OIL SEAL
OIL SEAL
FRONT OIL SEAL
FRONT OIL SEAL : Removal and InstallationINFOID:0000000006289574
REMOVAL
1. Remove the following parts:
Front under cover, using a power tool. Refer to EXT-25, "
Exploded View".
Drive belt: Refer to EM-20, "
Exploded View".
Cooling fan: Refer to CO-16, "
Exploded View".
2. Remove crankshaft pulley as per the following:
a. Remove rear plate cover. Refer to EM-54, "
Exploded View".
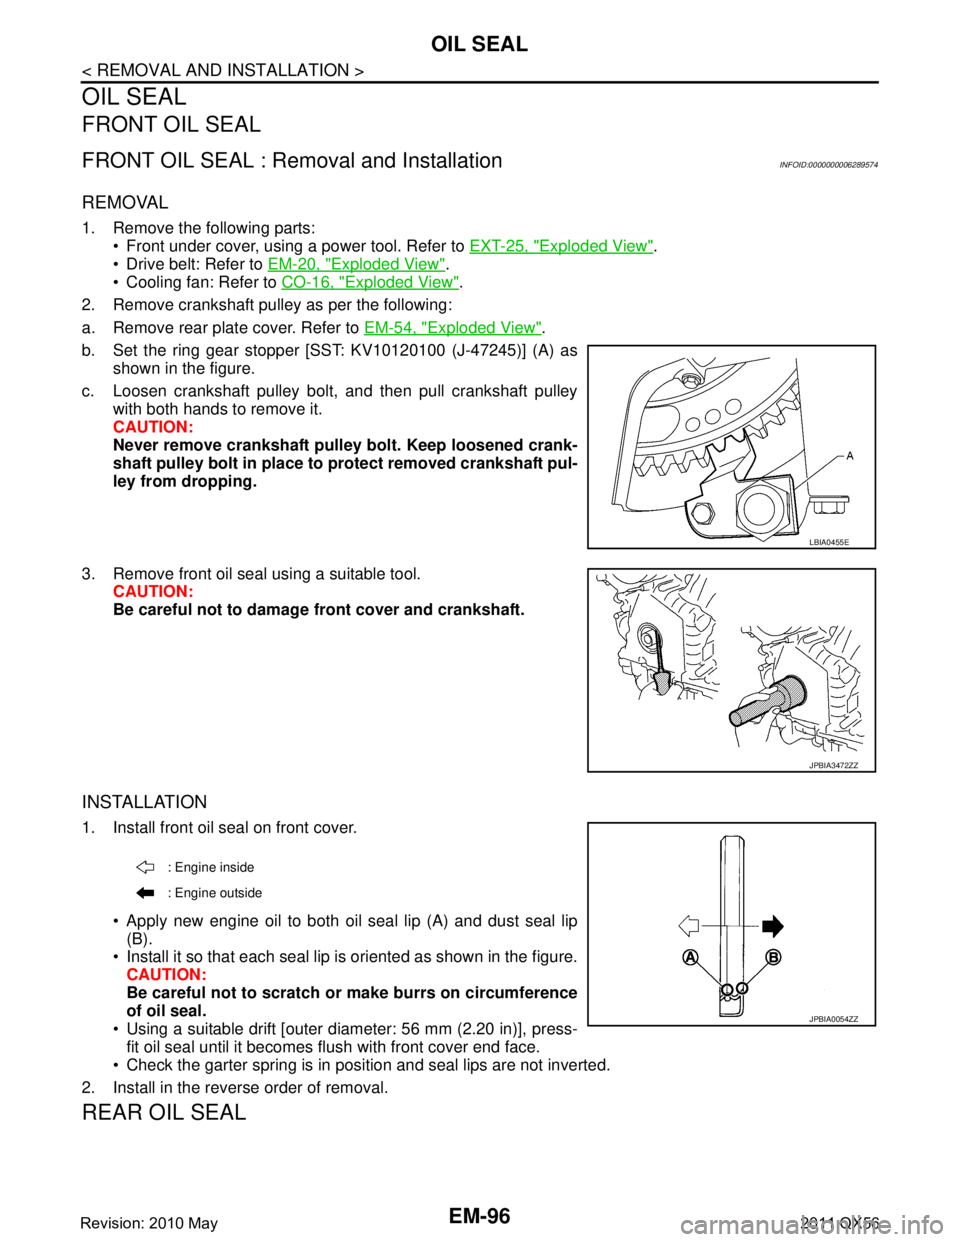
b. Set the ring gear stopper [SST: KV10120100 (J-47245)] (A) as shown in the figure.
c. Loosen crankshaft pulley bolt, and then pull crankshaft pulley with both hands to remove it.
CAUTION:
Never remove crankshaft pulley bolt. Keep loosened crank-
shaft pulley bolt in place to protect removed crankshaft pul-
ley from dropping.
3. Remove front oil seal using a suitable tool. CAUTION:
Be careful not to damage front cover and crankshaft.
INSTALLATION
1. Install front oil seal on front cover.
Apply new engine oil to both oil seal lip (A) and dust seal lip(B).
Install it so that each seal lip is oriented as shown in the figure. CAUTION:
Be careful not to scratch or make burrs on circumference
of oil seal.
Using a suitable drift [outer diameter: 56 mm (2.20 in)], press- fit oil seal until it becomes flush with front cover end face.
Check the garter spring is in position and seal lips are not inverted.
2. Install in the reverse order of removal.
REAR OIL SEAL
LBIA0455E
JPBIA3472ZZ
: Engine inside
: Engine outside
JPBIA0054ZZ
Revision: 2010 May2011 QX56
Page 2662 of 5598
EM-100
< UNIT REMOVAL AND INSTALLATION >
ENGINE ASSEMBLY
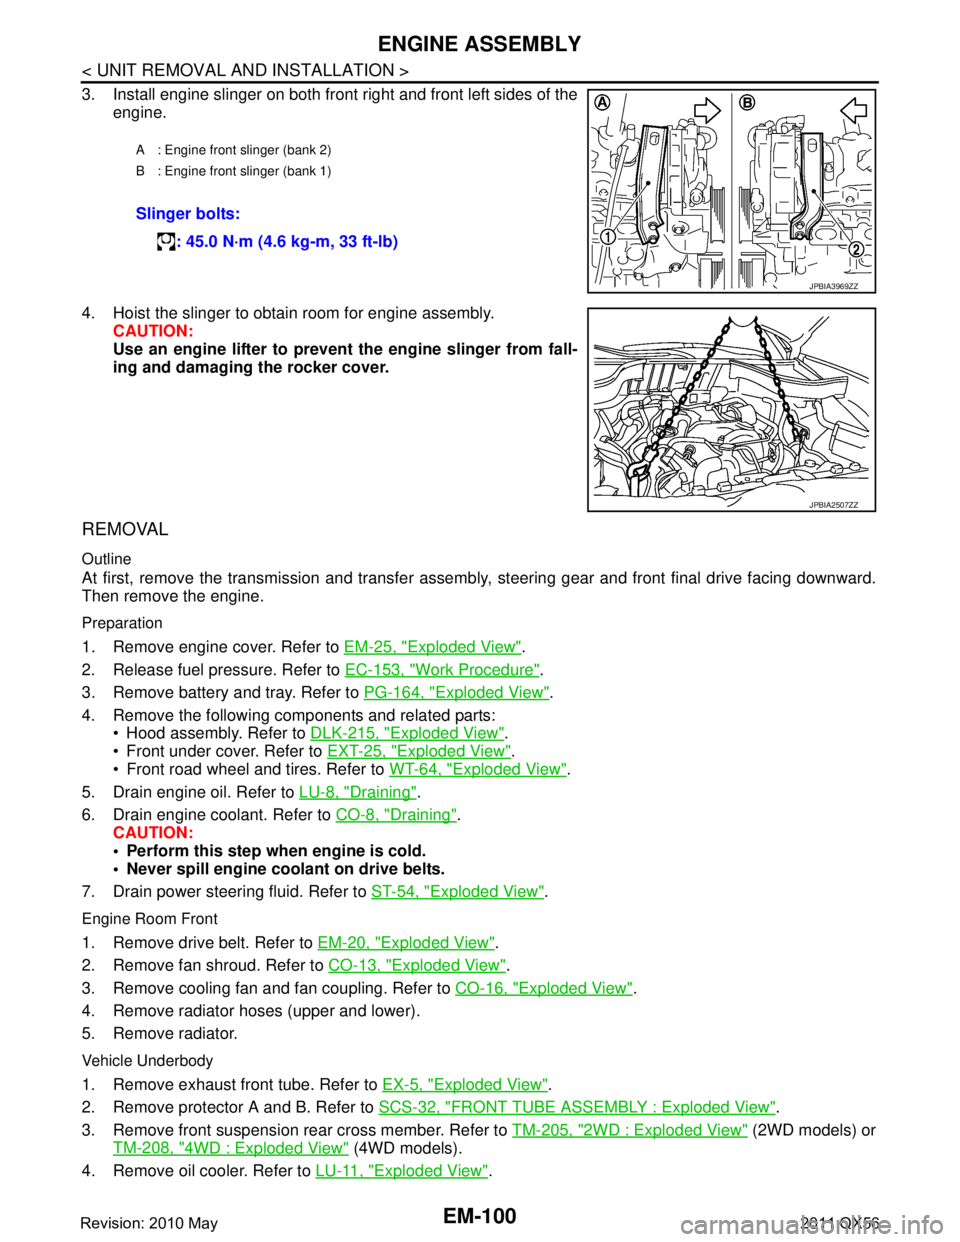
3. Install engine slinger on both front right and front left sides of theengine.
4. Hoist the slinger to obtain room for engine assembly. CAUTION:
Use an engine lifter to prevent the engine slinger from fall-
ing and damaging the rocker cover.
REMOVAL
Outline
At first, remove the transmission and transfer assemb ly, steering gear and front final drive facing downward.
Then remove the engine.
Preparation
1. Remove engine cover. Refer to EM-25, "Exploded View".
2. Release fuel pressure. Refer to EC-153, "
Work Procedure".
3. Remove battery and tray. Refer to PG-164, "
Exploded View".
4. Remove the following components and related parts: Hood assembly. Refer to DLK-215, "
Exploded View".
Front under cover. Refer to EXT-25, "
Exploded View".
Front road wheel and tires. Refer to WT-64, "
Exploded View".
5. Drain engine oil. Refer to LU-8, "
Draining".
6. Drain engine coolant. Refer to CO-8, "
Draining".
CAUTION:
Perform this step when engine is cold.
Never spill engine coolant on drive belts.
7. Drain power steering fluid. Refer to ST-54, "
Exploded View".
Engine Room Front
1. Remove drive belt. Refer to EM-20, "Exploded View".
2. Remove fan shroud. Refer to CO-13, "
Exploded View".
3. Remove cooling fan and fan coupling. Refer to CO-16, "
Exploded View".
4. Remove radiator hoses (upper and lower).
5. Remove radiator.
Vehicle Underbody
1. Remove exhaust front tube. Refer to EX-5, "Exploded View".
2. Remove protector A and B. Refer to SCS-32, "
FRONT TUBE ASSEMBLY : Exploded View".
3. Remove front suspension rear cross member. Refer to TM-205, "
2WD : Exploded View" (2WD models) or
TM-208, "
4WD : Exploded View" (4WD models).
4. Remove oil cooler. Refer to LU-11, "
Exploded View".
A : Engine front slinger (bank 2)
B : Engine front slinger (bank 1)
Slinger bolts:
: 45.0 N·m (4.6 kg-m, 33 ft-lb)
JPBIA3969ZZ
JPBIA2507ZZ
Revision: 2010 May2011 QX56
Page 2664 of 5598
EM-102
< UNIT REMOVAL AND INSTALLATION >
ENGINE ASSEMBLY
INSTALLATION
Install in the reverse order of removal.
CAUTION:
When replacing an engine or transmission you must make sure the dowels are installed correctly
during re-assembly.Improper alignment caused by mi ssing dowels may cause vibration, oil leaks or
breakage of drivetrain components.
InspectionINFOID:0000000006289578
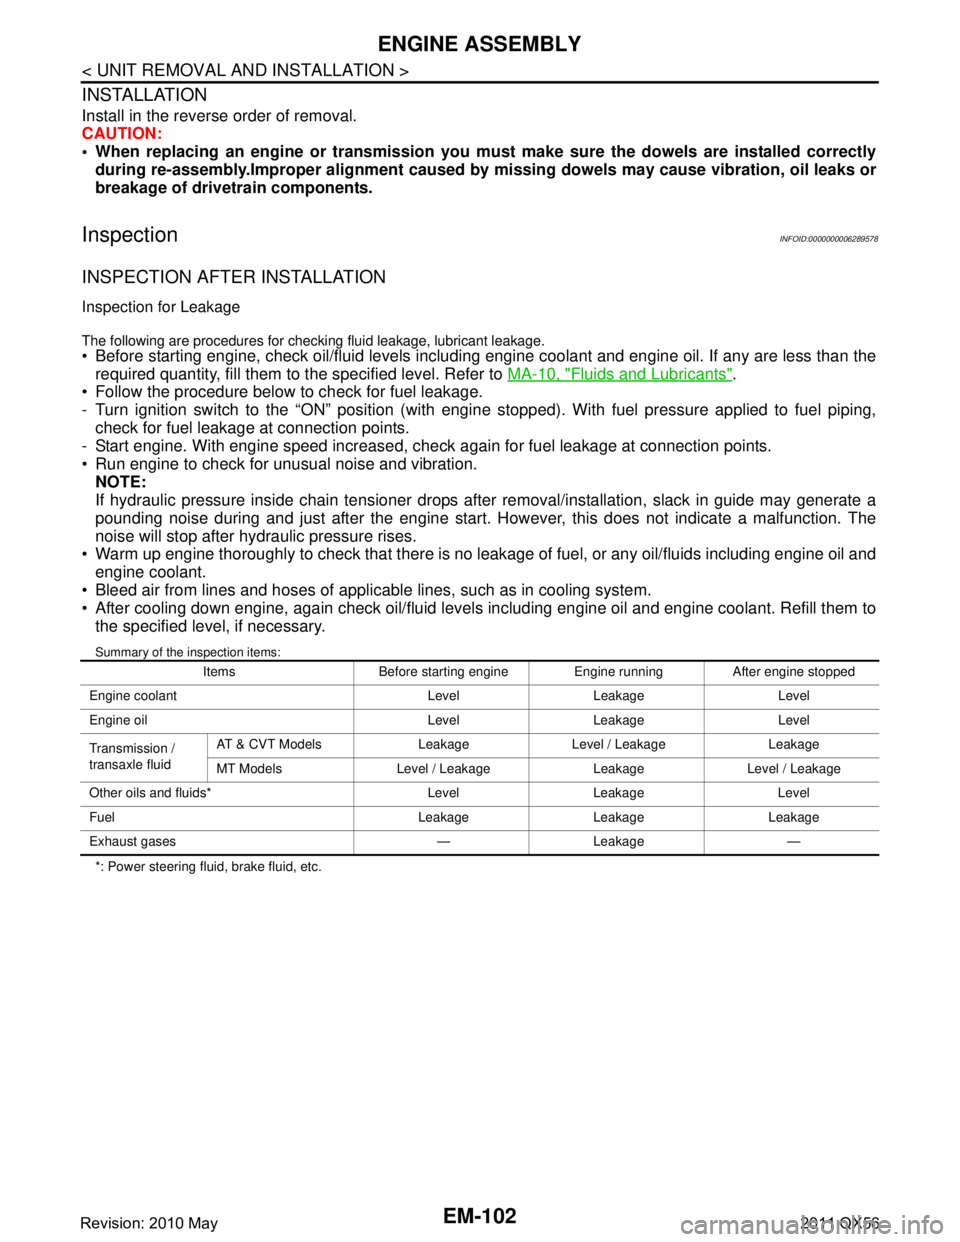
INSPECTION AFTER INSTALLATION
Inspection for Leakage
The following are procedures for checking fluid leakage, lubricant leakage. Before starting engine, check oil/fluid levels includi ng engine coolant and engine oil. If any are less than the
required quantity, fill them to the specified level. Refer to MA-10, "
Fluids and Lubricants".
Follow the procedure below to check for fuel leakage.
- Turn ignition switch to the “ON” position (with engi ne stopped). With fuel pressure applied to fuel piping,
check for fuel leakage at connection points.
- Start engine. With engine speed increased, che ck again for fuel leakage at connection points.
Run engine to check for unusual noise and vibration. NOTE:
If hydraulic pressure inside chain tensioner drops af ter removal/installation, slack in guide may generate a
pounding noise during and just after the engine start. However, this does not indicate a malfunction. The
noise will stop after hydraulic pressure rises.
Warm up engine thoroughly to check that there is no leak age of fuel, or any oil/fluids including engine oil and
engine coolant.
Bleed air from lines and hoses of applic able lines, such as in cooling system.
After cooling down engine, again check oil/fluid levels including engine oil and engine coolant. Refill them to
the specified level, if necessary.
Summary of the inspection items:
*: Power steering fluid, brake fluid, etc. Items Before starting engine Engine running After engine stopped
Engine coolant Level Leakage Level
Engine oil Level Leakage Level
Transmission /
transaxle fluid AT & CVT Models Leakage Level / Leakage Leakage
MT Models Level / Leakage Leakage Level / Leakage
Other oils and fluids* Level Leakage Level
Fuel Leakage Leakage Leakage
Exhaust gases — Leakage —
Revision: 2010 May2011 QX56
Page 2739 of 5598
![INFINITI QX56 2011 Factory Service Manual
DIAGNOSIS SYSTEM (IPDM E/R)EXL-29
< SYSTEM DESCRIPTION > [XENON TYPE]
C
D
E
F
G H
I
J
K
M A
B
EXL
N
O P
CONSULT-III Function (IPDM E/R)INFOID:0000000006368067
APPLICATION ITEM
CONSULT-III performs th INFINITI QX56 2011 Factory Service Manual
DIAGNOSIS SYSTEM (IPDM E/R)EXL-29
< SYSTEM DESCRIPTION > [XENON TYPE]
C
D
E
F
G H
I
J
K
M A
B
EXL
N
O P
CONSULT-III Function (IPDM E/R)INFOID:0000000006368067
APPLICATION ITEM
CONSULT-III performs th](/manual-img/42/57033/w960_57033-2738.png)
DIAGNOSIS SYSTEM (IPDM E/R)EXL-29
< SYSTEM DESCRIPTION > [XENON TYPE]
C
D
E
F
G H
I
J
K
M A
B
EXL
N
O P
CONSULT-III Function (IPDM E/R)INFOID:0000000006368067
APPLICATION ITEM
CONSULT-III performs the following functi ons via CAN communication with IPDM E/R.
SELF DIAGNOSTIC RESULT
Refer to PCS-22, "DTCIndex".
DATA MONITOR
Monitor item
Oil pressure warning lamp does not operate Perform auto active test.
Does the oil pressure warning
lamp blink?YES
Harness or connector be-
tween IPDM E/R and oil
pressure switch
Oil pressure switch
IPDM E/R
NO CAN communication signal
between IPDM E/R and
BCM
CAN communication signal
between BCM and combi-
nation meter
Combination meter
Symptom Inspection contents Possible cause
Diagnosis mode Description
Ecu Identification Allows confirmation of IPDM E/R part number.
Self Diagnostic Result Displays the diagnosis results judged by IPDM E/R.
Data Monitor Displays the real-time input/output data from IPDM E/R input/output data.
Active Test IPDM E/R can provide a drive signal to electronic components to check their operations.
CAN Diag Support Monitor The results of transmit/receive diagnosis of CAN communication can be read.
Monitor Item [Unit] MAIN SIG-
NALS Description
RAD FAN REQ
[1/2/3/4] ×Displays the value of the cooling fan speed request signal received from ECM via
CAN communication.
AC COMP REQ
[Off/On] ×Displays the status of the A/C compressor request signal received from ECM via
CAN communication.
TAIL&CLR REQ
[Off/On] ×
Displays the status of the position light request signal received from BCM via CAN
communication.
HL LO REQ
[Off/On] ×Displays the status of the low beam request signal received from BCM via CAN
communication.
HL HI REQ
[Off/On] ×Displays the status of the high beam request signal received from BCM via CAN
communication.
FR FOG REQ
[Off/On] ×Displays the status of the front fog light request signal received from BCM via
CAN communication.
FR WIP REQ
[Stop/1LOW/Low/Hi] ×
Displays the status of the front wiper request signal received from BCM via CAN
communication.
WIP AUTO STOP
[STOP P/ACT P] ×
Displays the status of the front wiper auto stop signal judged by IPDM E/R.
WIP PROT
[Off/BLOCK] ×
Displays the status of the front wiper fail-safe operation judged by IPDM E/R.
IGN RLY1 -REQ
[Off/On] Displays the status of the ignition switch ON signal received from BCM via CAN
communication.
IGN RLY
[Off/On] ×
Displays the status of the ignition relay judged by IPDM E/R.
Revision: 2010 May2011 QX56
Page 2740 of 5598
![INFINITI QX56 2011 Factory Service Manual
EXL-30
< SYSTEM DESCRIPTION >[XENON TYPE]
DIAGNOSIS SYSTEM (IPDM E/R)
ACTIVE TEST
Te s t i t e m
PUSH SW
[Off/On]Displays the status of the push-button ignition switch judged by IPDM E/R.
INTER/NP S INFINITI QX56 2011 Factory Service Manual
EXL-30
< SYSTEM DESCRIPTION >[XENON TYPE]
DIAGNOSIS SYSTEM (IPDM E/R)
ACTIVE TEST
Te s t i t e m
PUSH SW
[Off/On]Displays the status of the push-button ignition switch judged by IPDM E/R.
INTER/NP S](/manual-img/42/57033/w960_57033-2739.png)
EXL-30
< SYSTEM DESCRIPTION >[XENON TYPE]
DIAGNOSIS SYSTEM (IPDM E/R)
ACTIVE TEST
Te s t i t e m
PUSH SW
[Off/On]Displays the status of the push-button ignition switch judged by IPDM E/R.
INTER/NP SW
[Off/On] Displays the status of the shift position judged by IPDM E/R.
ST RLY CONT
[Off/On] Displays the status of the starter relay status signal received from BCM via CAN
communication.
IHBT RLY -REQ
[Off/On] Displays the status of the starter control relay signal received from BCM via CAN
communication.
ST/INHI RLY
[Off/ ST ON/INHI ON/UNKWN] Displays the status of the starter relay and starter control relay judged by IPDM
E/R.
DETENT SW
[Off/On] Displays the status of the A/T shift selector (detention switch) judged by IPDM E/
R.
S/L RLY -REQ
[Off/On] Displays the status of the steering lock relay signal received from BCM via CAN
communication.
S/L STATE
[LOCK/UNLK/UNKWN] Displays the status of the steering lock judged by IPDM E/R.
OIL P SW
[Open/Close] Displays the status of the oil pressure switch judged by IPDM E/R.
HOOD SW
[Off/On] Displays the status of the hood switch judged by IPDM E/R.
HL WASHER REQ
[Off/On] Displays the status of the headlamp washer request signal received from BCM via
CAN communication.
THFT HRN REQ
[Off/On] Displays the status of the theft warning horn request signal received from BCM
via CAN communication.
HORN CHIRP
[Off/On] Displays the status of the horn reminder signal received from BCM via CAN com-
munication.
Monitor Item
[Unit] MAIN SIG-
NALS Description
Test item Operation Description
CORNERING LAMP LH
NOTE:
This item is indicated, but cannot be tested.
RH
HORN On Operates horn relay for 20 ms.
REAR DEFOGGER Off OFF
On Operates the rear window defogger relay.
FRONT WIPER Off OFF
Lo Operates the front wiper relay.
Hi Operates the front wiper relay and front wiper high relay.
MOTOR FAN* 1OFF
2 Transmits 50% pulse duty signal (PWM signal) to the cooling fan control module.
3 Transmits 75% pulse duty signal (PWM signal) to the cooling fan control module.
4
Transmits 100% pulse duty signal (PWM signal) to the cooling fan control mod-
ule.
HEAD LAMP WASHER On Operates the headlamp washer relay for 1 second.
Revision: 2010 May2011 QX56
Page 2999 of 5598
TOW TRUCK TOWINGGI-35
< PRECAUTION >
C
DE
F
G H
I
J
K L
M B
GI
N
O P
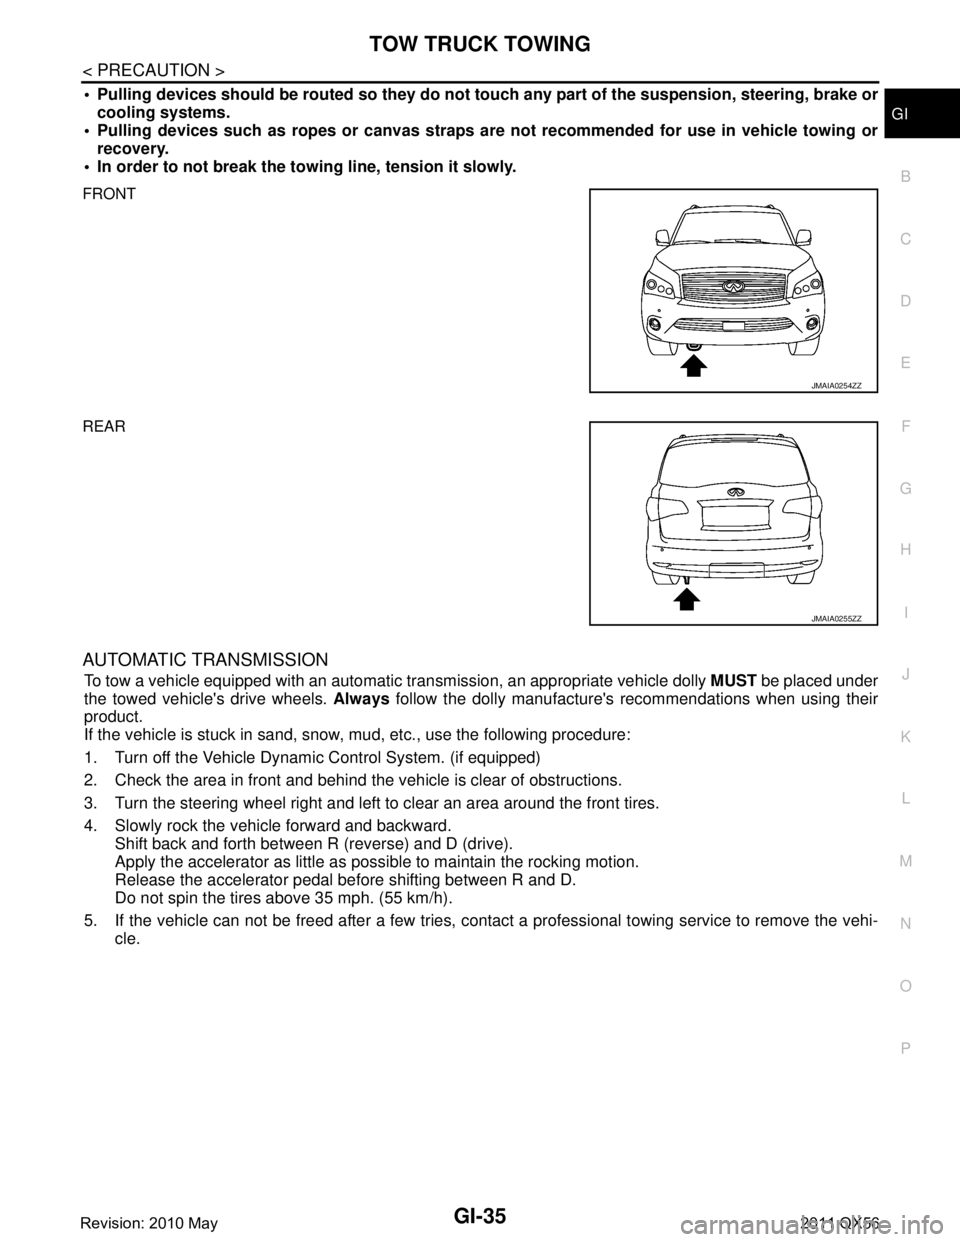
Pulling devices should be routed so they do not touch any part of the suspension, steering, brake or
cooling systems.
Pulling devices such as ropes or canvas straps ar e not recommended for use in vehicle towing or
recovery.
In order to not break the towi ng line, tension it slowly.
FRONT
REAR
AUTOMATIC TRANSMISSION
To tow a vehicle equipped with an automatic tr ansmission, an appropriate vehicle dolly MUST be placed under
the towed vehicle's drive wheels. Always follow the dolly manufacture's recommendations when using their
product.
If the vehicle is stuck in sand, snow , mud, etc., use the following procedure:
1. Turn off the Vehicle Dynam ic Control System. (if equipped)
2. Check the area in front and behind the vehicle is clear of obstructions.
3. Turn the steering wheel right and left to clear an area around the front tires.
4. Slowly rock the vehicle forward and backward. Shift back and forth between R (reverse) and D (drive).
Apply the accelerator as little as possible to maintain the rocking motion.
Release the accelerator pedal before shifting between R and D.
Do not spin the tires above 35 mph. (55 km/h).
5. If the vehicle can not be freed after a few tries, cont act a professional towing service to remove the vehi-
cle.
JMAIA0254ZZ
JMAIA0255ZZ
Revision: 2010 May2011 QX56
Page 3058 of 5598

HA-2
HIGH-PRESSURE PIPE : Removal and Installa-
tion ....................................................................... ...
35
LOW-PRESSURE PIPE ......................................... ...36
LOW-PRESSURE PIPE : Removal and Installa-
tion ..........................................................................
36
REAR COOLER PIPE ............................................ ...37
REAR COOLER PIPE : Removal and Installation ...37
CONDENSER ................................................. ...38
Exploded View ..................................................... ...38
CONDENSER ......................................................... ...38
CONDENSER : Removal and Installation ..............38
LIQUID TANK ......................................................... ...39
LIQUID TANK : Removal and Installation ...............39
REFRIGERANT PRESSURE SENSOR ....................39
REFRIGERANT PRESSURE SENSOR : Remov-
al and Installation ................................................. ...
39
A/C UNIT ASSEMBLY .................................... ...41
Exploded View ..................................................... ...41
HEATER & COOLING UNIT ASSEMBLY ................42
HEATER & COOLING UNIT ASSEMBLY : Re-
moval and Installation .......................................... ...
42
EVAPORATOR ...................................................... ...43
EVAPORATOR : Removal and Installation ............43
HEATER CORE ...................................................... ...44
HEATER CORE : Removal and Installation ...........44
EXPANSION VALVE .............................................. ...44
EXPANSION VALVE : Removal and Installation ....44
REAR A/C UNIT ................................................46
Exploded View ..................................................... ...46
REAR A/C UNIT ASSEMBLY ...................................47
REAR A/C UNIT ASSEMBLY : Removal and In-
stallation ............................................................... ...
47
EVAPORATOR ....................................................... ...48
EVAPORATOR : Removal and Installation .............48
EVAPORATOR PIPE ASSEMBLY ........................ ...48
EVAPORATOR PIPE ASSEMBLY : Removal and
Installation ...............................................................
48
HEATER CORE ...................................................... ...48
HEATER CORE : Removal and Installation ............48
EXPANSION VALVE .............................................. ...49
EXPANSION VALVE : Removal and Installation ....49
SERVICE DATA AND SPECIFICATIONS
(SDS) .......... ................................................
50
SERVICE DATA AND SPECIFICATIONS
(SDS) .............................................................. ...
50
Compressor ......................................................... ...50
Lubricant .................................................................50
Refrigerant ..............................................................50
Engine Idling Speed ................................................50
Belt Tension ............................................................50
Revision: 2010 May2011 QX56
Page 3069 of 5598
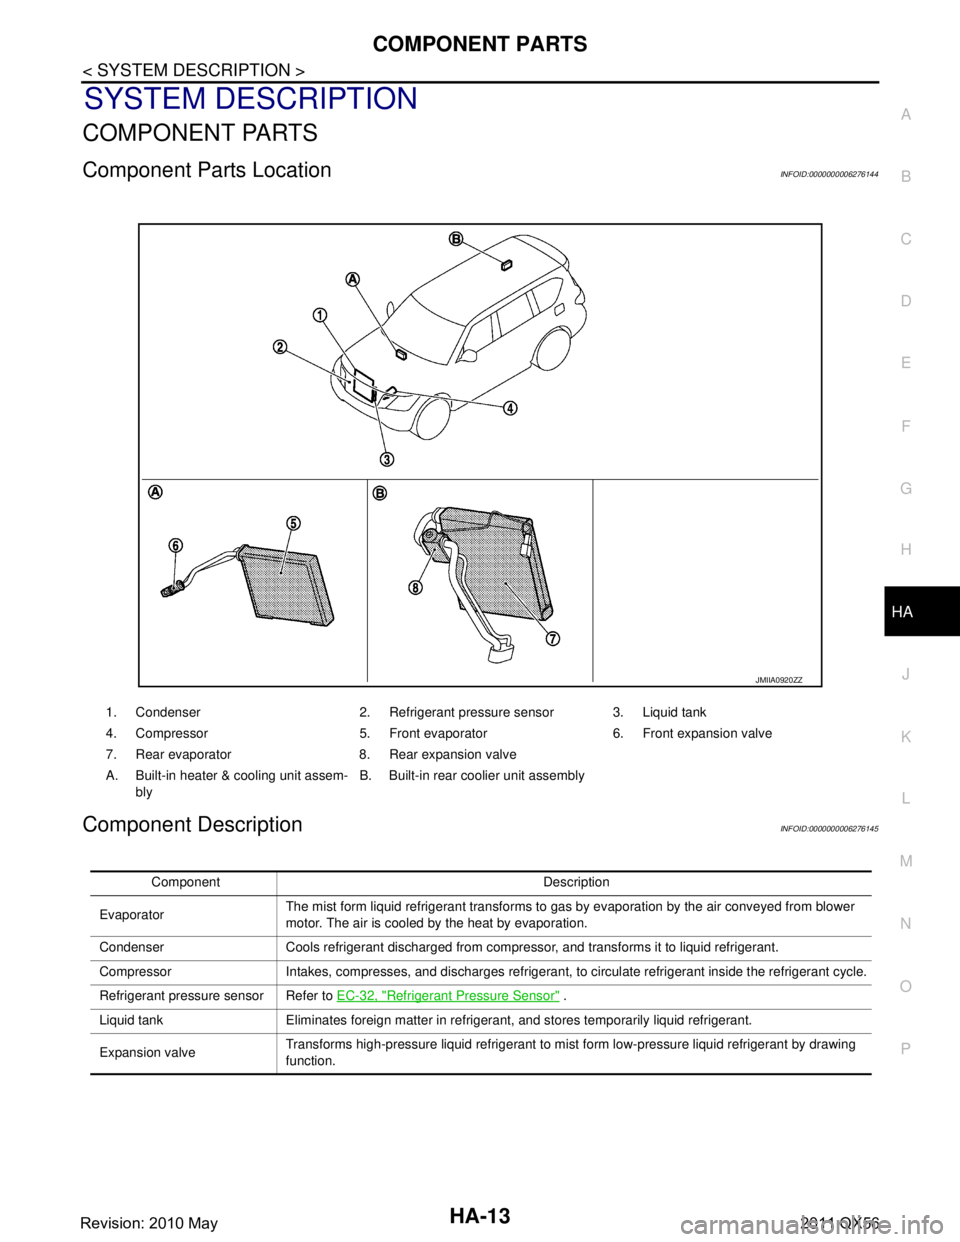
COMPONENT PARTSHA-13
< SYSTEM DESCRIPTION >
C
DE
F
G H
J
K L
M A
B
HA
N
O P
SYSTEM DESCRIPTION
COMPONENT PARTS
Component Parts LocationINFOID:0000000006276144
Component DescriptionINFOID:0000000006276145
JMIIA0920ZZ
1. Condenser 2. Refrigerant pressure sensor 3. Liquid tank
4. Compressor 5. Front evaporator 6. Front expansion valve
7. Rear evaporator 8. Rear expansion valve
A. Built-in heater & cooling unit assem- bly B. Built-in rear coolier unit assembly
Component Description
Evaporator The mist form liquid refrigerant transforms to gas by evaporation by the air conveyed from blower
motor. The air is cooled by the heat by evaporation.
Condenser Cools refrigerant discharged from compressor, and transforms it to liquid refrigerant.
Compressor Intakes, compresses, and discharges refrigerant, to circulate refrigerant inside the refrigerant cycle.
Refrigerant pressure sensor Refer to EC-32, "
Refrigerant Pressure Sensor" .
Liquid tank Eliminates foreign matter in refrigerant, and stores temporarily liquid refrigerant.
Expansion valve Transforms high-pressure liquid refrigerant to mist form low-pressure liquid refrigerant by drawing
function.
Revision: 2010 May2011 QX56