Page 5061 of 5598
STC-16
< DTC/CIRCUIT DIAGNOSIS >
POWER STEERING SOLENOID VALVE
POWER STEERING SOLENOID VALVE
Component Function CheckINFOID:0000000006256126
1.CHECK POWER STEERING SOLENOID VALVE OPERATION
Check changes in steering force from a halt condition to high-speed driving.
Is the inspection result normal?
YES >> INSPECTION END
NO >> Check the power steering solenoid valve. Refer to STC-16, "
Diagnosis Procedure".
Diagnosis Procedure INFOID:0000000006256127
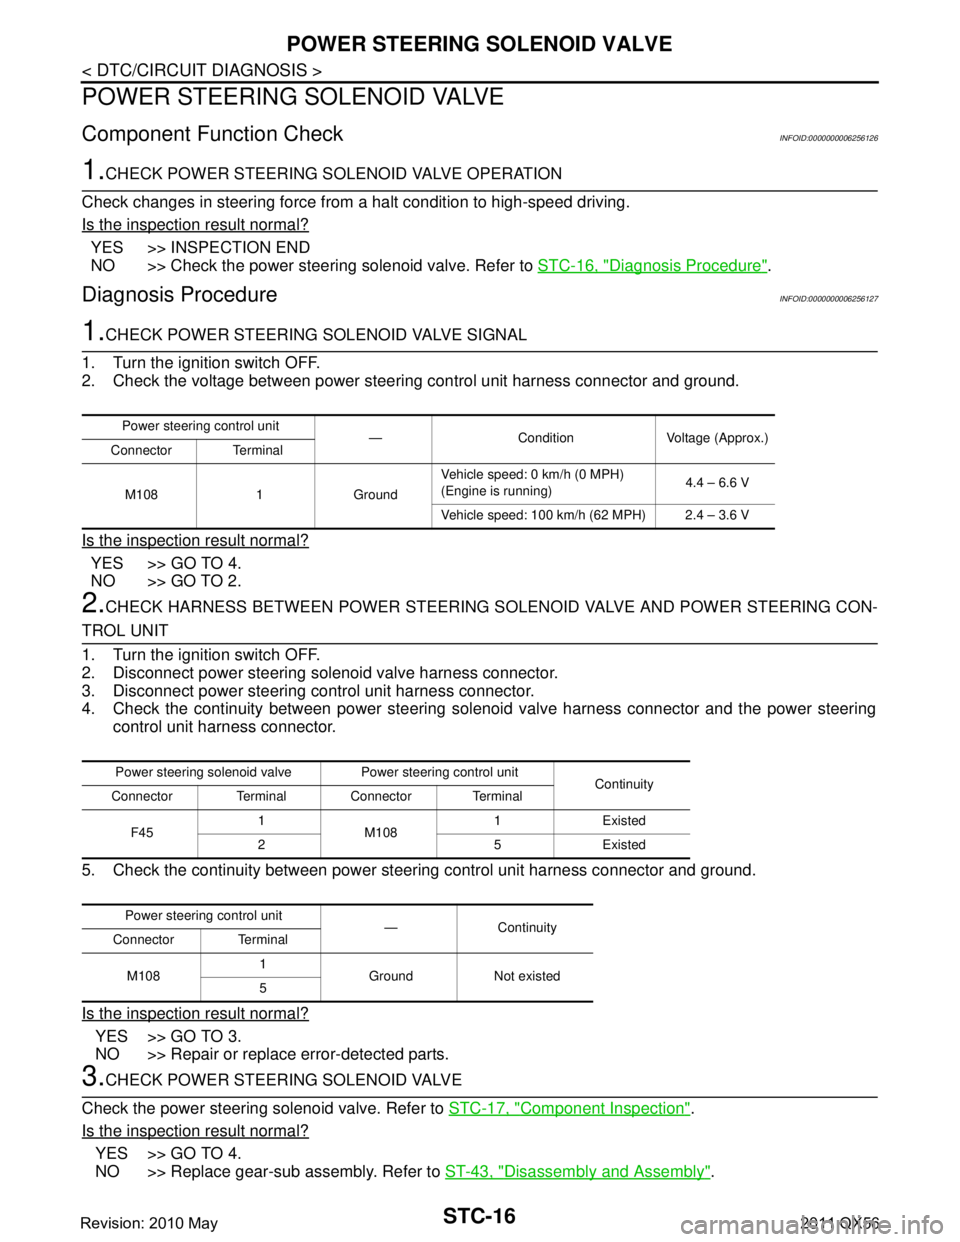
1.CHECK POWER STEERING SOLENOID VALVE SIGNAL
1. Turn the ignition switch OFF.
2. Check the voltage between power steering control unit harness connector and ground.
Is the inspection result normal?
YES >> GO TO 4.
NO >> GO TO 2.
2.CHECK HARNESS BETWEEN POWER STEERING SO LENOID VALVE AND POWER STEERING CON-
TROL UNIT
1. Turn the ignition switch OFF.
2. Disconnect power steering solenoid valve harness connector.
3. Disconnect power steering control unit harness connector.
4. Check the continuity between power steering solenoid valve harness connector and the power steering
control unit harness connector.
5. Check the continuity between power st eering control unit harness connector and ground.
Is the inspection result normal?
YES >> GO TO 3.
NO >> Repair or replace error-detected parts.
3.CHECK POWER STEERING SOLENOID VALVE
Check the power steering solenoid valve. Refer to STC-17, "
Component Inspection".
Is the inspection result normal?
YES >> GO TO 4.
NO >> Replace gear-sub assembly. Refer to ST-43, "
Disassembly and Assembly".
Power steering control unit
— Condition Voltage (Approx.)
Connector Terminal
M108 1 Ground Vehicle speed: 0 km/h (0 MPH)
(Engine is running)
4.4 – 6.6 V
Vehicle speed: 100 km/h (62 MPH) 2.4 – 3.6 V
Power steering solenoid valve Power steering control unit Continuity
Connector Terminal Connector Terminal
F45 1
M108 1 Existed
25Existed
Power steering control unit — Continuity
Connector Terminal
M108 1
Ground Not existed
5
Revision: 2010 May2011 QX56
Page 5062 of 5598
POWER STEERING SOLENOID VALVESTC-17
< DTC/CIRCUIT DIAGNOSIS >
C
DE
F
H I
J
K L
M A
B
STC
N
O P
4.CHECK TERMINALS AND HARNESS CONNECTORS
Check the power steering control unit pin terminal s for damage or loose connection with harness connector.
Check the power steering solenoid valve pin termi nals for damage or loose connection with harness connec-
tor.
Is the inspection result normal?
YES >> Replace power steering control unit. Refer to STC-23, "Removal and Installation".
NO >> Repair or replace error-detected parts.
Component Inspection INFOID:0000000006256128
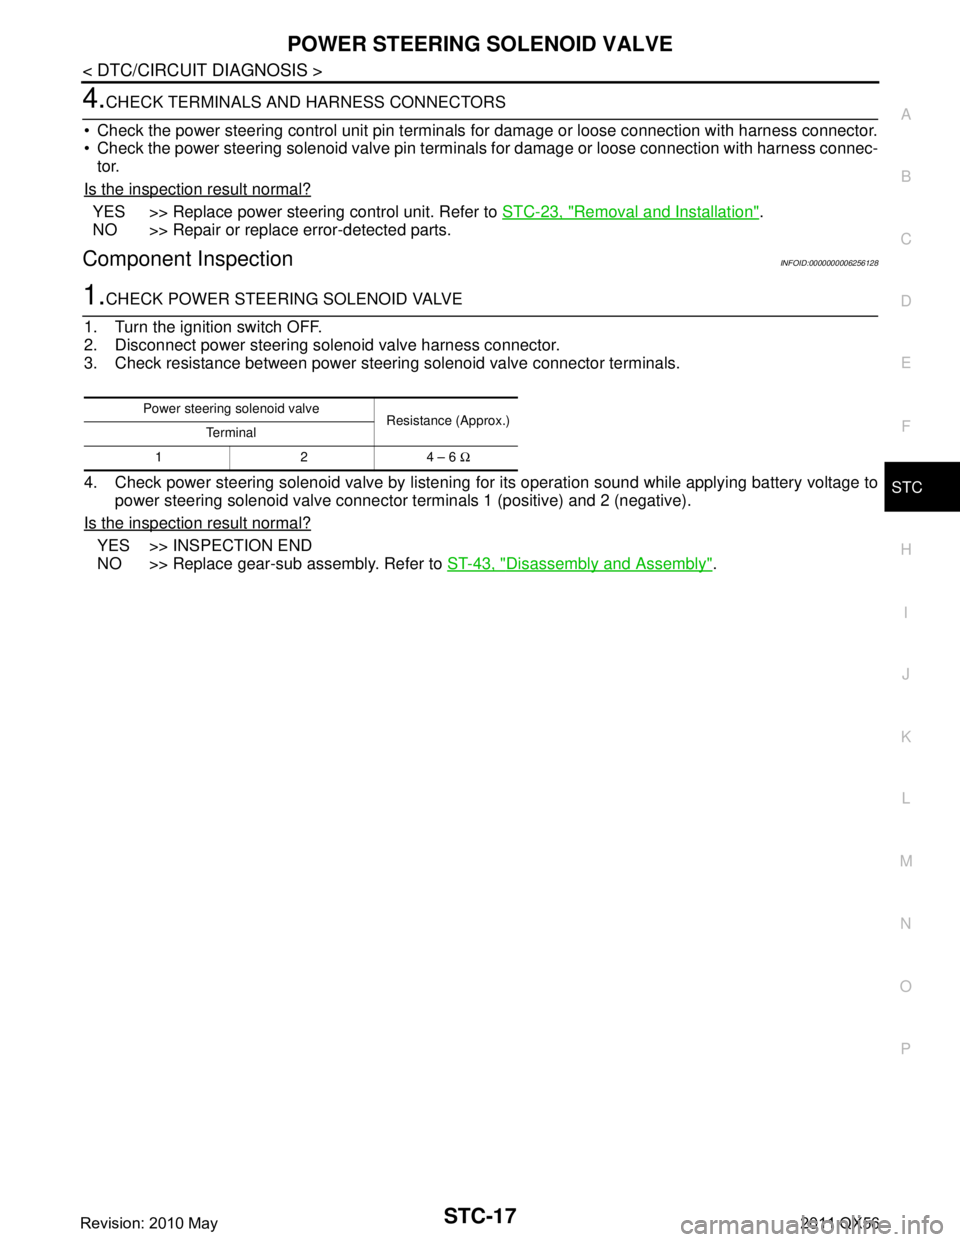
1.CHECK POWER STEERING SOLENOID VALVE
1. Turn the ignition switch OFF.
2. Disconnect power steering solenoid valve harness connector.
3. Check resistance between power steering solenoid valve connector terminals.
4. Check power steering solenoid valve by listening for its operation sound while applying battery voltage to
power steering solenoid valve connector terminals 1 (positive) and 2 (negative).
Is the inspection result normal?
YES >> INSPECTION END
NO >> Replace gear-sub assembly. Refer to ST-43, "
Disassembly and Assembly".
Power steering solenoid valve
Resistance (Approx.)
Te r m i n a l
1 2 4 – 6 Ω
Revision: 2010 May2011 QX56
Page 5063 of 5598
STC-18
< DTC/CIRCUIT DIAGNOSIS >
ENGINE SPEED SIGNAL CIRCUIT
ENGINE SPEED SIGNAL CIRCUIT
Diagnosis ProcedureINFOID:0000000006256129
1.PERFORM ECM SELF-DIAGNOSIS
With CONSULT-III
Perform “ENGINE” self-diagnosis.
Is any DTC detected?
YES >> Check the DTC. Refer to EC-98, "DTC Index".
NO >> GO TO 2.
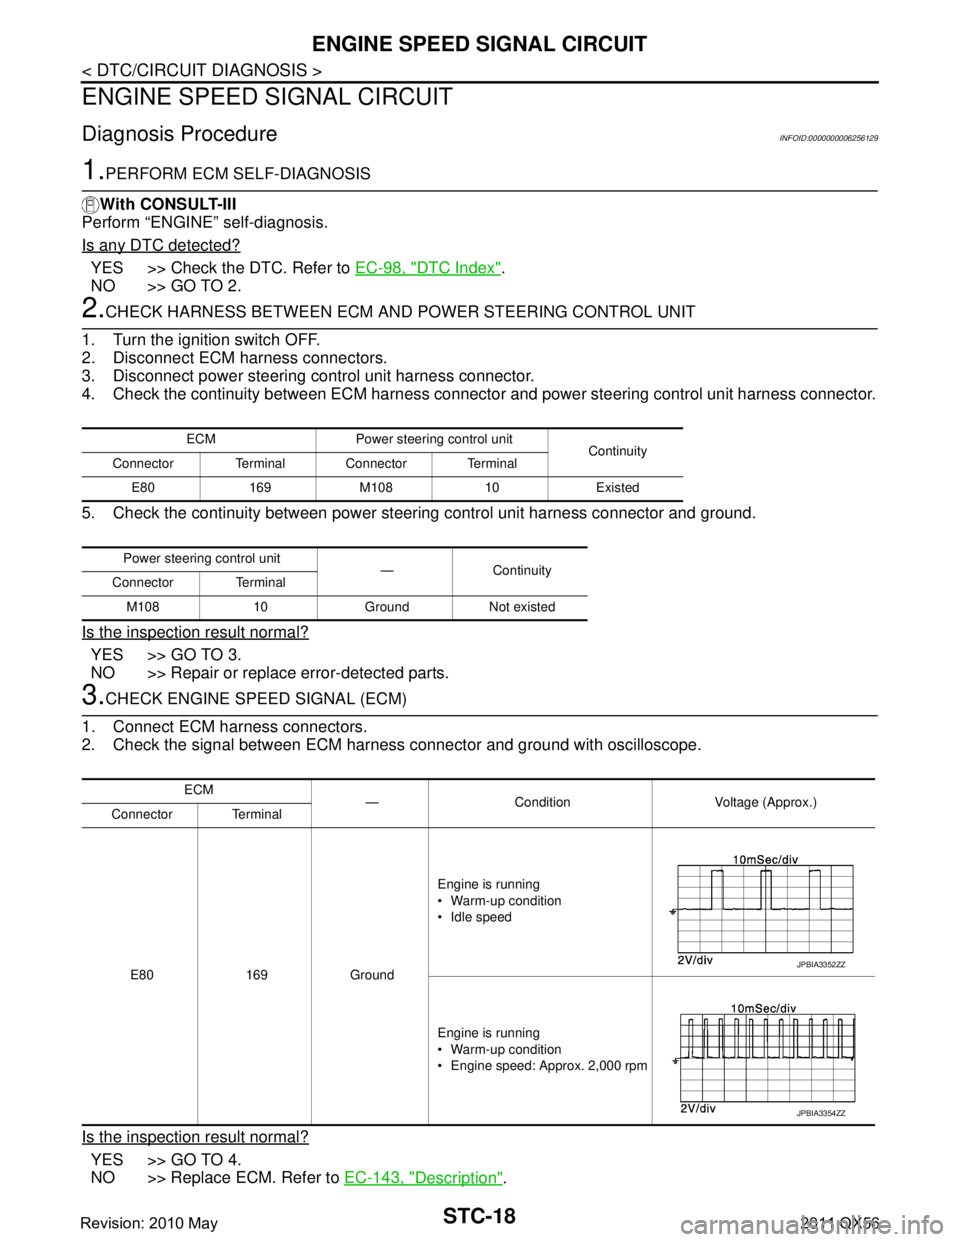
2.CHECK HARNESS BETWEEN ECM AND POWER STEERING CONTROL UNIT
1. Turn the ignition switch OFF.
2. Disconnect ECM harness connectors.
3. Disconnect power steering control unit harness connector.
4. Check the continuity between ECM harness connecto r and power steering control unit harness connector.
5. Check the continuity between power st eering control unit harness connector and ground.
Is the inspection result normal?
YES >> GO TO 3.
NO >> Repair or replace error-detected parts.
3.CHECK ENGINE SPEED SIGNAL (ECM)
1. Connect ECM harness connectors.
2. Check the signal between ECM harness connector and ground with oscilloscope.
Is the inspection result normal?
YES >> GO TO 4.
NO >> Replace ECM. Refer to EC-143, "
Description".
ECM Power steering control unit
Continuity
Connector Terminal Connector Terminal
E80 169 M108 10 Existed
Power steering control unit — Continuity
Connector Terminal
M108 10 Ground Not existed
ECM — Condition Voltage (Approx.)
Connector Terminal
E80 169 Ground Engine is running
Warm-up condition
Idle speed
Engine is running
Warm-up condition
Engine speed: Approx. 2,000 rpm
JPBIA3352ZZ
JPBIA3354ZZ
Revision: 2010 May2011 QX56
Page 5064 of 5598
ENGINE SPEED SIGNAL CIRCUITSTC-19
< DTC/CIRCUIT DIAGNOSIS >
C
DE
F
H I
J
K L
M A
B
STC
N
O P
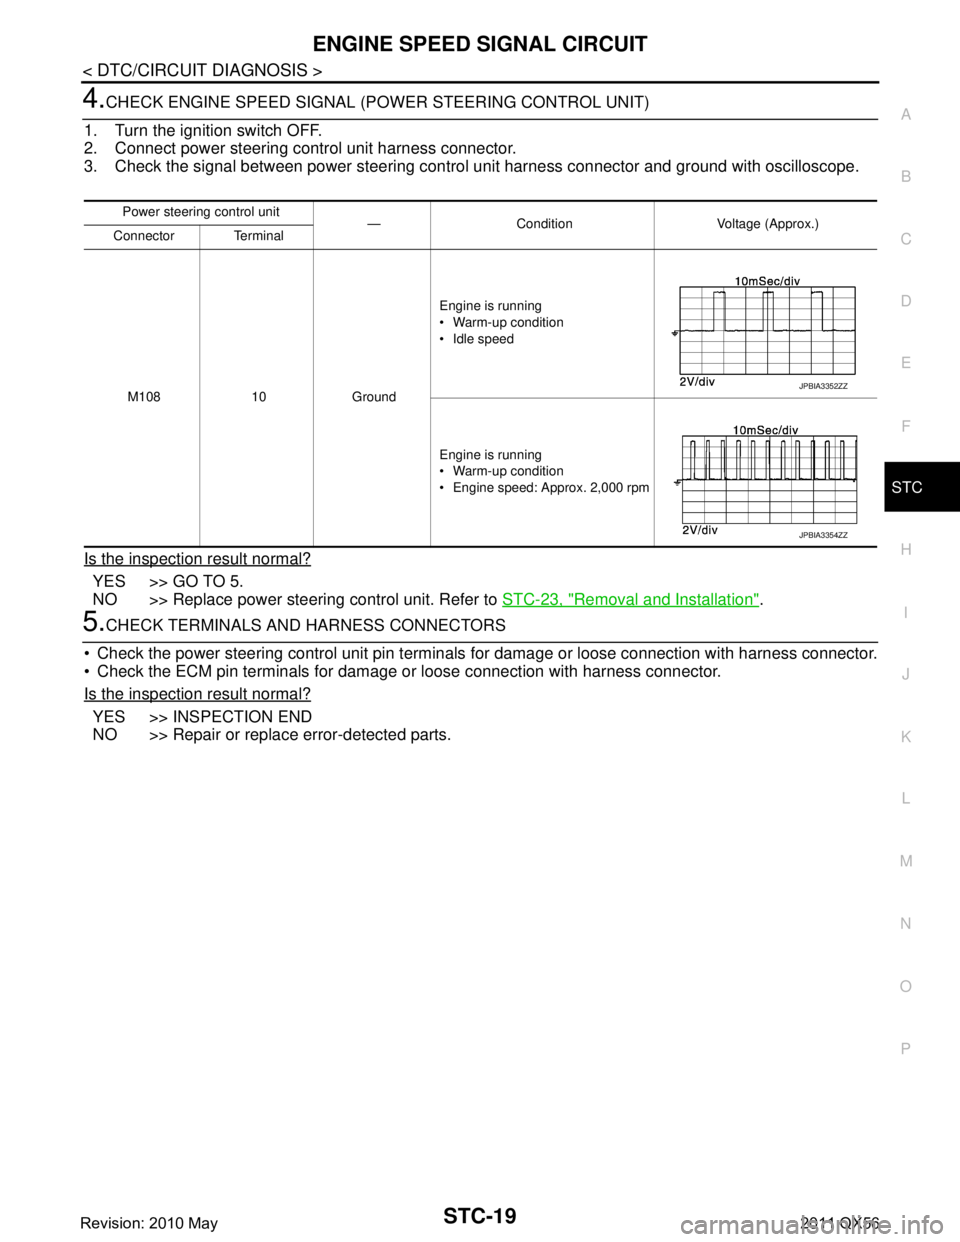
4.CHECK ENGINE SPEED SIGNAL (P OWER STEERING CONTROL UNIT)
1. Turn the ignition switch OFF.
2. Connect power steering control unit harness connector.
3. Check the signal between power steering control unit harness connector and ground with oscilloscope.
Is the inspection result normal?
YES >> GO TO 5.
NO >> Replace power steering control unit. Refer to STC-23, "
Removal and Installation".
5.CHECK TERMINALS AND HARNESS CONNECTORS
Check the power steering control unit pin terminal s for damage or loose connection with harness connector.
Check the ECM pin terminals for damage or loose connection with harness connector.
Is the inspection result normal?
YES >> INSPECTION END
NO >> Repair or replace error-detected parts.
Power steering control unit — Condition Voltage (Approx.)
Connector Terminal
M108 10 Ground Engine is running
Warm-up condition
Idle speed
Engine is running
Warm-up condition
Engine speed: Approx. 2,000 rpm
JPBIA3352ZZ
JPBIA3354ZZ
Revision: 2010 May2011 QX56
Page 5065 of 5598
STC-20
< DTC/CIRCUIT DIAGNOSIS >
VEHICLE SPEED SIGNAL CIRCUIT
VEHICLE SPEED SIGNAL CIRCUIT
Diagnosis ProcedureINFOID:0000000006256130
1.PERFORM COMBINATION METER SELF-DIAGNOSIS
With CONSULT-III
Perform “METER/M&A” self-diagnosis. Refer to MWI-30, "
CONSULT-III Function".
Is any DTC detected?
YES >> Check the DTC.
NO >> GO TO 2.
2.CHECK HARNESS BETWEEN COMBINATION ME TER AND POWER STEERING CONTROL UNIT
1. Turn the ignition switch OFF.
2. Disconnect combination meter harness connector.
3. Disconnect power steering control unit harness connector.
4. Check the continuity between combination meter harness connector and power steering control unit har-
ness connector.
5. Check the continuity between power st eering control unit harness connector and ground.
Is the inspection result normal?
YES >> GO TO 3.
NO >> Repair or replace error-detected parts.
3.CHECK VEHICLE SPEED SIGN AL (COMBINATION METER)
1. Connect combination meter harness connector.
2. Check the combination meter input/output standard values. Refer to MWI-35, "
Reference Value".
Is the inspection result normal?
YES >> GO TO 4.
NO >> Replace combination meter Refer to MWI-85, "
Removal and Installation".
4.CHECK VEHICLE SPEED SIGNAL (POWER STEERING CONTROL UNIT)
1. Turn the ignition switch OFF.
2. Connect power steering control unit harness connector.
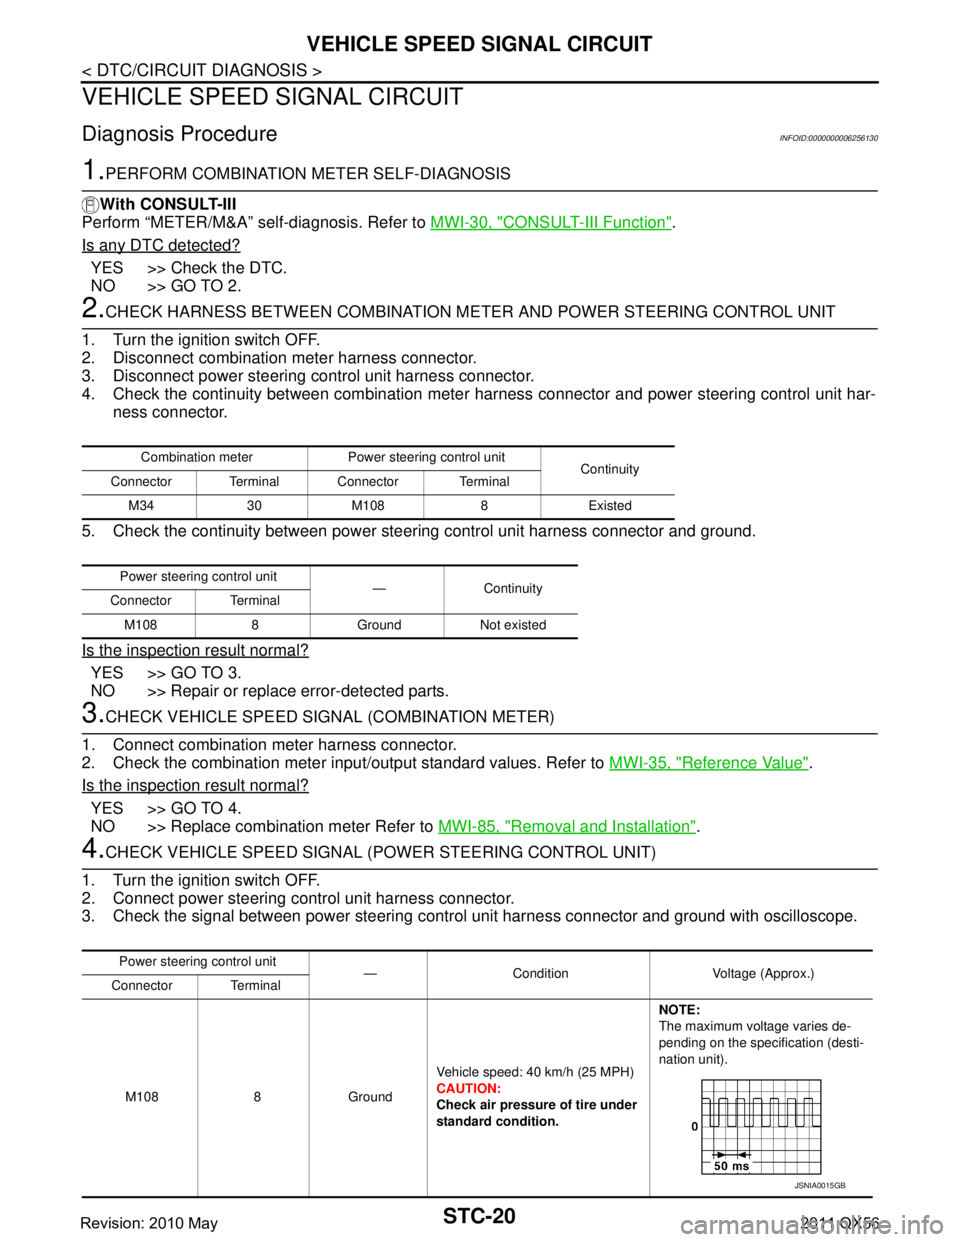
3. Check the signal between power steering cont rol unit harness connector and ground with oscilloscope.
Combination meter Power steering control unit
Continuity
Connector Terminal Connector Terminal
M34 30 M108 8 Existed
Power steering control unit —Continuity
Connector Terminal
M108 8 Ground Not existed
Power steering control unit — Condition Voltage (Approx.)
Connector Terminal
M108 8 Ground Vehicle speed: 40 km/h (25 MPH)
CAUTION:
Check air pressure of tire under
standard condition.NOTE:
The maximum voltage varies de-
pending on the specification (desti-
nation unit).
JSNIA0015GB
Revision: 2010 May2011 QX56
Page 5066 of 5598
VEHICLE SPEED SIGNAL CIRCUITSTC-21
< DTC/CIRCUIT DIAGNOSIS >
C
DE
F
H I
J
K L
M A
B
STC
N
O P
Is the inspection result normal?
YES >> GO TO 5.
NO >> Replace power steering control unit. Refer to STC-23, "
Removal and Installation".
5.CHECK TERMINALS AND HARNESS CONNECTORS
Check the power steering control unit pin terminal s for damage or loose connection with harness connector.
Check the combination meter pin terminals fo r damage or loose connection with harness connector.
Is the inspection result normal?
YES >> INSPECTION END
NO >> Repair or replace error-detected parts.
Revision: 2010 May2011 QX56
Page 5067 of 5598
STC-22
< SYMPTOM DIAGNOSIS >
UNBALANCE STEERING WHEEL TURNING FORCE (TORQUE VARIATION)
SYMPTOM DIAGNOSIS
UNBALANCE STEERING WHEEL TURNING FORCE (TORQUE VARIA-
TION)
Description INFOID:0000000006256131
Hard steering when fully turning the steering wheel.
Light steering when driving at a high speed.
Diagnosis Procedure INFOID:0000000006256132
1.CHECK SYSTEM FOR POWER SUPPLY AND GROUND
Perform trouble diagnosis for power supply and ground. Refer to STC-14, "
Diagnosis Procedure".
Is the inspection result normal?
YES >> GO TO 2.
NO >> Repair or replace error-detected parts.
2.CHECK SYSTEM FOR VEHICLE SPEED SIGNAL
Perform trouble diagnosis for vehicle speed signal. Refer to STC-20, "
Diagnosis Procedure".
Is the inspection result normal?
YES >> GO TO 3.
NO >> Repair or replace error-detected parts.
3.CHECK SYSTEM FOR ENGINE SPEED SIGNAL
Perform trouble diagnosis for engine speed signal. Refer to STC-18, "
Diagnosis Procedure".
Is the inspection result normal?
YES >> GO TO 4.
NO >> Repair or replace error-detected parts.
4.CHECK SYSTEM FOR POWER STEERING SOLENOID VALVE
Perform trouble diagnosis for power steering solenoid valve. Refer to STC-16, "
Diagnosis Procedure".
Is the inspection result normal?
YES >> Perform the symptom diagnosis for the steering system. Refer to ST-29, "NVH Troubleshooting
Chart".
NO >> Repair or replace error-detected parts.
Revision: 2010 May2011 QX56
Page 5068 of 5598
POWER STEERING CONTROL UNITSTC-23
< REMOVAL AND INSTALLATION >
C
DE
F
H I
J
K L
M A
B
STC
N
O P
REMOVAL AND INSTALLATION
POWER STEERING CONTROL UNIT
Removal and InstallationINFOID:0000000006256133
REMOVAL
1. Remove instrument lower cover. Refer to IP-14, "Removal and Installation".
2. Remove instrument lower panel RH. Refer to IP-14, "
Removal and Installation".
3. Disconnect power steering control unit connector.
4. Remove power steering control unit.
INSTALLATION
Install in the reverse order of removal.
Revision: 2010 May2011 QX56