Page 5510 of 5598

WT-60
< SYMPTOM DIAGNOSIS >
ID REGISTRATION CANNOT BE COMPLETED
ID REGISTRATION CANNOT BE COMPLETED
DescriptionINFOID:0000000006225542
The ID of the transmitter installed in each wheel cannot be registered in the tire pressure monitoring system.
Inspect the transmitter or the tire pressure monitoring system circuit.
Diagnosis ProcedureINFOID:0000000006225543
1.TRANSMITTER WAKE-UP
Perform the transmitter wake-up. Refer to WT-28, "
Work Procedure".
Is the transmitter wake-up completed?
YES >> GO TO 3.
NO >> GO TO 2.
2.CHECK TRANSMITTER ACTIVATION TOOL
Check transmitter activation tool.
Is the inspection result normal?
YES >> GO TO 3.
NO >> Replace battery for transmitter activation tool, or repair or replace transmitter activation tool.
3.TRANSMITTER ID REGISTRATION
Perform transmitter ID registration. Refer to WT-29, "
Work Procedure".
Is transmitter ID registration completed?
YES >> GO TO 4.
NO >> Change the work location and perform ID registration again.
4.CHECK TIRE PRESSURE SIGNAL
With CONSULT-III
1. Drive for 3 minutes at a speed of 40 km/h (25 MPH) or more, then drive normally for 10 minutes.
2. Stop the vehicle.
3. Select “DATA MONITOR” for “AIR PR ESSURE MONITOR” with CONSULT-III.
4. Within 5 minutes after vehicle stopped, check t hat the tire pressures match the standard value.
Is the inspection result normal?
YES >> INSPECTION END
NO >> Change the work location, then GO TO 3.
Monitor item Displayed value
AIR PRESS FL Approximately equal to the indication on tire gauge value for front LH tire
AIR PRESS FR Approximately equal to the indica tion on tire gauge value for front RH tire
AIR PRESS RR Approximately equal to the indica tion on tire gauge value for rear RH tire
AIR PRESS RL Approximately equal to the indicati on on tire gauge value for rear LH tire
Revision: 2010 May2011 QX56
Page 5511 of 5598
NOISE, VIBRATION AND HARSHNESS (NVH) TROUBLESHOOTINGWT-61
< SYMPTOM DIAGNOSIS >
C
DF
G H
I
J
K L
M A
B
WT
N
O P
NOISE, VIBRATION AND HARSHN ESS (NVH) TROUBLESHOOTING
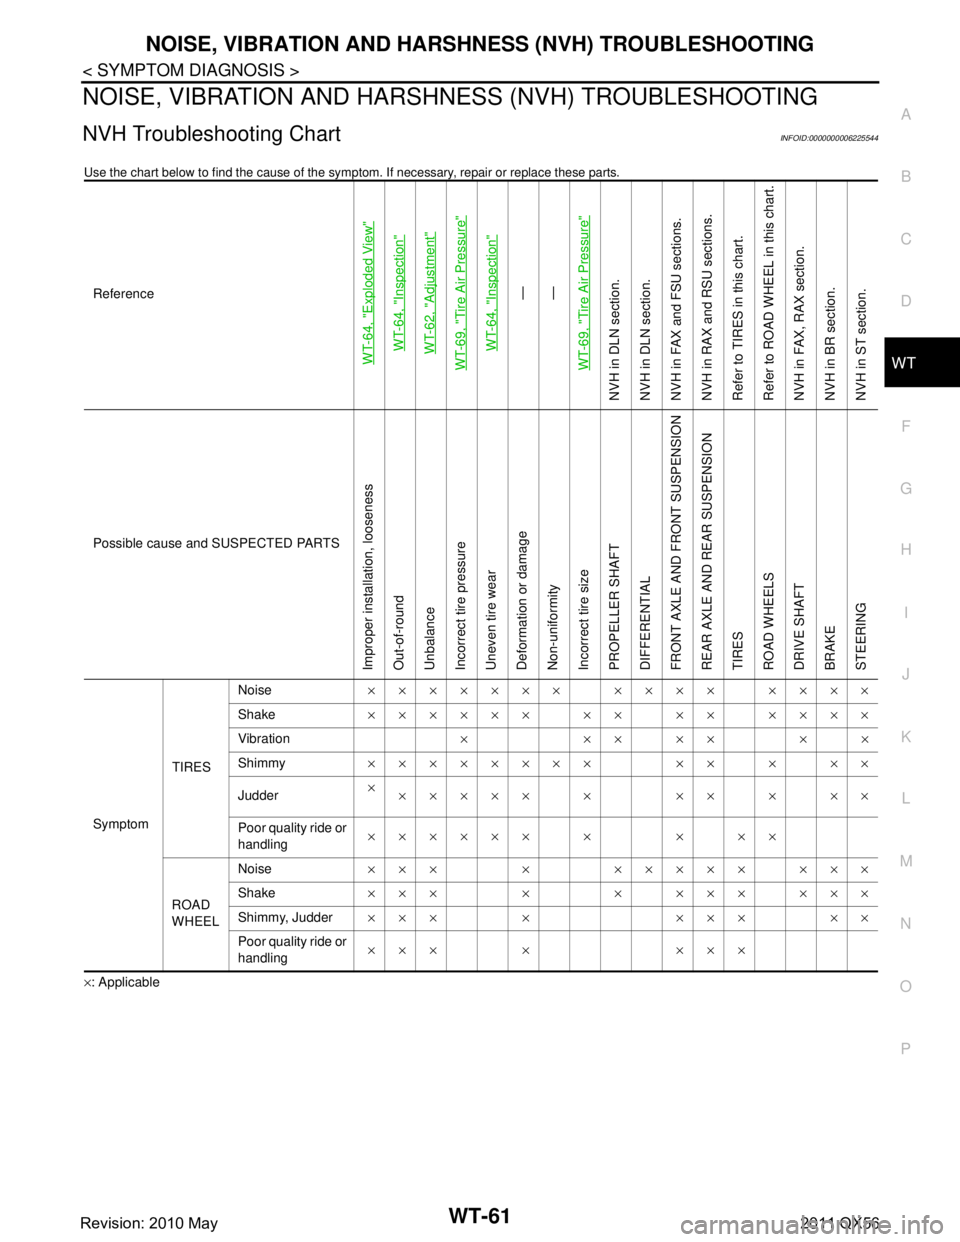
NVH Troubleshooting ChartINFOID:0000000006225544
Use the chart below to find the cause of the symp tom. If necessary, repair or replace these parts.
×: ApplicableReference
WT-64, "
Exploded View
"
WT-64, "
Inspection
"
WT-62, "
Adjustment
"
WT-69, "
Tire Air Pressure
"
WT-64, "
Inspection
"
—
—
WT-69, "
Tire Air Pressure
"
NVH in DLN section.
NVH in DLN section.
NVH in FAX and FSU sections.
NVH in RAX and RSU sections.
Refer to TIRES in this chart.
Refer to ROAD WHEEL in this chart.
NVH in FAX, RAX section.
NVH in BR section.
NVH in ST section.
Possible cause and SUSPECTED PARTS
Improper installation, looseness
Out-of-round
Unbalance
Incorrect tire pressure
Uneven tire wear
Deformation or damage
Non-uniformity
Incorrect tire size
PROPELLER SHAFT
DIFFERENTIAL
FRONT AXLE AND FRONT SUSPENSION
REAR AXLE AND REAR SUSPENSION
TIRES
ROAD WHEELS
DRIVE SHAFT
BRAKE
STEERING
Symptom TIRESNoise
××××××× ×××× ××××
Shake ×××××× ×× ×× ××××
Vibration ×××××××
Shimmy ×××××××× ×× × ××
Judder ×
××××× × ×× × ××
Poor quality ride or
handling ×××××× × × ××
ROAD
WHEEL Noise
××× × ××××× ×××
Shake ××× × × ××× ×××
Shimmy, Judder ××× × ××× ××
Poor quality ride or
handling ××× × ×××
Revision: 2010 May2011 QX56
Page 5512 of 5598
WT-62
< PERIODIC MAINTENANCE >
ROAD WHEEL
PERIODIC MAINTENANCE
ROAD WHEEL
AdjustmentINFOID:0000000006225545
BALANCING WHEELS (BONDING WEIGHT TYPE)
Preparation Before Adjustment
Using releasing agent, remove double-faced adhesive tape from the road wheel.
CAUTION:
Be careful not to scratch the road wheel during removal.
After removing double-faced adhesive tape, wi pe clean traces of releasing agent from the road
wheel.
Wheel Balance Adjustment
If a tire balance machine has adhesion balance weight m ode settings and drive-in weight mode setting, select
and adjust a drive-in weight mode suitable for road wheels.
1. Set road wheel on tire balance machine using the center hole as a guide. Start the tire balance machine.
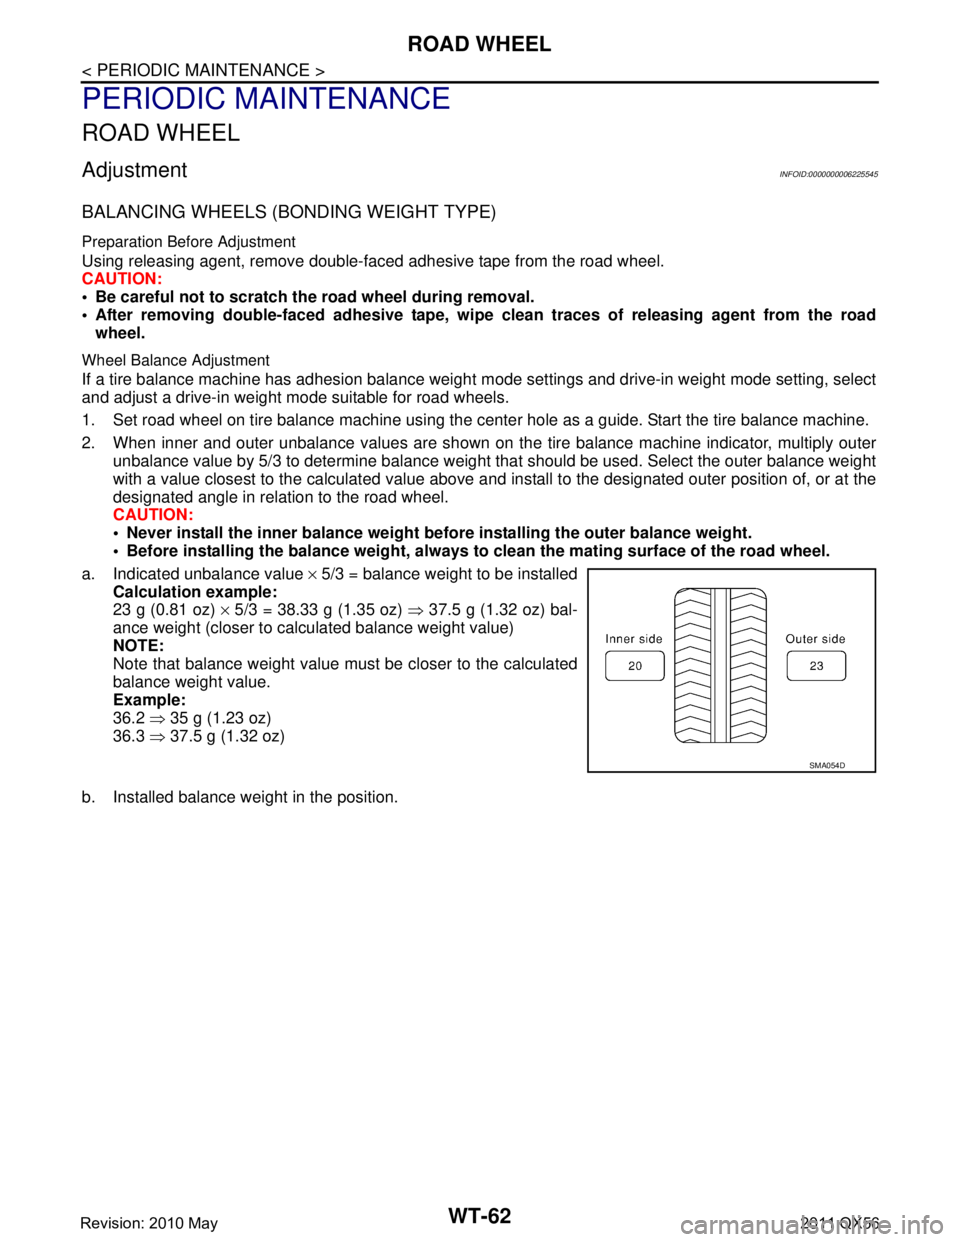
2. When inner and outer unbalance values are shown on the tire balance machine indicator, multiply outer unbalance value by 5/3 to determine balance weight t hat should be used. Select the outer balance weight
with a value closest to the calculated value above and in stall to the designated outer position of, or at the
designated angle in relation to the road wheel.
CAUTION:
Never install the inner balance weight be fore installing the outer balance weight.
Before installing the balance weight, always to clean the mating surface of the road wheel.
a. Indicated unbalance value × 5/3 = balance weight to be installed
Calculation example:
23 g (0.81 oz) × 5/3 = 38.33 g (1.35 oz) ⇒ 37.5 g (1.32 oz) bal-
ance weight (closer to calculated balance weight value)
NOTE:
Note that balance weight value must be closer to the calculated
balance weight value.
Example:
36.2 ⇒ 35 g (1.23 oz)
36.3 ⇒ 37.5 g (1.32 oz)
b. Installed balance weight in the position.
SMA054D
Revision: 2010 May2011 QX56
Page 5513 of 5598
ROAD WHEELWT-63
< PERIODIC MAINTENANCE >
C
DF
G H
I
J
K L
M A
B
WT
N
O P
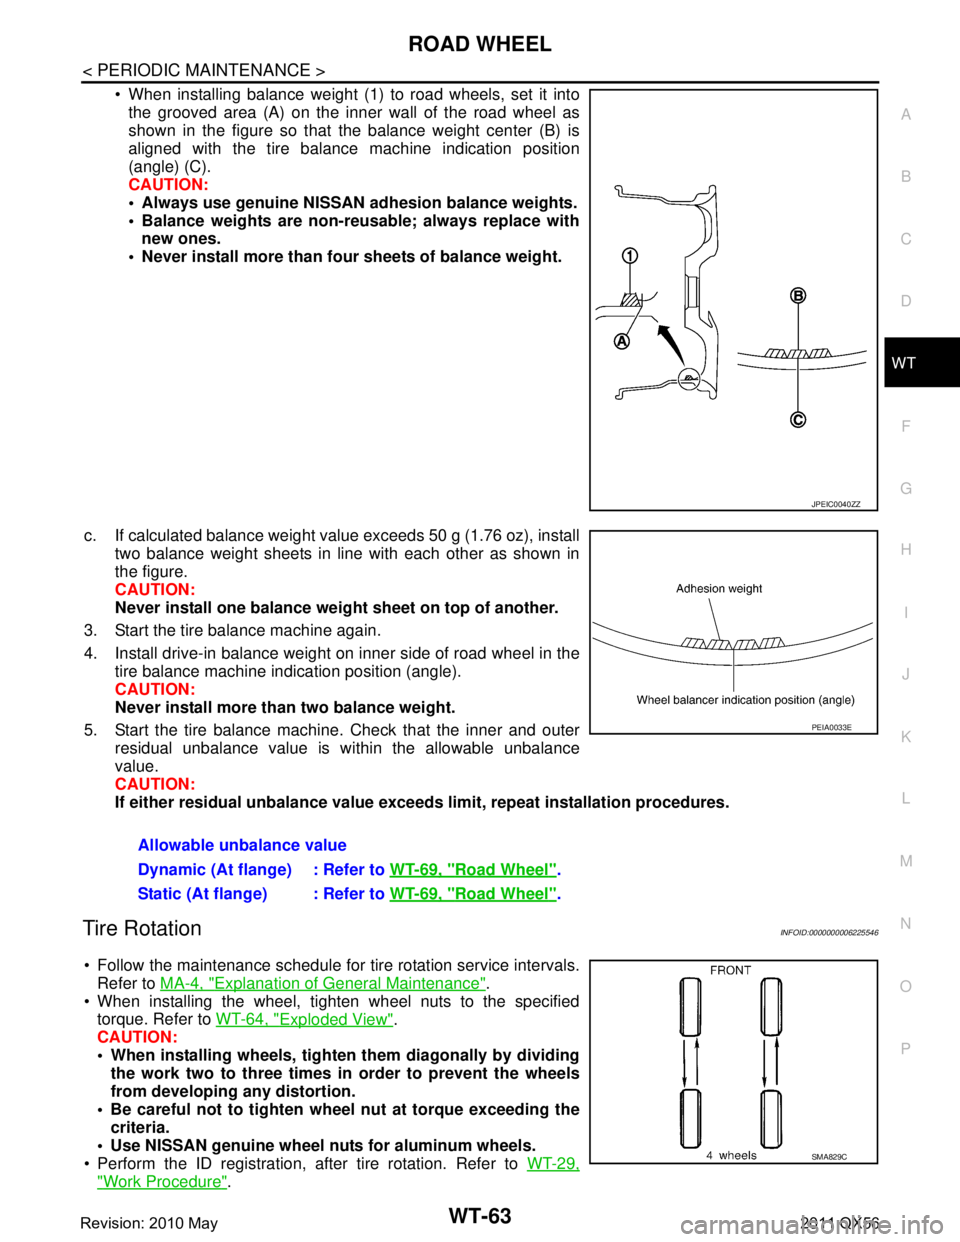
When installing balance weight (1) to road wheels, set it into the grooved area (A) on the inner wall of the road wheel as
shown in the figure so that the balance weight center (B) is
aligned with the tire balance machine indication position
(angle) (C).
CAUTION:
Always use genuine NISSAN ad hesion balance weights.
Balance weights are non-re usable; always replace with
new ones.
Never install more than four sheets of balance weight.
c. If calculated balance weight value exceeds 50 g (1.76 oz), install two balance weight sheets in line with each other as shown in
the figure.
CAUTION:
Never install one balance weight sheet on top of another.
3. Start the tire balance machine again.
4. Install drive-in balance weight on inner side of road wheel in the tire balance machine indication position (angle).
CAUTION:
Never install more than two balance weight.
5. Start the tire balance machine. Check that the inner and outer residual unbalance value is within the allowable unbalance
value.
CAUTION:
If either residual unbalan ce value exceeds limit, repeat installation procedures.
Tire RotationINFOID:0000000006225546
Follow the maintenance schedule for tire rotation service intervals.
Refer to MA-4, "
Explanation of General Maintenance".
When installing the wheel, tighten wheel nuts to the specified torque. Refer to WT-64, "
Exploded View".
CAUTION:
When installing wheels, tighte n them diagonally by dividing
the work two to three times in order to prevent the wheels
from developing any distortion.
Be careful not to tighten wh eel nut at torque exceeding the
criteria.
Use NISSAN genuine wheel nuts for aluminum wheels.
Perform the ID registration, after tire rotation. Refer to WT-29,
"Work Procedure".
JPEIC0040ZZ
Allowable unbalance value
Dynamic (At flange) : Refer to WT-69, "
Road Wheel".
Static (At flange) : Refer to WT-69, "
Road Wheel".
PEIA0033E
SMA829C
Revision: 2010 May2011 QX56
Page 5514 of 5598
WT-64
< REMOVAL AND INSTALLATION >
ROAD WHEEL TIRE ASSEMBLY
REMOVAL AND INSTALLATION
ROAD WHEEL TIRE ASSEMBLY
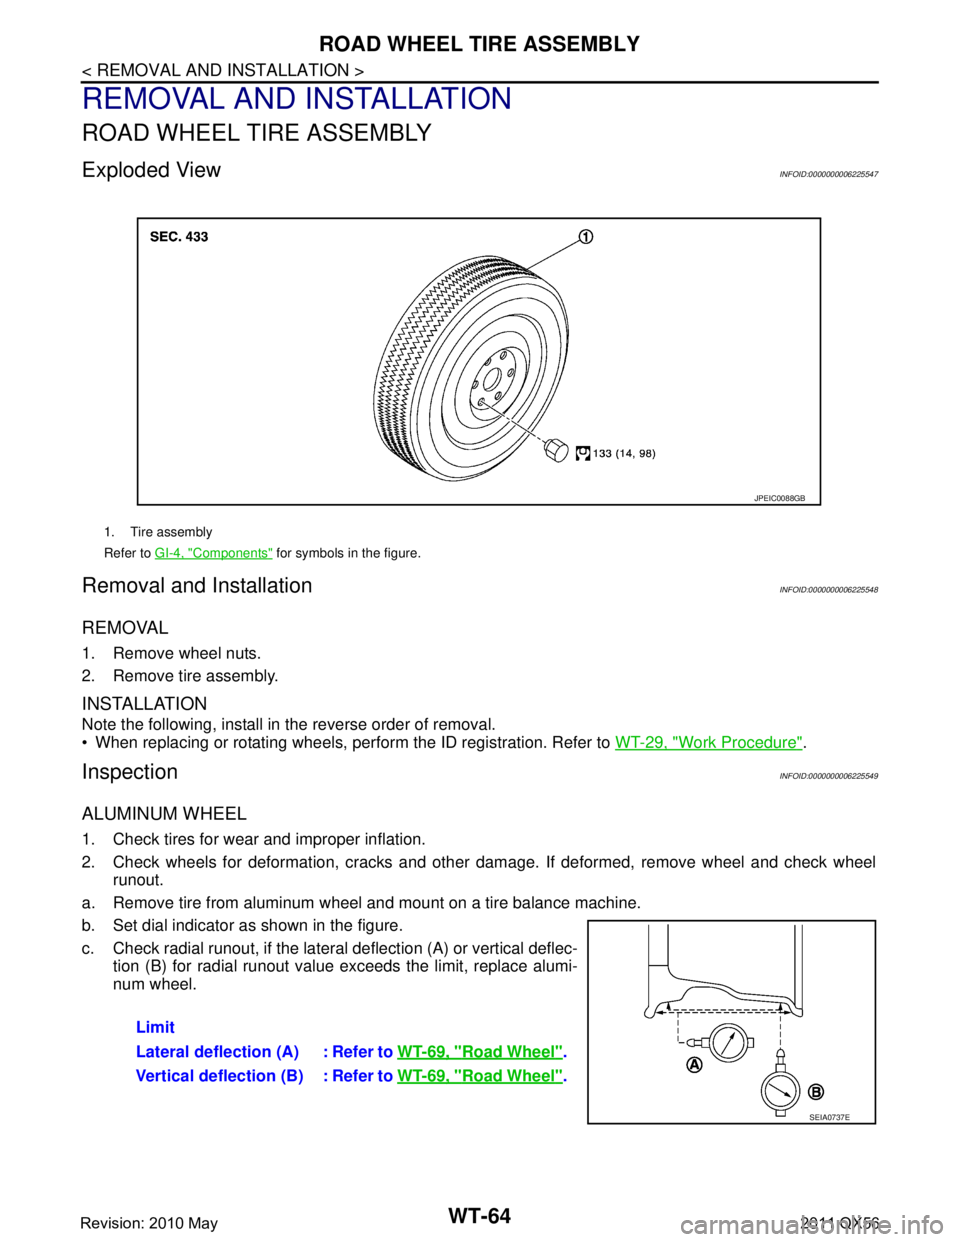
Exploded ViewINFOID:0000000006225547
Removal and InstallationINFOID:0000000006225548
REMOVAL
1. Remove wheel nuts.
2. Remove tire assembly.
INSTALLATION
Note the following, install in the reverse order of removal.
When replacing or rotating wheels, perform the ID registration. Refer to WT-29, "
Work Procedure".
InspectionINFOID:0000000006225549
ALUMINUM WHEEL
1. Check tires for wear and improper inflation.
2. Check wheels for deformation, cracks and other damage. If deformed, remove wheel and check wheel
runout.
a. Remove tire from aluminum wheel and mount on a tire balance machine.
b. Set dial indicator as shown in the figure.
c. Check radial runout, if the latera l deflection (A) or vertical deflec-
tion (B) for radial runout value exceeds the limit, replace alumi-
num wheel.
1. Tire assembly
Refer to GI-4, "
Components" for symbols in the figure.
JPEIC0088GB
Limit
Lateral deflection (A) : Refer to WT-69, "
Road Wheel".
Vertical deflection (B) : Refer to WT-69, "
Road Wheel".
SEIA0737E
Revision: 2010 May2011 QX56
Page 5517 of 5598
TRANSMITTERWT-67
< REMOVAL AND INSTALLATION >
C
DF
G H
I
J
K L
M A
B
WT
N
O P
1. Put first side of tire onto rim.
2. Mount transmitter on rim and tighten nut. CAUTION:
Speed for tightening nut sh ould be less than 10 rpm.
3. Place wheel on turntable of tire machine. Ensure that transmitter (1) is 270 degree from mounting head (2) when second side of
tire is fitted.
NOTE:
Do not touch transmitter at mounting head.
4. Lubricate tire well and fit second side of tire as normal. Ensure that tire does not rotate relative to rim.
5. Inflate tire and fit to appropriate wheel position.
6. Perform the transmitter wake-up after replacing transmitter. Refer to WT-28, "
Work Procedure".
SEIA0049E
JPEIC0014GB
Revision: 2010 May2011 QX56
Page 5518 of 5598
WT-68
< REMOVAL AND INSTALLATION >
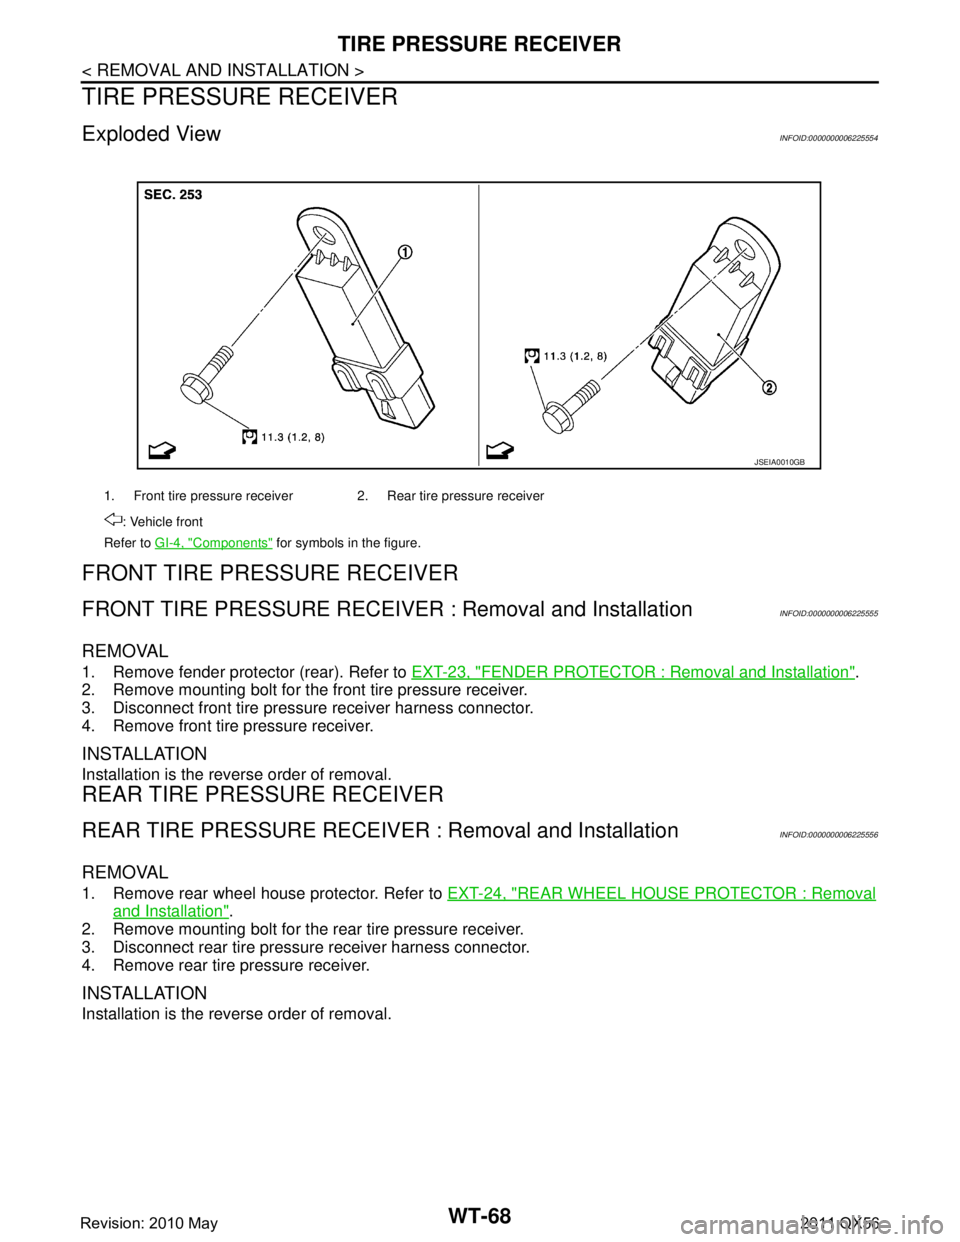
TIRE PRESSURE RECEIVER
TIRE PRESSURE RECEIVER
Exploded ViewINFOID:0000000006225554
FRONT TIRE PRESSURE RECEIVER
FRONT TIRE PRESSURE RECEIVER : Removal and InstallationINFOID:0000000006225555
REMOVAL
1. Remove fender protector (rear). Refer to EXT-23, "FENDER PROTECTOR : Removal and Installation".
2. Remove mounting bolt for the front tire pressure receiver.
3. Disconnect front tire pressure receiver harness connector.
4. Remove front tire pressure receiver.
INSTALLATION
Installation is the reverse order of removal.
REAR TIRE PRESSURE RECEIVER
REAR TIRE PRESSURE RECEIVER : Removal and InstallationINFOID:0000000006225556
REMOVAL
1. Remove rear wheel house protector. Refer to EXT-24, "REAR WHEEL HOUSE PROTECTOR : Removal
and Installation".
2. Remove mounting bolt for the rear tire pressure receiver.
3. Disconnect rear tire pressure receiver harness connector.
4. Remove rear tire pressure receiver.
INSTALLATION
Installation is the reverse order of removal.
1. Front tire pressure receiver 2. Rear tire pressure receiver
: Vehicle front
Refer to GI-4, "
Components" for symbols in the figure.
JSEIA0010GB
Revision: 2010 May2011 QX56
Page 5519 of 5598
SERVICE DATA AND SPECIFICATIONS (SDS)
WT-69
< SERVICE DATA AND SPECIFICATIONS (SDS)
C
D F
G H
I
J
K L
M A
B
WT
N
O P
SERVICE DATA AND SPECIFICATIONS (SDS)
SERVICE DATA AND SPECIFICATIONS (SDS)
Road WheelINFOID:0000000006225557
ALUMINUM WHEEL
Tire Air PressureINFOID:0000000006225558
Unit: kPa (kg/cm2, psi)
Item Limit
Radial runout Lateral deflection
Less than 0.3 mm (0.012 in)
Vertical deflection
Allowable unbalance Dynamic (At flange) Less than 7 g (0.25 oz) (one side)
Static (At flange) Less than 14 g (0.49 oz)
Tire size Air pressure
Front Rear
P275/60R20 114H 240 (2.4, 35)
P275/50R22 111H 240 (2.4, 35)
Revision: 2010 May2011 QX56