Page 4586 of 5598
SECOND SEATSE-127
< REMOVAL AND INSTALLATION >
C
DE
F
G H
I
K L
M A
B
SE
N
O P
(heater seat model only)
5. Remove the rear seat lever assembly. 1. Remove the rear seat lever assembly fixing screws.
2. Lift rear seat lever assembly and remove seatback control wire.
6. Remove the seatback center finisher. 1. Pull seatback center finisher cover rearward to remove.
2. Remove the seatback center finisher fixing screws.
3. Remove the seat belt from seatback center finisher.
7. Remove the center seat belt anchor. 1. Remove the seat cushion and seat cushion under cover.
Refer to SE-130, "
SEAT CUSHION : Disassembly and Assembly".
2. Remove the center seat belt anchor. Refer to SB-13, "
SEAT BELT RETRACTOR : Removal and Installation".
8. Remove the seatback trim and seatback pad. 1. Remove the headrest holder. CAUTION:
Before installing headrest holder check its orientation.
(front/rear and right/left)
JMJIA4471ZZ
: Pawl
JMJIA3877ZZ
PIIB4084J
Revision: 2010 May2011 QX56
Page 4588 of 5598

SECOND SEATSE-129
< REMOVAL AND INSTALLATION >
C
DE
F
G H
I
K L
M A
B
SE
N
O P
1. Slide and align the clips (B) to the holes on the seatback as shown in the figure, and then remove the seatback board
(A).
2. Remove the clips after removing the seatback board.
3. Disconnect the seatback heater unit harness connector (A).
(heater seat model only)
4. Remove the rear seat lever assembly. 1. Remove the rear seat lever assembly fixing screws.
2. Lift rear seat lever assembly and remove seatback control wire.
5. Remove the seatback trim and seatback pad. 1. Remove the headrest holder. CAUTION:
Before installing headrest holder check its orientation.
(front/rear and right/left)
2. Roll up seatback trim (2) from backward to forward so that seat control lever escutcheon (1) is visible.
3. Remove the seat control lever escutcheon (1).
4. Remove the seatback trim and seat back pad from the seatback frame.
5. Remove the hog rings, and separate the seatback trim and seatback pad.
6. Remove the seatback frame.
JMJIA4076ZZ
JMJIA4262ZZ
PIIB4084J
: Pawl
JMJIA3878ZZ
Revision: 2010 May2011 QX56
Page 4590 of 5598

SECOND SEATSE-131
< REMOVAL AND INSTALLATION >
C
DE
F
G H
I
K L
M A
B
SE
N
O P
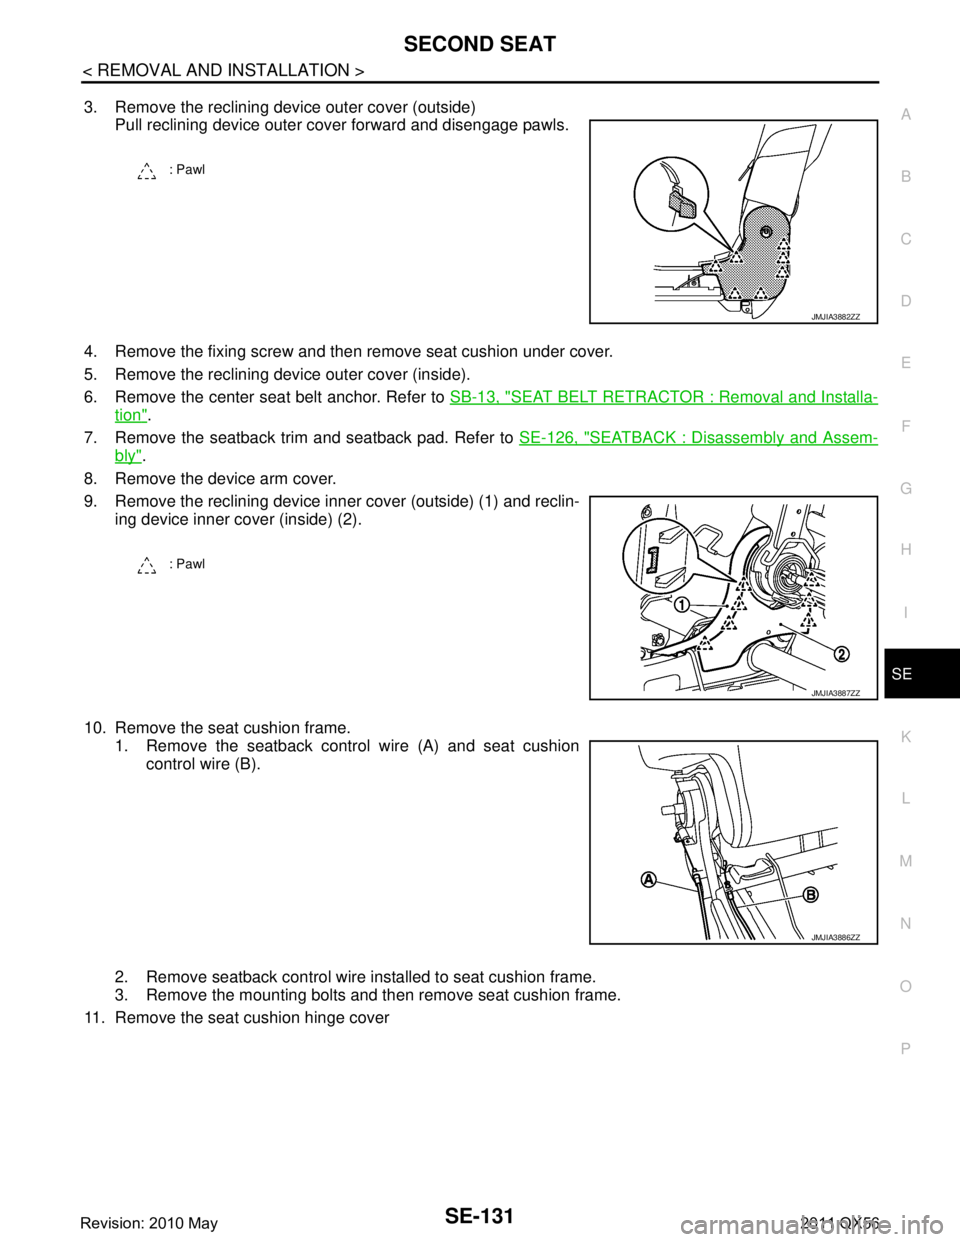
3. Remove the reclining device outer cover (outside) Pull reclining device outer cover forward and disengage pawls.
4. Remove the fixing screw and then remove seat cushion under cover.
5. Remove the reclining device outer cover (inside).
6. Remove the center seat belt anchor. Refer to SB-13, "
SEAT BELT RETRACTOR : Removal and Installa-
tion".
7. Remove the seatback trim and seatback pad. Refer to SE-126, "
SEATBACK : Disassembly and Assem-
bly".
8. Remove the device arm cover.
9. Remove the reclining device inner cover (outside) (1) and reclin- ing device inner cover (inside) (2).
10. Remove the seat cushion frame. 1. Remove the seatback control wire (A) and seat cushion control wire (B).
2. Remove seatback control wire installed to seat cushion frame.
3. Remove the mounting bolts and then remove seat cushion frame.
11. Remove the seat cushion hinge cover
: Pawl
JMJIA3882ZZ
: Pawl
JMJIA3887ZZ
JMJIA3886ZZ
Revision: 2010 May2011 QX56
Page 4592 of 5598

SECOND SEATSE-133
< REMOVAL AND INSTALLATION >
C
DE
F
G H
I
K L
M A
B
SE
N
O P
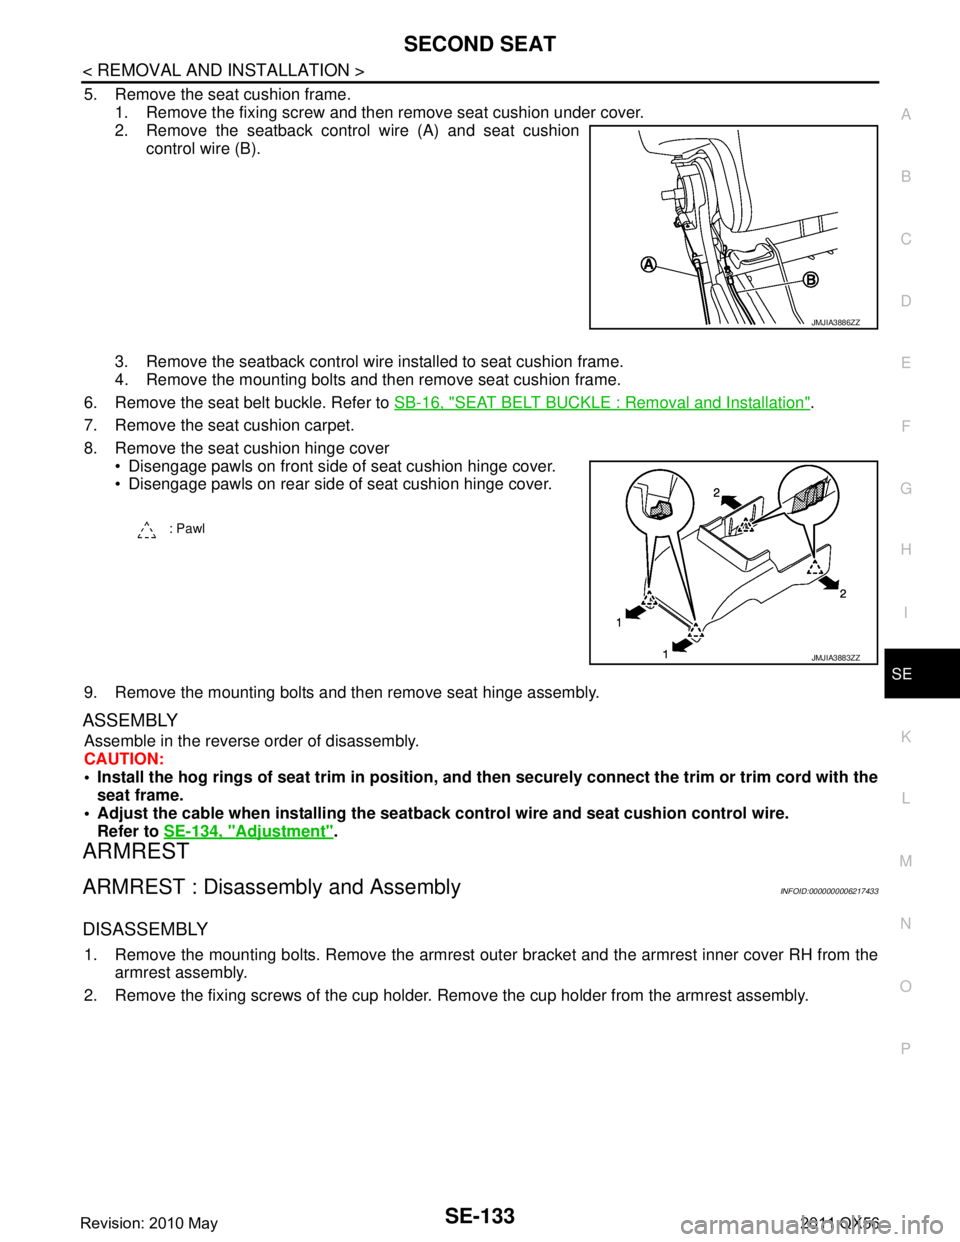
5. Remove the seat cushion frame. 1. Remove the fixing screw and then remove seat cushion under cover.
2. Remove the seatback control wire (A) and seat cushion control wire (B).
3. Remove the seatback control wire installed to seat cushion frame.
4. Remove the mounting bolts and then remove seat cushion frame.
6. Remove the seat belt buckle. Refer to SB-16, "
SEAT BELT BUCKLE : Removal and Installation".
7. Remove the seat cushion carpet.
8. Remove the seat cushion hinge cover Disengage pawls on front side of seat cushion hinge cover.
Disengage pawls on rear side of seat cushion hinge cover.
9. Remove the mounting bolts and then remove seat hinge assembly.
ASSEMBLY
Assemble in the reverse order of disassembly.
CAUTION:
Install the hog rings of seat trim in position, and then securely connect the trim or trim cord with the
seat frame.
Adjust the cable when installing the seatb ack control wire and seat cushion control wire.
Refer to SE-134, "
Adjustment".
ARMREST
ARMREST : Disassembly and AssemblyINFOID:0000000006217433
DISASSEMBLY
1. Remove the mounting bolts. Remove the armrest out er bracket and the armrest inner cover RH from the
armrest assembly.
2. Remove the fixing screws of the cup holder. Remove the cup holder from the armrest assembly.
JMJIA3886ZZ
: Pawl
JMJIA3883ZZ
Revision: 2010 May2011 QX56
Page 4594 of 5598
SECOND SEATSE-135
< REMOVAL AND INSTALLATION >
C
DE
F
G H
I
K L
M A
B
SE
N
O P
1. Align to hole and insert top end (A) of seatback frame side of seat cushion control wire (1).
2. Fit 2nd groove from the top end (B) of adjusting plastic part of seat cushion control wire (1) to the end of groove.
3. Lower the top end (A) of seat cushion control wire (1) to the lower end of hole.
4. Check branch portion (1) of seat cushi on control wire for the following items.
Check that ball (B) of wire top end is only visible from sponge portion (A).
Pull plastic portion (C) and check that seat cushion control wire is not disconnected.
CAUTION:
Adjust again for the following stat us A or B as shown in the figure.
Status A
The ball is not visible from sponge (A) portion. Adjust in accordance with the following procedures.
: Vehicle front
JMJIA4166ZZ
JMJIA4169ZZ
JMJIA4170ZZ
Revision: 2010 May2011 QX56
Page 4596 of 5598
THIRD SEATSE-137
< REMOVAL AND INSTALLATION >
C
DE
F
G H
I
K L
M A
B
SE
N
O P
THIRD SEAT
Exploded ViewINFOID:0000000006217435
1. Headrest RH 2. Headrest holder (free) 3. Headrest holder (locked)
4. Seatback silencer RH 5. Seatback trim 6. Seatback pad
7. Seat harness RH 8. Seat bracket assembly RH 9. Seat cushion trim
JMJIA4258GB
Revision: 2010 May2011 QX56
Page 4598 of 5598
THIRD SEATSE-139
< REMOVAL AND INSTALLATION >
C
DE
F
G H
I
K L
M A
B
SE
N
O P
Install in the reverse order of removal.
Disassembly and AssemblyINFOID:0000000006217437
SEATBACK
Disassembly
1. Remove the hinge cover. 1. Remove the seat cushion trim and seat cushion pad from seat cushion frame.
2. Remove the fixing screws, and then remove the hinge cover.
2. Remove the mounting bolts, and then remove the seatback assembly.
3. Open fastener (A) of seatback trim. LH side
RH side
4. Remove clips that retain seatback board and seatback trim.
5. Remove the seatback board and the clips. 1. Slide and align the clips (B) to the holes on the seatback board (A) as shown in the figure, and then remove the seat-
back board (A).
2. Remove the clips after removing the seatback board.
6. Remove the seatback trim and seatback pad.
JMJIA4328ZZ
JMJIA4329ZZ
JMJIA4076ZZ
Revision: 2010 May2011 QX56