2011 INFINITI QX56 light
[x] Cancel search: lightPage 4561 of 5598

SE-102
< SYMPTOM DIAGNOSIS >
SQUEAK AND RATTLE TROUBLE DIAGNOSES
Most of these incidents can be repaired by adjusting, securing or insulating the item(s) or component(s) caus-
ing the noise.
SUNROOF/HEADLINING
Noises in the sunroof/headlining area c an often be traced to one of the following:
1. Sunroof lid, rail, linkage or seals making a rattle or light knocking noise
2. Sunvisor shaft shaking in the holder
3. Front or rear windshield touching headlining and squeaking
Again, pressing on the components to stop the noise while duplicating the conditions can isolate most of these
incidents. Repairs usually consist of insulating with felt cloth tape.
SEATS
When isolating seat noise it's important to note the position the seats in and the load placed on the seat when
the noise occurs. These conditions should be duplicated when verifying and isolating the cause of the noise.
Cause of seat noise include:
1. Headrest rods and holder
2. A squeak between the seat pad cushion and frame
3. The rear seatback lock and bracket
These noises can be isolated by moving or pressing on the suspected components while duplicating the con-
ditions under which the noise occurs.Most of these incidents can be repaired by repositioning the component
or applying urethane tape to the contact area.
UNDERHOOD
Some interior noise may be caused by components under the hood or on the engine wall. The noise is then
transmitted into the passenger compartment.
Causes of transmitted underhood noise include:
1. Any component mounted to the engine wall
2. Components that pass through the engine wall
3. Engine wall mounts and connectors
4. Loose radiator mounting pins
5. Hood bumpers out of adjustment
6. Hood striker out of adjustment
These noises can be difficult to isolate since they cannot be reached from the interior of the vehicle. The best
method is to secure, move or insulate one component at a time and test drive the \
vehicle. Also, engine RPM
or load can be changed to isolate the noise. Repairs can usually be made by moving, adjusting, securing, or
insulating the component causing the noise.
Revision: 2010 May2011 QX56
Page 4631 of 5598
![INFINITI QX56 2011 Factory Service Manual
SEC-24
< SYSTEM DESCRIPTION >[WITH INTELLIGENT KEY SYSTEM]
DIAGNOSIS SYSTEM (BCM)
SELF-DIAG RESULT
Refer to
BCS-57, "DTCIndex".
DATA MONITOR
PW DOWN SET Unlock button pressing time on Intelligent Ke INFINITI QX56 2011 Factory Service Manual
SEC-24
< SYSTEM DESCRIPTION >[WITH INTELLIGENT KEY SYSTEM]
DIAGNOSIS SYSTEM (BCM)
SELF-DIAG RESULT
Refer to
BCS-57, "DTCIndex".
DATA MONITOR
PW DOWN SET Unlock button pressing time on Intelligent Ke](/manual-img/42/57033/w960_57033-4630.png)
SEC-24
< SYSTEM DESCRIPTION >[WITH INTELLIGENT KEY SYSTEM]
DIAGNOSIS SYSTEM (BCM)
SELF-DIAG RESULT
Refer to
BCS-57, "DTCIndex".
DATA MONITOR
PW DOWN SET Unlock button pressing time on Intelligent Key button can be selected from the following with
this mode
MODE 1: 3 sec
MODE 2: Non-operation
MODE 3: 5 sec
WELCOME LIGHT SELECT Welcome light function mode can be selected from the following with this mode
Puddle/Outside Handle
Room lamp
Head & Tail Lamps (this item is displayed, but cannot be used)
Heart Beat
WELCOME LIGHT OP SET Welcome light function mode can be changed to operation with this mode
On: Operate
Off: Non-operation
Monitor item Description
Monitor Item Condition
REQ SW -DR Indicates [On/Off] condition of door request switch (driver side)
REQ SW -AS Indicates [On/Off] condition of door request switch (passenger side)
REQ SW -BD/TR Indicates [On/Off] condition of back door request switch
PUSH SW Indicates [On/Off] condition of push-button ignition switch
CLUTCH SW NOTE:
This item is displayed, but cannot be monitored
BRAKE SW 1 Indicates [On/Off]* condition of stop lamp switch power supply
BRAKE SW 2 Indicates [On/Off] condition of stop lamp switch
DETE/CANCL SW Indicates [On/Off] condition of P position
SFT PN/N SW Indicates [On/Off] condition of P or N position
S/L -LOCK Indicates [On/Off] condition of steering lock unit (LOCK)
S/L -UNLOCK Indicates [On/Off] condition of steering lock unit (UNLOCK)
S/L RELAY -F/B Indicates [On/Off] condition of steering lock relay
UNLK SEN -DR Indicates [On/Off] condition of driver door UNLOCK status
PUSH SW -IPDM Indicates [On/Off] condition of push-button ignition switch
IGN RLY1 -F/B Indicates [On/Off] condition of ignition relay 1
DETE SW -IPDM Indicates [On/Off] condition of P position
SFT PN -IPDM Indicates [On/Off] condition of P or N position
SFT P -MET Indicates [On/Off] condition of P position
SFT N -MET Indicates [On/Off] condition of N position
ENGINE STATE Indicates [Stop/Stall/Crank/Run] condition of engine states
S/L LOCK-IPDM Indicates [On/Off] condition of steering lock unit (LOCK)
S/L UNLK-IPDM Indicates [On/Off] condition of steering lock unit (UNLOCK)
S/L RELAY-REQ Indicates [On/Off] condition of steering lock relay
VEH SPEED 1 Display the vehicle speed signal received from combination meter by numerical value [Km/h]
VEH SPEED 2 Display the vehi cle speed signal received from ABS or VDC or TCM by numerical value [Km/h]
DOOR STAT-DR Indicates [LOCK/READY/UNLK] condition of unlock sensor
DOOR STAT-AS Indicates [LOCK/READY/UNLK] condition of passenger side door status
ID OK FLAG Indicates [Set/Reset] condition of key ID
PRMT ENG STRT Indicates [Set/Reset] condition of engine start possibility
Revision: 2010 May2011 QX56
Page 4635 of 5598
![INFINITI QX56 2011 Factory Service Manual
SEC-28
< SYSTEM DESCRIPTION >[WITH INTELLIGENT KEY SYSTEM]
DIAGNOSIS SYSTEM (IPDM E/R)
DIAGNOSIS SYSTEM (IPDM E/R)
CONSULT-III Function (IPDM E/R)INFOID:0000000006365348
APPLICATION ITEM
CONSULT-III INFINITI QX56 2011 Factory Service Manual
SEC-28
< SYSTEM DESCRIPTION >[WITH INTELLIGENT KEY SYSTEM]
DIAGNOSIS SYSTEM (IPDM E/R)
DIAGNOSIS SYSTEM (IPDM E/R)
CONSULT-III Function (IPDM E/R)INFOID:0000000006365348
APPLICATION ITEM
CONSULT-III](/manual-img/42/57033/w960_57033-4634.png)
SEC-28
< SYSTEM DESCRIPTION >[WITH INTELLIGENT KEY SYSTEM]
DIAGNOSIS SYSTEM (IPDM E/R)
DIAGNOSIS SYSTEM (IPDM E/R)
CONSULT-III Function (IPDM E/R)INFOID:0000000006365348
APPLICATION ITEM
CONSULT-III performs the following functions via CAN communication with IPDM E/R.
SELF DIAGNOSTIC RESULT
Refer to
PCS-22, "DTCIndex".
DATA MONITOR
Monitor item
Diagnosis mode Description
Ecu Identification Allows confirmation of IPDM E/R part number.
Self Diagnostic Result Displays the diagnosis results judged by IPDM E/R.
Data Monitor Displays the real-time input/output data from IPDM E/R input/output data.
Active Test IPDM E/R can provide a drive signal to electronic components to check their operations.
CAN Diag Support Monitor The results of transmit/receive diagnosis of CAN communication can be read.
Monitor Item [Unit] MAIN SIG-
NALS Description
RAD FAN REQ
[1/2/3/4] ×
Displays the value of the cooling fan speed request signal received from ECM via
CAN communication.
AC COMP REQ
[Off/On] ×Displays the status of the A/C compressor request signal received from ECM via
CAN communication.
TA I L & C L R R E Q
[Off/On] ×Displays the status of the position light request signal received from BCM via CAN
communication.
HL LO REQ
[Off/On] ×
Displays the status of the low beam request signal received from BCM via CAN
communication.
HL HI REQ
[Off/On] ×Displays the status of the high beam request signal received from BCM via CAN
communication.
FR FOG REQ
[Off/On] ×Displays the status of the front fog light request signal received from BCM via
CAN communication.
FR WIP REQ
[Stop/1LOW/Low/Hi] ×
Displays the status of the front wiper request signal received from BCM via CAN
communication.
WIP AUTO STOP
[STOP P/ACT P] ×
Displays the status of the front wiper auto stop signal judged by IPDM E/R.
WIP PROT
[Off/BLOCK] ×
Displays the status of the front wiper fail-safe operation judged by IPDM E/R.
IGN RLY1 -REQ
[Off/On] Displays the status of the ignition switch ON signal received from BCM via CAN
communication.
IGN RLY
[Off/On] ×
Displays the status of the ignition relay judged by IPDM E/R.
PUSH SW
[Off/On] Displays the status of the push-button ignition switch judged by IPDM E/R.
INTER/NP SW
[Off/On] Displays the status of the shift position judged by IPDM E/R.
ST RLY CONT
[Off/On] Displays the status of the starter relay status signal received from BCM via CAN
communication.
IHBT RLY -REQ
[Off/On] Displays the status of the starter control relay signal received from BCM via CAN
communication.
ST/INHI RLY
[Off/ ST ON/INHI ON/UNKWN] Displays the status of the starter relay and starter control relay judged by IPDM
E/R.
Revision: 2010 May2011 QX56
Page 4747 of 5598
![INFINITI QX56 2011 Factory Service Manual
SEC-140
< DTC/CIRCUIT DIAGNOSIS >[WITH INTELLIGENT KEY SYSTEM]
HEADLAMP FUNCTION
HEADLAMP FUNCTION
Component Function CheckINFOID:0000000006226719
1.CHECK FUNCTION
1. Perform “HEAD LAMP(HI)” in � INFINITI QX56 2011 Factory Service Manual
SEC-140
< DTC/CIRCUIT DIAGNOSIS >[WITH INTELLIGENT KEY SYSTEM]
HEADLAMP FUNCTION
HEADLAMP FUNCTION
Component Function CheckINFOID:0000000006226719
1.CHECK FUNCTION
1. Perform “HEAD LAMP(HI)” in �](/manual-img/42/57033/w960_57033-4746.png)
SEC-140
< DTC/CIRCUIT DIAGNOSIS >[WITH INTELLIGENT KEY SYSTEM]
HEADLAMP FUNCTION
HEADLAMP FUNCTION
Component Function CheckINFOID:0000000006226719
1.CHECK FUNCTION
1. Perform “HEAD LAMP(HI)” in “ACTIVE TEST” m ode of “THEFT ALM” of “BCM” using CONSULT-III.
2. Check headlamps operation.
Is the inspection result normal?
YES >> INSPECTION END
NO >> Refer to SEC-140, "
Diagnosis Procedure".
Diagnosis ProcedureINFOID:0000000006226720
1.CHECK HEADLAMP FUNCTION
Refer to EXL-86, "
Component Function Check".
Is the inspection result normal?
YES >> GO TO 2.
NO >> Repair or replace the malfunctioning parts.
2.CHECK INTERMITTENT INCIDENT
Refer to GI-40, "
Intermittent Incident".
>> INSPECTION END
Te s t i t e m D e s c r i p t i o n
HEAD LAMP (HI) ON
Headlamps (Hi) Light
OFF Do not light
Revision: 2010 May2011 QX56
Page 4766 of 5598

PRECAUTIONSSR-3
< PRECAUTION >
C
DE
F
G
I
J
K L
M A
B
SR
N
O P
5. When the repair work is completed, re-connect both battery cables. With the brake pedal released, turn
the push-button ignition switch from ACC position to ON position, then to LOCK position. (The steering
wheel will lock when the push-button ignition switch is turned to LOCK position.)
6. Perform self-diagnosis check of a ll control units using CONSULT-III.
Precaution for Battery ServiceINFOID:0000000006113045
Before disconnecting the battery, lower both the driver and passenger windows. This will prevent any interfer-
ence between the window edge and the vehicle when the door is opened/closed. During normal operation, the
window slightly raises and lowers automatically to prev ent any window to vehicle interference. The automatic
window function will not work with the battery disconnected.
Occupant Classification SystemINFOID:0000000006113047
Replace occupant classification system control uni t and passenger front seat cushion as an assembly.
Refer to SE-105, "
Exploded View".
ServiceINFOID:0000000006113046
Never use electrical test equipment to check SRS circuits unless instructed to in this Service Manual.
Before servicing the SRS, turn ignition switch OFF, disconnect battery negative terminal and wait at least 3
minutes.
For approximately 3 minutes after the battery negative termi nal is removed, it is still possible for the air bag
and seat belt pre-tensioner to deploy. Therefore, never work on any SRS connectors or wires until at least 3
minutes have elapsed.
Diagnosis sensor unit must always be installed with their arrow marks “ ⇐” pointing towards the front of the
vehicle for proper operation. Also check diagnosis sensor unit for cracks, deformities, or rust before installa-
tion and replace as required.
The spiral cable must be aligned in the neutral position since its rotations are limited. Never turn steering
wheel and column after removal of steering gear.
Handle air bag module carefully. Always place driver and front passenger air bag modules with the pad side facing upward and seat mounted front side air bag m odule standing with the stud bolt side facing downward.
Perform self-diagnosis to check entire SRS fo r proper function after replacing any components.
After air bag deploys, the front instrument panel assembly should be replaced if damaged.
Always replace instrument panel pad following front passenger air bag deployment.
Revision: 2010 May2011 QX56
Page 4996 of 5598

SYSTEMST-9
< SYSTEM DESCRIPTION >
C
DE
F
H I
J
K L
M A
B
ST
N
O P
SYSTEM
System Description (Heated Steering Wheel)INFOID:0000000006225581
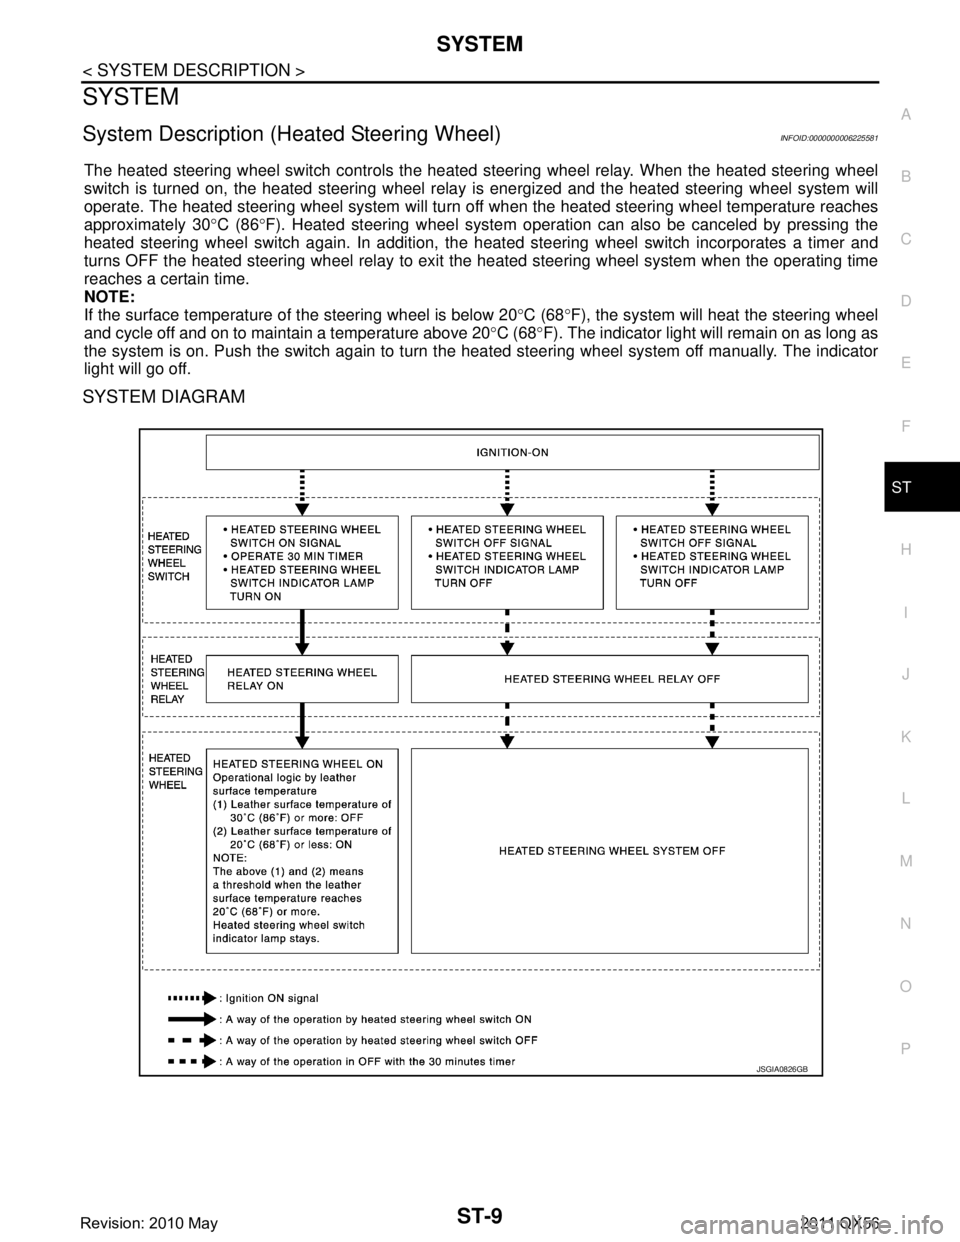
The heated steering wheel switch controls the heated steering wheel relay. When the heated steering wheel
switch is turned on, the heated steering wheel relay is energized and the heated steering wheel system will
operate. The heated steering wheel system will turn of f when the heated steering wheel temperature reaches
approximately 30 °C (86 °F). Heated steering wheel system operati on can also be canceled by pressing the
heated steering wheel switch again. In addition, the heat ed steering wheel switch incorporates a timer and
turns OFF the heated steering wheel relay to exit the heated steering wheel system when the operating time
reaches a certain time.
NOTE:
If the surface temperature of the steering wheel is below 20 °C (68 °F), the system will heat the steering wheel
and cycle off and on to maintain a temperature above 20 °C (68 °F). The indicator light will remain on as long as
the system is on. Push the switch again to turn t he heated steering wheel system off manually. The indicator
light will go off.
SYSTEM DIAGRAM
JSGIA0826GB
Revision: 2010 May2011 QX56
Page 5019 of 5598

ST-32
< PERIODIC MAINTENANCE >
STEERING WHEEL
STEERING WHEEL
InspectionINFOID:0000000006225598
STEERING WHEEL AXIAL END PLAY
1. Check installation conditions of steering gear assembly, front suspension assembly, axle and steering col-
umn assembly.
2. Check if movement exists when steering wheel is moved up and down, to the left and right and to the axial direction.
3. Check the following items when steering w heel axial end play is out of the standard.
Check the steering column assembly mounting condition. Refer to ST-34, "
Exploded View".
Check steering gear assembly mounting condition for looseness. Refer to ST-41, "
Exploded View".
STEERING WHEEL PLAY
1. Turn steering wheel so that front wheels come to the straight-ahead position.
2. Start engine and lightly turn steering wheel to the left and right until front wheels start to move.
3. Measure steering wheel movement on the outer circumference.
4. Check the following items when steeri ng wheel play is out of the standard.
Check backlash for each joint of steering column assembly.
Check installation condition of steering gear assembly. Steering wheel axial end play : Refer to
ST-57, "
Steering Wheel Axial End Play and Play".
Steering wheel play : Refer to ST-57, "
Steering Wheel Axial End Play and Play".
Revision: 2010 May2011 QX56
Page 5051 of 5598

STC-6
< SYSTEM DESCRIPTION >
SYSTEM
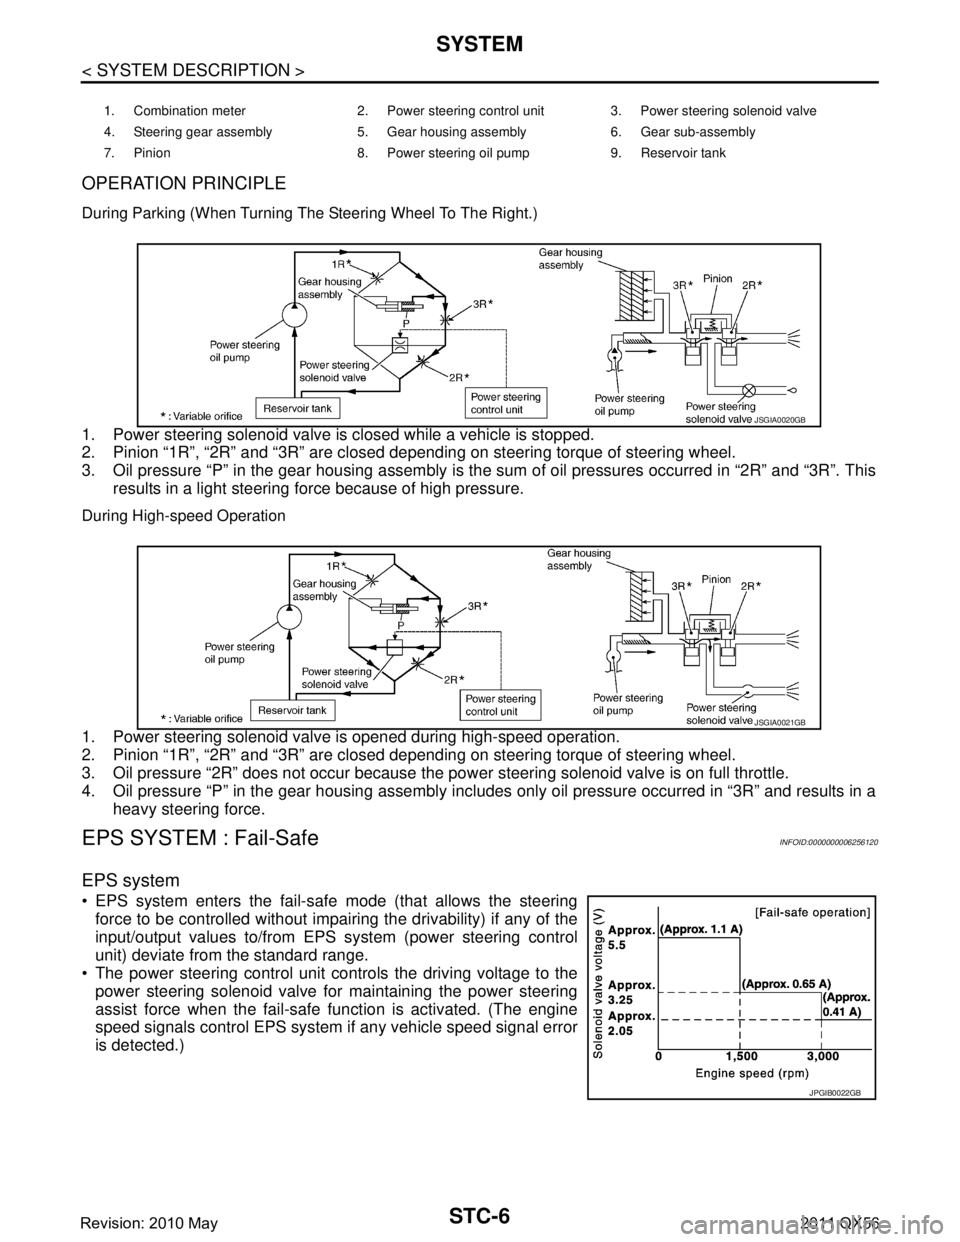
OPERATION PRINCIPLE
During Parking (When Turning The Steering Wheel To The Right.)
1. Power steering solenoid valve is closed while a vehicle is stopped.
2. Pinion “1R”, “2R” and “3R” are closed depending on steering torque of steering wheel.
3. Oil pressure “P” in the gear housing assembly is the sum of oil pressures occurred in “2R” and “3R”. Thisresults in a light steering force because of high pressure.
During High-speed Operation
1. Power steering solenoid valve is opened during high-speed operation.
2. Pinion “1R”, “2R” and “3R” are closed depending on steering torque of steering wheel.
3. Oil pressure “2R” does not occur because the pow er steering solenoid valve is on full throttle.
4. Oil pressure “P” in the gear housing assembly includes only oil pressure occurred in “3R” and results in a heavy steering force.
EPS SYSTEM : Fail-Safe INFOID:0000000006256120
EPS system
EPS system enters the fail-safe mode (that allows the steering
force to be controlled without impairi ng the drivability) if any of the
input/output values to/from EPS system (power steering control
unit) deviate from the standard range.
The power steering control unit controls the driving voltage to the
power steering solenoid valve for maintaining the power steering
assist force when the fail-safe function is activated. (The engine
speed signals control EPS system if any vehicle speed signal error
is detected.)
1. Combination meter 2. Power steering control unit 3. Power steering solenoid valve
4. Steering gear assembly 5. Gear housing assembly 6. Gear sub-assembly
7. Pinion 8. Power steering oil pump 9. Reservoir tank
JSGIA0020GB
JSGIA0021GB
JPGIB0022GB
Revision: 2010 May2011 QX56