Page 3404 of 5598

IP-14
< REMOVAL AND INSTALLATION >
INSTRUMENT PANEL ASSEMBLY
Removal and Installation
INFOID:0000000006113098
WORK STEP
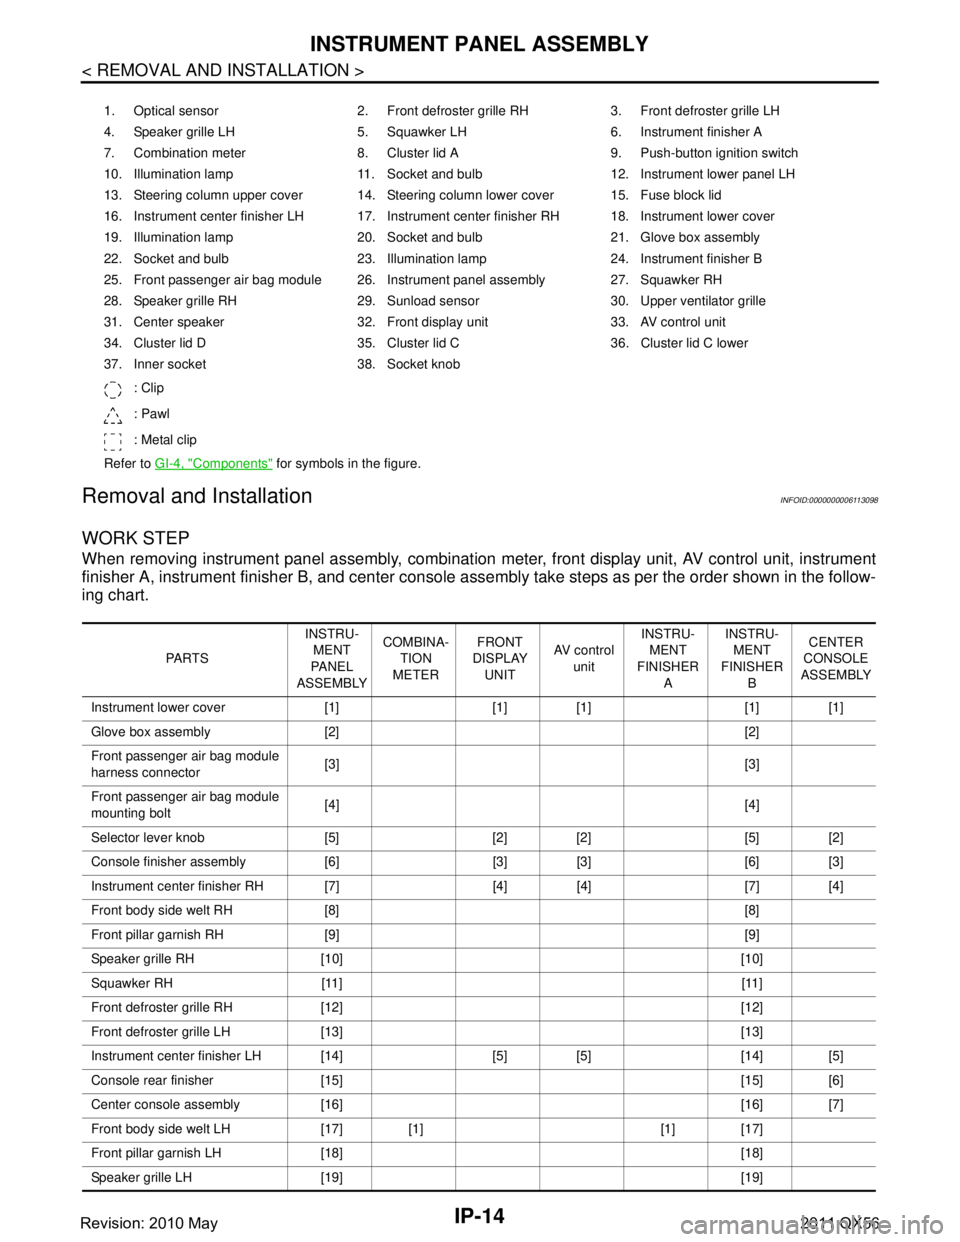
When removing instrument panel assembly, combination meter, front display unit, AV control unit, instrument
finisher A, instrument fini sher B, and center console assembly take st eps as per the order shown in the follow-
ing chart.
1. Optical sensor 2. Front defroster grille RH 3. Front defroster grille LH
4. Speaker grille LH 5. Squawker LH 6. Instrument finisher A
7. Combination meter 8. Cluster lid A 9. Push-button ignition switch
10. Illumination lamp 11. Socket and bulb 12. Instrument lower panel LH
13. Steering column upper cover 14. Steering column lower cover 15. Fuse block lid
16. Instrument center finisher LH 17. Instrument center finisher RH 18. Instrument lower cover
19. Illumination lamp 20. Socket and bulb 21. Glove box assembly
22. Socket and bulb 23. Illumination lamp 24. Instrument finisher B
25. Front passenger air bag module 26. Instrument panel assembly 27. Squawker RH
28. Speaker grille RH 29. Sunload sensor 30. Upper ventilator grille
31. Center speaker 32. Front display unit 33. AV control unit
34. Cluster lid D 35. Cluster lid C 36. Cluster lid C lower
37. Inner socket 38. Socket knob
: Clip
: Pawl
: Metal clip
Refer to GI-4, "
Components" for symbols in the figure.
PA R T S INSTRU-
MENT
PA N E L
ASSEMBLY COMBINA-
TION
METER FRONT
DISPLAY
UNIT AV c o n t r o l
unit INSTRU-
MENT
FINISHER A INSTRU-
MENT
FINISHER B CENTER
CONSOLE
ASSEMBLY
Instrument lower cover [1] [1] [1] [1] [1]
Glove box assembly [2] [2]
Front passenger air bag module
harness connector [3] [3]
Front passenger air bag module
mounting bolt [4] [4]
Selector lever knob [5] [2] [2] [5] [2]
Console finisher assembly [6] [3] [3] [6] [3]
Instrument center finisher RH [7] [4] [4] [7] [4]
Front body side welt RH [8] [8]
Front pillar garnish RH [9] [9]
Speaker grille RH [10] [10]
Squawker RH [11] [11]
Front defroster grille RH [12] [12]
Front defroster grille LH [13] [13]
Instrument center finisher LH [14] [5] [5] [14] [5]
Console rear finisher [15] [15] [6]
Center console assembly [16] [16] [7]
Front body side welt LH [17] [1] [1] [17]
Front pillar garnish LH [18] [18]
Speaker grille LH [19] [19]
Revision: 2010 May2011 QX56
Page 3405 of 5598
![INFINITI QX56 2011 Factory Service Manual
INSTRUMENT PANEL ASSEMBLYIP-15
< REMOVAL AND INSTALLATION >
C
DE
F
G H
I
K L
M A
B
IP
N
O P
[ ]:Number indicates step in removal procedures.
WARNING:
Before servicing, turn igni tion switch OFF, disc INFINITI QX56 2011 Factory Service Manual
INSTRUMENT PANEL ASSEMBLYIP-15
< REMOVAL AND INSTALLATION >
C
DE
F
G H
I
K L
M A
B
IP
N
O P
[ ]:Number indicates step in removal procedures.
WARNING:
Before servicing, turn igni tion switch OFF, disc](/manual-img/42/57033/w960_57033-3404.png)
INSTRUMENT PANEL ASSEMBLYIP-15
< REMOVAL AND INSTALLATION >
C
DE
F
G H
I
K L
M A
B
IP
N
O P
[ ]:Number indicates step in removal procedures.
WARNING:
Before servicing, turn igni tion switch OFF, disconnect battery ne gative terminal, and wait 3 minutes or
more.
CAUTION:
When removing, always use a remover tool that is made of plastic.
REMOVAL
1. Remove instrument lower cover.
1. Pull disengaged pawls downward.
2. Pull back instrument lower cover.
3. Disconnect harness connectors.
Squawker LH [20] [20]
Instrument lower panel LH [21] [2] [2] [21]
Disconnect meter control switch
harness connector [22] [3] [3] [22]
Driver air bag module [23] [23]
Steering wheel [24] [24]
Steering column cover [25] [25]
Combination switch [26] [26]
Spiral cable [27] [27]
Cluster lid A [28] [4] [4] [28]
Combination meter [29] [5] [29]
Instrument finisher A [5]
Upper ventilator grille [30] [30]
Center speaker [31] [31]
Cluster lid C [32] [6] [6] [32]
Cluster lid C lower [33] [7] [33]
AV control unit [34] [8] [34]
Cluster lid D [35] [7] [35]
Front display unit [36] [8] [36]
instrument panel assembly
mounting screws and bolts [37] [37]
Squawker LH harness clip [38] [38]
Instrument panel assembly [39] [39]
Instrument finisher B [40]
PA R T S
INSTRU-
MENT
PA N E L
ASSEMBLY COMBINA-
TION
METER FRONT
DISPLAY UNIT AV c o n t r o l
unit INSTRU-
MENT
FINISHER A INSTRU-
MENT
FINISHER B CENTER
CONSOLE
ASSEMBLY
: Pawl
JMJIA3828ZZ
Revision: 2010 May2011 QX56
Page 3406 of 5598
IP-16
< REMOVAL AND INSTALLATION >
INSTRUMENT PANEL ASSEMBLY
2. Remove glove box assembly.1. Remove glove box assembly fixing screws (A).
2. Open glove box lid.
3. Remove glove box assembly fixing screws (B).
4. Pull back glove box assembly.
5. Disconnect harness connector.
3. Disconnect harness connector (A) of front passenger air bag module.
4. Remove front passenger air bag module mounting bolt (B).
5. Remove selector lever knob. Refer to TM-176, "
Removal and Installation".
6. Remove console finisher assembly. 1. Put front seat to rearmost position.
2. Pull console finisher assembly upward to disengage from
center console assembly.
3. Disconnect harness connectors.
7. Remove instrument center finisher RH.
: Pawl
: Metal Clip
JMJIA4493ZZ
JMJIA3831ZZ
: Clip
: Pawl
JMJIA3832ZZ
Revision: 2010 May2011 QX56
Page 3408 of 5598
IP-18
< REMOVAL AND INSTALLATION >
INSTRUMENT PANEL ASSEMBLY
1. Pull the instrument center finisher LH lower side, and thendisengage the fixing clip.
2. Pull back instrument center finisher LH, and then disengage metal clips.
3. Disengage instrument center finisher LH fi xing pawl from instrument panel assembly.
15. Remove console rear finisher. 1. Put front seat to frontmost position.
2. Pull back console rear finisher with remover tool (A).
3. Disconnect harness connectors and harness clips.
CAUTION:
Apply protective tape (B) on the part to protect it from dam-
age.
16. Remove center console assembly. 1. Remove centre console assembly rear side fixing screws(A).
2. Put front seat to rearmost position.
Clip
JMJIA4496ZZ
: Pawl
: Metal Clip
JMJIA4499ZZ
: Metal Clip
JMJIA3848ZZ
JMJIA3897ZZ
Revision: 2010 May2011 QX56
Page 3409 of 5598

INSTRUMENT PANEL ASSEMBLYIP-19
< REMOVAL AND INSTALLATION >
C
DE
F
G H
I
K L
M A
B
IP
N
O P
3. Remove center console assembly front fixing screws (B).
4. Lift up center console assembly back side, and then remove center console assembly.
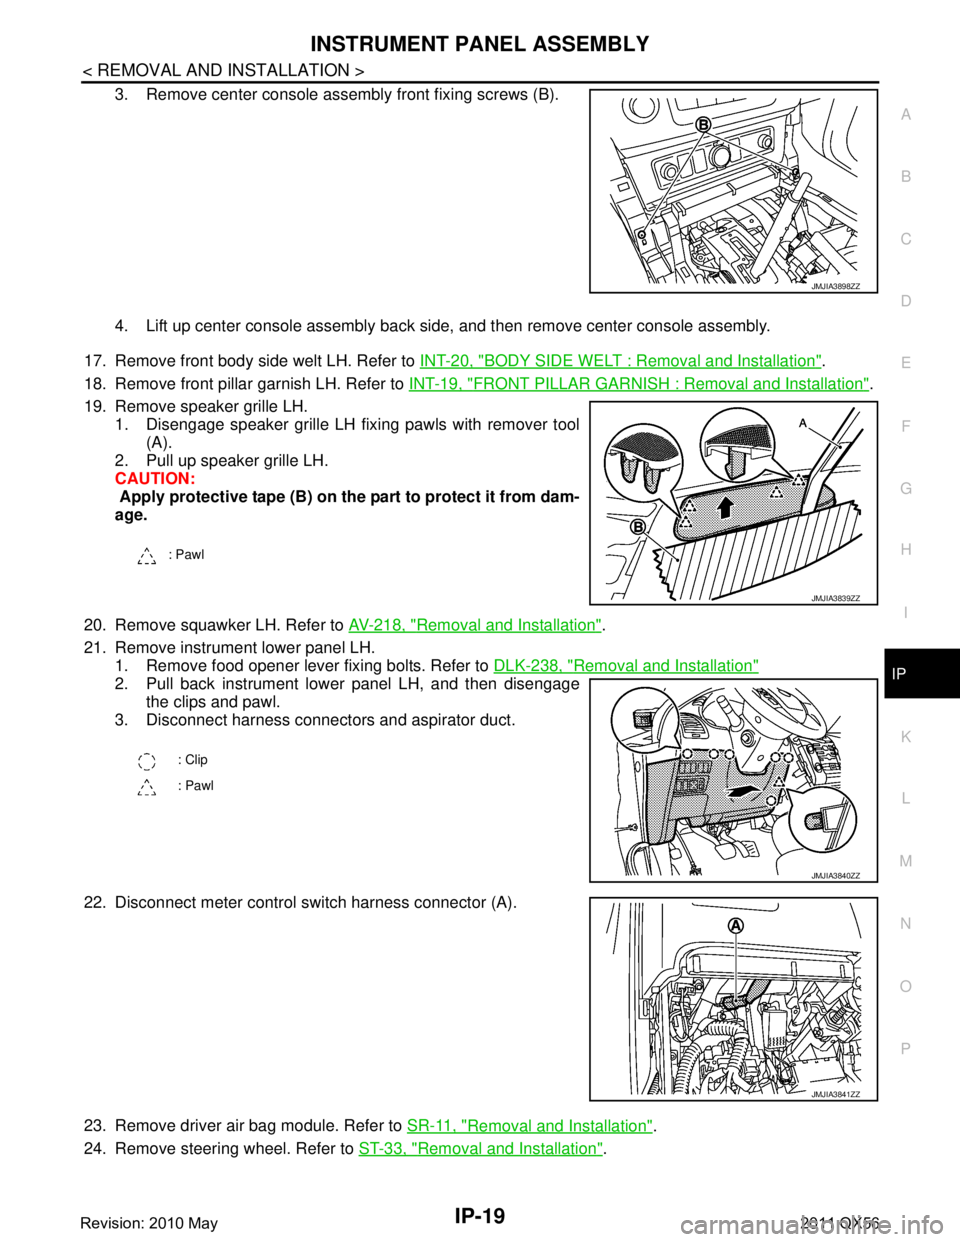
17. Remove front body side welt LH. Refer to INT-20, "
BODY SIDE WELT : Removal and Installation".
18. Remove front pillar garnish LH. Refer to INT-19, "
FRONT PILLAR GARNISH : Removal and Installation".
19. Remove speaker grille LH. 1. Disengage speaker grille LH fixing pawls with remover tool (A).
2. Pull up speaker grille LH.
CAUTION:
Apply protective tape (B) on the part to protect it from dam-
age.
20. Remove squawker LH. Refer to AV-218, "
Removal and Installation".
21. Remove instrument lower panel LH. 1. Remove food opener lever fixing bolts. Refer to DLK-238, "
Removal and Installation"
2. Pull back instrument lower panel LH, and then disengage
the clips and pawl.
3. Disconnect harness connectors and aspirator duct.
22. Disconnect meter control s witch harness connector (A).
23. Remove driver air bag module. Refer to SR-11, "
Removal and Installation".
24. Remove steering wheel. Refer to ST-33, "
Removal and Installation".
JMJIA3898ZZ
: Pawl
JMJIA3839ZZ
: Clip
: Pawl
JMJIA3840ZZ
JMJIA3841ZZ
Revision: 2010 May2011 QX56
Page 3411 of 5598

INSTRUMENT PANEL ASSEMBLYIP-21
< REMOVAL AND INSTALLATION >
C
DE
F
G H
I
K L
M A
B
IP
N
O P
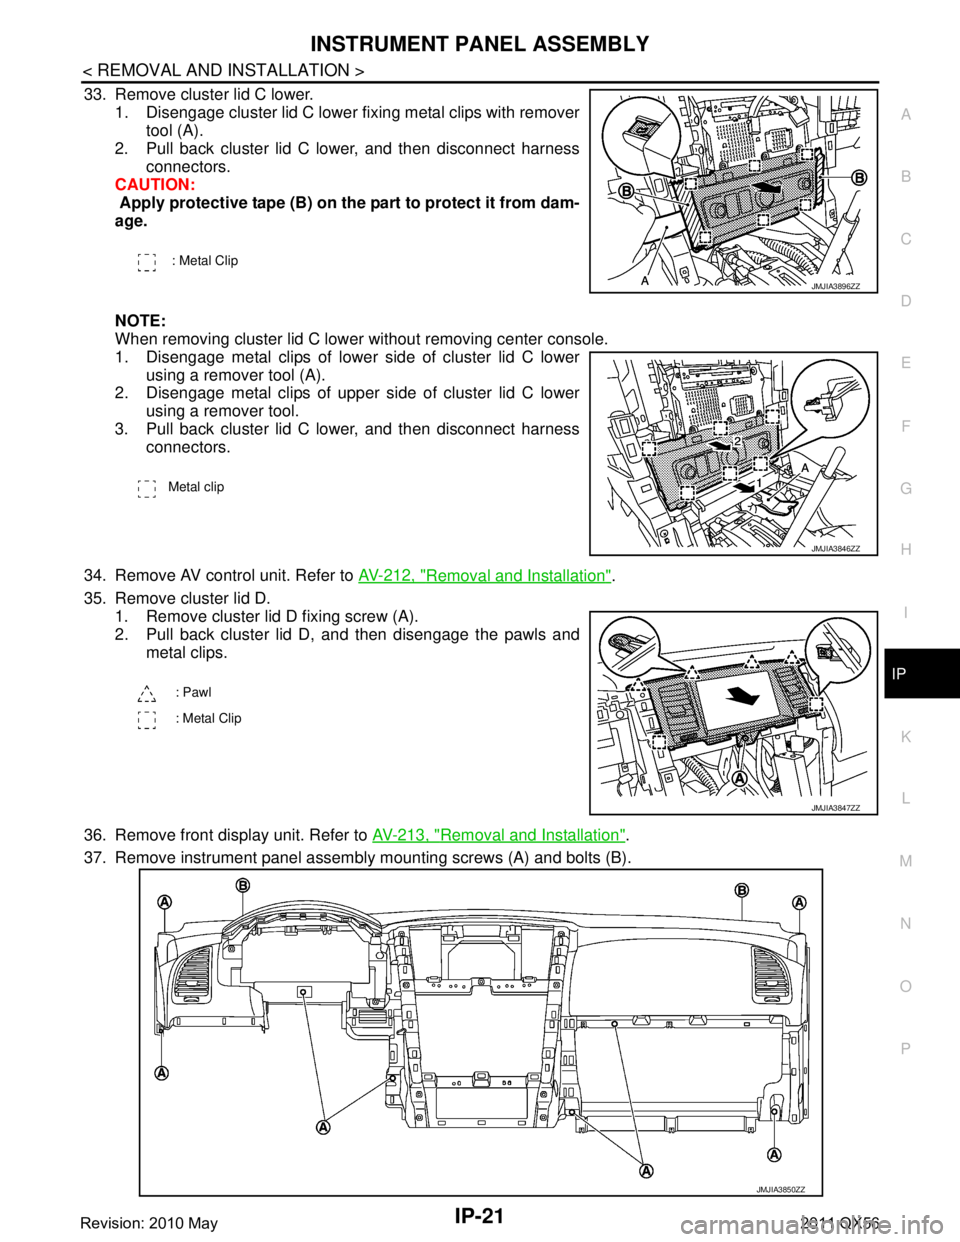
33. Remove cluster lid C lower. 1. Disengage cluster lid C lower fixing metal clips with remover tool (A).
2. Pull back cluster lid C lower, and then disconnect harness
connectors.
CAUTION:
Apply protective tape (B) on the part to protect it from dam-
age.
NOTE:
When removing cluster lid C lower without removing center console.
1. Disengage metal clips of lower side of cluster lid C lower
using a remover tool (A).
2. Disengage metal clips of upper side of cluster lid C lower
using a remover tool.
3. Pull back cluster lid C lower, and then disconnect harness connectors.
34. Remove AV control unit. Refer to AV-212, "
Removal and Installation".
35. Remove cluster lid D. 1. Remove cluster lid D fixing screw (A).
2. Pull back cluster lid D, and then disengage the pawls and metal clips.
36. Remove front display unit. Refer to AV-213, "
Removal and Installation".
37. Remove instrument panel assembly mounting screws (A) and bolts (B).
: Metal Clip
JMJIA3896ZZ
Metal clip
JMJIA3846ZZ
: Pawl
: Metal Clip
JMJIA3847ZZ
JMJIA3850ZZ
Revision: 2010 May2011 QX56
Page 3413 of 5598
CENTER CONSOLE ASSEMBLYIP-23
< REMOVAL AND INSTALLATION >
C
DE
F
G H
I
K L
M A
B
IP
N
O P
CENTER CONSOLE ASSEMBLY
Exploded ViewINFOID:0000000006113099
CENTER CONSOLE ASSEMBLY
JMJIA4229ZZ
1. Instrument center finisher RH 2. Console finisher assembly 3. Instrument center finisher LH
4. Front auxiliary input jacks 5. Switch hole mask 6. Main switch
Revision: 2010 May2011 QX56
Page 3414 of 5598
IP-24
< REMOVAL AND INSTALLATION >
CENTER CONSOLE ASSEMBLY
CONSOLE FINISHER ASSEMBLY
7. Second heated seat switch LH 8. 120W unit 9. Mask
10. Inner socket 11. Socket knob 12. Console ashtray
13. Mask (without ashtray) 14. Second heated seat switch RH 15. Console hinge cover
16. Console lid assembly 17. Console body assembly 18. Console box
19. Inside key antenna 20. Rear auxiliary input jacks 21. Console ashtray bracket
22. Console rear finisher 23. Rear A/C control: Clip
: Pawl
: Metal clip
JMJIA4230ZZ
1. AT control indicator assembly 2. 4WD: 4WD switch assembly 2WD: SNOW MODE/TOW MODE/
VDC OFF switch assembly3. Console pocket assembly
4. Cup holder assembly 5. Inner socket 6. Socket ring
7. Socket knob 8. USB connector 9. Inner case
10. Coin pocket : Clip
: Pawl
Revision: 2010 May2011 QX56