2011 INFINITI QX56 instrument cluster
[x] Cancel search: instrument clusterPage 3404 of 5598
IP-14
< REMOVAL AND INSTALLATION >
INSTRUMENT PANEL ASSEMBLY
Removal and Installation
INFOID:0000000006113098
WORK STEP
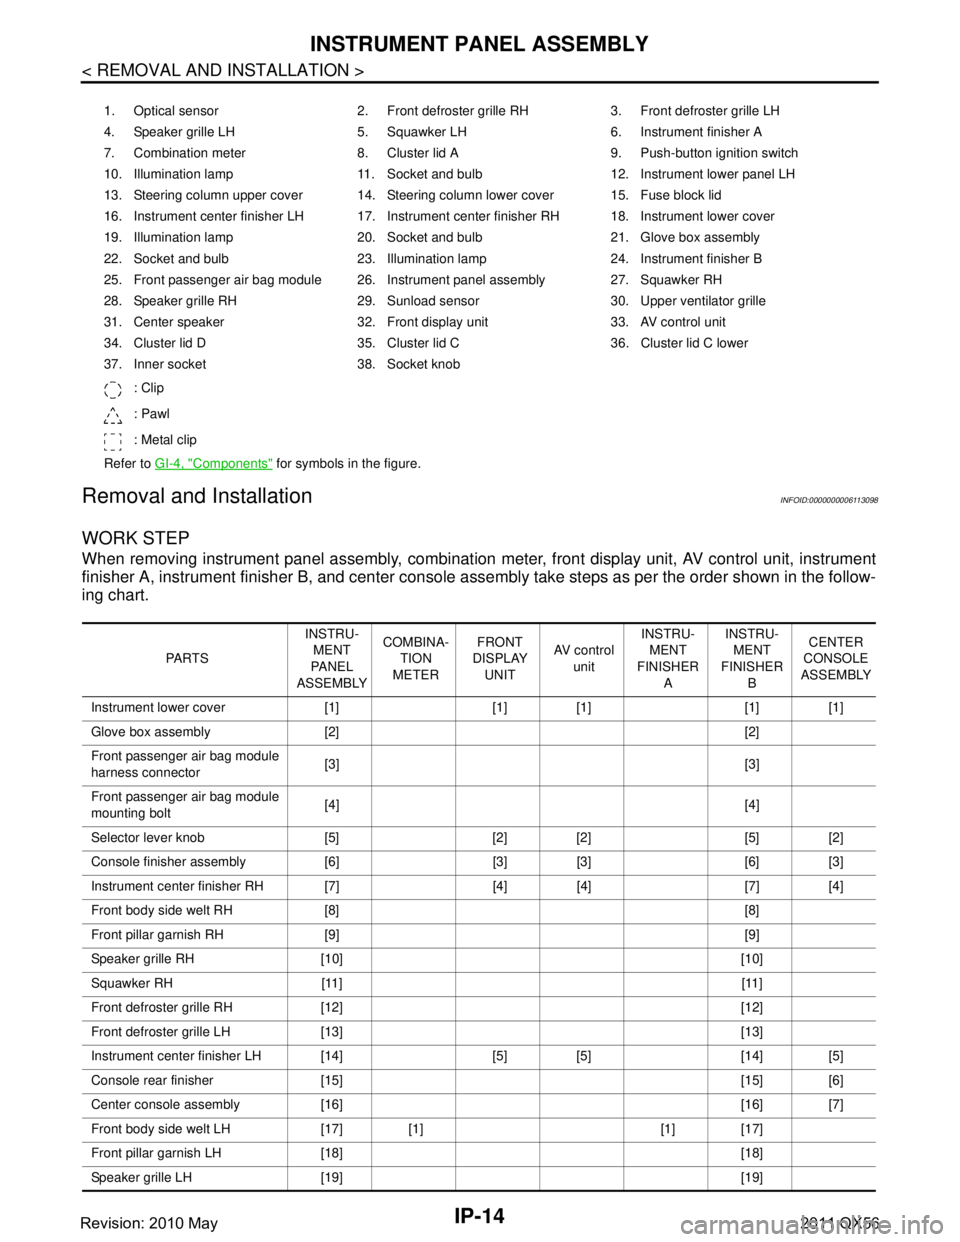
When removing instrument panel assembly, combination meter, front display unit, AV control unit, instrument
finisher A, instrument fini sher B, and center console assembly take st eps as per the order shown in the follow-
ing chart.
1. Optical sensor 2. Front defroster grille RH 3. Front defroster grille LH
4. Speaker grille LH 5. Squawker LH 6. Instrument finisher A
7. Combination meter 8. Cluster lid A 9. Push-button ignition switch
10. Illumination lamp 11. Socket and bulb 12. Instrument lower panel LH
13. Steering column upper cover 14. Steering column lower cover 15. Fuse block lid
16. Instrument center finisher LH 17. Instrument center finisher RH 18. Instrument lower cover
19. Illumination lamp 20. Socket and bulb 21. Glove box assembly
22. Socket and bulb 23. Illumination lamp 24. Instrument finisher B
25. Front passenger air bag module 26. Instrument panel assembly 27. Squawker RH
28. Speaker grille RH 29. Sunload sensor 30. Upper ventilator grille
31. Center speaker 32. Front display unit 33. AV control unit
34. Cluster lid D 35. Cluster lid C 36. Cluster lid C lower
37. Inner socket 38. Socket knob
: Clip
: Pawl
: Metal clip
Refer to GI-4, "
Components" for symbols in the figure.
PA R T S INSTRU-
MENT
PA N E L
ASSEMBLY COMBINA-
TION
METER FRONT
DISPLAY
UNIT AV c o n t r o l
unit INSTRU-
MENT
FINISHER A INSTRU-
MENT
FINISHER B CENTER
CONSOLE
ASSEMBLY
Instrument lower cover [1] [1] [1] [1] [1]
Glove box assembly [2] [2]
Front passenger air bag module
harness connector [3] [3]
Front passenger air bag module
mounting bolt [4] [4]
Selector lever knob [5] [2] [2] [5] [2]
Console finisher assembly [6] [3] [3] [6] [3]
Instrument center finisher RH [7] [4] [4] [7] [4]
Front body side welt RH [8] [8]
Front pillar garnish RH [9] [9]
Speaker grille RH [10] [10]
Squawker RH [11] [11]
Front defroster grille RH [12] [12]
Front defroster grille LH [13] [13]
Instrument center finisher LH [14] [5] [5] [14] [5]
Console rear finisher [15] [15] [6]
Center console assembly [16] [16] [7]
Front body side welt LH [17] [1] [1] [17]
Front pillar garnish LH [18] [18]
Speaker grille LH [19] [19]
Revision: 2010 May2011 QX56
Page 3405 of 5598
![INFINITI QX56 2011 Factory Service Manual
INSTRUMENT PANEL ASSEMBLYIP-15
< REMOVAL AND INSTALLATION >
C
DE
F
G H
I
K L
M A
B
IP
N
O P
[ ]:Number indicates step in removal procedures.
WARNING:
Before servicing, turn igni tion switch OFF, disc INFINITI QX56 2011 Factory Service Manual
INSTRUMENT PANEL ASSEMBLYIP-15
< REMOVAL AND INSTALLATION >
C
DE
F
G H
I
K L
M A
B
IP
N
O P
[ ]:Number indicates step in removal procedures.
WARNING:
Before servicing, turn igni tion switch OFF, disc](/manual-img/42/57033/w960_57033-3404.png)
INSTRUMENT PANEL ASSEMBLYIP-15
< REMOVAL AND INSTALLATION >
C
DE
F
G H
I
K L
M A
B
IP
N
O P
[ ]:Number indicates step in removal procedures.
WARNING:
Before servicing, turn igni tion switch OFF, disconnect battery ne gative terminal, and wait 3 minutes or
more.
CAUTION:
When removing, always use a remover tool that is made of plastic.
REMOVAL
1. Remove instrument lower cover.
1. Pull disengaged pawls downward.
2. Pull back instrument lower cover.
3. Disconnect harness connectors.
Squawker LH [20] [20]
Instrument lower panel LH [21] [2] [2] [21]
Disconnect meter control switch
harness connector [22] [3] [3] [22]
Driver air bag module [23] [23]
Steering wheel [24] [24]
Steering column cover [25] [25]
Combination switch [26] [26]
Spiral cable [27] [27]
Cluster lid A [28] [4] [4] [28]
Combination meter [29] [5] [29]
Instrument finisher A [5]
Upper ventilator grille [30] [30]
Center speaker [31] [31]
Cluster lid C [32] [6] [6] [32]
Cluster lid C lower [33] [7] [33]
AV control unit [34] [8] [34]
Cluster lid D [35] [7] [35]
Front display unit [36] [8] [36]
instrument panel assembly
mounting screws and bolts [37] [37]
Squawker LH harness clip [38] [38]
Instrument panel assembly [39] [39]
Instrument finisher B [40]
PA R T S
INSTRU-
MENT
PA N E L
ASSEMBLY COMBINA-
TION
METER FRONT
DISPLAY UNIT AV c o n t r o l
unit INSTRU-
MENT
FINISHER A INSTRU-
MENT
FINISHER B CENTER
CONSOLE
ASSEMBLY
: Pawl
JMJIA3828ZZ
Revision: 2010 May2011 QX56
Page 3410 of 5598
IP-20
< REMOVAL AND INSTALLATION >
INSTRUMENT PANEL ASSEMBLY
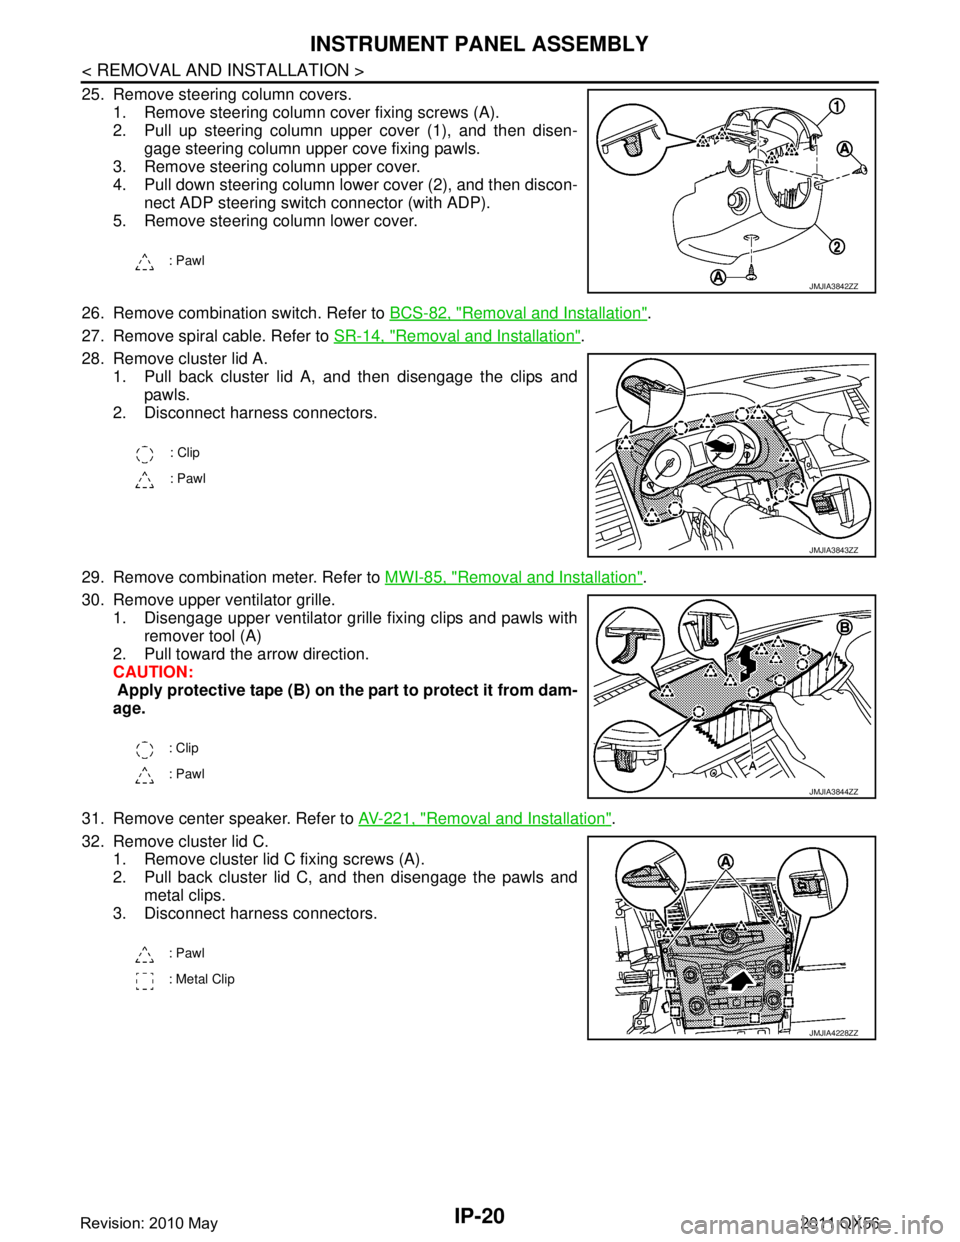
25. Remove steering column covers.1. Remove steering column cover fixing screws (A).
2. Pull up steering column upper cover (1), and then disen-gage steering column upper cove fixing pawls.
3. Remove steering column upper cover.
4. Pull down steering column lower cover (2), and then discon- nect ADP steering switch connector (with ADP).
5. Remove steering column lower cover.
26. Remove combination switch. Refer to BCS-82, "
Removal and Installation".
27. Remove spiral cable. Refer to SR-14, "
Removal and Installation".
28. Remove cluster lid A. 1. Pull back cluster lid A, and then disengage the clips and
pawls.
2. Disconnect harness connectors.
29. Remove combination meter. Refer to MWI-85, "
Removal and Installation".
30. Remove upper ventilator grille. 1. Disengage upper ventilator grille fixing clips and pawls with
remover tool (A)
2. Pull toward the arrow direction.
CAUTION:
Apply protective tape (B) on the part to protect it from dam-
age.
31. Remove center speaker. Refer to AV-221, "
Removal and Installation".
32. Remove cluster lid C. 1. Remove cluster lid C fixing screws (A).
2. Pull back cluster lid C, and then disengage the pawls and
metal clips.
3. Disconnect harness connectors.
: Pawl
JMJIA3842ZZ
: Clip
: Pawl
JMJIA3843ZZ
: Clip
: Pawl
JMJIA3844ZZ
: Pawl
: Metal Clip
JMJIA4228ZZ
Revision: 2010 May2011 QX56
Page 3411 of 5598
INSTRUMENT PANEL ASSEMBLYIP-21
< REMOVAL AND INSTALLATION >
C
DE
F
G H
I
K L
M A
B
IP
N
O P
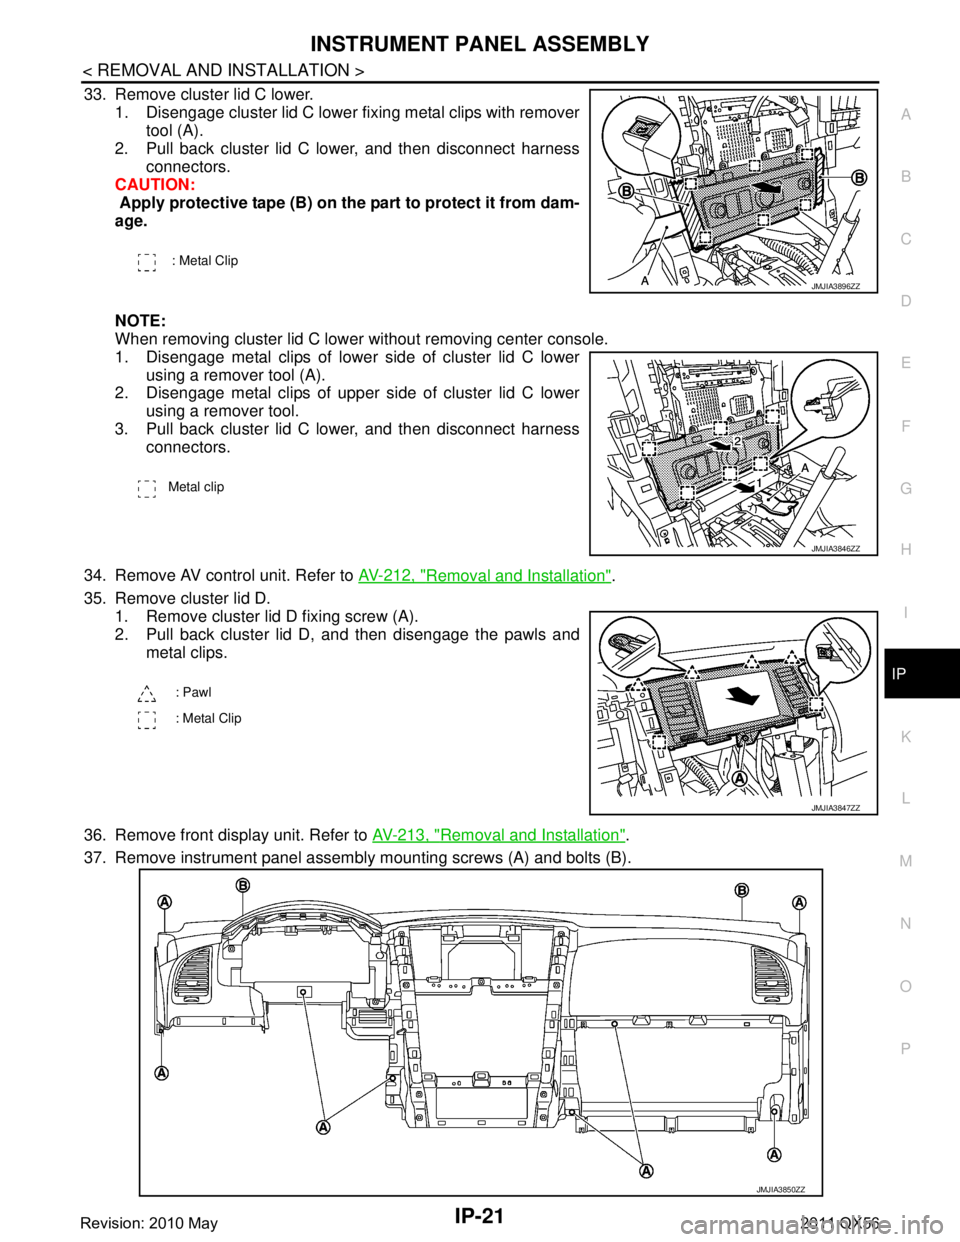
33. Remove cluster lid C lower. 1. Disengage cluster lid C lower fixing metal clips with remover tool (A).
2. Pull back cluster lid C lower, and then disconnect harness
connectors.
CAUTION:
Apply protective tape (B) on the part to protect it from dam-
age.
NOTE:
When removing cluster lid C lower without removing center console.
1. Disengage metal clips of lower side of cluster lid C lower
using a remover tool (A).
2. Disengage metal clips of upper side of cluster lid C lower
using a remover tool.
3. Pull back cluster lid C lower, and then disconnect harness connectors.
34. Remove AV control unit. Refer to AV-212, "
Removal and Installation".
35. Remove cluster lid D. 1. Remove cluster lid D fixing screw (A).
2. Pull back cluster lid D, and then disengage the pawls and metal clips.
36. Remove front display unit. Refer to AV-213, "
Removal and Installation".
37. Remove instrument panel assembly mounting screws (A) and bolts (B).
: Metal Clip
JMJIA3896ZZ
Metal clip
JMJIA3846ZZ
: Pawl
: Metal Clip
JMJIA3847ZZ
JMJIA3850ZZ
Revision: 2010 May2011 QX56
Page 3731 of 5598

MIR-26
< SYMPTOM DIAGNOSIS >
SQUEAK AND RATTLE TROUBLE DIAGNOSES
Insulates where slight movement is present. Ideal for instrument panel applications.
SILICONE GREASE
Used in place of UHMW tape that will be visible or not fit. Will only last a few months.
SILICONE SPRAY
Use when grease cannot be applied.
DUCT TAPE
Use to eliminate movement.
CONFIRM THE REPAIR
Confirm that the cause of a noise is repaired by test driving the vehicle. Operate the vehicle under the same
conditions as when the noise originally occurred. Refer to the notes on the Diagnostic Worksheet.
Inspection ProcedureINFOID:0000000006257248
Refer to Table of Contents for specific component removal and installationinformation.
INSTRUMENT PANEL
Most incidents are caused by contact and movement between:
1. The cluster lid A and instrument panel
2. Acrylic lens and combination meter housing
3. Instrument panel to front pillar garnish
4. Instrument panel to windshield
5. Instrument panel mounting pins
6. Wiring harnesses behind the combination meter
7. A/C defroster duct and duct joint
These incidents can usually be located by tapping or moving the components to duplicate the noise or by
pressing on the components while driving to stop the noise. Most of these incidents can be repaired by
applying felt cloth tape or silicon spray (in hard to reach areas). Urethane pads can be used to insulate
wiring harness.
CAUTION:
Do not use silicone spray to is olate a squeak or rattle. If you saturatethe area with silicone, you
will not be able to recheck the repair.
CENTER CONSOLE
Components to pay attention to include:
1. Shifter assembly cover to finisher
2. A/C control unit and cluster lid C
3. Wiring harnesses behind audio and A/C control unit
The instrument panel repair and isolation pr ocedures also apply to thecenter console.
DOORS
Pay attention to the:
1. Finisher and inner panel making a slapping noise
2. Inside handle escutcheon to door finisher
3. Wiring harnesses tapping
4. Door striker out of alignment causing a popping noise on startsand stops
Tapping or moving the components or pressing on them wh ile driving to duplicate the conditions can isolate
many of these incidents. You can usually insulate the areas with felt cloth tape or insulator foam blocks from
the Nissan Squeak and Rattle Kit (J-43980) to repair the noise.
TRUNK
Trunk noises are often caused by a loose jack or loose items put intothe trunk by the owner.
In addition look for:
1. Trunk lid dumpers out of adjustment
2. Trunk lid striker out of adjustment
3. The trunk lid torsion bars knocking together
4. A loose license plate or bracket
Revision: 2010 May2011 QX56
Page 4242 of 5598
RF-28
< SYMPTOM DIAGNOSIS >
SQUEAK AND RATTLE TROUBLE DIAGNOSES
The following materials, not found in the kit, can also be used to repair squeaks and rattles.
UHMW (TEFLON) TAPE
Insulates where slight movement is present. Ideal for instrument panel applications.
SILICONE GREASE
Used in place of UHMW tape that is visible or does not fit. Only lasts a few months.
SILICONE SPRAY
Used when grease cannot be applied.
DUCT TAPE
Used to eliminate movement.
CONFIRM THE REPAIR
After repair is complete, test drive the vehicle to confir m that the cause of noise is repaired by test driving the
vehicle. Operate the vehicle under the same conditions as when the noise originally occurred. Refer to the
notes on the Diagnostic Worksheet.
Inspection ProcedureINFOID:0000000006367804
Refer to Table of Contents for specific component removal and installation information.
INSTRUMENT PANEL
Most incidents are caused by contact and movement between:
1. The cluster lid A and instrument panel
2. Acrylic lens and combination meter housing
3. Instrument panel to front pillar garnish
4. Instrument panel to windshield
5. Instrument panel mounting pins
6. Wiring harnesses behind the combination meter
7. A/C defroster duct and duct joint These incidents can usually be located by tapping or moving the components to duplicate the noise or by
pressing on the components while driving to stop the noise. Most of these incidents can be repaired by
applying felt cloth tape or silicon spray (in hard to reach areas). Urethane pads can be used to insulate
wiring harness.
CAUTION:
Never use silicone spray to isolate a squeak or ra ttle. If the area is saturated with silicone, the
recheck of repair becomes impossible.
CENTER CONSOLE
Components to check include:
1. Shifter assembly cover to finisher
2. A/C control unit and cluster lid C
3. Wiring harnesses behind audio and A/C control unit
The instrument panel repair and isolation pr ocedures also apply to the center console.
DOORS
Check the following items:
1. Finisher and inner panel making a slapping noise
2. Inside handle escutcheon connection to door finisher
3. Wiring harnesses tapping
4. Door striker out of alignment causing a popping noise on starts and stops
Tapping, moving the components, or pressing on them wh ile driving to duplicate the conditions can isolate
many of these incidents. The areas can usually be insula ted with felt cloth tape or insulator foam blocks from
the NISSAN Squeak and Rattle Kit (J-43980) to repair the noise.
TRUNK
Trunk noises are often caused by a loose jack or loose items put into the trunk by the customer.
In addition check for the following items:
1. Trunk lid dumpers out of adjustment
2. Trunk lid striker out of adjustment
Revision: 2010 May2011 QX56
Page 4560 of 5598
SQUEAK AND RATTLE TROUBLE DIAGNOSESSE-101
< SYMPTOM DIAGNOSIS >
C
DE
F
G H
I
K L
M A
B
SE
N
O P
Insulates where slight movement is present. Ideal for instrument panel applications.
SILICONE GREASE
Used in place of UHMW tape that is be visible or does not fit. Will only last a few months.
SILICONE SPRAY
Used when grease cannot be applied.
DUCT TAPE
Used to eliminate movement.
CONFIRM THE REPAIR
Confirm that the cause of a noise is repaired by test driving the vehicle. Operate the vehicle under the same
conditions as when the noise originally occurred. Refer to the notes on the Diagnostic Worksheet.
Inspection ProcedureINFOID:0000000006219939
Refer to Table of Contents for specific component removal and installation information.
INSTRUMENT PANEL
Most incidents are caused by contact and movement between:
1. The cluster lid A and instrument panel
2. Acrylic lens and combination meter housing
3. Instrument panel to front pillar garnish
4. Instrument panel to windshield
5. Instrument panel mounting pins
6. Wiring harnesses behind the combination meter
7. A/C defroster duct and duct joint
These incidents can usually be located by tapping or moving the components to duplicate the noise or by
pressing on the components while driving to stop the noise. Most of these incidents can be repaired by
applying felt cloth tape or silicon spray (in hard to reach areas). Urethane pads can be used to insulate
wiring harness.
CAUTION:
Never use silicone spray to isolate a squeak or ra ttle. If the area is saturated with silicone, the
recheck of repair becomes impossible.
CENTER CONSOLE
Components to pay attention to include:
1. Shifter assembly cover to finisher
2. A/C control unit and cluster lid C
3. Wiring harnesses behind audio and A/C control unit
The instrument panel repair and isolation pr ocedures also apply to the center console.
DOORS
Pay attention to the following:
1. Finisher and inner panel making a slapping noise
2. Inside handle escutcheon to door finisher
3. Wiring harnesses tapping
4. Door striker out of alignment causing a popping noise on starts and stops
Tapping or moving the components or pressing on them while driving to duplicate the conditions can isolate
many of these incidents. The areas can usually be insula ted with felt cloth tape or insulator foam blocks from
the Nissan Squeak and Rattle Kit (J-43980) to repair the noise.
TRUNK
Trunk noises are often caused by a loose jack or loose items put into the trunk by the customer.
In addition look for the following:
1. Trunk lid dumpers out of adjustment
2. Trunk lid striker out of adjustment
3. The trunk lid torsion bars knocking together
4. A loose license plate or bracket
Revision: 2010 May2011 QX56
Page 5043 of 5598
ST-56
< REMOVAL AND INSTALLATION >
HEATED STEERING WHEEL SWITCH
HEATED STEERING WHEEL SWITCH
Exploded ViewINFOID:0000000006225616
Removal and InstallationINFOID:0000000006225617
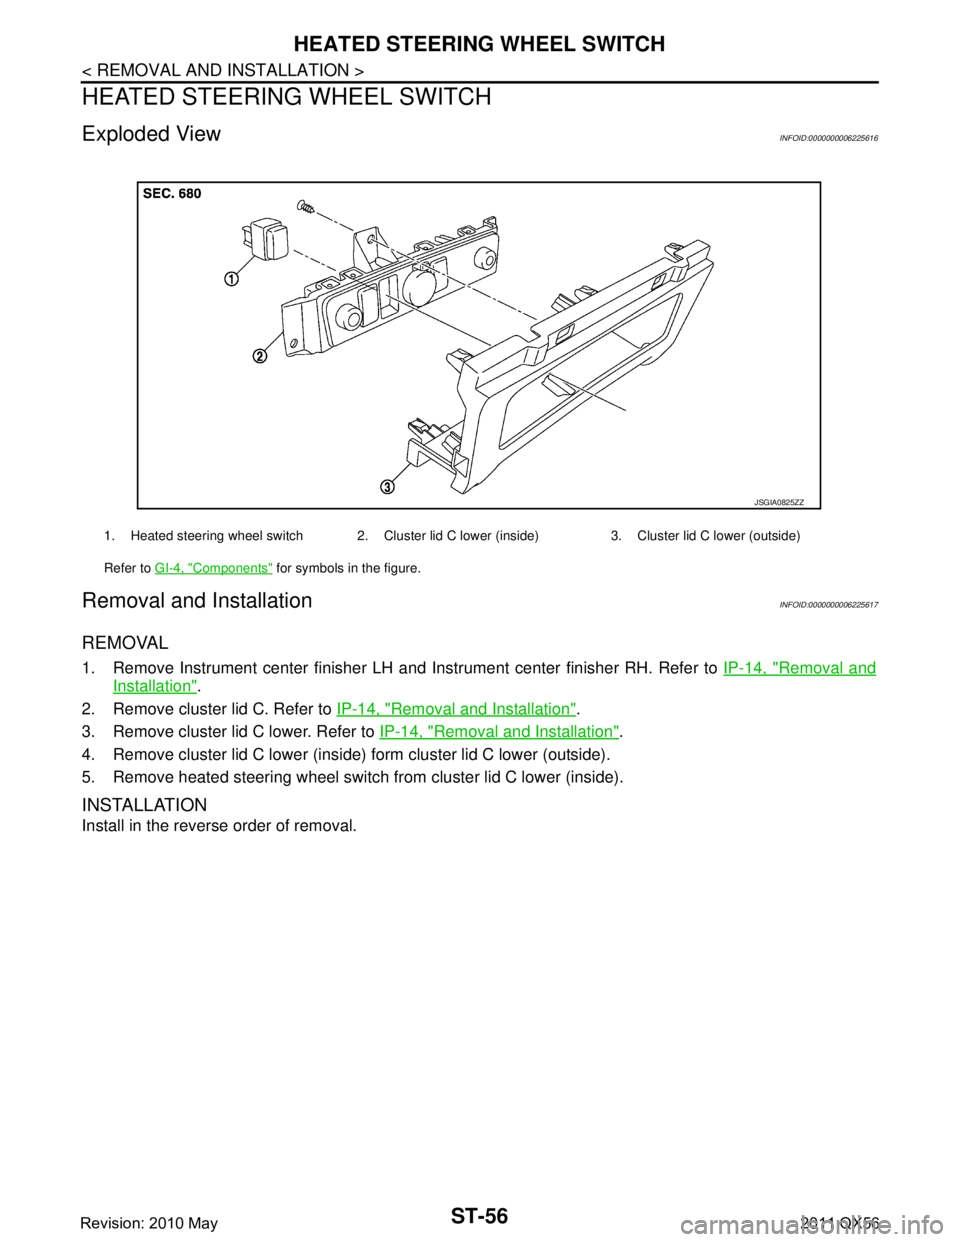
REMOVAL
1. Remove Instrument center finisher LH and Instrument center finisher RH. Refer to IP-14, "Removal and
Installation".
2. Remove cluster lid C. Refer to IP-14, "
Removal and Installation".
3. Remove cluster lid C lower. Refer to IP-14, "
Removal and Installation".
4. Remove cluster lid C lower (inside) form cluster lid C lower (outside).
5. Remove heated steering wheel switch from cluster lid C lower (inside).
INSTALLATION
Install in the reverse order of removal.
1. Heated steering wheel switch 2. Cluster lid C lower (inside) 3. Cluster lid C lower (outside)
Refer to GI-4, "
Components" for symbols in the figure.
JSGIA0825ZZ
Revision: 2010 May2011 QX56