2011 INFINITI QX56 ignition
[x] Cancel search: ignitionPage 4042 of 5598

PG
POWER SUPPLY ROUTING CIRCUITPG-123
< WIRING DIAGRAM >
C
DE
F
G H
I
J
K L
B A
O P
N
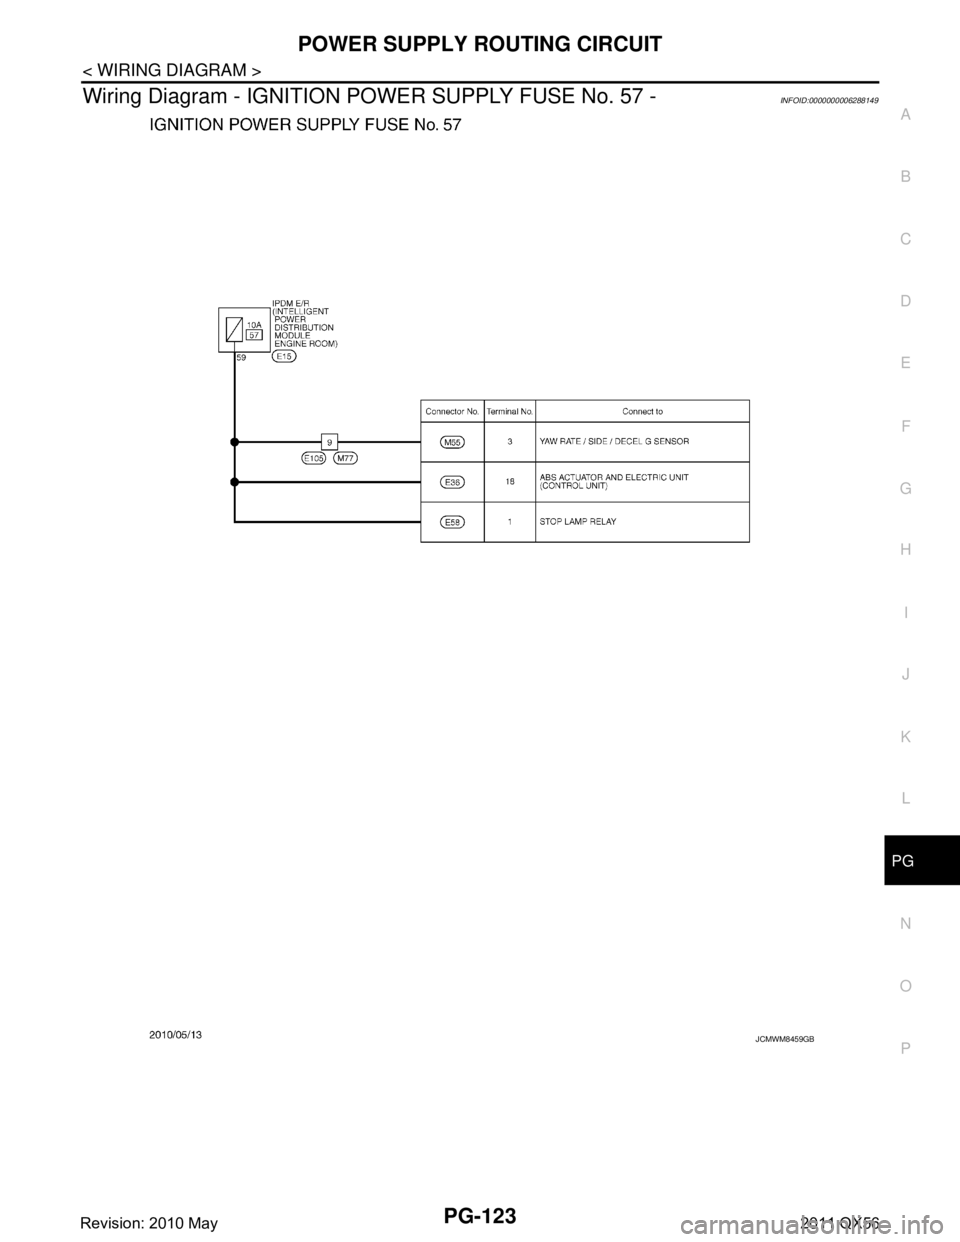
Wiring Diagram - IGNITION PO
WER SUPPLY FUSE No. 57 -INFOID:0000000006288149
JCMWM8459GB
Revision: 2010 May2011 QX56
Page 4045 of 5598

PG-126
< WIRING DIAGRAM >
POWER SUPPLY ROUTING CIRCUIT
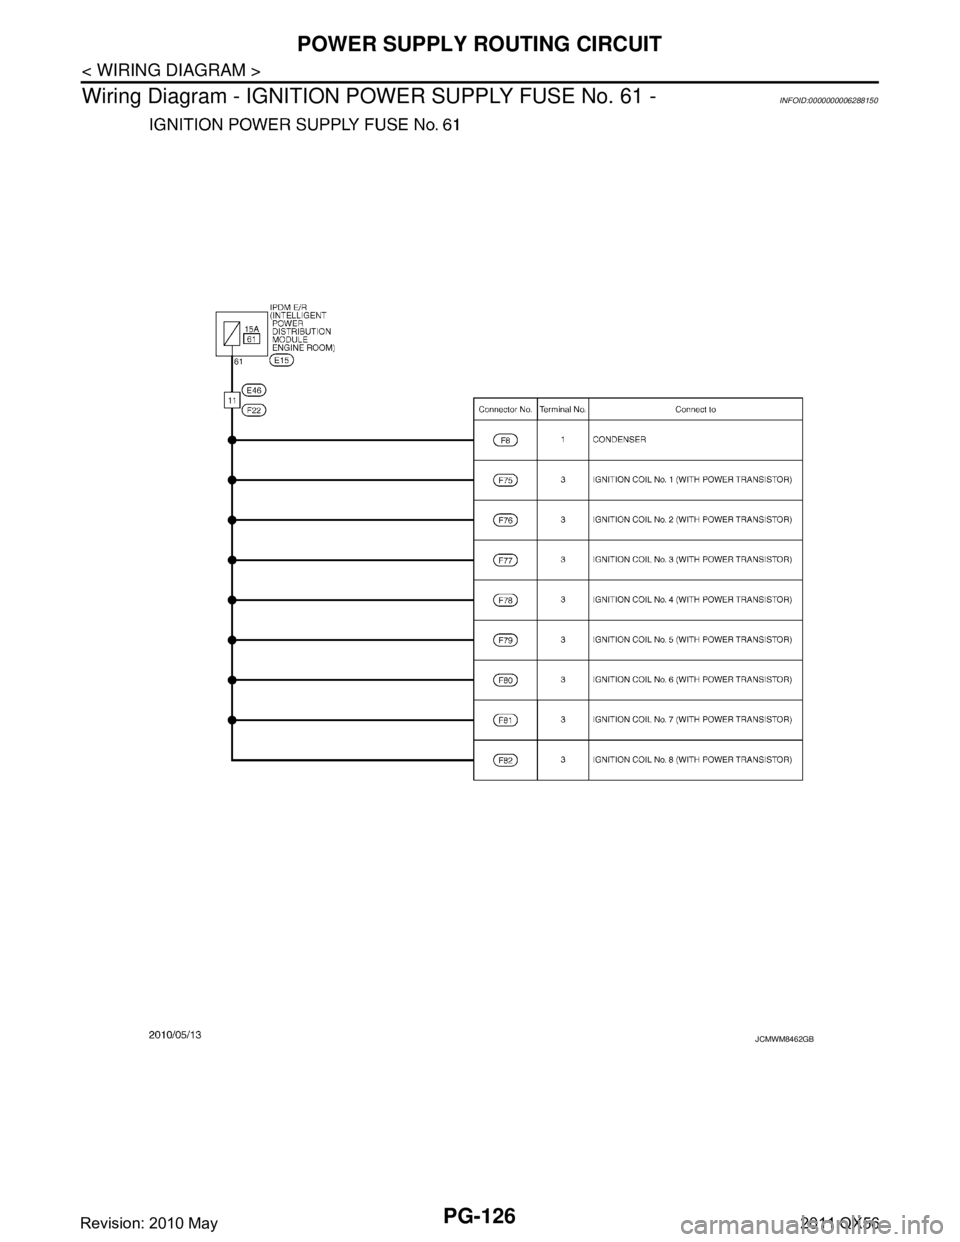
Wiring Diagram - IGNITION PO WER SUPPLY FUSE No. 61 -
INFOID:0000000006288150
JCMWM8462GB
Revision: 2010 May2011 QX56
Page 4048 of 5598

PG
POWER SUPPLY ROUTING CIRCUITPG-129
< WIRING DIAGRAM >
C
DE
F
G H
I
J
K L
B A
O P
N
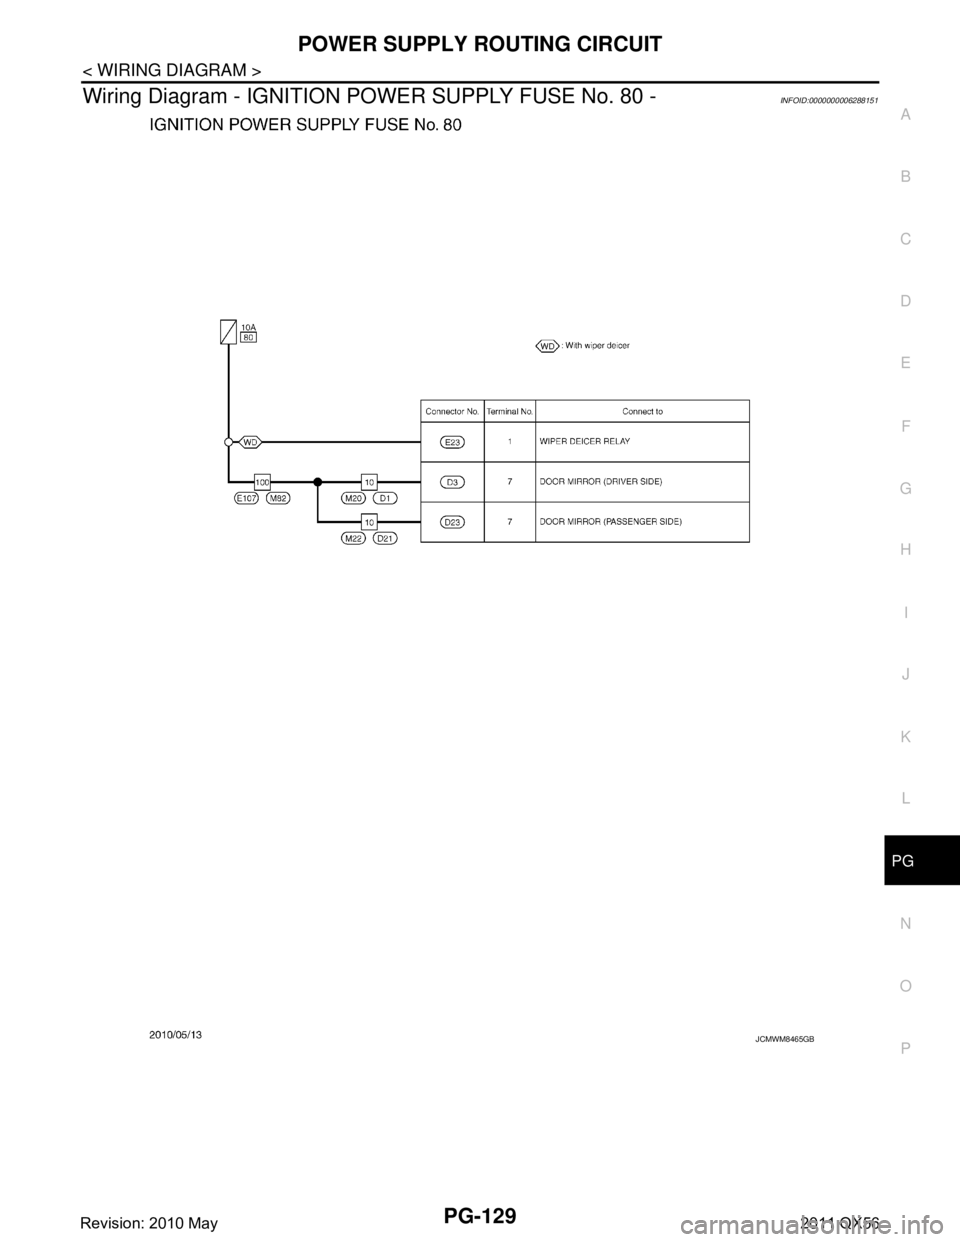
Wiring Diagram - IGNITION PO
WER SUPPLY FUSE No. 80 -INFOID:0000000006288151
JCMWM8465GB
Revision: 2010 May2011 QX56
Page 4089 of 5598

PWC-4
< PRECAUTION >
PRECAUTIONS
PRECAUTION
PRECAUTIONS
Precaution for Supplemental Restraint System (SRS) "AIR BAG" and "SEAT BELT
PRE-TENSIONER"
INFOID:0000000006237825
The Supplemental Restraint System such as “A IR BAG” and “SEAT BELT PRE-TENSIONER”, used along
with a front seat belt, helps to reduce the risk or severi ty of injury to the driver and front passenger for certain
types of collision. This system includes seat belt switch inputs and dual stage front air bag modules. The SRS
system uses the seat belt switches to determine the front air bag deployment, and may only deploy one front
air bag, depending on the severity of a collision and w hether the front occupants are belted or unbelted.
Information necessary to service the system safely is included in the “SRS AIR BAG” and “SEAT BELT” of this
Service Manual.
WARNING:
• To avoid rendering the SRS inopera tive, which could increase the risk of personal injury or death in
the event of a collision that would result in air bag inflation, all maintenance must be performed by
an authorized NISS AN/INFINITI dealer.
Improper maintenance, including in correct removal and installation of the SRS, can lead to personal
injury caused by unintent ional activation of the system. For re moval of Spiral Cable and Air Bag
Module, see the “SRS AIR BAG”.
Do not use electrical test equipmen t on any circuit related to the SRS unless instructed to in this
Service Manual. SRS wiring harnesses can be identi fied by yellow and/or orange harnesses or har-
ness connectors.
PRECAUTIONS WHEN USING POWER TOOLS (AIR OR ELECTRIC) AND HAMMERS
WARNING:
When working near the Air Bag Diagnosis Sensor Unit or other Air Bag System sensors with the ignition ON or engine running, DO NOT use air or electric power tools or strike near the sensor(s)
with a hammer. Heavy vibration could activate the sensor(s) and deploy the air bag(s), possibly
causing serious injury.
When using air or electric power tools or hammers , always switch the ignition OFF, disconnect the
battery, and wait at least 3 minu tes before performing any service.
Precaution Necessary for Steering W heel Rotation after Battery Disconnect
INFOID:0000000006217263
NOTE:
Before removing and installing any control units, first tu rn the push-button ignition switch to the LOCK posi-
tion, then disconnect bot h battery cables.
After finishing work, confirm that all control unit connectors are connected properly, then re-connect both
battery cables.
Always use CONSULT-III to perform self-diagnosis as a part of each function inspection after finishing work.
If a DTC is detected, perform trouble diagnos is according to self-diagnosis results.
For vehicle with steering lock unit, if the battery is disconnected or discharged, the steering wheel will lock and
cannot be turned.
If turning the steering wheel is required with the bat tery disconnected or discharged, follow the operation pro-
cedure below before starting the repair operation.
OPERATION PROCEDURE
1. Connect both battery cables. NOTE:
Supply power using jumper cables if battery is discharged.
2. Turn the push-button ignition switch to ACC position. (At this time, the steering lock will be released.)
3. Disconnect both battery cables. The steering lock wi ll remain released with both battery cables discon-
nected and the steering wheel can be turned.
4. Perform the necessary repair operation.
Revision: 2010 May2011 QX56
Page 4090 of 5598

PRECAUTIONSPWC-5
< PRECAUTION >
C
DE
F
G H
I
J
L
M A
B
PWC
N
O P
5. When the repair work is completed, re-connect both battery cables. With the brake pedal released, turn
the push-button ignition switch from ACC position to ON position, then to LOCK position. (The steering
wheel will lock when the push-button ignition switch is turned to LOCK position.)
6. Perform self-diagnosis check of a ll control units using CONSULT-III.
Revision: 2010 May2011 QX56
Page 4093 of 5598

PWC-8
< SYSTEM DESCRIPTION >
SYSTEM
SYSTEM
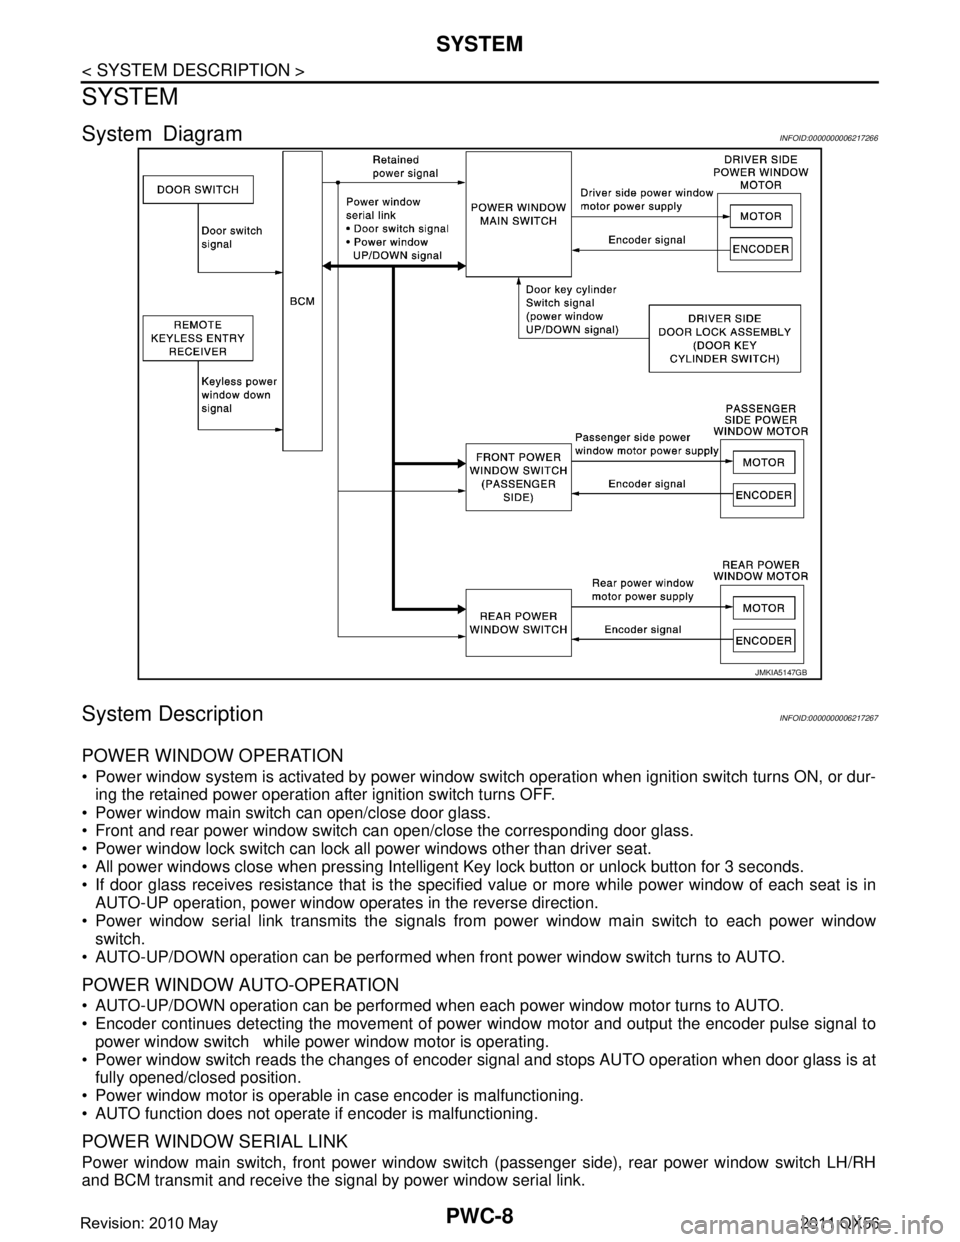
System DiagramINFOID:0000000006217266
System DescriptionINFOID:0000000006217267
POWER WINDOW OPERATION
Power window system is activated by power window switch operation when ignition switch turns ON, or dur-
ing the retained power operation after ignition switch turns OFF.
Power window main switch can open/close door glass.
Front and rear power window switch can open/close the corresponding door glass.
Power window lock switch can lock all power windows other than driver seat.
All power windows close when pressing Intelligent Ke y lock button or unlock button for 3 seconds.
If door glass receives resistance that is the specifi ed value or more while power window of each seat is in
AUTO-UP operation, power window operates in the reverse direction.
Power window serial link transmits the signals from power window main switch to each power window switch.
AUTO-UP/DOWN operation can be performed when front power window switch turns to AUTO.
POWER WINDOW AUTO-OPERATION
AUTO-UP/DOWN operation can be performed when each power window motor turns to AUTO.
Encoder continues detecting the movement of power window motor and output the encoder pulse signal to
power window switch while power window motor is operating.
Power window switch reads the changes of encoder signal and stops AUTO operation when door glass is at
fully opened/closed position.
Power window motor is operable in case encoder is malfunctioning.
AUTO function does not operate if encoder is malfunctioning.
POWER WINDOW SERIAL LINK
Power window main switch, front power window switch (passenger side), rear power window switch LH/RH
and BCM transmit and receive the signal by power window serial link.
JMKIA5147GB
Revision: 2010 May2011 QX56
Page 4094 of 5598

SYSTEMPWC-9
< SYSTEM DESCRIPTION >
C
DE
F
G H
I
J
L
M A
B
PWC
N
O P
The signal mentioned below is transmitted from BCM to power window main \
switch, front power window
switch (passenger side) and rear power window switch LH/RH.
Keyless power window down signal
Door switch signal
The signal mentioned below is transmitted from power window main switch to front power window switch (pas-
senger side) and rear power window switch LH/RH.
Front passenger side door window and rear door window operation signal
Power window control by door key cylinder switch signal
Power window lock switch signal
Retained power operation signal
RETAINED POWER OPERATION
Retained power operation is an additional power supply function that enables power window system to oper-
ate during the 45 seconds even when ignition switch is turned OFF.
Retained Power Function Cancel Conditions
Front door CLOSE (door switch OFF) →OPEN (door switch ON).
When ignition switch is ON again.
When timer time passes. (45 seconds)
POWER WINDOW LOCK FUNCTION
Ground circuit inside power window main switch shuts off when power window lock switch is ON. This inhibits
power window switch operation except with the power window main switch.
ANTI-PINCH OPERATION
Anti-pinch foreign lowers door glass 150 mm (5.9 in) when foreign material is pinched in door glass during
AUTO-UP operation.
Encoder continues detecting the movement of power window motor and output the encoder pulse signal to
power window switch l while power window motor is operating.
Resistance is applied to the power window motor ro tation that changes the frequency of encoder pulse sig-
nal if foreign material is trapped in the door glass.
Power window switch controls to lower the door glass for 150 mm (5.9 in) after it detects encoder pulse sig-
nal frequency change.
Operation Condition
When all door glass AUTO-UP operation is performed ( anti-pinch function does not operate just before the
door glass closes and is fully closed)
NOTE:
Depending on environment and driving conditions, if a similar impact or load is applied to the door glass, it
may lower.
DOOR KEY CYLINDER SWITCH OPERATION
Hold the door key cylinder to the LOCK or UNLOCK direct ion for 1.5 seconds or more to OPEN or CLOSE all
power windows when ignition switch is OFF. In addition, it stops when key position is moved to NEUTRAL
when operating.
Operation Condition
Ignition switch OFF.
Hold door key cylinder to LOCK position for 1.5 se conds or more to perform CLOSE operation of the door
glass.
Hold door key cylinder to UNLOCK position for 1.5 se conds or more to perform OPEN operation of the door
glass.
KEYLESS POWER WINDOW DOWN FUNCTION
All power windows open when the unlock button on Intelligent Key is activated and kept pressed for more than
3 seconds with the ignition switch OFF. The wi ndows keep opening if the unlock button is continuously
pressed.
The power window opening stops when the following operations are performed.
When the unlock button is kept pressed more than 15 seconds.
When the ignition switch is turned ON while the power window opening is operated.
When the unlock button is released.
While retained power operation activate, keyless power window down function cannot be operated.
Revision: 2010 May2011 QX56
Page 4097 of 5598

PWC-12
< SYSTEM DESCRIPTION >
DIAGNOSIS SYSTEM (BCM)
RETAIND PWR
RETAIND PWR : CONSULT-III Function (BCM - RETAINED PWR)INFOID:0000000006217270
Data monitor
CONSULT screen item Indication/Unit Description
Vehicle Speed km/h Vehicle speed of the moment a particular DTC is detected
Odo/Trip Meter km Total mileage (Odometer value) of the moment a particular DTC is detected
Vehicle Condition SLEEP>LOCK
Power position status of
the moment a particular
DTC is detected While turning BCM status from low power consumption mode to
normal mode (Power supply position is “LOCK”)
SLEEP>OFF While turning BCM status from low power consumption mode to
normal mode (Power supply position is “OFF”.)
LOCK>ACC While turning power supply position from “LOCK” to “ACC”
ACC>ON While turning power supply position from “ACC” to “IGN”
RUN>ACC While turning power supp
ly position from “RUN” to “ACC” (Vehicle
is stopping and selector lever is except P position.)
CRANK>RUN While turning power su
pply position from “CRANKING” to “RUN”
(From cranking up the engine to run it)
RUN>URGENT While turning power supply positi
on from “RUN“ to “ACC” (Emer-
gency stop operation)
ACC>OFF While turning power supply position from “ACC” to “OFF”
OFF>LOCK While turning power supply position from “OFF” to “LOCK”
OFF>ACC While turning power supply position from “OFF” to “ACC”
ON>CRANK While turning power supply position from “IGN” to “CRANKING”
OFF>SLEEP While turning BCM status from normal mode (Power supply posi-
tion is “OFF”.) to low power consumption mode
LOCK>SLEEP While turning BCM status from normal mode (Power supply posi-
tion is “LOCK”.) to low power consumption mode
LOCK Power supply position is “LOCK”
(Ignition switch OFF with steer-
ing is locked.)
OFF Power supply position is “OFF” (Ignition switch OFF with steering
is unlocked.)
ACC Power supply position is “ACC” (Ignition switch ACC)
ON Power supply position is “IGN” (Ignition switch ON with engine
stopped)
ENGINE RUN Power supply position is “RUN” (Ignition switch ON with engine
running)
CRANKING Power supply position is “CRANKING” (At engine cranking)
IGN Counter 0 - 39 The number of times that ignition switch is turned ON after DTC is detected
The number is 0 when a malfunction is detected now.
The number increases like 1
→ 2 → 3...38 → 39 after returning to the normal condition
whenever ignition switch OFF → ON.
The number is fixed to 39 until the self-diagnosis results are erased if it is over 39.
Monitor Item Description
DOOR SW-DR Indicates [ON/OFF] condition of driver side door switch.
DOOR SW-AS Indicates [ON/OFF] condition of passenger side door switch.
Revision: 2010 May2011 QX56