Page 4574 of 5598

FRONT SEATSE-115
< REMOVAL AND INSTALLATION >
C
DE
F
G H
I
K L
M A
B
SE
N
O P
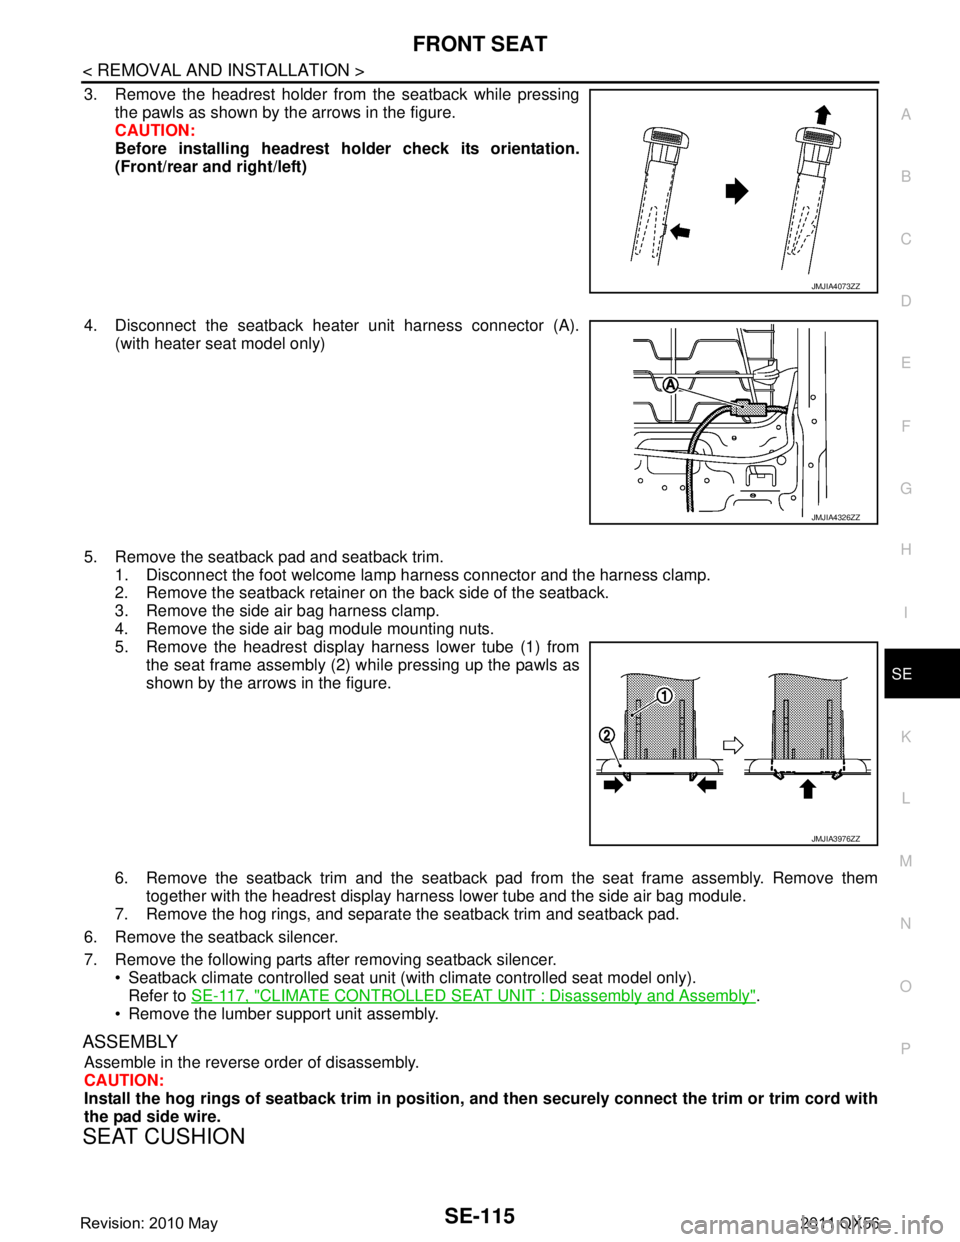
3. Remove the headrest holder from the seatback while pressing the pawls as shown by the arrows in the figure.
CAUTION:
Before installing headrest holder check its orientation.
(Front/rear and right/left)
4. Disconnect the seatback heater unit harness connector (A). (with heater seat model only)
5. Remove the seatback pad and seatback trim. 1. Disconnect the foot welcome lamp harness connector and the harness clamp.
2. Remove the seatback retainer on the back side of the seatback.
3. Remove the side air bag harness clamp.
4. Remove the side air bag module mounting nuts.
5. Remove the headrest display harness lower tube (1) from
the seat frame assembly (2) while pressing up the pawls as
shown by the arrows in the figure.
6. Remove the seatback trim and the seatback pad from the seat frame assembly. Remove them
together with the headrest display harness lower tube and the side air bag module.
7. Remove the hog rings, and separate the seatback trim and seatback pad.
6. Remove the seatback silencer.
7. Remove the following parts after removing seatback silencer. Seatback climate controlled seat unit (wit h climate controlled seat model only).
Refer to SE-117, "
CLIMATE CONTROLLED SEAT UNIT : Disassembly and Assembly".
Remove the lumber support unit assembly.
ASSEMBLY
Assemble in the reverse order of disassembly.
CAUTION:
Install the hog rings of seatback trim in position, and then securely connect the trim or trim cord with
the pad side wire.
SEAT CUSHION
JMJIA4073ZZ
JMJIA4326ZZ
JMJIA3976ZZ
Revision: 2010 May2011 QX56
Page 4575 of 5598

SE-116
< REMOVAL AND INSTALLATION >
FRONT SEAT
SEAT CUSHION : Disa ssembly and Assembly
INFOID:0000000006217426
DISASSEMBLY
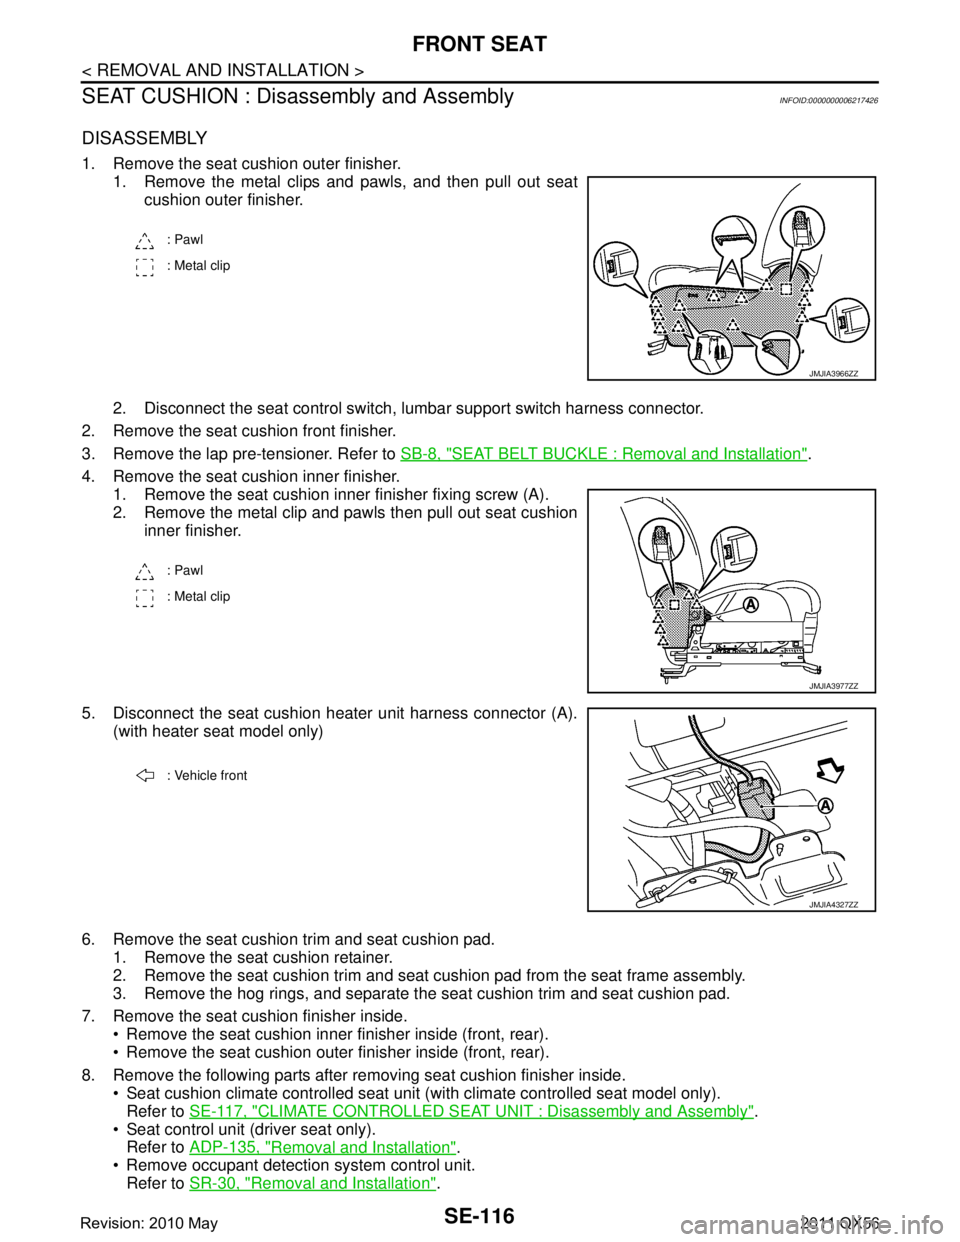
1. Remove the seat cushion outer finisher.
1. Remove the metal clips and pawls, and then pull out seat
cushion outer finisher.
2. Disconnect the seat control switch, lumbar support switch harness connector.
2. Remove the seat cushion front finisher.
3. Remove the lap pre-tensioner. Refer to SB-8, "
SEAT BELT BUCKLE : Removal and Installation".
4. Remove the seat cushion inner finisher. 1. Remove the seat cushion inner finisher fixing screw (A).
2. Remove the metal clip and pawls then pull out seat cushioninner finisher.
5. Disconnect the seat cushion heater unit harness connector (A). (with heater seat model only)
6. Remove the seat cushion trim and seat cushion pad. 1. Remove the seat cushion retainer.
2. Remove the seat cushion trim and seat cu shion pad from the seat frame assembly.
3. Remove the hog rings, and separate the seat cushion trim and seat cushion pad.
7. Remove the seat cushion finisher inside. Remove the seat cushion inner finisher inside (front, rear).
Remove the seat cushion outer finisher inside (front, rear).
8. Remove the following parts after removing seat cushion finisher inside. Seat cushion climate controlled seat unit (with climate controlled seat model only).
Refer to SE-117, "
CLIMATE CONTROLLED SEAT UNIT : Disassembly and Assembly".
Seat control unit (driver seat only).
Refer to ADP-135, "
Removal and Installation".
Remove occupant detection system control unit. Refer to SR-30, "
Removal and Installation".
: Pawl
: Metal clip
JMJIA3966ZZ
: Pawl
: Metal clip
JMJIA3977ZZ
: Vehicle front
JMJIA4327ZZ
Revision: 2010 May2011 QX56
Page 4576 of 5598

FRONT SEATSE-117
< REMOVAL AND INSTALLATION >
C
DE
F
G H
I
K L
M A
B
SE
N
O P
ASSEMBLY
Assemble in the reverse order of disassembly.
CAUTION:
Install the hog rings of seat cushion trim in positi on, and then securely connect the trim or trim cord
with the pad side wire.
CLIMATE CONTROLLED SEAT UNIT
CLIMATE CONTROLLED SEAT UNI T : Disassembly and AssemblyINFOID:0000000006217427
DISASSEMBLY
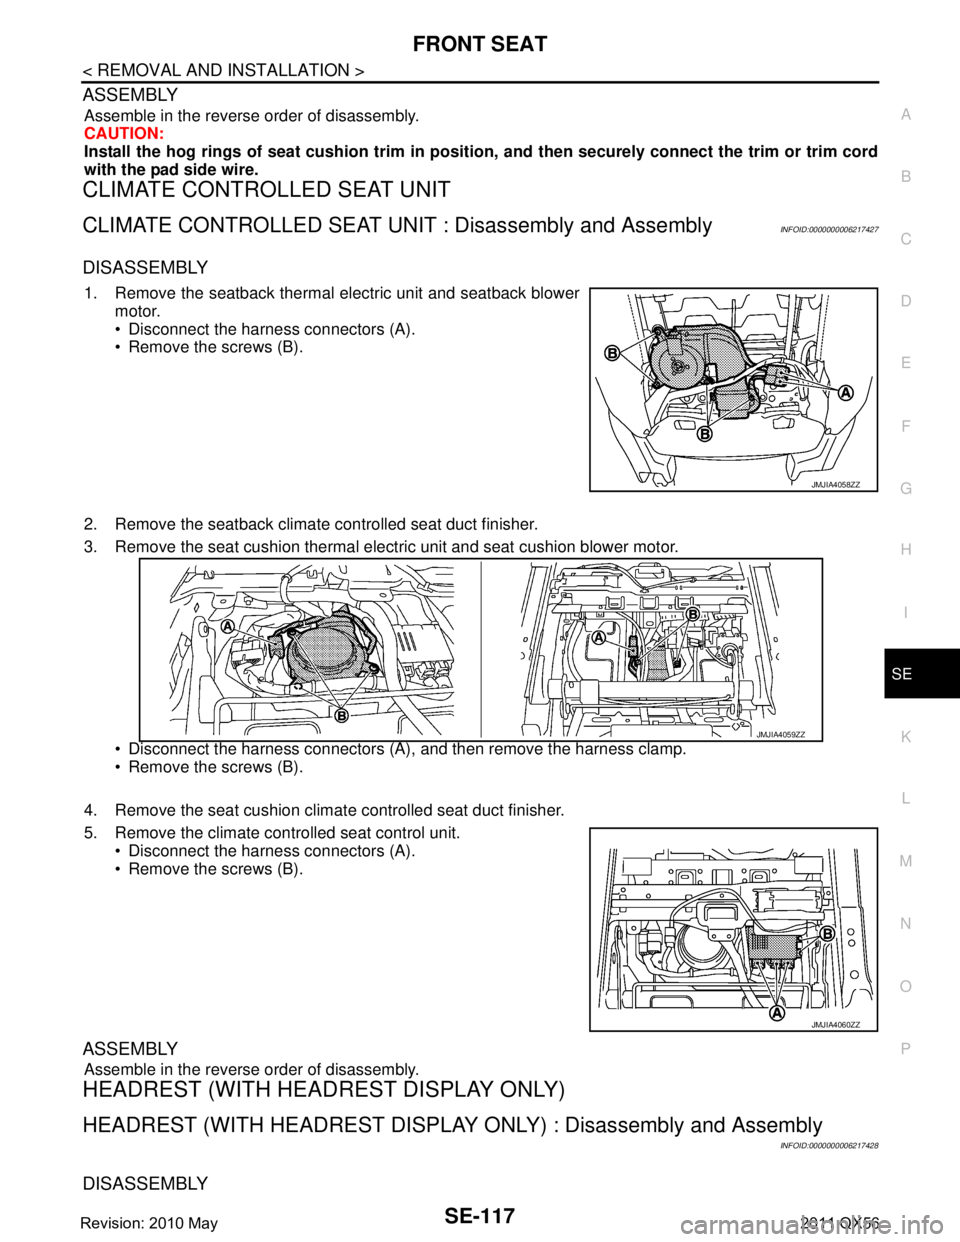
1. Remove the seatback thermal electric unit and seatback blower
motor.
Disconnect the harness connectors (A).
Remove the screws (B).
2. Remove the seatback climate controlled seat duct finisher.
3. Remove the seat cushion thermal electric unit and seat cushion blower motor.
Disconnect the harness connectors (A), and then remove the harness clamp.
Remove the screws (B).
4. Remove the seat cushion climat e controlled seat duct finisher.
5. Remove the climate controlled seat control unit. Disconnect the harness connectors (A).
Remove the screws (B).
ASSEMBLY
Assemble in the reverse order of disassembly.
HEADREST (WITH HEAD REST DISPLAY ONLY)
HEADREST (WITH HEADREST DISPLAY ONLY) : Disassembly and Assembly
INFOID:0000000006217428
DISASSEMBLY
JMJIA4058ZZ
JMJIA4059ZZ
JMJIA4060ZZ
Revision: 2010 May2011 QX56
Page 4606 of 5598
CLIMATE CONTROLLED SEAT SWITCHSE-147
< REMOVAL AND INSTALLATION >
C
DE
F
G H
I
K L
M A
B
SE
N
O P
CLIMATE CONTROLLED SEAT SWITCH
Removal and InstallationINFOID:0000000006217444
REMOVAL
CAUTION:
When removing and in stalling, use shop cloths to protect parts from damage.
1. Remove the cluster lid C lower. Refer to IP-14, "
Removal and Installation".
2. Remove climate controlled seat switch from cluster lid C lower using flat-bladed screwdriver.
INSTALLATION
Install in the reverse order of removal.
Revision: 2010 May2011 QX56
Page 4607 of 5598
SE-148
< REMOVAL AND INSTALLATION >
CLIMATE CONTROLLED SEAT BLOWER FILTER
CLIMATE CONTROLLED SEAT BLOWER FILTER
SEAT CUSHION
SEAT CUSHION : Removal and InstallationINFOID:0000000006217445
REMOVAL
CAUTION:
When removing and installing, use shop cloths to protect parts from damage.
1. Remove the seat.
2. Turn blower filter counter counterclockwise and remo ve it from climate controlled seat cushion blower
motor.
INSTALLATION
Install in the reverse order of removal.
SEATBACK
SEATBACK : Removal and InstallationINFOID:0000000006217446
REMOVAL
CAUTION:
When removing and installi ng, use shop cloths to protect parts from damage.
1. Remove the seatback board.
2. Turn blower filter counter counterclockwise and re move it from climate controlled seat blower motor.
INSTALLATION
Install in the reverse order of removal.
Revision: 2010 May2011 QX56