Page 313 of 419
What to do in an emergency
22
6
When towing your vehicle in an emer- gency without wheel dollies :
1. Set the ignition switch in the ACC posi-
tion.
2. Place the transaxle shift lever in N (Neutral).
3. Release the parking brake.
F080200AUN
Removable towing hook (rear) (if equipped)
1. Open the tailgate, and remove the tow-ing hook from the tool case.
2. Remove the hole cover pressing the lower part of the cover on the rear
bumper. 3. Install the towing hook by turning it
clockwise into the hole until it is fullysecured.
4. Remove the towing hook and install the cover after use.
CAUTION
Failure to place the transaxle shift
lever in N (Neutral) may cause inter-nal damage to the transaxle.
OEN066010OEN066011
procarmanuals.com
Page 348 of 419

731
Maintenance
G060200AEN Changing the engine oil and filter
Have engine oil and filter changed by an
authorized HYUNDAI dealer according tothe Maintenance Schedule at the begin-ning of this section.G070000AUN The high-pressure cooling system has a
reservoir filled with year-round antifreeze
coolant. The reservoir is filled at the fac-
tory.
Check the antifreeze protection and
coolant level at least once a year, at thebeginning of the winter season, and
before traveling to a colder climate. G070100AEN
Checking the coolant level
WARNING
Used engine oil may cause irrita- tion or cancer of the skin if left in
contact with the skin for prolonged
periods of time. Used engine oil
contains chemicals that have
caused cancer in laboratory ani-
mals. Always protect your skin by
washing your hands thoroughlywith soap and warm water as soon
as possible after handling used oil.
ENGINE COOLANT
WARNING - Removing
radiator cap
Never attempt to remove the radi- ator cap while the engine is oper-
ating or hot. Doing so might leadto cooling system and engine
damage and could result in seri-
ous personal injury from escap-ing hot coolant or steam.
(Continued)
(Continued)
Turn the engine off and wait untilit cools down. Use extreme care
when removing the radiator cap.
Wrap a thick towel around it, and
turn it counterclockwise slowly to
the first stop. Step back while the
pressure is released from the
cooling system. When you aresure all the pressure has been
released, press down on the cap,
using a thick towel, and continue
turning counterclockwise to
remove it.
Even if the engine is not operat- ing, do not remove the radiatorcap or the drain plug while the
engine and radiator are hot. Hot
coolant and steam may still blow
out under pressure, causing seri-
ous injury.
procarmanuals.com
Page 363 of 419
Maintenance
46
7
G190400AEN
Removing the battery
1. Remove the nut (1) and disconnect the
battery cable from the negative termi-
nal of the battery.
2. Remove the nuts (2, 3) and disconnect the battery cable from the positive ter-
minal of the battery.
3. Remove the battery.
4. Reinstall the battery in the reverse order of removal. G190300AEN Reset items
Items should be reset after the battery
has been discharged or the battery hasbeen disconnected.
Power tailgate (See section 4)
Auto up/down window (See section 4)
Sunroof (See section 4)
Driver position memory system
(See section 4)
Trip computer (See section 4)
Climate control system (See section 4)
Clock (See section 4)
Audio (See section 4)
OEN076052
WARNING
Before performing maintenance or recharging the battery, turn off all accessories and stop the
engine.
The negative battery cable must be removed first and installed
last when the battery is discon-nected.
procarmanuals.com
Page 376 of 419
759
Maintenance
G210101AUN
Memory fuse
Your vehicle is equipped with a memory
fuse to prevent battery discharge if your
vehicle is parked without being operated
for prolonged periods. Use the following
procedures before parking the vehicle for
prolonged periods.
1. Turn off the engine.
2. Turn off the headlights and tail lights.
3. Open the driver’s side panel cover andpull up the memory fuse.
✽✽ NOTICE
If the memory fuse is pulled up from the fuse panel, the warning chime,
audio, clock and interior lamps, etc.,
will not operate. Some items must be
reset after replacement. Refer to
“Battery” in this section.
Even though the memory fuse is
pulled up, the battery can still be dis-
charged by operation of the head-
lights or other electrical devices.
G210200AEN
Engine compartment fuse replacement
1. Turn the ignition switch and all other switches off.
2. Remove the fuse panel cover by pressing the tab and pulling up.
OEN076023
OEN076024
OEN076025
procarmanuals.com
Page 379 of 419

Maintenance
62
7
Instrument panel fuse panel
Description Fuse rating Protected component
AUDIO 2 10A Audio, Console & rear power outlet relay, Digital clock, BCM
C/LIGHTER 20A Front cigarette lighter & Power outlet
A/BAG 2 10A -
A/BAG 1 15A SRS control module
A/BAG IND 10A Instrument cluster (Air bag indicator lamp)
B/UP LP 10A Back-up lamp relay, TCM, Electro chromic mirror, Back warning control module
CRUISE 10A Multifunction switch, PIC immobilizer module, Driver/Passenger seat warmer switch
ATM CONT 10A ATM key lock unit, 4WD ECM, BCM, Multifunction switch, Semi active engine mounting control module
CLUSTER 10A Instrument cluster, Generator, BCM, PIC immobilizer module
START 10A Burglar alarm relay, Power tailgate control module
EPS 10A BCM, Rheostat, Power window main/assist switch
A/CON 10A Front A/C control module, Blower relay, Rear A/C control module, Rear A/C relay, Rain sensor, Sunroof control module, Electro chromic mirror
FR S/HTR 15A Driver/Passenger Seat warmer switch
RR S/HTR 15A -
IMS 10A IMS control module, Tilt & Telescopic module, PTC heater relay, Power tailgate control module
H/LP, AQS 10A Head lamp low relay, AQS sensor
FR WASHER 15A Front wiper relay, Front washer relay
RR WIPER 15A Rear wiper control module, Rear wiper motor
TAIL LH 10A Head lamp LH, Rear combi lamp LH, Front fog lamp relay, Tailgate handler license lamp
TAIL RH 10A Head lamp RH, Rear combi lamp RH, Glove box lamp, Illuminations
procarmanuals.com
Page 385 of 419

Maintenance
68
7
G220101AEN
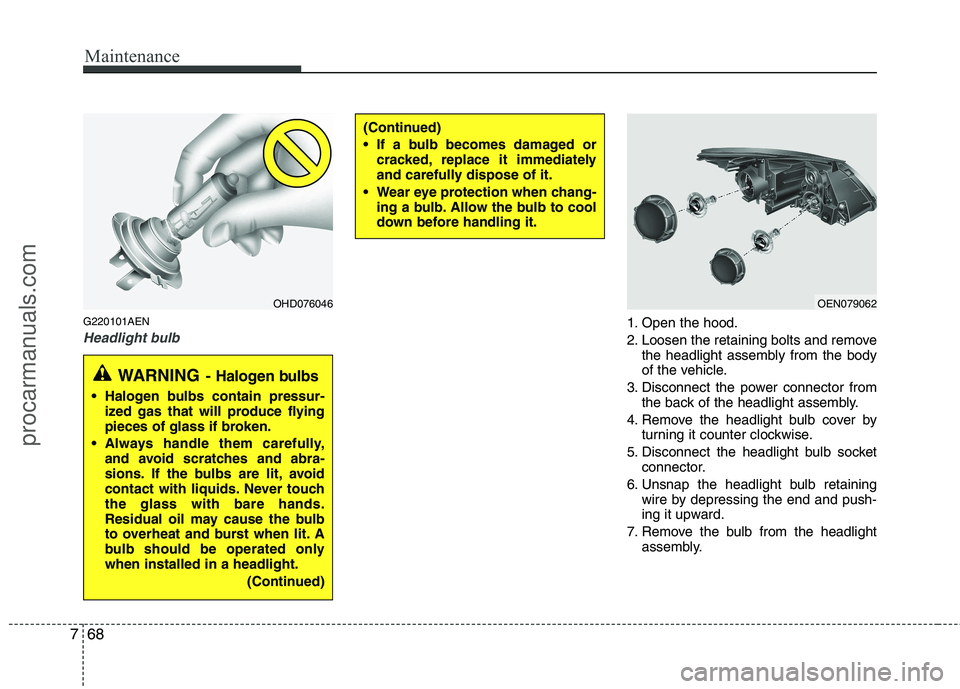
Headlight bulb1. Open the hood.
2. Loosen the retaining bolts and remove
the headlight assembly from the body
of the vehicle.
3. Disconnect the power connector from the back of the headlight assembly.
4. Remove the headlight bulb cover by turning it counter clockwise.
5. Disconnect the headlight bulb socket connector.
6. Unsnap the headlight bulb retaining wire by depressing the end and push-
ing it upward.
7. Remove the bulb from the headlight assembly.
(Continued)
If a bulb becomes damaged orcracked, replace it immediately
and carefully dispose of it.
Wear eye protection when chang- ing a bulb. Allow the bulb to cool
down before handling it.
OHD076046OEN079062
WARNING - Halogen bulbs
Halogen bulbs contain pressur-
ized gas that will produce flying
pieces of glass if broken.
Always handle them carefully, and avoid scratches and abra-
sions. If the bulbs are lit, avoid
contact with liquids. Never touchthe glass with bare hands.
Residual oil may cause the bulb
to overheat and burst when lit. A
bulb should be operated onlywhen installed in a headlight.
(Continued)
procarmanuals.com
Page 386 of 419

769
Maintenance
8. Install a new headlight bulb and snapthe headlight bulb retaining wire into
position by aligning the wire with the
groove on the bulb.
9. Connect the headlight bulb socket connector.
10. Install the headlight bulb cover by turning it clockwise.
11. Connect the power connector to the back of the headlight assembly.
12. Reinstall the headlight assembly to the body of the vehicle.
✽✽NOTICE
If the headlight aiming adjustment is
necessary after the headlight assembly is
reinstalled, consult an authorized
HYUNDAI dealer.Position light bulb
1. Remove the socket from the assembly by pulling it out.
2. Remove the bulb by pulling it straight out.
3. Insert a new bulb into the socket.
4. Install the socket into the assembly by pushing it in. Turn signal light bulb
1. Remove the socket from the assembly
by turning the socket counter clock-
wise until the tabs on the socket align
with the slots on the assembly.
2. Remove the bulb from the socket by pressing it in and rotating it until the
tabs on the bulb align with the slots in
the socket. Pull the bulb out of the
socket.
3. Insert a new bulb by inserting it into the socket and rotating it until it locks
into place.
4. Install the socket into the assembly by aligning the tabs on the socket with the
slots in the assembly. Push the socket
into the assembly and turn the socket
clockwise.
OEN079063OEN079064
procarmanuals.com
Page 387 of 419

Maintenance
70
7
G220103AEN
Front fog light bulb replacement
1. Remove the front bumper under cover
and reach your hand into the back of
the front bumper.
2. Disconnect the power connector from the socket.
3. Remove the bulb-socket from the housing by turning the socket counter
clockwise until the tabs on the socketalign with the slots on the housing.
4. Install the new bulb-socket into the housing by aligning the tabs on the
socket with the slots in the housing.
Push the socket into the housing and
turn the socket clockwise.
5. Connect the power connector to the socket.
6. Reinstall the front bumper under cover. G220102BEN
Headlight (HID type) bulb replace-
ment
If the light bulb is not operating, have the
vehicle checked by an authorized
HYUNDAI dealer.
✽✽ NOTICE
HID lamps have superior performance vs.
halogen bulbs. HID lamps are estimated by
the manufacturer to last twice as long or
longer than halogen bulbs depending on their
frequency of use. They will probably require
replacement at some point in the life of the
vehicle. Cycling the headlamps on and off
more than typical use will shorten HID lamps
life. HID lamps do not fail in the same man-
ner as halogen incandescent lamps. If a head-
lamp goes out after a period of operation but
will immediately relight when the headlamp
switch is cycled it is likely the HID lamp needs
to be replaced. HID lighting components are
more complex than conventional halogen
bulbs thus have higher replacement cost.
G220200AEN
Side repeater light bulb replace- ment (if equipped)
If the light bulb is not operating, have the
vehicle checked by an authorized
HYUNDAI dealer.
WARNING - HID Headlight
low beam (if equipped)
Do not attempt to replace or
inspect the low beam (XENON bulb)
due to electric shock danger. If the
low beam (XENON bulb) is not
working, have your vehicle checked
by an authorized HYUNDAI Dealer
OEN079061OEN076031
procarmanuals.com