2011 HYUNDAI VERACRUZ display
[x] Cancel search: displayPage 120 of 419

Features of your vehicle
42
4
To operate the electric rearview mirror:
Press the ON/OFF button (1) to turn
the automatic dimming function on.
The mirror indicator light will illuminate.
Press the ON/OFF button to turn the
automatic dimming function off. The
mirror indicator light will turn off.
The mirror defaults to the ON position whenever the ignition switch is turnedon. D140103AUN
Electric chromic mirror (ECM) with
compass (if equipped)
To operate the electric rearview mirror:
Press the MIRROR button (3) to turn the automatic dimming function on.
The mirror indicator light will illuminate.
Press the MIRROR button to turn the
automatic dimming function off. The
mirror indicator light will turn off.
The other automatic dimming function of the mirror is same as the general
electric chromic mirror (ECM)
described previously. To operate the compass:
The vehicle compass displays the direc-
tion the vehicle is heading.
Press the COMPASS button (2) to turn
the compass function on.
Press the COMPASS button to turn the
compass function off.
If the ignition switch is turned on, the compass function is on or off depend-
ing on the status before ignition switch
is turned off.
Heading display
- E: East
- W: West
- S: South
- N: North
i.e.,) NE: North East
✽✽ NOTICE
If new vehicle is first driven, perform
calibration procedure as follows.
OEN046033OEN046034
1IndicatorSensorIndicatorSensor23
procarmanuals.com
Page 121 of 419

443
Features of your vehicle
Calibration procedure
The compass may not indicate the cor- rect compass direction if the electronic
compass has not been calibrated cor-
rectly, if the compass zone number is dif-
ferent for your current location, or when
you are driving in certain areas (tunnel,
parking garage, underground parking lot,
near transformer substation, etc.), and
the following may occur:
The compass headings become inac-curate.
The compass heading doesn't change when the vehicle changes direction.
Some compass headings are not dis- played.
The compass headings are inaccurate in long distance driving.
If the vehicle's compass headings
become inaccurate continuously, the
compass should be manually calibrated
as follows: 1. For optimum calibration, switch off all
nonessential electrical accessories
(rear window defroster, climate controlsystem, audio system and windshield
wiper, etc.) and close all doors.
2. Move the vehicle to a safe and large place away from any large steel struc-
tures or power generating cables orequipment.
3. Turn on the compass function, and press and hold the COMPASS button
(2) for about 3 seconds until the
"ZONE" appears in the display.
Release the button and the zone num-
ber will appear in the display. If the zone number is different for your
current location, set the correct zone
number referring to "Setting the compass
zone" and perform the "Calibration pro-cedure" again.
OEN046035
procarmanuals.com
Page 122 of 419

Features of your vehicle
44
4
4. With the compass heading displaying
normally, press and hold the button
(2) again for about 6~7 seconds untilthe "CAL" appears and release the
button.
5. Drive your vehicle in at least 2~3 com- plete circle (either clockwise or coun-
terclockwise) at less than 5 mph (8
km/h) until the "CAL" disappears, andthe compass heading appears then
calibration will be complete. If the compass mirror does not recog-
nize the terrestrial magnetism correct-
ly depending on the external circum-
stances, it may be delayed in the cal-
ibration procedure.
6. If the vehicle's compass headings become inaccurate again, repeat
above steps. Setting the compass zone
This compass must be set to compen-
sate for the variation between true north
and magnetic north. To set variation:
1. Find your current location and vari-
ance zone number on the zone map.
2. Press and hold the COMPASS button (2) for about 3 seconds until the
"ZONE" appears in the display, and
release the button. Then the zone
number will appear in the display.
3. Press the button (2) repeatedly until the correct zone number for your loca-
tion appears in the display. 4. If the desired zone number is selected,
release the button (2). After about 3
seconds, the "ZONE" disappears and
a compass direction will be shown in
the display.
5. If the new compass zone is set, per- form the "Calibration procedure".
✽✽ NOTICE
Do not install a ski rack, antenna, etc. that is attached to the vehicle using a
magnet as anything attached to the
roof of the vehicle with a magnet will
effect compass operation.
If the compass deviates from the cor-
rect indication after repeated adjust-
ment, have the compass checked at an
authorized dealer.
The compass may not indicate the
correct compass point in tunnels or
while driving up or down a steep hill.
(The compass returns to the correct
compass point when the vehicle moves
to an area where the geomagnetism is
stabilized.)
OEN046036OEN046035
procarmanuals.com
Page 132 of 419
Features of your vehicle
54
4
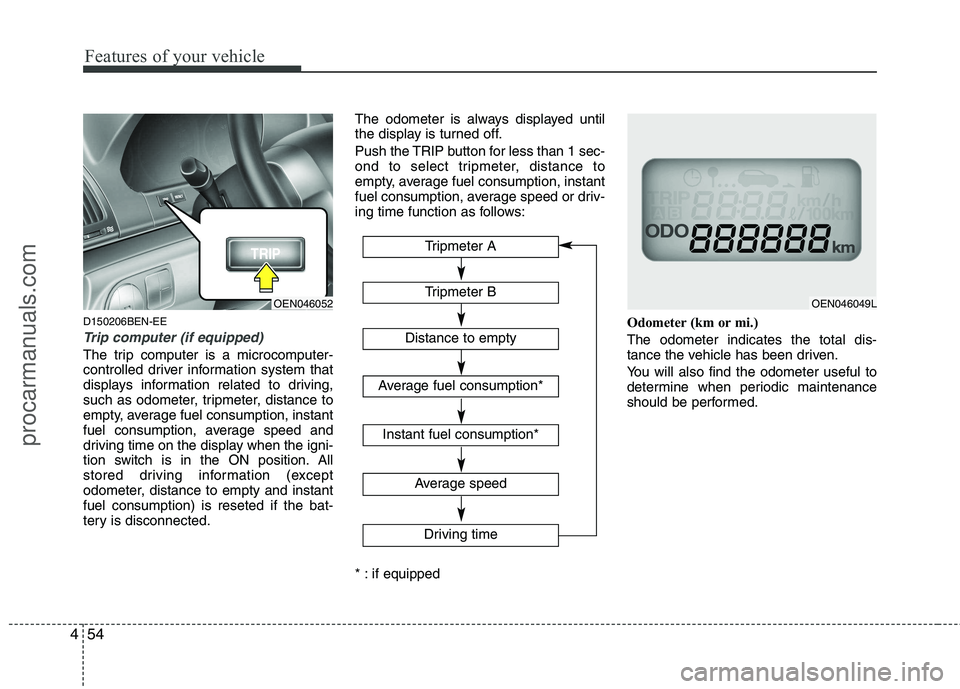
D150206BEN-EE
Trip computer (if equipped)
The trip computer is a microcomputer-
controlled driver information system that
displays information related to driving,
such as odometer, tripmeter, distance to
empty, average fuel consumption, instant
fuel consumption, average speed and
driving time on the display when the igni-
tion switch is in the ON position. All
stored driving information (except
odometer, distance to empty and instantfuel consumption) is reseted if the bat-
tery is disconnected. The odometer is always displayed until
the display is turned off.
Push the TRIP button for less than 1 sec-
ond to select tripmeter, distance to
empty, average fuel consumption, instant
fuel consumption, average speed or driv-
ing time function as follows:
* : if equipped
Odometer (km or mi.) The odometer indicates the total dis-
tance the vehicle has been driven.
You will also find the odometer useful to
determine when periodic maintenance
should be performed.
OEN046052OEN046049L
Tripmeter B
Average speed
Driving time
Tripmeter A
Distance to empty
Average fuel consumption*
Instant fuel consumption*
procarmanuals.com
Page 133 of 419
455
Features of your vehicle
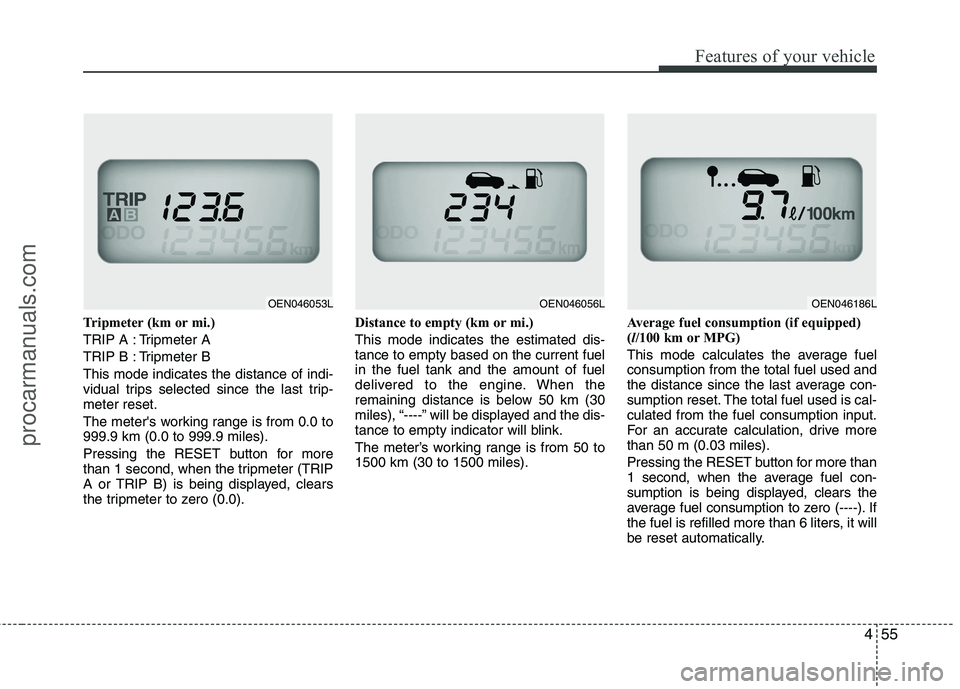
Tripmeter (km or mi.)
TRIP A : Tripmeter A
TRIP B : Tripmeter BThis mode indicates the distance of indi-
vidual trips selected since the last trip-meter reset.
The meter's working range is from 0.0 to 999.9 km (0.0 to 999.9 miles).
Pressing the RESET button for more
than 1 second, when the tripmeter (TRIP
A or TRIP B) is being displayed, clears
the tripmeter to zero (0.0).Distance to empty (km or mi.) This mode indicates the estimated dis- tance to empty based on the current fuelin the fuel tank and the amount of fuel
delivered to the engine. When the
remaining distance is below 50 km (30
miles), “----” will be displayed and the dis-
tance to empty indicator will blink.
The meter’s working range is from 50 to 1500 km (30 to 1500 miles).
Average fuel consumption (if equipped)(
l/100 km or MPG)
This mode calculates the average fuelconsumption from the total fuel used and
the distance since the last average con-
sumption reset. The total fuel used is cal-culated from the fuel consumption input.
For an accurate calculation, drive morethan 50 m (0.03 miles).
Pressing the RESET button for more than
1 second, when the average fuel con-
sumption is being displayed, clears the
average fuel consumption to zero (----). If
the fuel is refilled more than 6 liters, it will
be reset automatically.
OEN046053LOEN046056LOEN046186L
procarmanuals.com
Page 134 of 419
Features of your vehicle
56
4
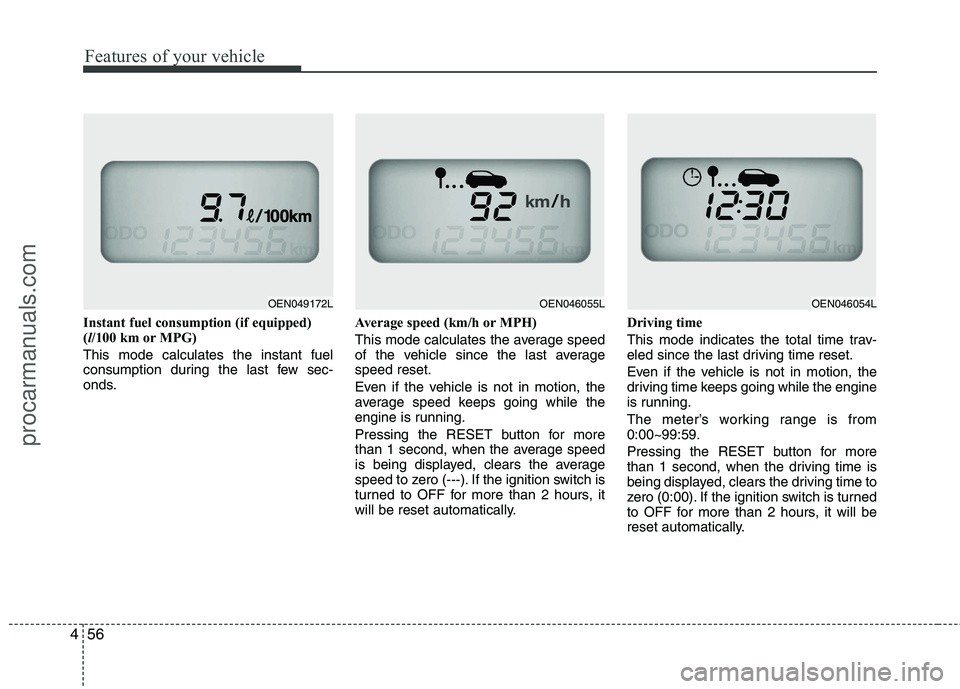
Instant fuel consumption (if equipped) ( l/100 km or MPG)
This mode calculates the instant fuel
consumption during the last few sec-
onds. Average speed (km/h or MPH)
This mode calculates the average speed
of the vehicle since the last averagespeed reset.
Even if the vehicle is not in motion, the
average speed keeps going while the
engine is running.
Pressing the RESET button for more
than 1 second, when the average speed
is being displayed, clears the average
speed to zero (---). If the ignition switch is
turned to OFF for more than 2 hours, it
will be reset automatically.Driving time
This mode indicates the total time trav-
eled since the last driving time reset.
Even if the vehicle is not in motion, the
driving time keeps going while the engine
is running.
The meter’s working range is from 0:00~99:59.
Pressing the RESET button for more
than 1 second, when the driving time is
being displayed, clears the driving time to
zero (0:00). If the ignition switch is turned
to OFF for more than 2 hours, it will be
reset automatically.
OEN046054LOEN046055LOEN049172L
procarmanuals.com
Page 141 of 419
463
Features of your vehicle
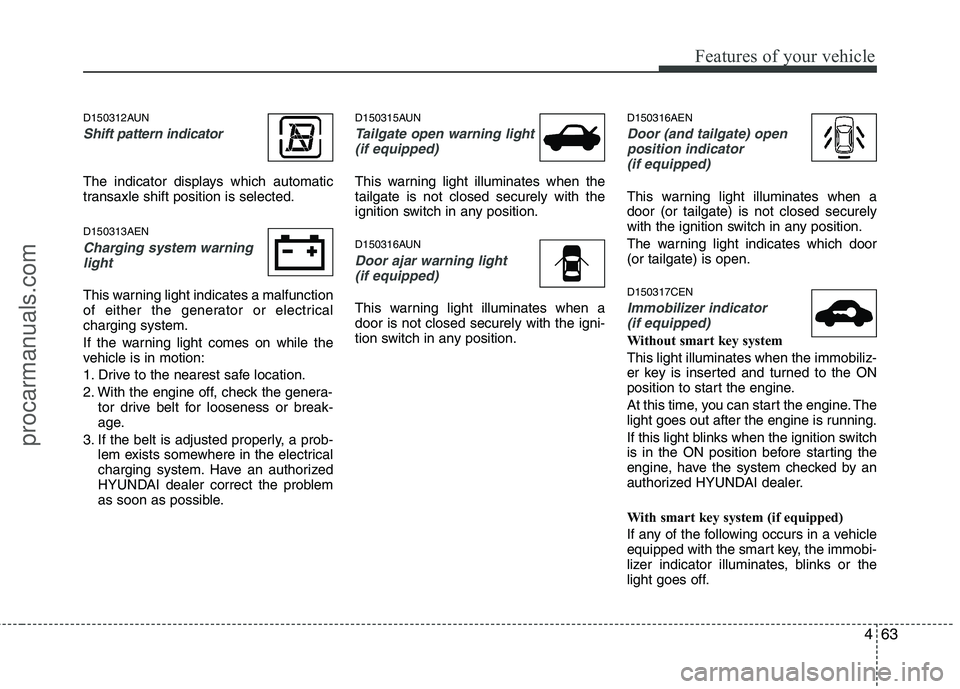
D150312AUN
Shift pattern indicator
The indicator displays which automatic
transaxle shift position is selected. D150313AEN
Charging system warninglight
This warning light indicates a malfunction
of either the generator or electricalcharging system.
If the warning light comes on while the
vehicle is in motion:
1. Drive to the nearest safe location.
2. With the engine off, check the genera- tor drive belt for looseness or break-
age.
3. If the belt is adjusted properly, a prob- lem exists somewhere in the electrical
charging system. Have an authorized
HYUNDAI dealer correct the problem
as soon as possible. D150315AUN
Tailgate open warning light
(if equipped)
This warning light illuminates when the tailgate is not closed securely with the
ignition switch in any position.
D150316AUN
Door ajar warning light(if equipped)
This warning light illuminates when a door is not closed securely with the igni-
tion switch in any position. D150316AEN
Door (and tailgate) open
position indicator
(if equipped)
This warning light illuminates when a door (or tailgate) is not closed securely
with the ignition switch in any position.
The warning light indicates which door (or tailgate) is open. D150317CEN
Immobilizer indicator (if equipped)
Without smart key system This light illuminates when the immobiliz-
er key is inserted and turned to the ON
position to start the engine.
At this time, you can start the engine. The
light goes out after the engine is running.
If this light blinks when the ignition switch
is in the ON position before starting the
engine, have the system checked by an
authorized HYUNDAI dealer.
With smart key system (if equipped)
If any of the following occurs in a vehicle
equipped with the smart key, the immobi-
lizer indicator illuminates, blinks or the
light goes off.
procarmanuals.com
Page 179 of 419
4101
Features of your vehicle
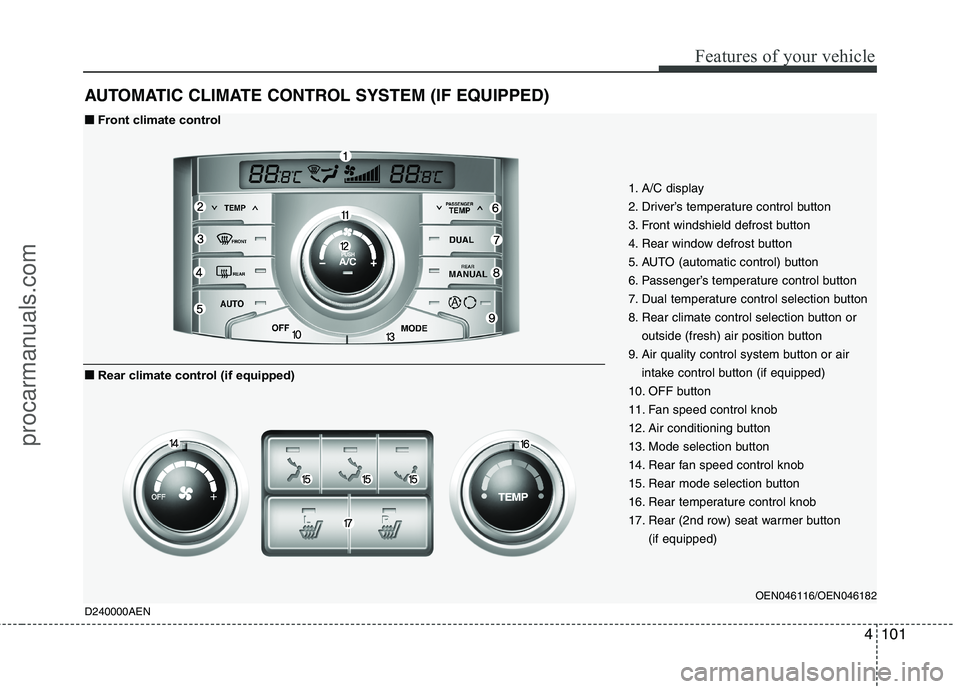
AUTOMATIC CLIMATE CONTROL SYSTEM (IF EQUIPPED)
1. A/C display
2. Driver’s temperature control button
3. Front windshield defrost button
4. Rear window defrost button
5. AUTO (automatic control) button
6. Passenger’s temperature control button
7. Dual temperature control selection button
8. Rear climate control selection button oroutside (fresh) air position button
9. Air quality control system button or air intake control button (if equipped)
10. OFF button
11. Fan speed control knob
12. Air conditioning button
13. Mode selection button
14. Rear fan speed control knob
15. Rear mode selection button
16. Rear temperature control knob
17. Rear (2nd row) seat warmer button (if equipped)
OEN046116/OEN046182
D240000AEN
■■ Front climate control
■
■ Rear climate control (if equipped)
procarmanuals.com