Page 94 of 382

413
Features of your vehicle
Opening the tailgate
The tailgate is locked or unlockedwhen all doors are locked or unlocked
with the key, transmitter or central door
lock switch.
If unlocked, the tailgate can be opened by pressing the handle switch and
pulling the handle up.
✽✽ NOTICE
In cold and wet climates, door lock and
door mechanisms may not work proper-
ly due to freezing conditions.
Closing the tailgate
To close the tailgate, lower and push
down the tailgate firmly. Make sure thatthe tailgate is securely latched.
TAILGATE
OLM049013OLM049014
WARNING
The tailgate swings upward. Make sure no objects or people are near
the rear of the vehicle when open-
ing the tailgate.
CAUTION
Make certain that you close the tail- gate before driving your vehicle.Possible damage may occur to thetailgate lift cylinders and attached
hardware if the tailgate is notclosed prior to driving.
WARNING- Exhaust fumes
If you drive with the tailgate open,
you will draw dangerous exhaust
fumes into your vehicle which can
cause serious injury or death to
vehicle occupants.
If you must drive with the tailgate
open, keep the air vents and all win-
dows open so that additional out-
side air comes into the vehicle.
Page 96 of 382
415
Features of your vehicle
(1) Driver’s door power window switch
(2) Front passenger’s door power win-dow switch
(3) Rear door (left) power window switch (4) Rear door (right) power window
switch
(5) Window opening and closing
(6) Automatic power window up/down* (Driver’s window)
(7) Power window lock switch
* : if equipped
✽✽ NOTICE
In cold and wet climates, power windows
may not work properly due to freezing
conditions.
WINDOWS
OLM049020N
Page 97 of 382
Features of your vehicle
16
4
Power windows
The ignition switch must be in the ON
position for power windows to operate.
Each door has a power window switch
that controls the door's window. The driv-
er has a power window lock switch which
can block the operation of passenger
windows. The power windows can be
operated for approximately 30 seconds
after the ignition key is removed or turned
to the ACC or LOCK position. However, if
the front doors are opened, the power
windows cannot be operated within the
30 second period after the ignition key
removal.
✽✽
NOTICE
While driving with the rear windows
down or with the sunroof (if equipped)
in an open (or partially open) position,
your vehicle may demonstrate a wind
buffeting or pulsation noise. This noise
is a normal occurrence and can be
reduced or eliminated by taking the fol-
lowing actions. If the noise occurs with
one or both of the rear windows down,
partially lower both front windows
approximately one inch. If you experi-
ence the noise with the sunroof open,
slightly reduce the size of the sunroof
opening.
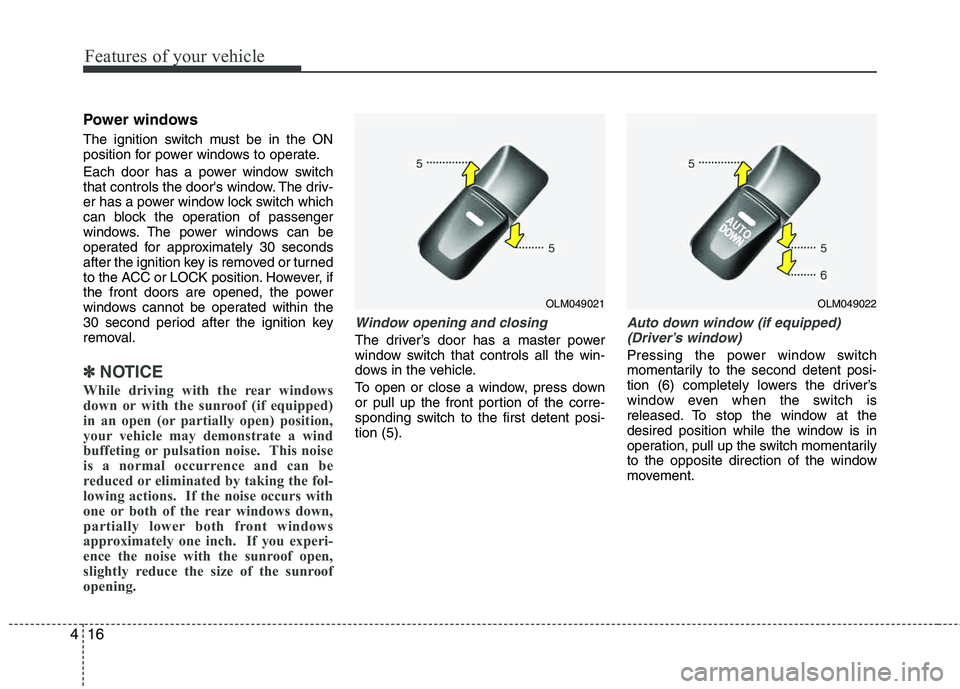
Window opening and closing
The driver’s door has a master power
window switch that controls all the win-
dows in the vehicle.
To open or close a window, press down
or pull up the front portion of the corre-
sponding switch to the first detent posi-tion (5).
Auto down window (if equipped) (Driver’s window)
Pressing the power window switch
momentarily to the second detent posi-
tion (6) completely lowers the driver’s
window even when the switch is
released. To stop the window at the
desired position while the window is in
operation, pull up the switch momentarily
to the opposite direction of the window
movement.
OLM049021OLM049022
Page 99 of 382
Features of your vehicle
18
4
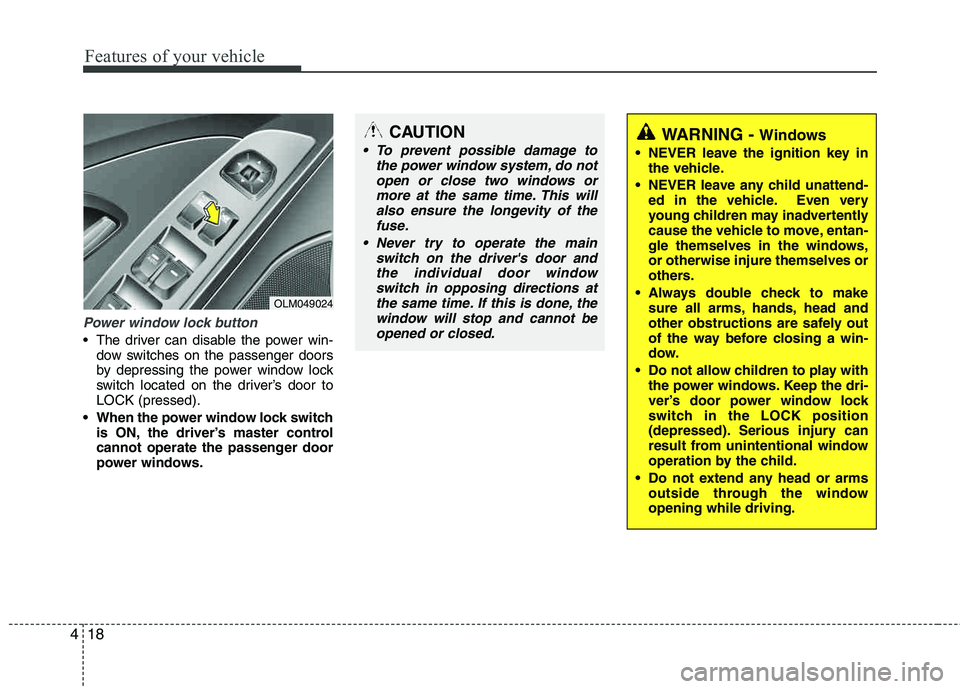
Power window lock button
The driver can disable the power win-
dow switches on the passenger doors
by depressing the power window lock
switch located on the driver’s door to LOCK (pressed).
When the power window lock switch is ON, the driver’s master control
cannot operate the passenger door
power windows.
OLM049024
CAUTION
To prevent possible damage to
the power window system, do notopen or close two windows or
more at the same time. This willalso ensure the longevity of thefuse.
Never try to operate the main switch on the driver's door andthe individual door windowswitch in opposing directions at
the same time. If this is done, thewindow will stop and cannot be opened or closed.WARNING - Windows
NEVER leave the ignition key in the vehicle.
NEVER leave any child unattend- ed in the vehicle. Even very
young children may inadvertently
cause the vehicle to move, entan-
gle themselves in the windows, or otherwise injure themselves or
others.
Always double check to make sure all arms, hands, head and
other obstructions are safely out
of the way before closing a win-
dow.
Do not allow children to play with the power windows. Keep the dri-
ver’s door power window lock
switch in the LOCK position
(depressed). Serious injury can
result from unintentional window
operation by the child.
Do not extend any head or arms outside through the windowopening while driving.
Page 102 of 382

421
Features of your vehicle
Opening the fuel filler door
The fuel filler door must be opened from
inside the vehicle by pulling up the fuel
filler door opener lever.
✽✽NOTICE
If the fuel filler door does not open
because ice has formed around it, tap
lightly or push on the door to break the
ice and release the door. Do not pry on
the door. If necessary, spray around the
door with an approved de-icer fluid (do
not use radiator anti-freeze) or move the
vehicle to a warm place and allow the ice
to melt.
1. Stop the engine.
2. To open the fuel filler door, pull the fuel filler door opener up.
3. Pull the fuel filler door (1) out to fully open.
4. To remove the cap, turn the fuel filler cap (2) counterclockwise.
5. Refuel as needed.
Closing the fuel filler door
1. To install the cap, turn it clockwise until it “clicks” one time. This indicates that the cap is securely tightened.
2. Close the fuel filler door and push it lightly making sure that it is securely closed.
FUEL FILLER DOOR
OSA047022OLM049028
WARNING - Refueling
If pressurized fuel sprays out, it
can cover your clothes or skin
and thus subject you to the risk
of fire and burns. Always remove
the fuel cap carefully and slowly.
If the cap is venting fuel or if you
hear a hissing sound, wait until
the condition stops before com-
pletely removing the cap.
Do not "top off" after the nozzle automatically shuts off whenrefueling.
Tighten the cap until it clicks one time, otherwise the Check Engine light will illuminate.
Always check that the fuel cap is installed securely to prevent fuel
spillage in the event of an acci- dent.
Page 128 of 382
447
Features of your vehicle
Engine coolanttemperature warning light
(if equipped)
The warning light illuminates if the tem-
perature of the engine coolant is above248±5.4°F (120±3°C).
Do not continue driving with an overheat-
ed engine. If your vehicle overheats, refer
to “Overheating” in section 6.
✽✽ NOTICE
If the engine coolant temperature warn-
ing light illuminates, it indicates over-
heating that may damage the engine.
Electric power steering (EPS) system warning light
This indicator light comes on after the
ignition key is turned to the ON position and then it will go out after the engine is
started. This light also comes on when the EPS
has some troubles. If it comes on while
driving, have your vehicle inspected by
an authorized HYUNDAI dealer.
Cruise indicator CRUISE indicator The indicator light illuminates when the
cruise control system is enabled.
The cruise indicator light in the instru- ment cluster is illuminated when the
cruise control ON-OFF button on the
steering wheel is pushed.
The indicator light turns off when the
cruise control ON-OFF button is pushed
again. For more information about the
use of cruise control, refer to “Cruise
control system” in section 5.
Cruise SET indicator The indicator light illuminates when the
cruise function switch (SET- or RES+) is ON.
The cruise SET indicator light in the
instrument cluster is illuminated when
the cruise control switch (SET- or RES+)
is pushed. The cruise SET indicator light
does not illuminate when the cruise con-
trol switch (CANCEL) is pushed or the system is disengaged.Key reminder warning chime
If the driver’s door is opened while the
ignition key is left in the ignition switch
(ACC or LOCK position), the key
reminder warning chime will sound. This
is to prevent you from locking your keys
in the vehicle. The chime sounds until the
key is removed from the ignition switch or
the driver’s door is closed.
EPSSET
CRUISE
Page 130 of 382
449
Features of your vehicle
Battery saver function
The purpose of this feature is to pre-vent the battery from being dis-
charged. The system automatically
turns off the parking lights when the
driver removes the ignition key and
opens the driver-side door (in thatorder).
With this feature, the parking lights will be turned off automatically if the driver
parks on the side of road at night.
If necessary, to keep the lights on
when the ignition key is removed, per-
form the following:
1) Open the driver-side door.
2) Turn the parking lights OFF and ON again using the light switch on the
steering column.
Headlight escort function (if equipped)
The headlights (and/or taillights) remain
on for approximately 20 minutes after the
ignition key is removed or turned to the
ACC or LOCK position. However, if the
driver’s door is opened and closed, the
headlights are turned off after 30 sec-
onds.
The headlights can be turned off by
pressing the lock button on the transmit-
ter twice or turning off the light switch
from the headlight or Auto light position.
LIGHTING
CAUTION
If the driver gets out of the vehicle
through other doors (except dri-ver’s door), the battery saver func-
tion does not operate and the head-light escort function does not turnoff automatically. Therefore, It caus-es the battery to be discharged. In
this case, make sure to turn off thelamp before getting out of the vehi-cle.
Page 131 of 382
Features of your vehicle
50
4
Headlight welcome function
When the headlight switch is in the ON
position or in the AUTO position and all doors (and tailgate) are closed and
locked, if you press the door unlock but-
ton on the transmitter, the headlight will
come on for about 15 seconds.
If the headlight switch is in the AUTO
position, the function can only operate atnight.
To turn off the headlight immediately, do
one of the following:
Press the door lock button.
Press the unlock button twice within 4
seconds.
Press the unlock button once more after 4 seconds.
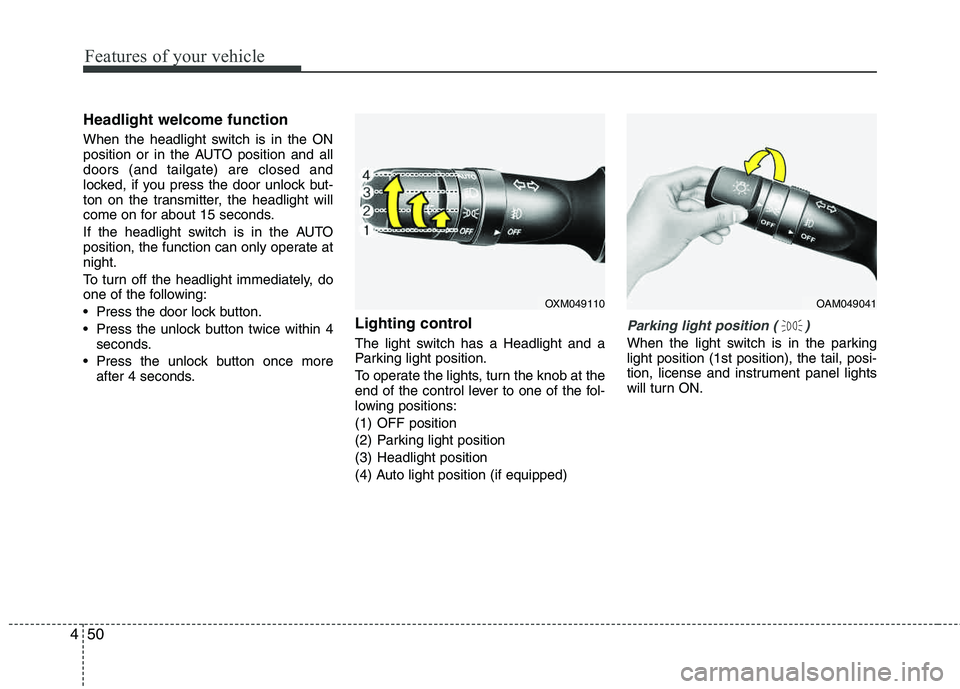
Lighting control
The light switch has a Headlight and a
Parking light position.
To operate the lights, turn the knob at the
end of the control lever to one of the fol-
lowing positions:
(1) OFF position
(2) Parking light position
(3) Headlight position
(4) Auto light position (if equipped)
Parking light position ( )
When the light switch is in the parking light position (1st position), the tail, posi-
tion, license and instrument panel lights
will turn ON.
OAM049041OXM049110