2011 HYUNDAI TUCSON display
[x] Cancel search: displayPage 185 of 382
Features of your vehicle
104
4
Using USB device
1. AUX/USB Selection Button
If the auxiliary device is connected, it
switches to AUX or USB mode to play the
sound from the auxiliary player.
If there is no auxiliary device, then the message "No Media" will become dis-
played on the LCD for 3 seconds and
returns to previous mode.
2. TRACK Selection Button
Press the [TRACK ] button for less
than 0.8 seconds to play from the beginning of the current song.
Press the button for less than 0.8 sec- onds and press it again within 1 sec-
ond to move to and play the previous song.
Press the button for 0.8 seconds or
longer to play the song in reverse
direction in fast speed.
Press the [TRACK ] button for less
than 0.8 seconds to move to the next
song. Press the button for 0.8 seconds
or longer to play the song in forward
direction in fast speed.
3. RANDOM Playback Button
Press this button for less than 0.8 sec- onds to play songs randomly in current
folder.
Press this button for 0.8 seconds or longer to play songs randomly in entire
USB device.
To cancel RANDOM play, press this button again.
4. REPEAT Button
Press this button for less than 0.8 sec-onds to repeat current song.
Press this button for 0.8 seconds or longer to repeat all songs in current
folder.
To cancel REPEAT, press this button again.
5. SCAN Selection Button
Plays each song in the USB device for 10
seconds.
To cancel SCAN Play, press this button again.
6. INFO Button
Displays the information of the file cur-
rently played in the order of FILE NAME
➟ TITLE ➟ ARTIST ➟ ALBUM ➟ FOLDER➟ TOTAL FILE ➟NORMAL DISPLAY ➟FILE NAME ➟… (Displays no informa-
tion if the file has no song information.)
7. FOLDER Moving Button
Press [FOLDER ] button to move to
child folder of the current folder and
display the first song in the folder.
Press TUNE/ ENTER knob to move to
the folder displayed. It will play the first
song in the folder.
Press [FOLDER ] button to move to parent folder display the first song in
the folder.
Press TUNE/ENTER knob to move to
the folder displayed.
8. SEARCH Knob & ENTER Button
songs after current song, or counter
clockwise to browse songs before cur-
rent song. To play the displayed song,
press the knob.
enters to AUDIO CONTROL mode.
Page 188 of 382
4107
Features of your vehicle
Using iPod®
1. iPod Selection Button
If iPod is connected, it switches to the
iPod mode from the previous mode to
play the song files stored in the iPod.
If there is no iPod connected, then it dis-
plays the message "No Media" for 3 sec-
onds and returns to the previous mode.
2. TRACK Selection Button
Press the [TRACK ] but ton for less
than 0.8 seconds to play from the
beginning of the song currently played.
Press the button for less than 0.8 sec- onds and press it again within 1 sec-
ond to move to and play the previous
track.
Press the button for 0.8 seconds or
longer to play the song in reverse
direction in fast speed.
Press the [TRACK ] button for less than 0.8 seconds to move to the next
track.
Press the button for 0.8 seconds or
longer to play the song in forward direc-
tion in fast speed.
3. REPEAT Button
Repeats the song currently played.
4. RANDOM Playback Button
Press this button for less than 0.8 sec-onds to shuffle order of all songs in
current category. (Song Random)
Press this button for 0.8 seconds or longer to shuffle order of albums in cur-
rent category. (Album Random)
To cancel RANDOM Play, press this button again.
5. INFO Button
Displays the information of the file cur-
rently played in the order of TITLE ➟ARTIST ➟ALBUM ➟NORMAL DISPLAY➟TITLE ➟... (Displays no information if
the file has no song information.)
6. CATEGORY Selection Button
Moves to the upper category from cur-
rently played category of the iPod.
To move to (play) the category (song)
displayed, press TUNE/ENTER knob.
You will be able to search through the
lower category of the selected category. The order of iPod’s category is SONG,
ALBUMS, ARTISTS, GENRES, and iPod.
7. SEARCH Knob & ENTER
Button
When you rotate the knob clockwise, it
will display the songs (category) ahead
of the song currently played (category in
the same level).
Also, when you rotate the knob counter-
clockwise, it will display the songs (cate-
gory) before the song currently played
(category in the same level).
To listen to the song displayed in the
song category, press the button to skip to
and play the selected song.
Pressing the button changes the BASS,
MIDDLE, TREBLE, FADER and BAL-
ANCE TUNE mode. The mode selected
is shown on the display. After selecting
each mode, rotate the Audio control knob
clockwise or counterclockwise.
Page 190 of 382
4109
Features of your vehicle
Using XM Satellite Radio
Your vehicle is equipped with 3 months
complimentary period of XM Satellite
Radio so you have access to over 130
channels of music, information, and
entertainment programming.
1. XM Selection Button
Turns to XM Satellite Radio Mode. XMmode toggles in order to XM1➟XM2➟XM3➟XM1... when the button is pressed
each time.
2. Channel Selection Button
Push [TRACK ] button for less than
0.8 seconds to select previous channel.
Push [TRACK ] button for 0.8 sec- onds or longer to continuously move to
previous channel.
Push [SEEK ] button for less than 0.8 seconds to select next channel.
Push [SEEK ] button for 0.8 sec- onds or longer to continuously move to
next channel.
Radio ID : Seek or Tune to XM channel 0 to display the Radio ID.
3. Preset Selection Button
Push [1]~[6] buttons less than 0.8 sec-
onds to play the channel saved in each
button. Push Preset button for 0.8 sec-
onds or longer to save current channel to
the respective button with a beep.
4. SCAN Selection Button
Press to hear a brief sampling of all
channel. To cancel the scan mode, press
the button once again.
5. INFO Button
Displays the information of the current
channel in the order of Artist/Song title➟Category/Channel name➟Current Play
Channel➟Artist/Song title➟Category/
Channel name... when the button is
pressed each time.
If can not display the whole text informa-
tion, rotate the tune button to see the
next page.
6. CATEGORY Search Button
Push [FOLDER ] button to search
previous category.
Push [CAT ] button to search next category. To listen to the displayed cat-
egory, press the TUNE/SETUP button.
To scan channel in displayed category,
press the scan button. To search chan-
nel in displayed category, press seek
buttons or turn the tune button clock-
wise/counterclockwise.(CATEGORY
icon is will be turned on in Categorymode)
7. Manual Channel Selection Button
While listening to XM broadcast, rotate
this control to the right or left to searchother channels while listening to current
channel. (Turn to the right to searchhigh-
er channels and left, lower channels)
Page 192 of 382
4111
Features of your vehicle
BLUETOOTH®
PHONE OPERA-
TION (IF EQUIPPED)
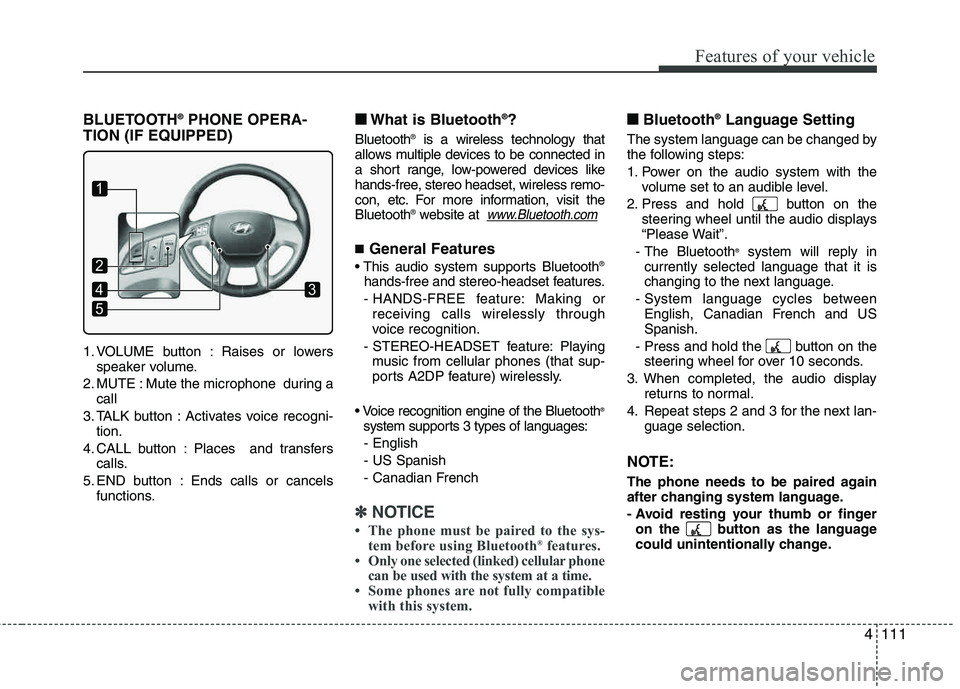
1. VOLUME button : Raises or lowers speaker volume.
2. MUTE : Mute the microphone during a call
3. TALK button : Activates voice recogni- tion.
4. CALL button : Places and transfers calls.
5. END button : Ends calls or cancels functions.
■■ What is Bluetooth ®
?
Bluetooth ®
is a wireless technology that
allows multiple devices to be connected in
a short range, low-powered devices like
hands-free, stereo headset, wireless remo-
con, etc. For more information, visit theBluetooth ®
website at
www.Bluetooth.com
■ General Features
®
hands-free and stereo-headset features.
- HANDS-FREE feature: Making or receiving calls wirelessly through
voice recognition.
- STEREO-HEADSET feature: Playing music from cellular phones (that sup-
ports A2DP feature) wirelessly.
®
system supports 3 types of languages: - English - US Spanish
- Canadian French
✽✽ NOTICE
The phone must be paired to the sys- tem before using Bluetooth ®
features.
Only one selected (linked) cellular phone
can be used with the system at a time.
Some phones are not fully compatible with this system.
■■ Bluetooth ®
Language Setting
The system language can be changed by
the following steps:
1. Power on the audio system with the
volume set to an audible level.
2. Press and hold button on the steering wheel until the audio displays
“Please Wait”.
- The Bluetooth ®
system will reply in
currently selected language that it is
changing to the next language.
- System language cycles between English, Canadian French and USSpanish.
- Press and hold the button on the steering wheel for over 10 seconds.
3. When completed, the audio display returns to normal.
4. Repeat steps 2 and 3 for the next lan- guage selection.
NOTE:
The phone needs to be paired again
after changing system language.
- Avoid resting your thumb or fingeron the button as the language
could unintentionally change.
1
5
43
2
Page 194 of 382
4113
Features of your vehicle
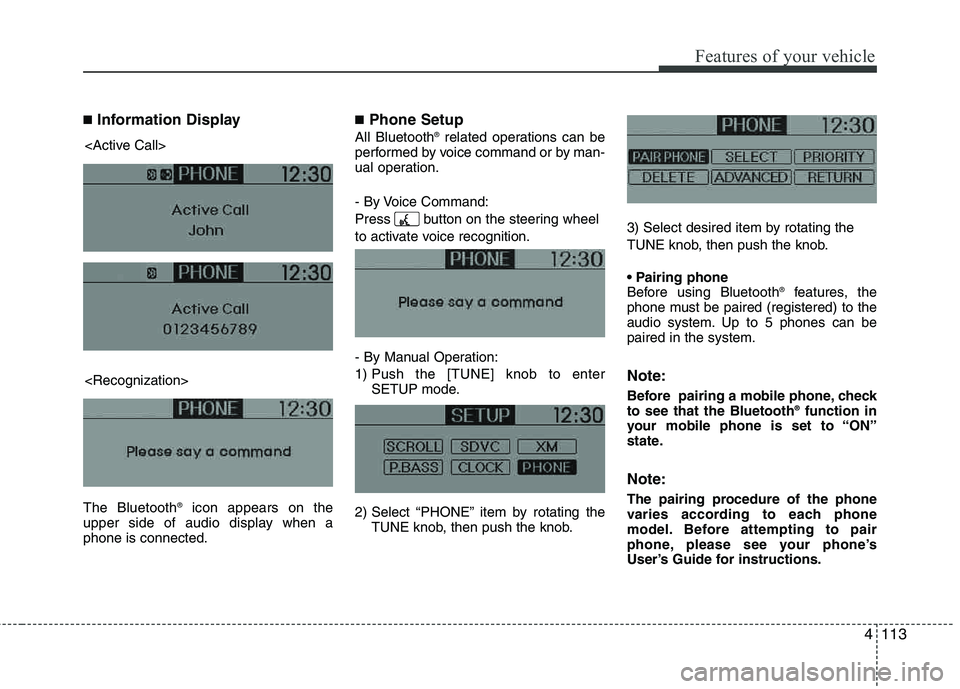
■Information Display
The Bluetooth ®
icon appears on the
upper side of audio display when a phone is connected.
■ Phone Setup
All Bluetooth ®
related operations can be
performed by voice command or by man-
ual operation.
- By Voice Command:
Press button on the steering wheel
to activate voice recognition.
- By Manual Operation:
1) Push the [TUNE] knob to enter SETUP mode.
2) Select “PHONE” item by rotating the TUNE knob, then push the knob. 3) Select desired item by rotating the
TUNE knob, then push the knob.
Before using Bluetooth
®
features, the
phone must be paired (registered) to the
audio system. Up to 5 phones can bepaired in the system.
Note:
Before pairing a mobile phone, check to see that the Bluetooth ®
function in
your mobile phone is set to “ON”
state.
Note:
The pairing procedure of the phone
varies according to each phone
model. Before attempting to pair
phone, please see your phone’s
User’s Guide for instructions.
Page 195 of 382
Features of your vehicle
114
4
Note:
Once pairing with the phone is com-
pleted, there is no need to pair with
that phone again unless the phone is
deleted manually from the audio sys-
tem (refer “Deleting Phone” section)
or the vehicle’s information is
removed from the phone.
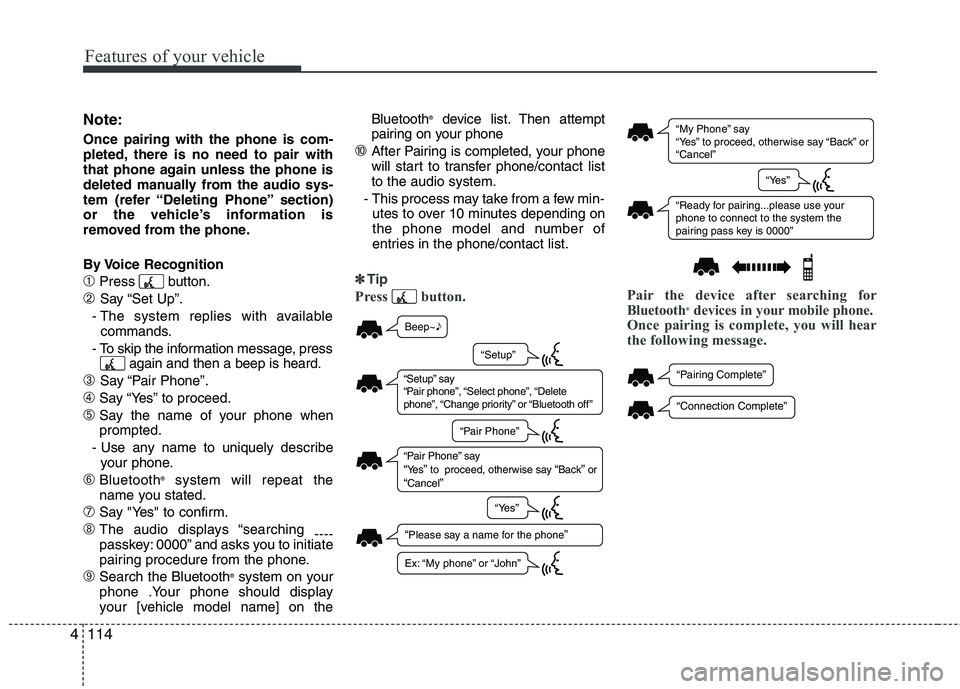
By Voice Recognition
➀Press button.
➁ Say “Set Up”.
- The system replies with available commands.
- To skip the information message, press again and then a beep is heard.
➂ Say “Pair Phone”.
➃Say “Yes” to proceed.
➄Say the name of your phone when prompted.
- Use any name to uniquely describe your phone.
➅Bluetooth ®
system will repeat the
name you stated.
➆Say "Yes" to confirm.
➇The audio displays “searching ----
passkey: 0000” and asks you to initiate
pairing procedure from the phone.
➈Search the Bluetooth ®
system on your
phone .Your phone should display
your [vehicle model name] on the Bluetooth
®
device list. Then attempt
pairing on your phone
➉After Pairing is completed, your phone
will start to transfer phone /contact list
to the audio system.
- This process may take from a few min- utes to over 10 minutes depending on
the phone model and number of
entries in the phone/contact list.
✽✽ Tip
Press button. Pair the device after searching for
Bluetooth®
devices in your mobile phone.
Once pairing is complete, you will hear
the following message.
“ My Phone ” sa y
“ Ye s” to proceed, otherwi se sa y “B ack ” or
“ C ancel ”
“Re ady for p airing...ple ase us e yo ur
phone to connect to the system the
p airing p ass key i s 0000 ”
“Ye s”
“P airing Complete ”
“Connection Complete ”
Beep~♪
“Ple ase sa y a n ame for the phone”
“S etup” sa y
“ P air phone ”, “S elect phone ”, “Delete
phone ”, “Ch ange priority ” or “Bl uetooth off ”
“P air Phone ” sa y “Ye s” to proceed, otherwi se sa y “Back” or “C ancel”
“S etup”
“P air Phone ”
“Ye s”
Ex: “My phone ” or “John ”
Page 196 of 382
4115
Features of your vehicle
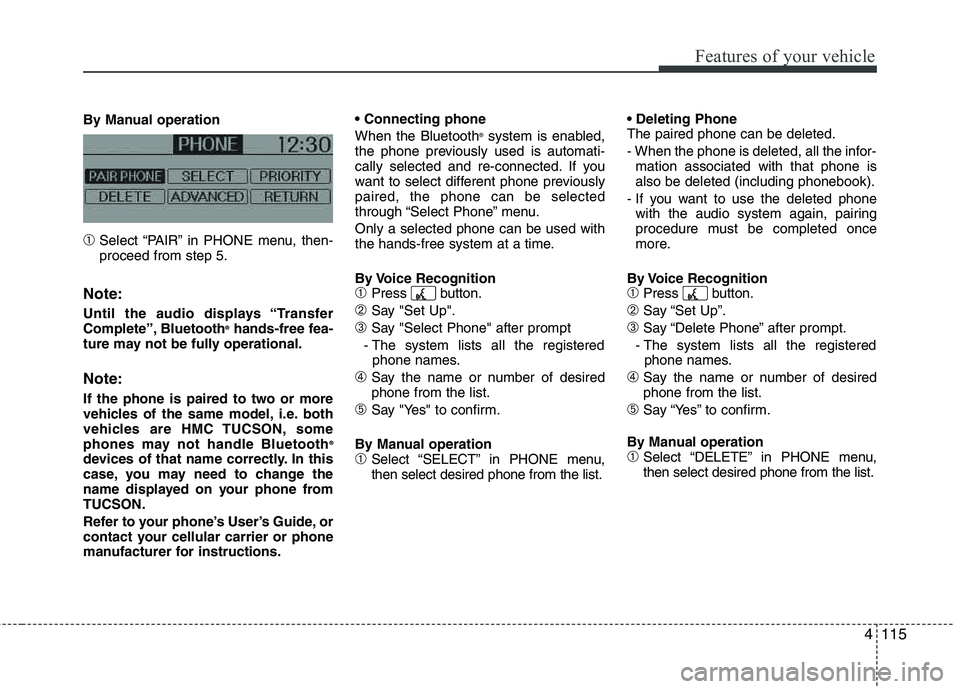
By Manual operation
➀Select “PAIR” in PHONE menu, then- proceed from step 5.
Note:
Until the audio displays “Transfer
Complete”, Bluetooth®
hands-free fea-
ture may not be fully operational.
Note:
If the phone is paired to two or more
vehicles of the same model, i.e. both
vehicles are HMC TUCSON, some
phones may not handle Bluetooth ®
devices of that name correctly. In this
case, you may need to change the
name displayed on your phone fromTUCSON.
Refer to your phone’s User’s Guide, or
contact your cellular carrier or phone
manufacturer for instructions. When the Bluetooth
®
system is enabled,
the phone previously used is automati-
cally selected and re-connected. If you
want to select different phone previously paired, the phone can be selected
through “Select Phone” menu. Only a selected phone can be used with
the hands-free system at a time.
By Voice Recognition
➀Press button.
➁Say "Set Up".
➂Say "Select Phone" after prompt
- The system lists all the registered phone names.
➃Say the name or number of desired phone from the list.
➄Say "Yes" to confirm.
By Manual operation
➀Select “SELECT” in PHONE menu, then select desired phone from the list. The paired phone can be deleted.
- When the phone is deleted, all the infor-
mation associated with that phone is also be deleted (including phonebook).
- If you want to use the deleted phone with the audio system again, pairing
procedure must be completed once
more.
By Voice Recognition
➀Press button.
➁Say “Set Up”.
➂Say “Delete Phone” after prompt.
- The system lists all the registered phone names.
➃Say the name or number of desiredphone from the list.
➄Say “Yes” to confirm.
By Manual operation
➀Select “DELETE” in PHONE menu, then select desired phone from the list.
Page 197 of 382
Features of your vehicle
116
4
When several phones are paired to theaudio system, the system attempts to
connect following order when the Bluetooth ®
system is enabled:
1) “Priority” checked phone.
2) Previously connected phone
3) Gives up auto connection.
By Voice Recognition
➀Press button.
➁Say “Set Up”.
➂Say “Change Priority” after prompt.
- The system lists all the registered phone names.
➃Say the name or number of desired phone from the list.
➄Say “Yes” to confirm.
By Manual operation
➀Select “PRIORITY” in PHONE menu,then select desired phone from thelist.
■ Phone Book (In-Vehicle)
Phone numbers and voice tags can be
registered. Entries registered in the
phone can also be transferred.
➀Press button.
➁Say "Phonebook".
- The system replies with all available commands.
- To skip the information message, press again and then a beep is heard.
➂Say "Add Entry".
➃Say "By Voice" to proceed.
➄Say the name of the entry whenprompted.
➅Say “Yes”to confirm.
➆Say the phone number of that entry when prompted.
➇Say “Store” if phone number input is finished.
➈Say a phone number type. “Home”,
“Work”, “Mobile”, “Other” or “Default” is
available.
➉Say “Yes” to complete adding entry.
Say “Yes” to store additional location
for this contact, or say “Cancel” to fin-
ish the process.
✽✽ NOTICE
- The system can recognize single digits from zero to nine. Numbers that are
ten or greater cannot be recognized.
- You can enter each digit individually or group digits together in preferred
string lengths.
- To speed up input, it is a good idea to
group all digits into a continuous
string.
- The display corresponding to each operation appears on the screen as fol-
lows:
- Input operation example: 1. Say: “Nine, nine, five”
➟ Display: “995”
2. And say: “Seven, three, four”
➟ Display: “995734”
11