2011 HYUNDAI TUCSON tow
[x] Cancel search: towPage 79 of 382
361
Safety features of your vehicle
SRS Care
The SRS is virtually maintenance-free
and there are no parts you can safely
service by yourself. If the SRS air bag
warning light does not illuminate, or con-
tinuously remains on, have your vehicle
immediately inspected by an authorized
HYUNDAI dealer.
Any work on the SRS system, such as
removing, installing, repairing, or any
work on the steering wheel, the front passenger's panel, front seats and roof
rails must be performed by an authorized
HYUNDAI dealer. Improper handling of
the SRS system may result in serious
personal injury.WARNING
Modification to SRS components or wiring, including the addition
of any kind of badges to the pad
covers or modifications to the
body structure, can adversely
affect SRS performance and lead
to possible injury.
Not only the modification of the parts where the SRS sensors are
but also the modification of other
parts of the vehicle may affect the
SRS performance and lead to
possible injury.
For cleaning the air bag pad cov- ers, use only a soft, dry cloth or
one which has been moistened
with plain water. Solvents or
cleaners could adversely affect
the air bag covers and proper
deployment of the system.
No objects should be placed over
or near the air bag modules on the
steering wheel, instrument panel,
and the front passenger's panel
above the glove box, because any
such object could cause harm if the
vehicle is in a crash severe enough
to cause the air bags to inflate.
(Continued)
(Continued)
If the air bags inflate, they must be replaced by an authorized
HYUNDAI dealer.
Do not tamper with or disconnect SRS wiring, or other components
of the SRS system. Doing so
could result in injury, due to acci-
dental inflation of the air bags or
by rendering the SRS inopera-
tive.
If components of the air bag sys- tem must be discarded, or if the
vehicle must be scrapped, certain
safety precautions must be
observed. An authorized HYUNDAI
dealer knows these precautions
and can give you the necessary
information. Failure to follow these
precautions and procedures could
increase the risk of personal
injury.
If your vehicle was flooded and has soaked carpeting or water on
the floor, you shouldn't try to
start the engine; have the car
towed to an authorized HYUNDAI
dealer.
Page 80 of 382

Safety features of your vehicle
62
3
Additional safety precautions
Never let passengers ride in the
cargo area or on top of a folded-
down back seat. All occupants should
sit upright, fully back in their seats with
their seat belts on and their feet on the
floor.
Passengers should not move out of
or change seats while the vehicle is
moving. A passenger who is not wear-
ing a seat belt during a crash or emer-
gency stop can be thrown against the
inside of the vehicle, against other
occupants, or out of the vehicle.
Each seat belt is designed torestrain one occupant. If more than
one person uses the same seat belt,
they could be seriously injured or killed in a collision.
Do not use any accessories on seat belts. Devices claiming to improve
occupant comfort or reposition the seat
belt can reduce the protection provided
by the seat belt and increase the
chance of serious injury in a crash.
Passengers should not place hardor sharp objects between them-
selves and the air bags. Carrying
hard or sharp objects on your lap or in
your mouth can result in injuries if an
air bag inflates.
Keep occupants away from the air
bag covers. All occupants should sit
upright, fully back in their seats with
their seat belts on and their feet on the
floor. If occupants are too close to the
air bag covers, they could be injured if
the air bags inflate.
Do not attach or place objects on or
near the air bag covers. Any object
attached to or placed on the front or
side air bag covers could interfere with
the proper operation of the air bags.
Do not modify the front seats.Modification of the front seats could
interfere with the operation of the sup-
plemental restraint system sensing
components or side air bags.
Do not place items under the front seats. Placing items under the front
seats could interfere with the operation
of the supplemental restraint system
sensing components and wiring har-
nesses.
Never hold an infant or child on yourlap. The infant or child could be seri-
ously injured or killed in the event of a
crash. All infants and children should
be properly restrained in appropriate
child safety seats or seat belts in therear seat.
Adding equipment to or modifying
your air bag-equipped vehicle
If you modify your vehicle by changing
your vehicle's frame, bumper system,
front end or side sheet metal or ride
height, this may affect the operation of
your vehicle's air bag system.
WARNING
Sitting improperly or out of posi- tion can cause occupants to be
shifted too close to a deploying air
bag, strike the interior structure or
be thrown from the vehicle result-
ing in serious injury or death.
Always sit upright with the seat- back in an upright position, cen-tered on the seat cushion with
your seat belt on, legs comfortably
extended and your feet on the
floor.
Always have the ignition OFF in an abnormal situation. The side air
bags may inflate if the vehicle is
tilted such as when being towed
because the rollover sensor
detects it as a rollover situation.
Be careful not to cause impact to the doors when the ignition is ON.
The air bags may inflate.
Page 90 of 382
49
Features of your vehicle
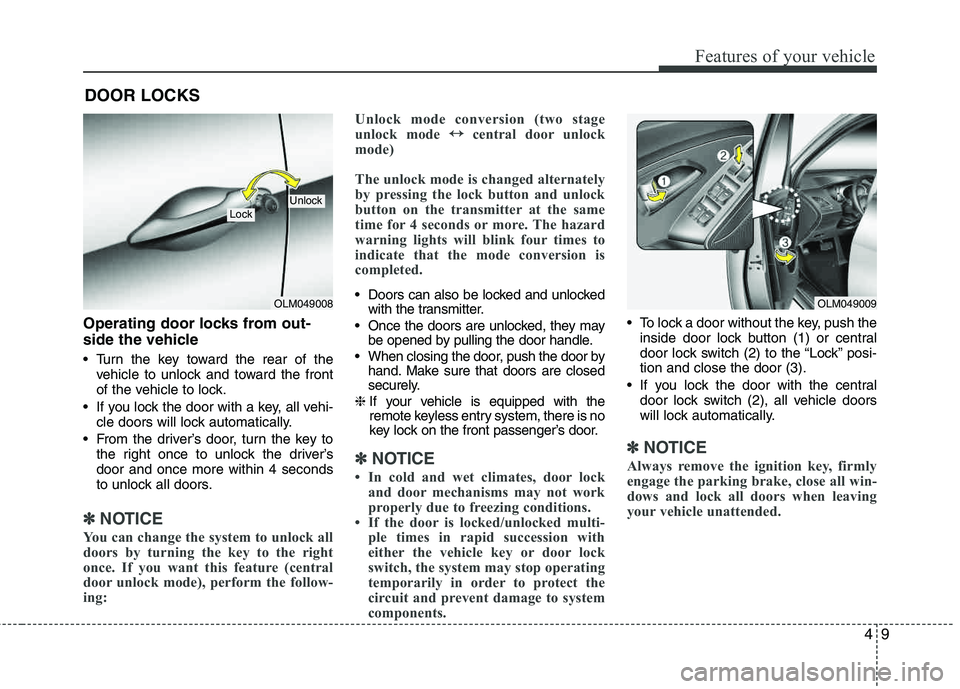
Operating door locks from out-
side the vehicle
Turn the key toward the rear of thevehicle to unlock and toward the front
of the vehicle to lock.
If you lock the door with a key, all vehi- cle doors will lock automatically.
From the driver’s door, turn the key to the right once to unlock the driver’sdoor and once more within 4 seconds
to unlock all doors.
✽✽ NOTICE
You can change the system to unlock all
doors by turning the key to the right
once. If you want this feature (central
door unlock mode), perform the follow-
ing: Unlock mode conversion (two stage
unlock mode
↔
↔
central door unlock
mode)
The unlock mode is changed alternately
by pressing the lock button and unlock
button on the transmitter at the same
time for 4 seconds or more. The hazard
warning lights will blink four times to
indicate that the mode conversion is
completed.
Doors can also be locked and unlocked with the transmitter.
Once the doors are unlocked, they may be opened by pulling the door handle.
When closing the door, push the door by hand. Make sure that doors are closed
securely.
❈ If your vehicle is equipped with the
remote keyless entry system, there is no
key lock on the front passenger’s door.
✽✽
NOTICE
In cold and wet climates, door lock and door mechanisms may not work
properly due to freezing conditions.
If the door is locked/unlocked multi- ple times in rapid succession with
either the vehicle key or door lock
switch, the system may stop operating
temporarily in order to protect the
circuit and prevent damage to system
components.
To lock a door without the key, push the
inside door lock button (1) or central
door lock switch (2 ) to the “Lock” posi-
tion and close the door (3).
If you lock the door with the central door lock switch (2), all vehicle doors
will lock automatically.
✽✽ NOTICE
Always remove the ignition key, firmly
engage the parking brake, close all win-
dows and lock all doors when leaving
your vehicle unattended.
DOOR LOCKS
OLM049008
LockUnlock
OLM049009
Page 111 of 382
Features of your vehicle
30
4
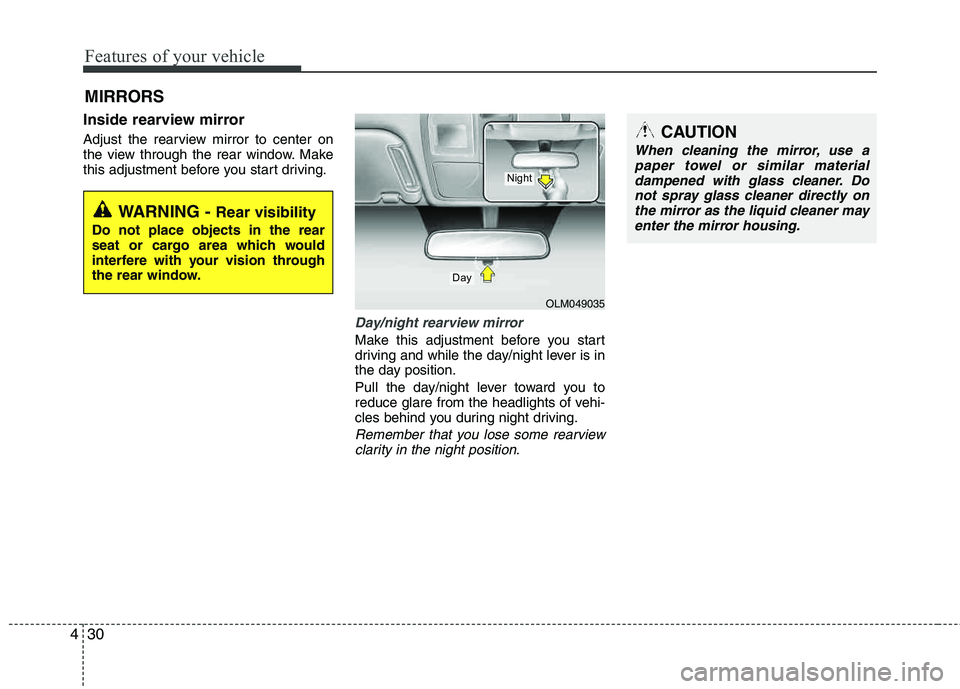
Inside rearview mirror
Adjust the rearview mirror to center on
the view through the rear window. Make
this adjustment before you start driving.
Day/night rearview mirror
Make this adjustment before you start
driving and while the day/night lever is in
the day position.
Pull the day/night lever toward you to
reduce glare from the headlights of vehi-
cles behind you during night driving.
Remember that you lose some rearview
clarity in the night position.
MIRRORS
WARNING - Rear visibility
Do not place objects in the rear
seat or cargo area which would
interfere with your vision through
the rear window.
OLM049035
Day
Night
CAUTION
When cleaning the mirror, use apaper towel or similar materialdampened with glass cleaner. Do
not spray glass cleaner directly onthe mirror as the liquid cleaner mayenter the mirror housing.
Page 116 of 382
435
Features of your vehicle
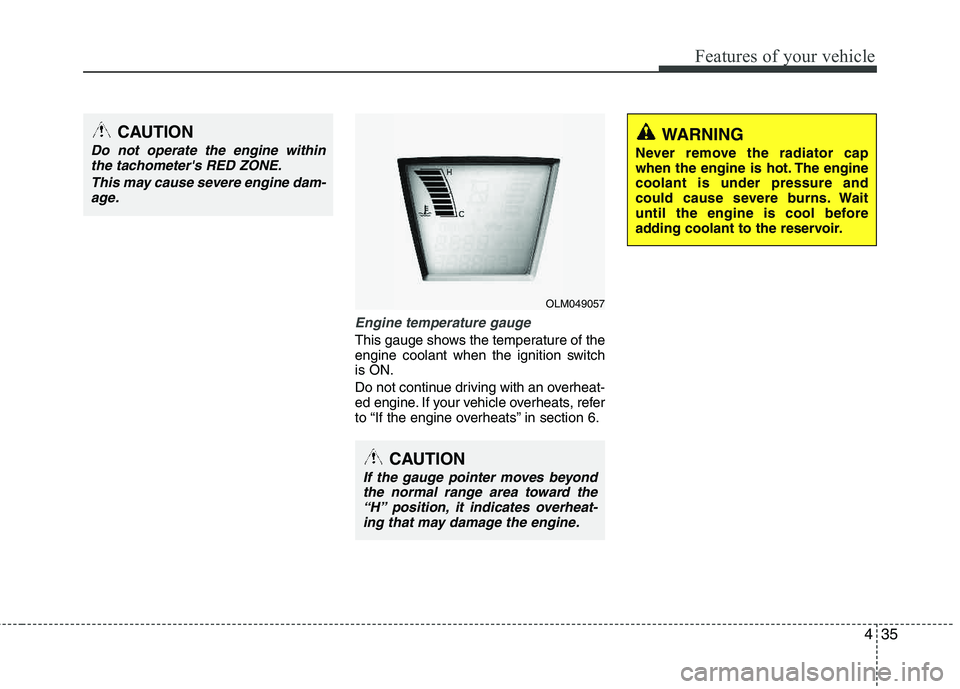
Engine temperature gauge
This gauge shows the temperature of the
engine coolant when the ignition switchis ON.
Do not continue driving with an overheat-
ed engine. If your vehicle overheats, refer
to “If the engine overheats” in section 6.
CAUTION
If the gauge pointer moves beyondthe normal range area toward the
“H” position, it indicates overheat-ing that may damage the engine.
CAUTION
Do not operate the engine withinthe tachometer's RED ZONE.
This may cause severe engine dam-age.WARNING
Never remove the radiator cap
when the engine is hot. The enginecoolant is under pressure and
could cause severe burns. Wait
until the engine is cool before
adding coolant to the reservoir.
OLM049057
Page 123 of 382

Features of your vehicle
42
4
Parking brake & brake
fluid warning light
Parking brake warning
This light is illuminated when the parking
brake is applied with the ignition switch in
the START or ON position. The warning
light should go off when the parking
brake is released while engine is run-ning.
The parking brake warning chime will
sound to remind you that the parking
brake is applied when you are driving
above 6 mph (10 km/h). Always release
the parking brake before you drive.
Low brake fluid level warning
If the warning light remains on, it may
indicate that the brake fluid level in the
reservoir is low.
If the warning light remains on:
1. Drive carefully to the nearest safe location and stop your vehicle.
2. With the engine stopped, check the brake fluid level immediately and add
fluid as required. Then check all brake
components for fluid leaks. 3. Do not drive the vehicle if leaks are
found, the warning light remains on or
the brakes do not operate properly.
Have the vehicle towed to any author-
ized HYUNDAI dealer for a brake sys-
tem inspection and necessary repairs.
Your vehicle is equipped with a dual-
diagonal braking system. This means you
still have braking on two wheels even if
one of the brake circuits is damaged or
malfunctions. With only one of the circuits
working, more than normal pedal travel
and greater pedal pressure are required
to stop the car. Also, the car will not stop
in as short a distance with only a portion
of the brake system working. If the
brakes fail while you are driving, shift to a
lower gear for additional engine braking
and stop the car as soon as it is safe to
do so.
To check bulb operation, check whether
the parking brake and brake fluid warning
light illuminates when the ignition switchis in the ON position.
Seat belt warning
As a reminder to the driver, the seat belt
warning light will blink for approximately
6 seconds each time you turn the ignition
switch ON, regardless of belt fastening.
For details, refer to the seat belt on chap- ter 3.
Turn signal indicator
The blinking green arrows on the instru-
ment panel show the direction indicated
by the turn signals. If the arrow comes on
but does not blink, blinks more rapidly
than normal, or does not illuminate at all,
a malfunction in the turn signal system is
indicated. Your dealer should be consult-
ed for repairs.
This indicator also blinks when the haz-
ard warning switch is turned on.
WARNING
Driving the vehicle with a warning
light on is dangerous. If the brake
warning light remains on, have the
brakes checked and repaired imme-
diately by an authorized HYUNDAI
dealer.
Page 133 of 382
Features of your vehicle
52
4
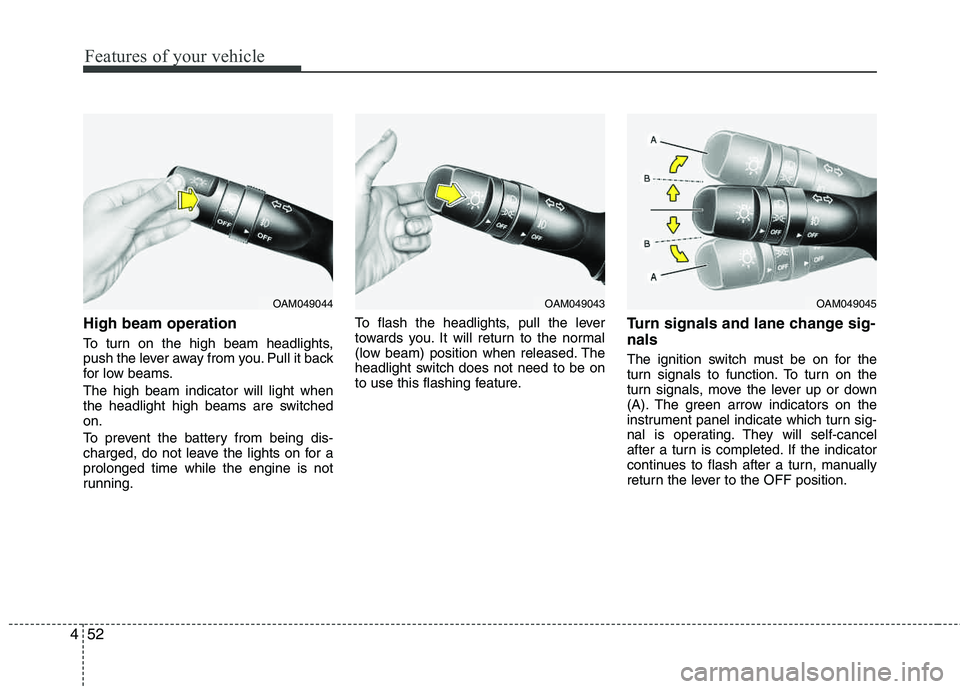
High beam operation
To turn on the high beam headlights,
push the lever away from you. Pull it back
for low beams. The high beam indicator will light when
the headlight high beams are switchedon.
To prevent the battery from being dis-
charged, do not leave the lights on for aprolonged time while the engine is not
running. To flash the headlights, pull the lever
towards you. It will return to the normal
(low beam) position when released. The
headlight switch does not need to be on
to use this flashing feature.
Turn signals and lane change sig- nals
The ignition switch must be on for the
turn signals to function. To turn on the
turn signals, move the lever up or down
(A). The green arrow indicators on the
instrument panel indicate which turn sig-
nal is operating. They will self-cancel
after a turn is completed. If the indicator
continues to flash after a turn, manually
return the lever to the OFF position.
OAM049044OAM049043OAM049045
Page 136 of 382
455
Features of your vehicle
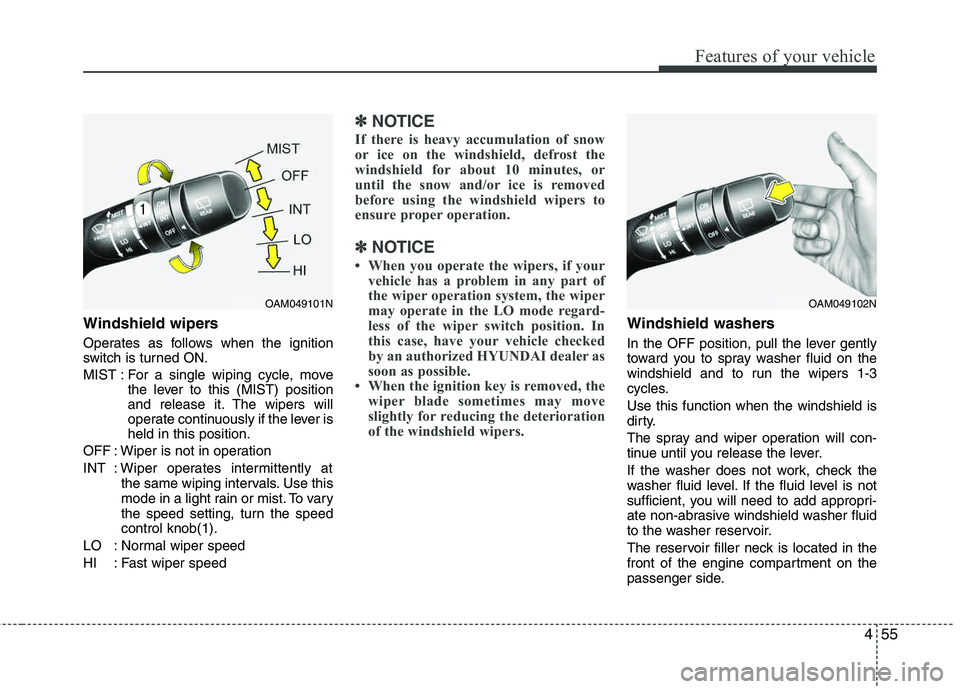
Windshield wipers
Operates as follows when the ignition
switch is turned ON.
MIST : For a single wiping cycle, movethe lever to this (MIST) position
and release it. The wipers will
operate continuously if the lever isheld in this position.
OFF : Wiper is not in operation
INT : Wiper operates intermittently at the same wiping intervals. Use this
mode in a light rain or mist. To vary
the speed setting, turn the speed control knob(1).
LO : Normal wiper speed
HI : Fast wiper speed
✽✽ NOTICE
If there is heavy accumulation of snow
or ice on the windshield, defrost the
windshield for about 10 minutes, or
until the snow and/or ice is removed
before using the windshield wipers to
ensure proper operation.
✽
✽ NOTICE
When you operate the wipers, if your vehicle has a problem in any part of
the wiper operation system, the wiper
may operate in the LO mode regard-
less of the wiper switch position. In
this case, have your vehicle checked
by an authorized HYUNDAI dealer as
soon as possible.
When the ignition key is removed, the wiper blade sometimes may move
slightly for reducing the deterioration
of the windshield wipers.
Windshield washers
In the OFF position, pull the lever gently
toward you to spray washer fluid on the
windshield and to run the wipers 1-3
cycles. Use this function when the windshield is
dirty.
The spray and wiper operation will con-
tinue until you release the lever.
If the washer does not work, check the
washer fluid level. If the fluid level is not
sufficient, you will need to add appropri-
ate non-abrasive windshield washer fluid
to the washer reservoir.
The reservoir filler neck is located in the
front of the engine compartment on the
passenger side.
OAM049101NOAM049102N