Page 240 of 358

Driving your vehicle
42
5
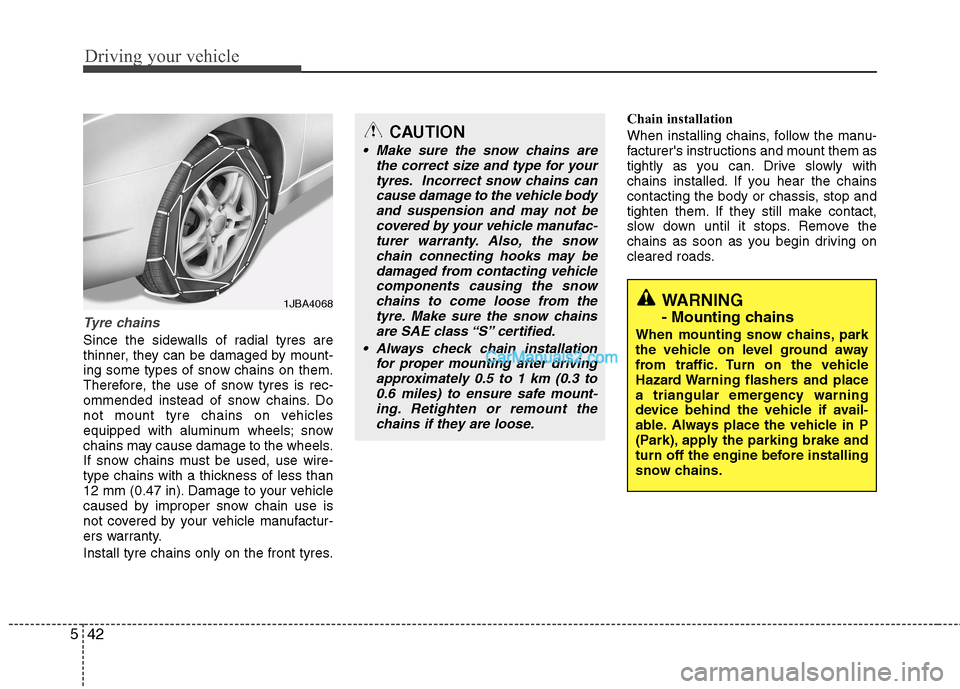
Tyre chains
Since the sidewalls of radial tyres are
thinner, they can be damaged by mount-
ing some types of snow chains on them.
Therefore, the use of snow tyres is rec-
ommended instead of snow chains. Do
not mount tyre chains on vehicles
equipped with aluminum wheels; snow
chains may cause damage to the wheels.
If snow chains must be used, use wire-
type chains with a thickness of less than
12 mm (0.47 in). Damage to your vehicle
caused by improper snow chain use is
not covered by your vehicle manufactur-
ers warranty.
Install tyre chains only on the front tyres. Chain installation
When installing chains, follow the manu-
facturer's instructions and mount them as
tightly as you can. Drive slowly with
chains installed. If you hear the chains
contacting the body or chassis, stop and
tighten them. If they still make contact,
slow down until it stops. Remove the
chains as soon as you begin driving on
cleared roads.
CAUTION
Make sure the snow chains are
the correct size and type for your
tyres. Incorrect snow chains cancause damage to the vehicle bodyand suspension and may not be covered by your vehicle manufac-
turer warranty. Also, the snowchain connecting hooks may bedamaged from contacting vehicle
components causing the snow chains to come loose from thetyre. Make sure the snow chainsare SAE class “S” certified.
Always check chain installation for proper mounting after drivingapproximately 0.5 to 1 km (0.3 to0.6 miles) to ensure safe mount-ing. Retighten or remount the
chains if they are loose.
WARNING
- Mounting chains
When mounting snow chains, park
the vehicle on level ground away
from traffic. Turn on the vehicle
Hazard Warning flashers and place
a triangular emergency warning
device behind the vehicle if avail-
able. Always place the vehicle in P
(Park), apply the parking brake and
turn off the engine before installing
snow chains.1JBA4068
Page 281 of 358
Maintenance
10
7
NORMAL MAINTENANCE SCHEDULE (CONT.)
I : Inspect and if necessary, adjust, correct, clean or replace.
R : Replace or change.* 8
: Manual transaxle fluid should be changed anytime they have been submerged in water.
Number of months or driving distance, whichever comes first
Months1224364860728496
Km×1,000153045607590105120
Steering gear rack, linkage and bootsIIIIIIII
Driveshaft and bootsIIII
Tyre (pressure & tread wear) IIIIIIII
Front suspension ball jointsIIIIIIII
Bolt and nuts on chassis and bodyIIIIIIII
Air conditioner refrigerant (if equipped)IIIIIIII
Air conditioner compressor (if equipped)IIIIIIII
Climate control air filter (if equipped)RRRRRRRR
Manual transaxle fluid (if equipped) * 8II
Automatic transaxle fluid(if equipped) No check, No service required
Exhaust systemIIII
MAINTENANCE
INTERVALS
MAINTENANCE ITEM
Page 282 of 358

711
Maintenance
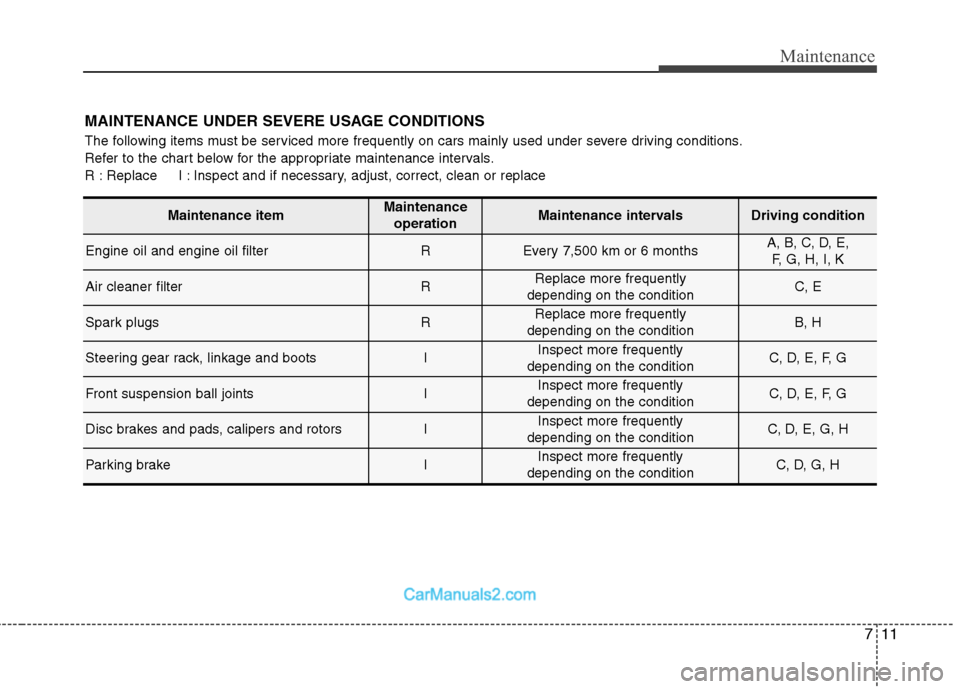
MAINTENANCE UNDER SEVERE USAGE CONDITIONS
The following items must be serviced more frequently on cars mainly used under severe driving conditions.
Refer to the chart below for the appropriate maintenance intervals.
R : Replace I : Inspect and if necessary, adjust, correct, clean or replace
Maintenance itemMaintenance operationMaintenance intervalsDriving condition
Engine oil and engine oil filterREvery 7,500 km or 6 months A, B, C, D, E, F, G, H, I, K
Air cleaner filterRReplace more frequently
depending on the conditionC, E
Spark plugs RReplace more frequently
depending on the conditionB, H
Steering gear rack, linkage and bootsIInspect more frequently
depending on the conditionC, D, E, F, G
Front suspension ball jointsIInspect more frequently
depending on the conditionC, D, E, F, G
Disc brakes and pads, calipers and rotorsIInspect more frequently
depending on the conditionC, D, E, G, H
Parking brakeIInspect more frequently
depending on the conditionC, D, G, H
Page 286 of 358

715
Maintenance
Brake hoses and lines
Visually check for proper installation,
chafing, cracks, deterioration and any
leakage. Replace any deteriorated or
damaged parts immediately. Brake fluid
Check brake fluid level in the brake fluid
reservoir. The level should be between
“MIN” and “MAX” marks on the side of
the reservoir. Use only hydraulic brake
fluid conforming to DOT 3 or DOT 4specification.
Parking brake
Inspect the parking brake system includ-
ing the parking brake pedal or lever and
cables.Brake discs, pads, calipers and
rotors
Check the pads for excessive wear, discs
for run out and wear, and calipers for fluid
leakage. Suspension mounting bolts
Check the suspension connections for
looseness or damage. Retighten to the
specified torque.
Steering gear box, linkage &
boots/lower arm ball joint
With the vehicle stopped and engine off,
check for excessive free-play in the
steering wheel.
Check the linkage for bends or damage.
Check the dust boots and ball joints for
deterioration, cracks, or damage.
Replace any damaged parts.Power steering pump, belt and hoses
Check the power steering pump and
hoses for leakage and damage. Replace
any damaged or leaking parts immedi-
ately. Inspect the power steering belt (or
drive belt) for evidence of cuts, cracks,
excessive wear, oiliness and proper ten-
sion. Replace or adjust it if necessary. Drive shafts and boots
Check the drive shafts, boots and clamps
for cracks, deterioration, or damage.
Replace any damaged parts and, if nec-
essary, repack the grease.
Air conditioning refrigerant (if equipped)
Check the air conditioning lines and con-
nections for leakage and damage.