2011 Hyundai Santa Fe display
[x] Cancel search: displayPage 229 of 408
Features of your vehicle
150
4
Also you can select the CATEGORYor
CHANNEL function by using FF>and
pressing the NEXTor PREV but-
ton will activate the category up or down,
channel up or down function. When the
focus on the CATEGORY, if you press
the ENTER button and move the focus
on the CHANNEL icon, you can select
the channel up or down function in the
current category by pressing the
NEXT or PREV buttons.
Move the focus on the SCAN icon, you
can activate the scan function by press-
ing the ENTER button. If meantime, the
CATEGORY icon been highlighted,
above operation will activate the scan
function in the current category.Listening to the Vehicle Radio
To control the vehicle radio from the RSE
control panel or remote control, press the
SOURCE button on the remote control or
the SRC button on the RSE control
panel, then select the desired play mode
on the source change operation. Finally,
press the ENTERbutton to complete the
selection.
The RSE monitor status display and the
RSE control panel will indicate the
selected source.
Tuning a Station
While the vehicle radio is the current
source, press the NEXTor PREV
button on the RSE control panel or
remote control once to search up or
down for the next available station. When
the tuner finds a station it will stop at the
station and start to play.
Press the NEXTor PREV button
to seek up or down through all radio sta-
tions. When the radio finds a station, it
will stop and play that station.
Press the FF >or < REW button to man-
ually tune up or down one channel. Press
and hold the FF >or < REW button to
continue tuning up or down.
Pressing a number on the remote control
keypad will tune to the corresponding
preset station. For example, if 89.7 has
been stored as preset 1 (CH1), then
pressing the 1 button on the keypad will
tune to that station.
Page 230 of 408
4151
Features of your vehicle
AM, FM1 and FM2 Selection
When you press the SOURCEbutton,
the Source Selection UI will come out,
along with the current available mode.
You can select the Radio mode by the
remote controller. After pressing the
ENTER button, both RSE and front
Radio will play your selection station at
the same time.
All of the RSE control panel and remote
controller navigation functions can be
used to control the front radio when the
vehicle front radio is also playing the
same radio mode.
Viewing Front CD and MP3
Programs
The RSE can be used to control discs
that are loaded and playing in the vehicle
radio. To control these discs, you must
first select the vehicle radio as the
source. Press the SOURCEbutton on
the remote control, or the SRCbutton on
the RSE control panel, Meanwhile, the
Source Change UI will bring out. Use the
four direction arrow buttons to select the
source of vehicle radio. And press the
ENTER button for completing the selec-
tion.
CD/CD-MP3 Control
While the vehicle radio is playing a CD or
MP3 audio disc, all of the RSE control
panel and remote control navigation
functions can be used to control the vehi-
cle radio. This includes:
• Pause/Play
Fast Forward/Reverse
Previous/Next Track (CD) and Previous/Next File (MP3)
See these sections of the Users Manual
for information on using these functions.
All of the RSE control panel and remote
control navigation functions can be used
to control the front radio when the vehicle
front radio is also playing the CD or CD-
MP3 mode.
AUX Audio and Video Input
Controls
This allows you to display the video out-
put on the RSE monitor, and listen to the
audio through the wireless headsets and
the vehicle speakers.
To switch to an external auxiliary device,
press the SOURCE button on the remote
control or SRCon the RSE control panel,
then select the AUX icon button. And
press the ENTERbutton for completing.
Page 232 of 408
4153
Features of your vehicle
1. POWER On/Off
Press the RSE control panel POWER
button or the POWER ON/OFF button
on the remote control to turn the
RSE on or off. If a disc is loaded and
playing when the RSE is turned off, when
the RSE is turned back on the disc will
automatically resume playback at the
point where it was stopped.
2. Mute
Press the MUTEbutton to mute the
audio in the vehicle speakers. The MUTE
button has no effect on the wireless
headphones.
While muted, the RSE control panel,
vehicle radio and RSE monitor will all dis-
play " MUTE ." Press the button again, or
adjust the volume at RSE control panel
or vehicle radio, to un-mute the audio.
3. Number Buttons ~
The number buttons ( 0 through 9) can
be used to directly enter information such
as chapters in a DVD, track or file num-
bers for audio CDs, and preset radio.
To select a DVD or VCD chapter, while a
DVD/VCD is playing, press the number
button(s) that correspond to the desired
chapter and press ENTER.
To select a CD track, while a CD is play-
ing press the number button(s) that cor-
respond to the track and press ENTER.
To select an MP3 file, while an MP3 disc
is playing, press the number button(s)
that correspond to the desired file and
press ENTER.
To select a radio station preset, while the
desired band (AM, FM1 or FM2) is
selected, press the numbered button that
corresponds to the preset on the vehicle
radio. There is no need to press ENTER.
4. Source
Pressing this SOURCEbutton will bring
out the Source Change selection opera-
tion. You can select any available mode
by using the four direction arrow buttons
and press the ENTERbutton for com-
pleting the selection.
The RSE control panel will display
"REAR" if the current source is the RSE
player, and will display "FRONT" if the
current source is the vehicle radio.
5. A.LANG - Alternate Language Folder -
Where alternate languages are available
on a DVD, pressing the A.LANGbutton
will allow you to select your preferred lan-
guage. Press the button repeatedly to
cycle through the available languages.
When the desired language is displayed,
press ENTER .
Pressing the A.LANG(or FOLD- ) button
during MP3 normal play will immediately
bring the player to the first file of the pre-
vious folder.
Pressing the A.LANG(or FOLD- ) button
during CD or VCD play will do nothing.
Page 233 of 408
Features of your vehicle
154
4
6. S.Title - Subtitles, Folders +
The S.TITLE button allows you to display
or remove language subtitles while play-
ing DVDs. If no language subtitles are
available, the display will show an invalid
icon. Press the S. TITLEbutton repeat-
edly to cycle through all of the available
languages.
Pressing the S. TITLE(or FOLD+ ) button
during MP3 normal play will immediately
bring the player to the first file of the next
folder.
Pressing the S. TITLE(or FOLD+ ) button
during CD or VCD play will do nothing.
7. Menu
Pressing the MENUbutton during DVD
play will present the DVD menu.
Pressing the MENUbutton during MP3
disc play will display the Song List on the
monitor.
Pressing the MENUbutton during CD or
VCD play has no effect.
Press the button again to return to the
program. After five seconds with no but-
ton press, the menu will automatically
close and the program begin playing.
8. Title/PBC
While viewing a DVD, press the TITLE
button on the remote control to jump to
the top menu. Press the < REW / FF >or
PREV / NEXT buttons to highlight
the desired selection, then press ENTER
to make your selection.
Press TITLE again to return to the DVD.
While viewing a VCD, pressing the
TITLE/PBC button will switch the PBC
function on and off.
9. Return
While viewing any operation, pressing
the RETURN button will exit the current
operation on screen display and resume
last play.
10. Speaker Volume "VOL +" and "VOL -"
If the audio from the RSE is being played
through the vehicle speakers, you can
adjust the volume of the speakers with
the " VOL + " and " VOL -" buttons.
Adjusting the volume in this way will not
adjust the wireless headphone volume.
To adjust the headphones, roll the VOL
control wheel.
Batteries
The remote control requires a CR2025
battery (included).
Page 234 of 408
4155
Features of your vehicle
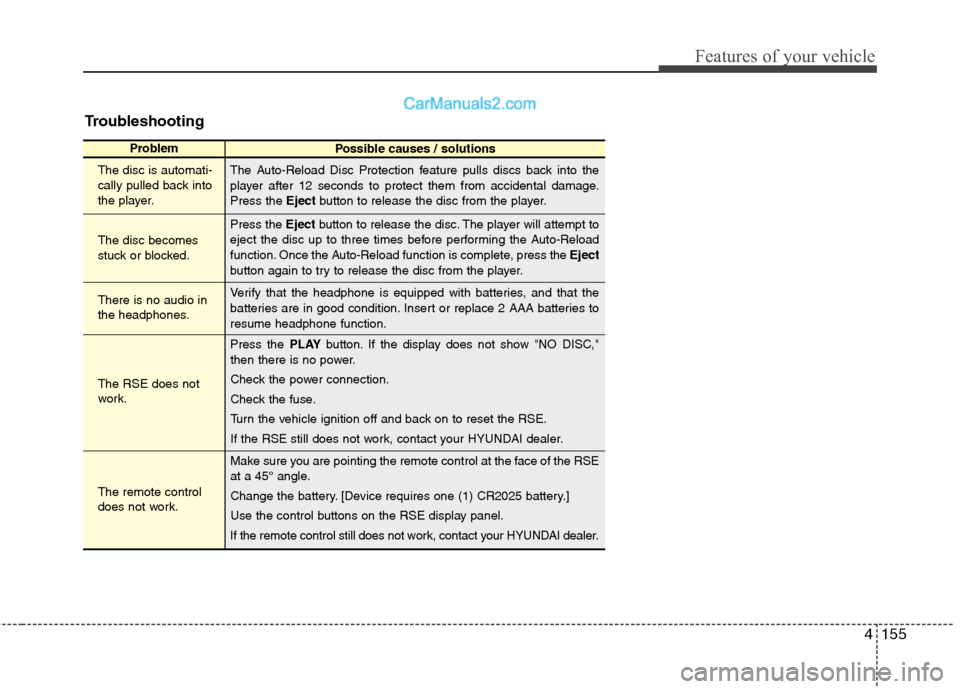
Troubleshooting
ProblemPossible causes / solutions
The disc is automati-
cally pulled back into
the player.
The disc becomes
stuck or blocked.
There is no audio in
the headphones.
The RSE does not
work.
The remote control
does not work. The Auto-Reload Disc Protection feature pulls discs back into the
player after 12 seconds to protect them from accidental damage.
Press the
Ejectbutton to release the disc from the player.
Press the Ejectbutton to release the disc. The player will attempt to
eject the disc up to three times before performing the Auto-Reload
function. Once the Auto-Reload function is complete, press the Eject
button again to try to release the disc from the player.
Verify that the headphone is equipped with batteries, and that the
batteries are in good condition. Insert or replace 2 AAA batteries to
resume headphone function.
Press the PLAYbutton. If the display does not show "NO DISC,"
then there is no power.
Check the power connection.
Check the fuse.
Turn the vehicle ignition off and back on to reset the RSE.
If the RSE still does not work, contact your HYUNDAI dealer.
Make sure you are pointing the remote control at the face of the RSE
at a 45° angle.
Change the battery. [Device requires one (1) CR2025 battery.]
Use the control buttons on the RSE display panel.
If the remote control still does not work, contact your HYUNDAI dealer.
Page 245 of 408

511
Driving your vehicle
E060100AFD
Automatic transaxle operation
The highly efficient automatic transaxle
has 6 forward speeds and one reverse
speed. The individual speeds are select-
ed automatically, depending on the posi-
tion of the shift lever.
✽ ✽NOTICE
The first few shifts on a new vehicle, if
the battery has been disconnected, may
be somewhat abrupt. This is a normal
condition, and the shifting sequence will
adjust after shifts are cycled a few times
by the TCM (Transaxle Control
Module) or PCM (Powertrain Control
Module).
For smooth operation, depress the brake
pedal when shifting from N (Neutral) to aforward or reverse gear.
E060101AFD
Transaxle ranges
The indicator lights in the instrument
cluster displays the shift lever position
when the ignition switch is in the ON
position.
P (Park)
Always come to a complete stop before
shifting into P (Park). This position locks
the transaxle and prevents the front
wheels from rotating.
WARNING- Automatic transaxle
Always check the surrounding
areas near your vehicle for peo-
ple, especially children, before
shifting a vehicle into D (Drive) or
R (Reverse).
Before leaving the driver’s seat, always make sure the shift lever
is in the P (Park) position; then
set the parking brake fully and
shut the engine off. Unexpected
and sudden vehicle movement
can occur if these precautions
are not followed in the order iden-
tified.
CAUTION
To avoid damage to your transaxle, do not accelerate theengine in R (Reverse) or any for- ward gear position with thebrakes on.
When stopped on an upgrade, do not hold the vehicle stationarywith engine power. Use the serv-ice brake or the parking brake.
Do not shift from N (Neutral) or P (Park) into D (Drive), or R(Reverse) when the engine isabove idle speed.
Page 358 of 408
739
Maintenance
102 - Load Index, a numerical codeassociated with the maximum
load the tire can carry.
H - Speed Rating Symbol. See the speed rating chart in this section
for additional information.
Wheel size designation
Wheels are also marked with impor-
tant information that you need if you
ever have to replace one. The follow-
ing explains what the letters and
numbers in the wheel size designa-
tion mean.
Example wheel size designation:
7.0JX18
7.0 - Rim width in inches.
J - Rim contour designation.
18 - Rim diameter in inches.
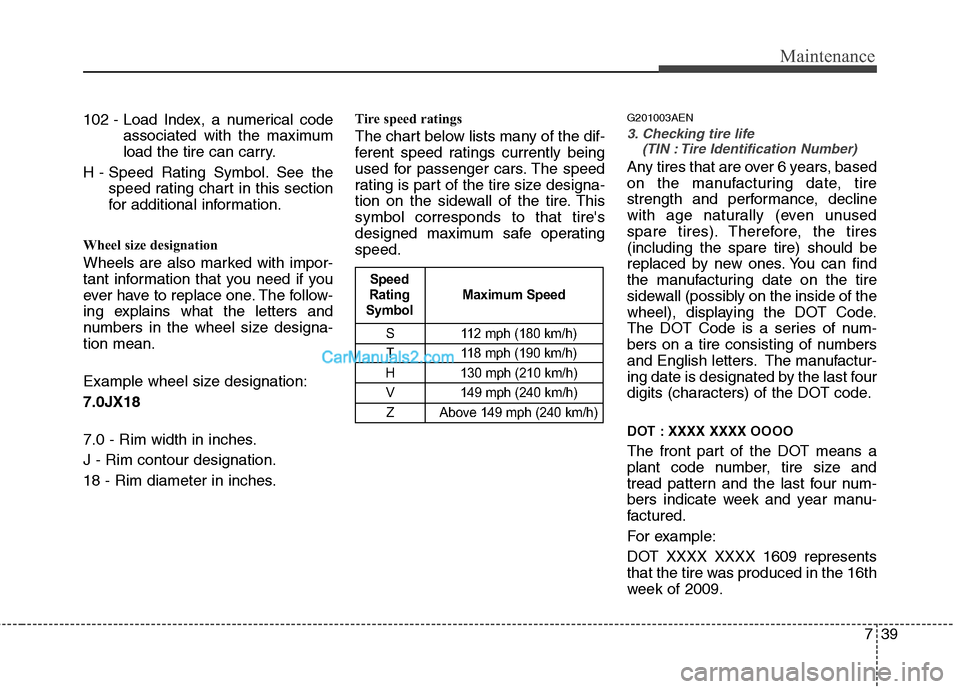
Tire speed ratings
The chart below lists many of the dif-
ferent speed ratings currently being
used for passenger cars. The speed
rating is part of the tire size designa-
tion on the sidewall of the tire. This
symbol corresponds to that tire's
designed maximum safe operating
speed.
G201003AEN
3. Checking tire life
(TIN : Tire Identification Number)
Any tires that are over 6 years, based
on the manufacturing date, tire
strength and performance, decline
with age naturally (even unused
spare tires). Therefore, the tires
(including the spare tire) should be
replaced by new ones. You can find
the manufacturing date on the tire
sidewall (possibly on the inside of the
wheel), displaying the DOT Code.
The DOT Code is a series of num-
bers on a tire consisting of numbers
and English letters. The manufactur-
ing date is designated by the last four
digits (characters) of the DOT code.
DOT : XXXX XXXX OOOO
The front part of the DOT means a
plant code number, tire size and
tread pattern and the last four num-
bers indicate week and year manu-
factured.
For example:
DOT XXXX XXXX 1609 represents
that the tire was produced in the 16th
week of 2009.
S 112 mph (180 km/h)
T 118 mph (190 km/h)
H 130 mph (210 km/h) V 149 mph (240 km/h)Z Above 149 mph (240 km/h)
Maximum Speed
Speed
Rating
Symbol